
How to Mount Small Frame Pump Behind Bottle Cage: Easy!
Have you ever been on a bike ride and gotten a flat tire? It can be scary when you are far from home. A small frame pump can help you fix it. But where do you keep the pump? Many people wonder how to mount small frame pump behind bottle cage. It is a smart way to keep your pump safe and easy to reach. Let’s learn how!
Key Takeaways
- Mounting your pump behind the bottle cage saves space on your bike frame.
- Proper mounting keeps the pump secure and prevents it from falling off.
- You will need basic tools like a screwdriver or Allen wrench for installation.
- Knowing how to mount small frame pump behind bottle cage is a useful skill.
- Regularly check the mount to ensure the pump is always securely in place.
How To Mount Small Frame Pump: Getting Started
Having a flat tire can ruin a fun bike ride. A small frame pump is a must-have tool. You need to know how to mount small frame pump behind bottle cage. This keeps the pump handy when you need it. Before you start, gather your tools. You will need a screwdriver or Allen wrench. Also, check if your pump came with mounting brackets. These brackets help attach the pump to your bike. Make sure the pump fits well with the bottle cage. If it does not fit, you may need a different bracket or pump. Taking the time to set up properly will make your rides safer and more fun. You will be ready for any flat tire that comes your way!
- Gather your tools: screwdriver or Allen wrench.
- Check for mounting brackets with your pump.
- Make sure the pump fits with the bottle cage.
- Choose a spot that is easy to reach while riding.
- Read the pump’s instructions before you start.
Think of your bike as a superhero with its utility belt. The small frame pump is one of its essential gadgets. By learning how to mount small frame pump behind bottle cage, you are equipping your bike for any challenge. It is like giving your bike a superpower to fix itself. This not only makes your rides safer but also boosts your confidence. You know you can handle unexpected problems. So, grab your tools, follow the steps, and get your pump mounted. Happy riding!
Fun Fact or Stat: Did you know that properly inflated tires can make you ride up to 10% faster?
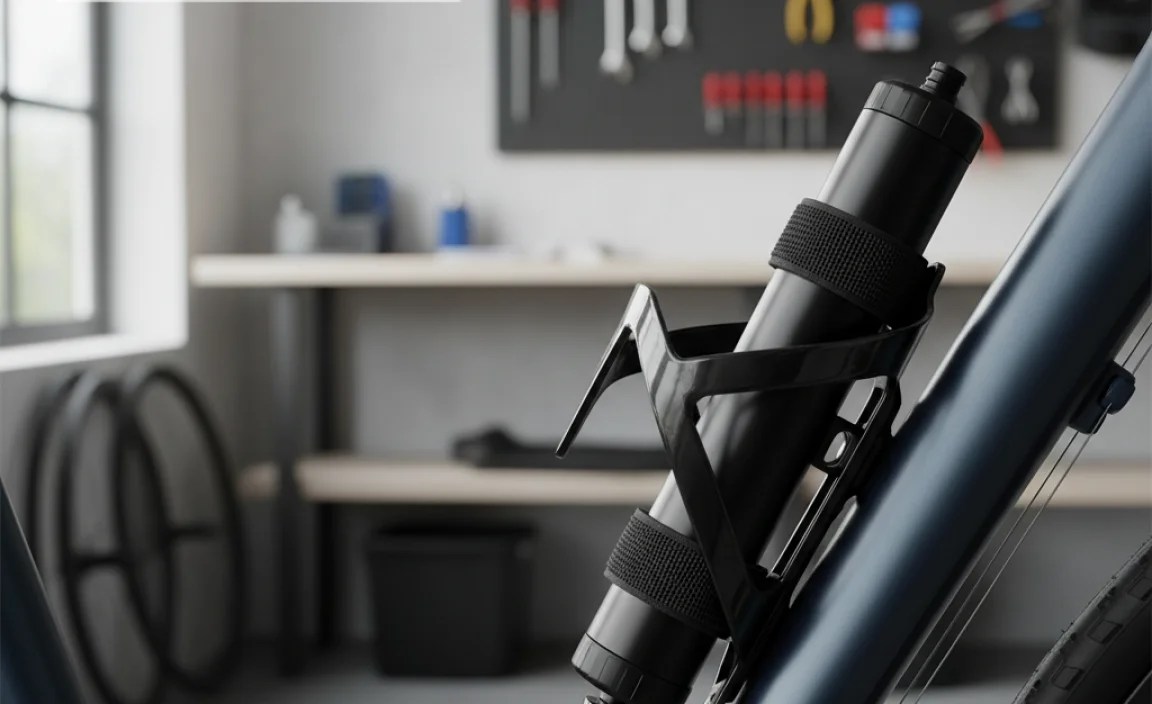
Why Mount Behind the Bottle Cage?
Have you ever wished you had more space on your bike frame? Mounting your pump behind the bottle cage is a great solution. It frees up space for other accessories. This method keeps your pump out of the way. It also protects it from dirt and damage. When you mount the pump, make sure it does not interfere with your pedaling. You want to avoid hitting it with your legs. Test the position by spinning the pedals. Choose a spot that keeps the pump secure and easy to access. This will make your rides more enjoyable and worry-free. Keeping things tidy on your bike is always a win!
Choosing the Right Mounting Bracket
Imagine trying to build a tower with wobbly blocks. A good mounting bracket is like the strong base. It keeps your pump steady and secure. When choosing a bracket, look for one that fits your pump’s size. The bracket should also match your bike frame. Some brackets are adjustable. This can help you find the perfect fit. Check if the bracket is made of strong material. Plastic or metal brackets are common. Make sure the bracket can handle bumps and vibrations. A solid bracket is the key to a secure and reliable pump mount. It ensures your pump stays put on every ride.
Tools Needed for Mounting
Do you like building things with LEGOs? Mounting your pump is similar. You need the right tools to get the job done. A screwdriver or Allen wrench is essential. The size depends on the bolts on your bottle cage. A multi-tool can be very handy. It has different sizes of wrenches and screwdrivers. This saves you from carrying many tools. A small wrench can also help tighten the bolts. Having the right tools makes the job easier and faster. It also helps prevent damage to your bike or pump. So, gather your tools and get ready to mount!
Step-By-Step: Mounting the Pump Correctly

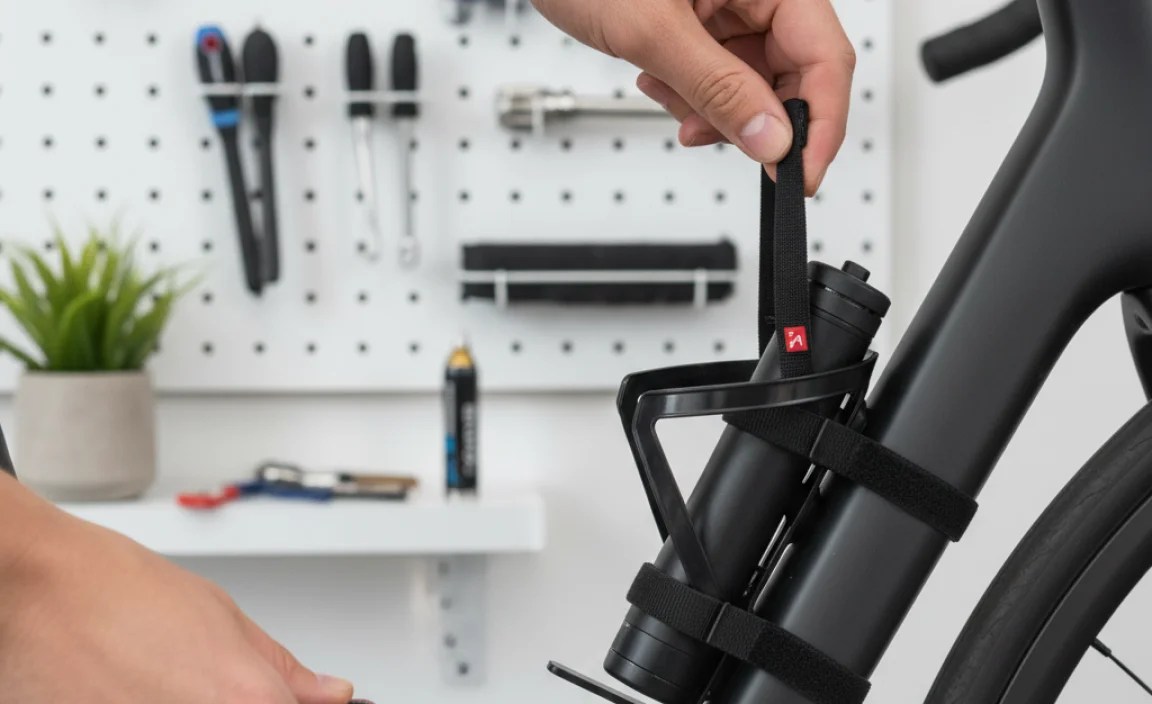
Knowing how to mount small frame pump behind bottle cage correctly is important. First, loosen the bolts on your bottle cage. Do not remove them completely. Slide the mounting bracket behind the bottle cage. Line up the holes in the bracket with the holes in the cage. Now, put the bolts back in and tighten them. Make sure the bracket and cage are secure. Attach the pump to the bracket. Some pumps clip in, while others use straps. Double-check that the pump is firmly attached. Give it a gentle tug to ensure it won’t fall off. A secure mount means you can ride without worry.
- Loosen the bolts on the bottle cage slightly.
- Slide the mounting bracket behind the cage.
- Line up the holes and re-tighten the bolts.
- Attach the pump securely to the bracket.
- Test the mount to ensure it is stable.
Think of mounting your pump like building a mini-fortress for it. You want to make sure it is strong and secure. Learning how to mount small frame pump behind bottle cage properly ensures your pump is always ready. No one wants a pump that rattles or falls off mid-ride. Taking your time and following each step carefully pays off. You will have a reliable setup that lasts. This simple task can make a big difference in your biking adventures. Happy building, and happy riding!
Fun Fact or Stat: The first bicycle pump was invented in the late 1800s and was much larger than today’s small frame pumps!
Preparing the Bike Frame
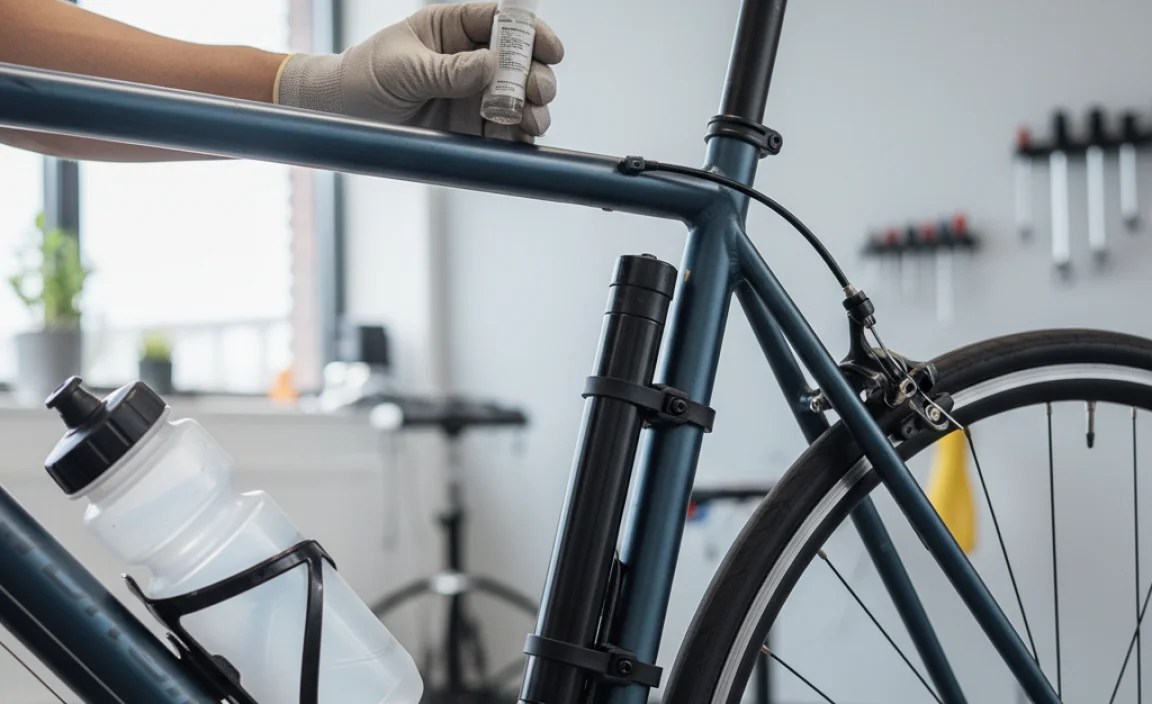
Before you start mounting, take a quick look at your bike frame. Is it clean around the bottle cage area? Wipe away any dirt or mud. This helps the bracket sit better. Check for any scratches or damage. If you find any, you might want to use a protective film. This film prevents further damage. Make sure the bottle cage bolts are not rusty. If they are, replace them. A clean and well-maintained frame makes the mounting process smoother. It also ensures a more secure fit for your pump. A little preparation goes a long way!
Attaching the Mounting Bracket
Attaching the bracket is like putting together a puzzle. The pieces need to fit just right. Make sure the bracket lines up with the bottle cage holes. If the bracket is adjustable, experiment with different positions. Find the spot that feels most secure and comfortable. Tighten the bolts evenly. Do not overtighten them, as this can damage the frame. Check that the bracket is stable before attaching the pump. A well-attached bracket is the foundation for a reliable pump mount. It keeps your pump safe and ready for action.
Securing the Pump to the Bracket
Now comes the exciting part: attaching the pump! Most pumps have a clip or strap. This secures them to the bracket. Make sure the clip clicks into place. If using a strap, tighten it snugly. The pump should not wiggle or move around. Give it a gentle shake to test its stability. If it feels loose, adjust the clip or tighten the strap. A securely attached pump is essential. It prevents it from falling off during your ride. This ensures you always have your pump when you need it most.
Troubleshooting Common Mounting Problems
Sometimes, things do not go as planned. You might face some problems when learning how to mount small frame pump behind bottle cage. Maybe the bolts are too tight or too loose. Perhaps the bracket does not fit properly. Do not worry! These are common issues. If the bolts are too tight, use a little lubricant. This helps loosen them. If the bracket does not fit, try adjusting its position. You might need a different bracket altogether. Always double-check the pump’s instructions. They often have tips for mounting. With a little patience, you can solve these problems and get your pump mounted securely.
- Bolts are too tight: Use lubricant to loosen them.
- Bracket does not fit: Adjust the position or get a new one.
- Pump rattles: Tighten the straps or clips.
- Mounting is unstable: Check the bracket and bolts.
- Instructions unclear: Read the pump’s manual carefully.
Imagine you are a detective solving a mystery. The mystery is how to mount small frame pump behind bottle cage. Every problem is a clue. Tight bolts? Clue: Use lubricant. Loose bracket? Clue: Adjust the position. By looking closely at each problem, you can find the solution. Remember, even experienced bikers face these issues sometimes. The key is to stay calm and keep trying. With a little effort, you will crack the case and have your pump securely mounted. Happy sleuthing!
Fun Fact or Stat: Some professional cyclists carry two small frame pumps on long rides, just in case!
Dealing With Stripped Bolts
Oh no, a stripped bolt! This can be a tricky problem. A stripped bolt is when the head of the bolt is damaged. This makes it hard to turn with a screwdriver or wrench. If this happens, do not force it. You could damage it even more. Try using a rubber band or steel wool. Place it between the bolt and the tool. This can give you extra grip. If that does not work, you might need a bolt extractor tool. This tool is designed to remove stripped bolts. If you are not comfortable doing this, ask a bike shop for help. They can remove the bolt and replace it with a new one.
Adjusting for Different Bike Frames
Not all bikes are the same. Some have different frame shapes and sizes. This can make mounting your pump a bit challenging. If your frame is small, you might need a shorter pump. You can also try using an adjustable mounting bracket. This allows you to position the pump in different ways. Make sure the pump does not interfere with your pedaling or steering. Test the position by riding your bike slowly. If you are unsure, ask a bike shop for advice. They can help you find the best mounting solution for your bike.
Preventing Pump Rattling
A rattling pump can be annoying. It can also be a sign that the pump is not secure. To prevent rattling, make sure the pump is tightly secured to the bracket. Check the clips or straps. Tighten them if necessary. You can also use a small piece of foam or rubber. Place it between the pump and the bracket. This helps absorb vibrations and reduce noise. Regularly check the mount to ensure everything is still tight. A quiet and secure pump makes for a more enjoyable ride.
Maintaining Your Pump Mount
Learning how to mount small frame pump behind bottle cage is just the first step. You also need to take care of it. Regularly check the bolts and brackets. Make sure they are tight. Clean the pump and mount with a damp cloth. This removes dirt and grime. Lubricate the bolts occasionally. This prevents them from rusting. Inspect the pump hose for cracks or damage. Replace it if needed. A little maintenance keeps your pump mount in top condition. This ensures it is always ready when you need it.
- Check bolts and brackets regularly for tightness.
- Clean the pump and mount to remove dirt.
- Lubricate bolts to prevent rust.
- Inspect the pump hose for damage.
- Store your bike in a dry place.
Think of your pump mount as a loyal friend. It is always there for you when you need it. Just like any friendship, it needs care and attention. Learning how to mount small frame pump behind bottle cage is important. But keeping it in good shape is just as vital. A little cleaning, a little tightening, and a little inspection go a long way. By taking good care of your pump mount, you are ensuring it will be reliable for many rides to come. Happy maintaining!
Fun Fact or Stat: Some high-end bike pumps have built-in pressure gauges to help you inflate your tires perfectly!
Checking Bolt Tightness
Loose bolts can cause problems. They can lead to rattling, instability, or even pump failure. Make it a habit to check your bolts before each ride. Use a wrench or screwdriver to tighten them. Do not overtighten them, as this can damage the threads. If a bolt feels loose, inspect it for damage. Replace it if necessary. Tight bolts are essential for a secure and reliable pump mount. They give you peace of mind knowing your pump is safe.
Cleaning the Pump and Mount
Dirt and grime can build up on your pump and mount. This can make them look bad and affect their performance. Use a damp cloth to wipe away dirt and mud. You can also use a mild soap if needed. Avoid using harsh chemicals, as they can damage the materials. Dry the pump and mount thoroughly after cleaning. A clean pump and mount not only look better but also last longer. Regular cleaning keeps them in top condition.
Protecting Against Weather
Weather can be tough on your pump and mount. Rain, sun, and snow can cause damage. Store your bike indoors when possible. This protects it from the elements. If you must store it outside, cover it with a tarp. This shields it from rain and sun. You can also apply a protective coating to the pump and mount. This helps prevent rust and corrosion. Taking these steps can extend the life of your pump mount. It keeps it working well for years to come.
Choosing the Right Pump for Your Bike

Not all pumps are created equal. Some are big, and some are small. Some are easy to use, and some are not. When choosing a pump, think about your needs. A small frame pump is great for on-the-go repairs. It is lightweight and easy to carry. A floor pump is better for home use. It is more powerful and easier to use. Consider the type of valve on your tires. Some pumps work with both Schrader and Presta valves. Others only work with one type. Choose a pump that fits your bike and your riding style. This ensures you always have the right tool for the job.
| Pump Type | Size | Pros | Cons |
|---|---|---|---|
| Small Frame Pump | Small | Portable, lightweight, easy to carry | Less powerful, takes longer to inflate |
| Floor Pump | Large | Powerful, easy to use, inflates quickly | Not portable, for home use only |
| CO2 Inflator | Very Small | Fast inflation, very portable | Requires CO2 cartridges, one-time use |
| Mini Floor Pump | Medium | More powerful than frame pump, portable | Slightly bulky, may require more effort |
- Consider the pump size and weight.
- Think about your riding style and needs.
- Check the pump’s valve compatibility.
- Read reviews from other cyclists.
- Choose a pump that is easy to use.
Imagine you are picking out a new pair of shoes. You would not choose shoes that are too big or too small. You would want shoes that fit just right. Choosing a pump is the same. You want one that fits your bike and your needs. Knowing how to mount small frame pump behind bottle cage is important. But having the right pump is even more crucial. A good pump makes fixing a flat tire much easier. It gives you the confidence to tackle any ride. So, do your research and choose wisely. Your bike will thank you!
Fun Fact or Stat: Some modern bike pumps can inflate tires to over 100 PSI (pounds per square inch)!
Understanding Valve Types
Bike tires have different types of valves. The two most common types are Schrader and Presta. Schrader valves are like the ones on car tires. They are wider and have a spring-loaded pin. Presta valves are narrower and have a locking nut. Most pumps can work with both types of valves. However, you might need to switch the pump head or use an adapter. Make sure you know what type of valve your tires have. This helps you choose the right pump and avoid frustration. Knowing your valve type is a key part of bike maintenance.
Pump Size and Portability
Pump size matters. A small pump is easy to carry on your bike. It fits easily in a bag or pocket. A larger pump is more powerful but less portable. Think about how you will use the pump. If you mostly ride short distances, a small pump is fine. If you ride long distances, you might want a more powerful pump. Consider the pump’s weight as well. A lightweight pump is easier to carry. Choose a pump that balances size, weight, and power.
Features to Look For
Pumps come with different features. Some have a built-in pressure gauge. This helps you inflate your tires to the correct pressure. Others have a comfortable handle. This makes pumping easier. Some pumps have a flexible hose. This makes it easier to reach the valve. Look for features that make the pump easy to use. A good pump should be reliable and durable. It should also make inflating your tires quick and easy. Choose a pump with features that meet your needs.
Safety Tips for Using Your Bike Pump
Using a bike pump is usually safe. But it is important to take some precautions. Always wear eye protection. This protects your eyes from flying debris. Be careful when inflating your tires. Do not overinflate them. This can cause them to explode. Check the recommended pressure on your tire sidewall. Use a pressure gauge to make sure you do not exceed this limit. Keep your fingers away from moving parts. This prevents injuries. Follow these safety tips to avoid accidents and enjoy safe riding.
- Wear eye protection to avoid injuries.
- Do not overinflate your tires.
- Check the tire pressure regularly.
- Keep fingers away from moving parts.
- Use the pump in a safe area.
Imagine you are a pilot preparing for takeoff. You would check all the instruments and follow safety procedures. Using a bike pump is similar. You need to take precautions to ensure a safe and successful outcome. Learning how to mount small frame pump behind bottle cage is just one aspect of bike safety. Knowing how to use the pump safely is just as important. By following these tips, you can avoid accidents and enjoy your ride with confidence. Happy and safe inflating!
Fun Fact or Stat: Tire pressure is measured in PSI (pounds per square inch) or BAR (a metric unit). Always check your tire’s recommended pressure!
Checking Tire Pressure
Tire pressure is crucial for a safe and comfortable ride. Underinflated tires can lead to flats and poor handling. Overinflated tires can be uncomfortable and prone to blowouts. Check your tire pressure before each ride. Use a pressure gauge to get an accurate reading. Inflate your tires to the recommended pressure on the tire sidewall. This ensures optimal performance and safety. Proper tire pressure makes a big difference in your riding experience.
Avoiding Overinflation
Overinflating your tires can be dangerous. It can cause them to explode. This can lead to serious injuries. Always check the recommended pressure on your tire sidewall. Use a pressure gauge to avoid overinflation. Inflate your tires gradually. Check the pressure frequently. If you accidentally overinflate your tires, release some air. A little caution can prevent accidents and keep you safe.
Proper Pump Storage
Proper storage helps extend the life of your pump. Store it in a dry place. This prevents rust and corrosion. Keep it away from direct sunlight. This can damage the pump’s seals and hoses. If you are not using the pump for a long time, lubricate the moving parts. This keeps them working smoothly. A little care in storage can keep your pump in top condition for years to come.
Summary
Knowing how to mount small frame pump behind bottle cage is a great skill for any cyclist. It keeps your pump safe, secure, and easy to reach. This article has covered everything from choosing the right pump to troubleshooting common problems. Remember to gather your tools, follow the steps carefully, and maintain your mount regularly. With a little practice, you will be able to mount your pump like a pro. This simple task can make a big difference in your biking adventures. It gives you the confidence to handle any flat tire that comes your way.
Conclusion
Mounting your small frame pump behind your bottle cage is a simple and effective way to carry it. It saves space and keeps your pump accessible. Remember to choose the right pump and mounting bracket. Follow the steps carefully and maintain your mount regularly. Knowing how to mount small frame pump behind bottle cage will make your rides safer and more enjoyable. So, get out there and enjoy the ride!
Frequently Asked Questions
Question No 1: What tools do I need to mount a small frame pump?
Answer: You will usually need a screwdriver or an Allen wrench. The size depends on the bolts that hold your bottle cage. A multi-tool can be very useful. It has different sizes of wrenches and screwdrivers. This saves you from carrying many tools. Also, check if your pump came with mounting brackets. These brackets help attach the pump to your bike. Make sure you have everything ready before you start.
Question No 2: How do I choose the right mounting bracket?
Answer: Look for a bracket that fits your pump’s size and your bike frame. Some brackets are adjustable, which can help you find the perfect fit. Check if the bracket is made of strong material, like plastic or metal. Make sure the bracket can handle bumps and vibrations. A solid bracket is the key to a secure and reliable pump mount. If you are not sure, ask a bike shop for advice. They can help you find the right bracket for your needs.
Question No 3: What if the bolts are too tight?
Answer: If the bolts are too tight, do not force them. You could damage the threads. Try using a little lubricant, like WD-40. This helps loosen them. Let the lubricant sit for a few minutes before trying again. Use a wrench or screwdriver that fits the bolt properly. This prevents stripping the bolt head. If the bolt is still too tight, ask a bike shop for help. They have tools and experience to remove stubborn bolts.
Question No 4: How do I prevent the pump from rattling?
Answer: A rattling pump can be annoying. It can also be a sign that the pump is not secure. To prevent rattling, make sure the pump is tightly secured to the bracket. Check the clips or straps. Tighten them if necessary. You can also use a small piece of foam or rubber. Place it between the pump and the bracket. This helps absorb vibrations and reduce noise. Regularly check the mount to ensure everything is still tight. This is important when considering how to mount small frame pump behind bottle cage.
Question No 5: What if I strip a bolt while trying to mount the pump?
Answer: Oh no, a stripped bolt! This can be a tricky problem. If this happens, do not force it. You could damage it even more. Try using a rubber band or steel wool. Place it between the bolt and the tool. This can give you extra grip. If that does not work, you might need a bolt extractor tool. If you are not comfortable doing this, ask a bike shop for help. They can remove the bolt and replace it with a new one. Remember, knowing how to mount small frame pump behind bottle cage includes knowing how to deal with problems.
Question No 6: How often should I check the pump mount?
Answer: You should check the pump mount regularly. Before each ride, give it a quick look. Make sure the bolts are tight and the pump is secure. If you ride frequently, check it more often. Pay attention to any rattling or looseness. Address any issues promptly. Regular checks help prevent problems and ensure your pump is always ready when you need it. This is a key part of maintaining your bike and knowing how to mount small frame pump behind bottle cage properly.


