
How to Fix Air Chuck Thread Damage: Easy Fix!
Quick Summary: Damaged threads on your air chuck can cause leaks and make inflating tires a real pain. Luckily, you can often fix them! Try cleaning the threads first. If that doesn’t work, use a thread file or tap to reshape them. For severe damage, consider replacing the chuck. A little patience can save you from buying a whole new pump!
Ever tried to pump up your bike tires only to find the air chuck hissing and leaking? Stripped or damaged threads on your air chuck are a common problem for cyclists. It means the chuck can’t grip the valve properly, leading to frustration and wasted effort. But don’t worry, you don’t always need to replace the entire pump!
This guide will walk you through simple steps to diagnose and fix damaged air chuck threads. We’ll cover cleaning, reshaping, and when it’s time to consider a replacement. Get ready to breathe new life into your trusty bike pump!
Understanding Air Chuck Thread Damage
Before diving into the fix, let’s understand what causes thread damage in the first place. Knowing the causes helps you prevent it in the future.
Common Causes of Thread Damage
- Cross-threading: This happens when you force the chuck onto the valve at an angle, damaging the threads as they grind against each other.
- Over-tightening: Excessive force can strip the threads, especially on aluminum chucks.
- Dirt and Debris: Grit can get lodged in the threads, causing wear and tear over time.
- Corrosion: Moisture can lead to rust and corrosion, weakening the threads.
- Physical Impact: Dropping your pump or banging the chuck against something can damage the threads.
Identifying the Type of Damage
Carefully inspect the threads to determine the extent of the damage. This will help you choose the right repair method.
- Minor Damage: Threads are slightly flattened or have small burrs.
- Moderate Damage: Threads are visibly stripped or deformed.
- Severe Damage: Threads are completely gone or the chuck is cracked.
Tools and Materials You’ll Need

Gathering the right tools beforehand will make the repair process smoother and more efficient.
- Cleaning Supplies:
- Clean rags
- Small brush (like a toothbrush)
- Solvent or degreaser (e.g., WD-40, isopropyl alcohol)
- Thread Repair Tools:
- Thread file (for reshaping threads)
- Thread tap (for recutting threads – choose the correct size for your chuck)
- Die (for repairing external threads)
- Lubricant:
- Light machine oil or silicone grease
- Safety Gear:
- Gloves
- Safety glasses
- Optional:
- Magnifying glass (for close inspection)
- Bench vise (to hold the chuck steady)
Step-by-Step Guide to Fixing Air Chuck Thread Damage

Follow these steps carefully to repair your air chuck threads. Start with the simplest methods and move on to more advanced techniques if needed.
Step 1: Cleaning the Threads
Often, what appears to be damage is just dirt and grime. Start by thoroughly cleaning the threads.
- Apply Solvent: Spray a small amount of solvent or degreaser onto the threads.
- Scrub the Threads: Use a small brush to scrub away any dirt, debris, or corrosion.
- Wipe Clean: Wipe the chuck clean with a rag.
- Inspect: Check the threads again to see if cleaning alone resolved the issue.
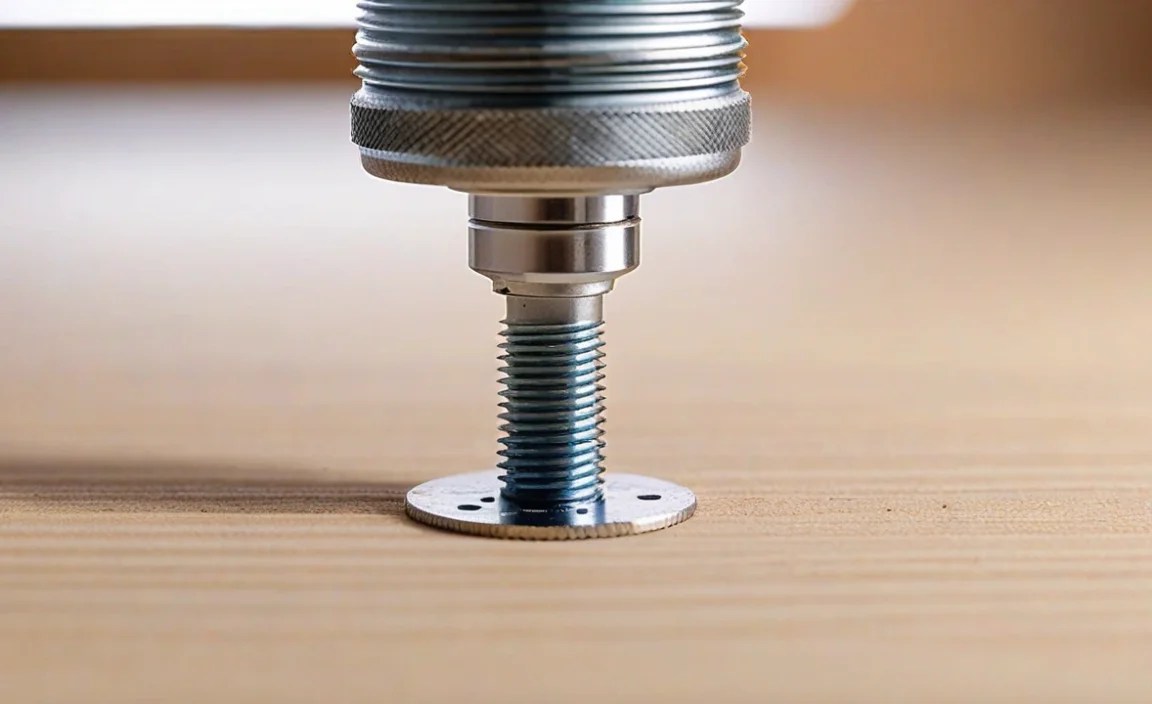
Step 2: Reshaping Threads with a Thread File
If cleaning doesn’t work, use a thread file to gently reshape any flattened or damaged threads. Thread files are specifically designed with multiple thread pitches so you can use the one that matches your chuck.
- Secure the Chuck: If possible, secure the chuck in a bench vise. Be careful not to over-tighten and damage it further.
- Select the Correct Pitch: Match the thread file’s pitch to the chuck’s threads.
- File the Threads: Gently run the thread file along the damaged threads, following the existing thread pattern. Use smooth, even strokes.
- Test Fit: Try threading the chuck onto a valve stem to check the fit. If it’s still tight, repeat the filing process.
- Clean and Lubricate: Clean the chuck again to remove any metal filings and apply a small amount of lubricant.
Step 3: Recutting Threads with a Thread Tap
For more severely damaged threads, you might need to use a thread tap to recut the threads. This requires more precision and care.
- Identify Thread Size: Determine the correct thread size and pitch for your air chuck. This information is often stamped on the chuck itself or can be found in the pump’s manual.
- Secure the Chuck: Secure the chuck in a vise, ensuring it’s stable.
- Start the Tap: Insert the tap into the chuck’s opening and begin turning it clockwise, applying gentle pressure. Keep the tap perpendicular to the opening.
- Cut the Threads: Turn the tap slowly and steadily, backing it out occasionally to clear any metal shavings.
- Test Fit: Remove the tap and test the fit with a valve stem. If needed, repeat the tapping process until the fit is correct.
- Clean and Lubricate: Clean the chuck thoroughly and apply a small amount of lubricant.
Step 4: Using a Die to Repair External Threads
If the damaged threads are on an external part, like a threaded rod connecting to the chuck, a die can be used to repair them.
- Identify Thread Size: Determine the correct thread size and pitch for the external threads.
- Secure the Rod: Secure the part with the external threads in a vise.
- Start the Die: Place the die over the end of the threaded rod and begin turning it clockwise, applying gentle pressure. Keep the die perpendicular to the rod.
- Repair the Threads: Turn the die slowly and steadily, backing it out occasionally to clear any metal shavings.
- Test Fit: Remove the die and test the fit with the corresponding nut or fitting. If needed, repeat the process until the fit is correct.
- Clean and Lubricate: Clean the threads thoroughly and apply a small amount of lubricant.
Step 5: When to Replace the Air Chuck
Sometimes, the damage is too severe to repair. Here are signs that it’s time to replace the air chuck:
- Cracked Housing: If the chuck body is cracked, it’s unsafe to use.
- Completely Stripped Threads: If the threads are entirely gone, there’s nothing to grip the valve.
- Corrosion Damage: Extensive corrosion can weaken the chuck, making it prone to failure.
- Failed Repair Attempts: If you’ve tried the above methods and the chuck still leaks, it’s time to replace it.
Preventing Future Thread Damage
Prevention is always better than cure. Here are some tips to keep your air chuck threads in good condition.
- Align Properly: Always align the chuck straight onto the valve before tightening.
- Avoid Over-tightening: Tighten the chuck just enough to create a seal. Over-tightening can strip the threads.
- Keep it Clean: Regularly clean the chuck to remove dirt and debris.
- Lubricate: Apply a small amount of lubricant to the threads occasionally.
- Store Carefully: Store your pump in a clean, dry place to prevent corrosion.
Troubleshooting Common Issues
Even with careful repair, you might encounter some issues. Here’s how to troubleshoot them.
| Issue | Possible Cause | Solution |
|---|---|---|
| Air still leaks after repair | Improper thread alignment, remaining debris, or damaged valve stem | Re-clean the threads, check valve stem for damage, ensure proper alignment |
| Chuck is too tight after repair | Over-filing or incorrect thread size | Use a smaller thread file, double-check thread size |
| Tap is difficult to turn | Incorrect thread size, excessive force, or lack of lubrication | Verify thread size, reduce pressure, apply cutting oil |
| Chuck won’t thread onto the valve | Cross-threading, damaged threads, or incorrect chuck type | Ensure proper alignment, repair threads, verify chuck compatibility |
Choosing the Right Replacement Air Chuck
If you need to replace your air chuck, consider these factors when choosing a new one.
- Material: Brass chucks are durable and corrosion-resistant, while aluminum chucks are lighter but more prone to damage.
- Type: Schrader chucks are for standard car-type valves, while Presta chucks are for narrower bicycle valves. Some chucks are dual-headed and can handle both.
- Compatibility: Ensure the chuck is compatible with your pump and valve types.
- Quality: Invest in a high-quality chuck from a reputable brand for long-lasting performance.
Cost Considerations
Deciding whether to repair or replace depends partly on cost. Here’s a breakdown:
| Option | Estimated Cost | Pros | Cons |
|---|---|---|---|
| Repair (cleaning and filing) | $0 – $10 (for cleaning supplies and a thread file) | Inexpensive, simple, extends the life of the chuck | May not work for severe damage, requires some skill |
| Repair (using a thread tap) | $15 – $30 (for a thread tap) | Can fix more severe damage, restores original threads | Requires more skill, risk of damaging the chuck further |
| Replace the air chuck | $10 – $50 (depending on the quality and type) | Guaranteed fix, new and reliable | More expensive, requires replacing the entire chuck |
| Replace the entire pump | $30 – $200+ (depending on the type and quality) | A damaged pump could have other issues or be near the end of its life | Most expensive option if only the chuck is the problem |
External Resources for Further Learning
For more in-depth information on thread repair and maintenance, check out these resources:
- Engineer’s Edge – Unified Screw Thread Forms: Comprehensive details on thread types and standards.
- YouTube – How to use a Thread Restoring File: A helpful video tutorial on using a thread file.
FAQ: Fixing Air Chuck Thread Damage
Question 1: Can I use any type of oil to lubricate the threads?
No, avoid using general-purpose oils like cooking oil, which can attract dirt. Use light machine oil or silicone grease specifically designed for metal parts.
Question 2: What if I don’t know the thread size of my air chuck?
Try to find the pump’s manual or look for markings on the chuck itself. If not, take the chuck to a hardware store; they can usually help you identify the thread size.
Question 3: Is it safe to use a thread tap if I’ve never used one before?
Using a thread tap requires some skill and patience. Practice on a scrap piece of metal first to get a feel for it. Always use gentle pressure and back the tap out frequently to clear shavings.
Question 4: How do I prevent cross-threading?
Always align the chuck straight onto the valve before tightening. Start turning it slowly and gently until you feel the threads engage properly. Never force it.
Question 5: Can I use Teflon tape to seal damaged threads?
Teflon tape can help create a tighter seal, but it’s not a long-term solution for damaged threads. It’s best used as a temporary fix until you can properly repair or replace the chuck.
Question 6: What’s the difference between a thread file and a thread tap?
A thread file is used to reshape existing threads that are slightly damaged. A thread tap is used to recut completely new threads or repair severely damaged ones.
Question 7: Where can I buy a replacement air chuck?
You can find replacement air chucks at most bike shops, hardware stores, and online retailers like Amazon or specialty cycling websites.
Conclusion
Fixing damaged air chuck threads might seem daunting, but with the right tools and a bit of patience, it’s a manageable task. By following these steps, you can often restore your air chuck to its former glory, saving you money and keeping your tires properly inflated. Remember to take your time, work carefully, and prioritize safety. Happy cycling!


