
How to Make a Cycle Pump with a Bottle: A DIY Guide
Quick Summary: Building a basic bike pump from a bottle is possible in emergencies. You’ll need a plastic bottle, a valve stem (from an old tube or purchased), some tubing, and strong tape. Cut a hole in the cap for the valve stem, seal it airtight, and attach the tubing to the bottle’s opening. Use the bottle as a piston to force air into your tire. It’s not as efficient as a real pump, but it can get you rolling!
Ever been miles from home with a flat tire and no pump? It’s a cyclist’s nightmare! While a proper bike pump is always the best solution, knowing how to improvise can save the day. In this guide, I’ll show you how to make a basic, emergency cycle pump using a plastic bottle. It’s not perfect, but it’s a clever trick to get you back on the road. Let’s get started!
What You’ll Need

Before we dive in, gather these materials. Most can be found in a garage, bike repair kit, or at a local hardware store.
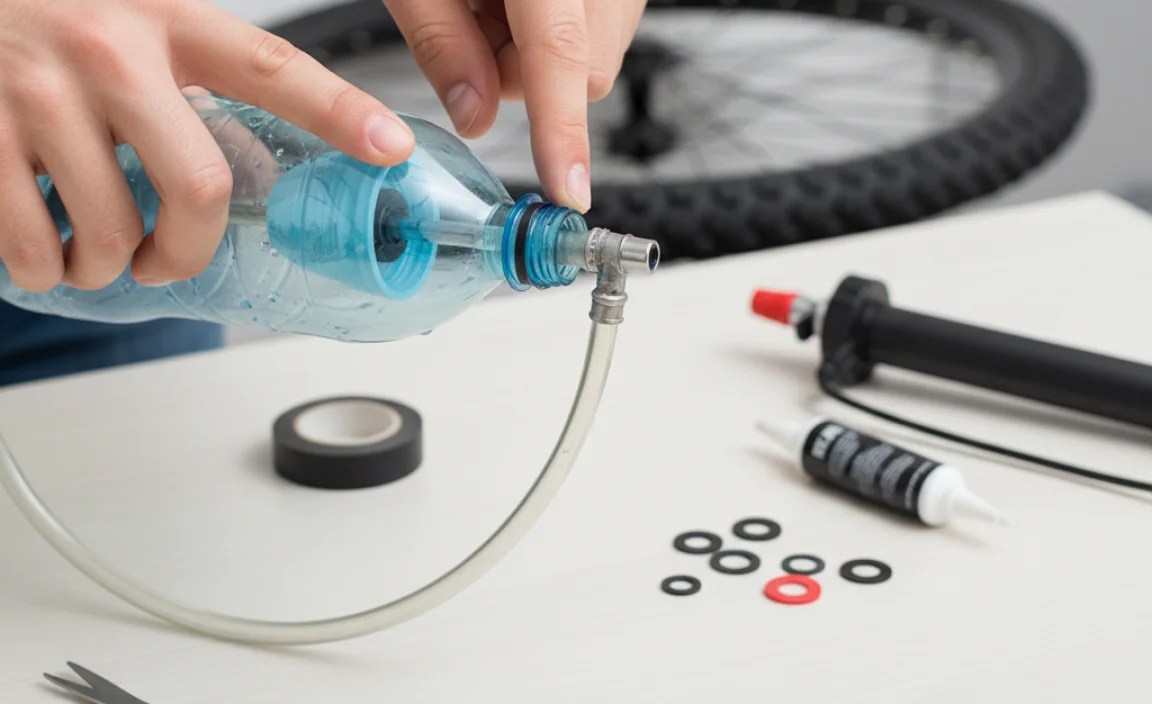
- Plastic Bottle: A sturdy plastic bottle (500ml to 1 liter) works best. Think soda or water bottles.
- Valve Stem: You’ll need a valve stem from an old inner tube (Presta or Schrader, depending on your bike) or purchase one.
- Tubing: Flexible tubing that fits snugly over the bottle opening and the valve stem. Aquarium tubing or similar works well.
- Strong Tape: Duct tape or electrical tape is essential for creating airtight seals.
- Scissors or Knife: For cutting the bottle and tubing. Be careful!
- (Optional) Piston Material: A sturdy stick or dowel that fits inside the bottle for better air compression.
Step-by-Step Guide: Building Your Bottle Pump

Follow these steps carefully to construct your emergency bike pump. Take your time and ensure all connections are as airtight as possible.
Step 1: Prepare the Bottle Cap
This is where the valve stem will connect, so accuracy is important.
- Drill or Cut a Hole: Create a hole in the center of the bottle cap that’s slightly smaller than the valve stem. A snug fit is crucial for an airtight seal.
- Insert the Valve Stem: Push the valve stem through the hole from the inside of the cap. It should be a tight fit.
- Seal the Stem: Use plenty of strong tape (duct tape or electrical tape) to seal the valve stem to the cap, both inside and outside. Ensure there are no air leaks. This is the most critical step for pump efficiency.
Step 2: Attach the Tubing
The tubing will connect the bottle to your tire’s valve.
- Cut the Tubing: Cut a length of tubing long enough to comfortably reach from the bottle to your tire valve.
- Connect to the Bottle Opening: Attach one end of the tubing securely to the opening of the plastic bottle. Again, use tape to ensure an airtight seal. The tighter the seal, the more air you’ll be able to force into the tire.
- Connect to the Valve Stem: Attach the other end of the tubing to the valve stem you’ve secured in the bottle cap. Secure with tape.
Step 3: Create a Piston (Optional)
A piston can help compress more air with each pump, but it’s optional. If you don’t have piston material available, simply use the bottle directly.
- Find a Piston: Find a stick or dowel that fits snugly inside the bottle. It should slide easily without too much resistance.
- Attach to the Base: Attach the piston to the base of the bottle with tape. Leave enough of the stick exposed that you can grip it.
Step 4: Using Your Bottle Pump
Now it’s time to inflate your tire. Be patient; it will take several pumps to add a meaningful amount of air.
- Connect to the Tire Valve: Attach the bottle cap (with the valve stem and tubing connected) to your tire’s valve. Make sure it’s a secure connection. You may need an adapter depending on the type of valve stem you use.
- Pump: Hold the bottle firmly and use the piston (or the bottle itself) to push air into the tire. Compress the bottle quickly and steadily.
- Check Tire Pressure: Periodically check the tire pressure by squeezing the tire. The goal is to add enough air to make the tire rideable until you can get to a proper pump.
Troubleshooting
Even with careful construction, problems can arise. Here’s how to address common issues.
- Air Leaks: The most common problem. Check all tape seals and reinforce them as needed. Pay special attention to the valve stem connection.
- Inefficient Pumping: This could be due to leaks or a poor piston. Ensure the piston fits snugly and that you’re compressing the bottle fully with each pump.
- Valve Stem Issues: Make sure the valve stem is compatible with your tire valve and that it’s properly seated.
The Science Behind the Improvised Pump

While not as efficient as a purpose-built pump, your bottle-based creation leverages basic physics principles. Here’s a simplified view:
- Volume Reduction: By compressing the bottle, you reduce the volume of the air inside.
- Pressure Increase: Compressing the air increases its pressure.
- Airflow: The increased pressure forces air through the tubing and into the tire.
The effectiveness of the pump depends on how well you can seal the system and how much you can reduce the bottle’s volume with each stroke. A proper bike pump uses a precisely engineered piston and cylinder to maximize these effects, but our DIY version gets the job done in a pinch.
Advantages and Disadvantages

Let’s be realistic about what a bottle pump can and can’t do.
Advantages:
- Emergency Solution: It can get you rolling when you have no other options.
- Low Cost: Uses readily available materials.
- Lightweight and Portable: Easy to carry in a backpack or attach to your bike.
- DIY Satisfaction: It’s rewarding to MacGyver your way out of a tough situation!
Disadvantages:
- Inefficient: Requires many pumps to inflate a tire.
- Not Precise: Difficult to achieve accurate tire pressure.
- Fragile: Can break easily with rough use.
- Temporary Fix: Should be replaced with a proper pump as soon as possible.
Essential Tools and Gear for Cyclists
While a bottle pump is a great emergency tool, having the right gear is essential for regular cycling. Here are some recommendations:
- Reliable Bike Pump: A high-quality floor pump for home use and a mini pump for on-the-go repairs.
- Tire Levers: For easy tire removal and installation.
- Multi-Tool: A compact tool with Allen wrenches, screwdrivers, and other essential functions.
- Spare Inner Tube: Properly sized for your tires.
- Patch Kit: For repairing punctures on the road.
- Saddle Bag: To carry your tools and spare tube.
Choosing the Right Bike Pump
Investing in a good bike pump is crucial for maintaining your tires and ensuring a smooth, safe ride. Here’s a comparison of different types of bike pumps:
| Type of Pump | Pros | Cons | Best For |
|---|---|---|---|
| Floor Pump | Efficient, accurate pressure readings, stable | Bulky, not portable | Home use, inflating tires to high pressures |
| Mini Pump | Portable, lightweight | Less efficient, can be difficult to reach high pressures | On-the-go repairs, topping off tire pressure |
| CO2 Inflator | Fast inflation, very compact | Requires CO2 cartridges, can be wasteful | Racing, quick repairs |
| Electric Pump | Effortless inflation, precise pressure settings | Requires charging, can be expensive | E-bikes, users with limited strength |
When selecting a pump, consider the type of bike you have (road, mountain, etc.), the valve type (Presta or Schrader), and your budget. A reliable pump will make a noticeable difference in your cycling experience.
Tips for Maintaining Your Bike Pump
A well-maintained bike pump will last longer and perform better. Here are some tips:
- Store it Properly: Keep your pump in a dry place to prevent rust and corrosion.
- Clean Regularly: Wipe down the pump with a damp cloth to remove dirt and grime.
- Lubricate the Piston: Apply a small amount of silicone lubricant to the piston to keep it moving smoothly.
- Check for Leaks: Inspect the hose and connections for leaks and repair them promptly.
- Replace Worn Parts: Replace worn seals and valves as needed to maintain optimal performance.
FAQ: Making a Cycle Pump with a Bottle
Here are some common questions about building and using a bottle pump.
Can I really inflate a tire with just a bottle?
Yes, you can! While it won’t be as efficient as a real pump, it can provide enough pressure to make your bike rideable in an emergency.
What type of bottle works best?
A sturdy plastic bottle, like a soda or water bottle (500ml to 1 liter), is ideal. Avoid thin, flimsy bottles that will collapse easily.
Is it better to use a Presta or Schrader valve stem?
Use the type of valve stem that matches your bike’s inner tubes. If you’re unsure, Schrader valves are more common on recreational bikes, while Presta valves are often found on road bikes.
How do I make sure the connections are airtight?
Use plenty of strong tape (duct tape or electrical tape) to seal all connections. Overlap the tape and apply pressure to create a tight seal. This is the most crucial step for pump efficiency.
How much pressure can I get with a bottle pump?
It’s difficult to say exactly, as it depends on the bottle, seals, and your pumping effort. However, you can usually achieve enough pressure to make the tire firm enough to ride safely to a repair shop.
Can I use this bottle pump for tubeless tires?
While possible, it’s less effective. Tubeless tires often require a large volume of air to seat the bead on the rim. A bottle pump may not provide enough air quickly enough to achieve this.
Is there anything else I can use besides a bottle?
Yes, you could also try using a plastic bag. However, a bottle is sturdier and generally provides a better seal, making it a more reliable option.
Conclusion
Making a cycle pump with a bottle is a valuable skill for any cyclist. While it’s not a replacement for a proper pump, it can be a lifesaver in an emergency. By following these steps and taking the time to create airtight seals, you can get back on the road and continue your ride. Remember to always prioritize safety and replace your makeshift pump with a reliable one as soon as possible. Happy cycling!
“`


