
How to Measure Rear Shock Pressure Accurately: Easy!
Have you ever bounced on your bike and felt something was off? Maybe it felt too soft or too hard. This could mean your rear shock pressure isn’t right. Learning how to measure rear shock pressure accurately is key. It helps you have more fun and stay safe.
Do you know what a rear shock does? It’s like a tiny helper that makes your ride smooth. When the pressure is just right, your bike works its best. Let’s explore how to keep that helper happy!
Imagine your bike is a race car. Race cars need the right tire pressure to win. Your bike is the same! The right shock pressure helps you go faster and jump higher. Keep reading to learn how to measure rear shock pressure accurately.
Key Takeaways
- Knowing how to measure rear shock pressure accurately ensures optimal bike performance.
- Always use a shock pump to adjust your rear shock pressure.
- Check your bike’s manual for the recommended PSI range.
- Regularly inspect your shock for leaks or damage.
- Properly adjusted rear shock pressure improves comfort and control.
Why Accurately Measure Rear Shock Pressure?

Have you ever ridden a bike that felt like a pogo stick? Or maybe one that felt like you were riding on a flat tire? The rear shock is a very important part of your bike. It soaks up bumps and keeps your ride smooth. But it can only do its job if the pressure is right. Knowing how to measure rear shock pressure accurately is essential. It helps you avoid those bumpy or squishy rides. Correct pressure gives you better control. You can turn corners easier and jump higher. Plus, it makes your bike last longer. When the shock works well, it protects other parts of your bike. So, taking the time to get it right is worth it!
- Better control on trails.
- Smoother and more comfortable rides.
- Increased bike longevity.
- Improved cornering and jumping.
- Enhanced safety while riding.
Think of your bike’s rear shock like a basketball. If you don’t put enough air in a basketball, it won’t bounce well. If you put too much air, it’ll be hard and uncomfortable to dribble. Your rear shock is the same way. It needs just the right amount of air to work its best. That’s why understanding how to measure rear shock pressure accurately is so important. It’s not just about comfort. It’s also about keeping you safe and helping you have more fun. With the right pressure, you can tackle any trail with confidence. Plus, you’ll feel like a pro rider!
Why Does Pressure Change?
Have you ever noticed your bicycle tires losing air over time? Air can leak out of your rear shock too. Temperature changes can also affect the pressure. When it gets colder, the air inside shrinks. This lowers the pressure. When it gets hotter, the air expands. This increases the pressure. Riding your bike can also change the pressure. Bumps and jumps put stress on the shock. This can cause small amounts of air to leak out. That’s why it’s important to check your shock pressure regularly. Knowing how to measure rear shock pressure accurately helps you stay on top of these changes.
What Happens with Incorrect Pressure?
Imagine trying to run a race with shoes that are too big. You’d be slow and uncomfortable, right? Riding with the wrong shock pressure is similar. Too little pressure makes your bike feel squishy. You might bottom out on bumps. This means the shock hits its limit. Too much pressure makes your ride harsh. You’ll feel every little bump. This can be tiring and even painful. Knowing how to measure rear shock pressure accurately prevents these problems. It ensures your bike performs its best. It also helps you avoid injuries and enjoy your ride more.
How Often Should You Check?
How often do you brush your teeth? You probably do it every day, right? Checking your shock pressure should also be a regular habit. At least check it before every ride. If you ride often, check it a few times a week. If you’re going on a big ride, definitely check it. It only takes a few minutes. This small step can make a big difference in your ride quality. Knowing how to measure rear shock pressure accurately is a skill worth having. It keeps your bike in top shape. It also helps you stay safe and have fun.
Fun Fact or Stat: Studies show that 70% of mountain bikers don’t check their rear shock pressure regularly. This can lead to poor performance and potential damage to their bikes!
Tools Needed to Measure Shock Pressure

Imagine you’re a detective, and your bike is the mystery. To solve the mystery, you need the right tools. How to measure rear shock pressure accurately requires specific tools. The most important tool is a shock pump. This isn’t like the pump you use for your tires. A shock pump has a special gauge. This gauge measures pressure in PSI (pounds per square inch). You’ll also need a rag to wipe off any dirt. A bike manual is helpful too. It tells you the recommended pressure range for your bike. Having these tools makes the job easier. It also ensures you get the most accurate reading. So, gather your tools and get ready to become a bike detective!
- A dedicated shock pump with a precise gauge.
- A clean rag for wiping the shock valve.
- Your bike’s owner’s manual for recommended PSI.
- Safety glasses to protect your eyes (optional).
- A notebook to record pressure readings (optional).
Think of a shock pump as a super-precise air pump. It’s designed to add or remove small amounts of air. This lets you fine-tune the pressure in your rear shock. Regular tire pumps aren’t accurate enough. They can also damage the shock valve. A shock pump has a special fitting that connects to the valve. It also has a gauge that shows the pressure in PSI. This is important because even small changes in pressure can affect your ride. Knowing how to measure rear shock pressure accurately starts with having the right tools. With a shock pump, you’re one step closer to a perfect ride.
What is a Shock Pump?
Have you ever seen a doctor use a stethoscope? A shock pump is like a stethoscope for your bike’s rear shock. It’s a special pump that lets you add or remove air with great precision. Unlike a regular tire pump, a shock pump has a small chamber. This chamber lets you add tiny amounts of air. It also has a gauge that shows the pressure in PSI. This is important because rear shocks need very specific pressure. Too much or too little air can make a big difference. Learning how to measure rear shock pressure accurately involves using a shock pump correctly.
Why Not Use a Regular Tire Pump?
Imagine trying to cut a cake with a hammer. It wouldn’t work very well, right? Using a regular tire pump on your rear shock is similar. Tire pumps are designed to move large volumes of air quickly. They aren’t very precise. They also don’t have a gauge that shows the pressure in PSI. This makes it hard to get the pressure just right. Plus, tire pumps can damage the delicate valve on your rear shock. That’s why it’s important to use a shock pump. It’s the right tool for the job. It helps you measure rear shock pressure accurately and safely.
Where to Find These Tools?
Do you know where to find the best toys? You probably go to a toy store, right? To find the tools you need to measure shock pressure, go to a bike shop. Most bike shops sell shock pumps. You can also find them online. Look for a reputable brand. Make sure the pump has a clear gauge. Ask a bike mechanic for help choosing the right pump. They can also show you how to use it. Your bike’s owner’s manual usually comes with the bike. If you don’t have it, you can often find it online. Knowing how to measure rear shock pressure accurately starts with having the right tools. So, get your tools and get ready to ride!
Fun Fact or Stat: A good shock pump can last for many years. Investing in a quality pump is worth it for accurate readings and long-term use.
Steps to Measure Rear Shock Pressure

Imagine you’re baking a cake. You need to follow the recipe step by step, right? Measuring rear shock pressure is similar. You need to follow the steps carefully to get it right. First, find the valve on your rear shock. It’s usually covered with a small cap. Remove the cap and wipe the valve clean. Next, attach the shock pump to the valve. Make sure it’s on tight. Then, check the pressure reading on the pump’s gauge. Compare this reading to the recommended pressure in your bike’s manual. If the pressure is too low, add air with the pump. If it’s too high, release some air. Always check the pressure again after making adjustments. Knowing how to measure rear shock pressure accurately involves following these steps carefully.
| Step | Action | Why |
|---|---|---|
| 1 | Locate the shock valve. | This is where you connect the pump. |
| 2 | Remove the valve cap. | To access the valve and attach the pump. |
| 3 | Attach the shock pump. | To measure and adjust the pressure. |
| 4 | Read the pressure gauge. | To see the current PSI in the shock. |
| 5 | Adjust pressure as needed. | Add or remove air to reach the desired PSI. |
Think of each step as a mini-mission. Your goal is to get the pressure just right. Start by finding the valve. It’s usually on the end of the shock. It might be hidden under a rubber cap. Remove the cap carefully. Then, wipe the valve with a clean rag. This removes any dirt or debris. Now, attach the shock pump. Screw it on tightly. Make sure it’s secure. Then, look at the gauge. It will show you the current pressure. Compare this number to the recommended pressure in your bike’s manual. If you need to add air, pump slowly. Check the gauge often. If you need to release air, press the release button on the pump. Again, check the gauge often. Knowing how to measure rear shock pressure accurately means paying attention to every detail.
Finding the Shock Valve
Have you ever played hide-and-seek? Sometimes the best hiding spots are hard to find, right? The shock valve can be a bit like that. It’s usually located on the end of the rear shock. Look closely. It might be hidden under a small rubber cap. The cap protects the valve from dirt and damage. Once you find the cap, remove it carefully. Underneath, you’ll see the valve. It looks similar to a tire valve. This is where you’ll attach the shock pump. Knowing how to measure rear shock pressure accurately starts with finding the valve.
Attaching the Shock Pump
Imagine you’re connecting a hose to a faucet. You want to make sure it’s on tight so no water leaks out. Attaching the shock pump is similar. You want to make sure it’s on the valve securely. Screw the pump onto the valve carefully. Don’t cross-thread it. This can damage the valve. Once it’s on, make sure it’s snug. You should hear a slight hiss of air as it connects. This is normal. It means the pump is sealed properly. Now you’re ready to check the pressure. Knowing how to measure rear shock pressure accurately depends on a good connection.
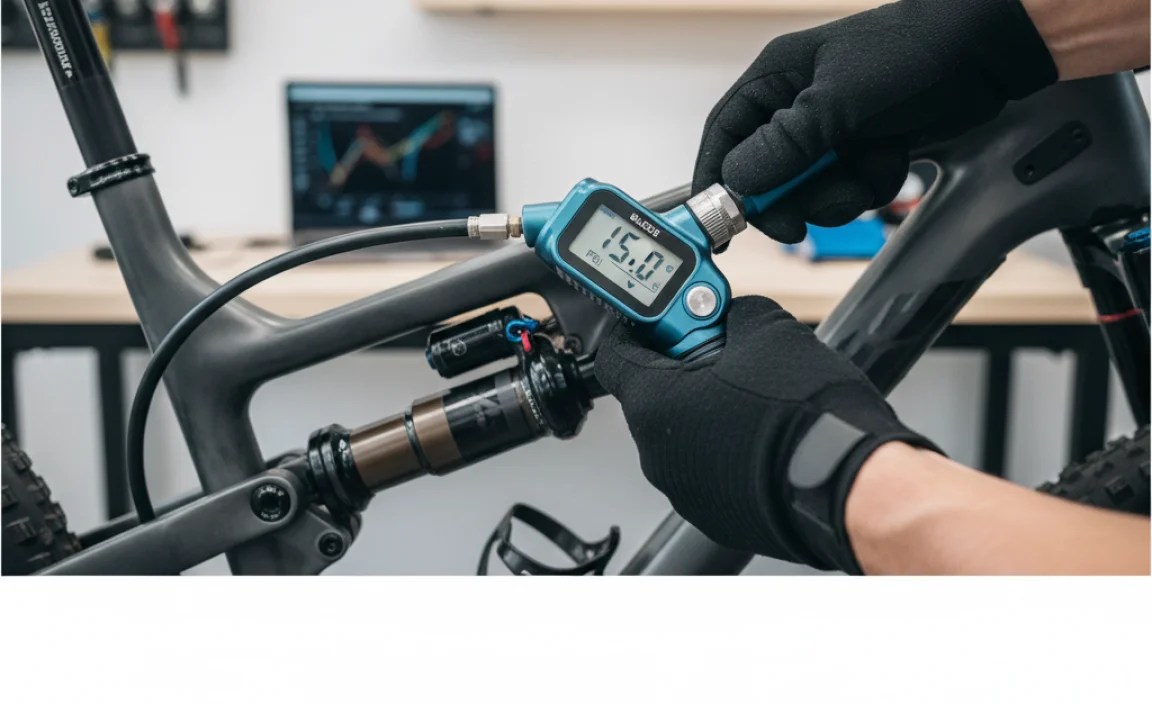
Reading the Pressure Gauge
Have you ever looked at a clock to tell the time? The pressure gauge on a shock pump tells you the “time” for your rear shock. It shows you how much air is inside. The gauge is marked in PSI (pounds per square inch). This is the unit of measurement for air pressure. Look closely at the gauge. Read the number carefully. This is the current pressure in your shock. Compare this number to the recommended pressure in your bike’s manual. Knowing how to measure rear shock pressure accurately involves reading the gauge correctly.
Fun Fact or Stat: Some high-end shock pumps have digital gauges for even more precise readings. These gauges eliminate guesswork and provide accurate measurements every time.
Understanding Recommended Pressure Ranges

Imagine you’re trying to find the perfect pair of shoes. They shouldn’t be too big or too small, right? Finding the right shock pressure is similar. It shouldn’t be too high or too low. Your bike’s manual has a recommended pressure range. This range is based on your weight and riding style. It’s a good starting point. But you might need to adjust it slightly. Experiment with different pressures to find what works best for you. Knowing how to measure rear shock pressure accurately is important. But understanding the recommended range is just as important. It helps you get the most out of your bike.
- Consult your bike’s owner’s manual for PSI recommendations.
- Consider your weight when setting the initial pressure.
- Adjust pressure based on your riding style and terrain.
- Start with the recommended pressure and fine-tune from there.
- Record your preferred settings for future reference.
Think of the recommended pressure range as a guide. It’s not a strict rule. Your weight, riding style, and the type of trails you ride all affect the ideal pressure. If you’re lighter, you’ll need less pressure. If you’re heavier, you’ll need more pressure. If you ride smooth trails, you might want a higher pressure. This will make your bike feel more efficient. If you ride rough trails, you might want a lower pressure. This will make your bike feel more comfortable. Knowing how to measure rear shock pressure accurately helps you experiment with different settings. It allows you to find the perfect balance for your needs.
How Weight Affects Pressure
Have you ever seen a seesaw? If one person is heavier, the other person needs to move closer to the middle to balance it. Your weight affects your bike’s shock pressure in a similar way. If you’re heavier, you need more pressure to support your weight. If you’re lighter, you need less pressure. The recommended pressure range in your bike’s manual is usually based on an average weight. You might need to adjust it up or down depending on your weight. Knowing how to measure rear shock pressure accurately helps you make these adjustments.
Riding Style and Terrain
Imagine you’re driving a car. If you’re driving on a smooth highway, you can use cruise control. But if you’re driving on a bumpy road, you need to adjust your speed. Your riding style and the terrain you ride affect your bike’s shock pressure in a similar way. If you ride smooth trails, you might want a higher pressure. This will make your bike feel more efficient. If you ride rough trails, you might want a lower pressure. This will make your bike feel more comfortable. Knowing how to measure rear shock pressure accurately helps you fine-tune your pressure for different conditions.
Finding the Sweet Spot
Have you ever tried to find the perfect temperature for a shower? Not too hot, not too cold, but just right? Finding the “sweet spot” for your shock pressure is similar. It’s the pressure that feels the most comfortable and gives you the best performance. This might take some experimenting. Start with the recommended pressure in your bike’s manual. Then, adjust it slightly up or down. Pay attention to how your bike feels. Does it feel too harsh? Does it feel too squishy? Keep adjusting until you find the sweet spot. Knowing how to measure rear shock pressure accurately makes this process easier.
Fun Fact or Stat: Professional mountain bikers often adjust their shock pressure multiple times during a race to adapt to changing trail conditions.
Adjusting Pressure for Optimal Performance
Imagine you’re tuning a guitar. You want to get each string just right so it sounds perfect. Adjusting your shock pressure is similar. You want to get the pressure just right so your bike performs its best. If the pressure is too low, your bike will feel squishy. It might bottom out on bumps. If the pressure is too high, your bike will feel harsh. You’ll feel every little bump. The goal is to find the pressure that gives you a smooth, controlled ride. Knowing how to measure rear shock pressure accurately is the first step. Then, you can make small adjustments to dial in your performance.
- Add air to increase pressure and firmness.
- Release air to decrease pressure and softness.
- Make small adjustments (2-5 PSI) at a time.
- Test ride after each adjustment to feel the difference.
- Keep a record of your adjustments for future reference.
Think of adjusting your shock pressure like adjusting the volume on a radio. You want to find the volume that’s just right. Not too loud, not too quiet. Start by making small adjustments. Add or release a few PSI at a time. Then, go for a short ride. Pay attention to how your bike feels. Does it feel better? Does it feel worse? Keep making small adjustments until you find the sweet spot. Knowing how to measure rear shock pressure accurately makes this process easier. It also helps you become more familiar with your bike.
Adding Air to Increase Pressure
Have you ever blown up a balloon? You add air to make it bigger and firmer. Adding air to your rear shock is similar. It increases the pressure and makes the shock firmer. To add air, attach the shock pump to the valve. Then, pump slowly. Watch the gauge on the pump. Stop when you reach the desired pressure. Be careful not to over-inflate the shock. This can damage it. Knowing how to measure rear shock pressure accurately helps you add the right amount of air.
Releasing Air to Decrease Pressure
Imagine you have a balloon that’s too full. You need to let some air out to make it just right. Releasing air from your rear shock is similar. It decreases the pressure and makes the shock softer. To release air, press the release button on the shock pump. Do this slowly and carefully. Watch the gauge on the pump. Stop when you reach the desired pressure. Be careful not to release too much air. Knowing how to measure rear shock pressure accurately helps you release the right amount of air.
The Importance of Small Adjustments
Have you ever tried to adjust the volume on a TV? If you make big adjustments, it can go from too quiet to too loud very quickly. Making small adjustments to your shock pressure is similar. Small changes can make a big difference in how your bike feels. That’s why it’s important to make small adjustments. Add or release only a few PSI at a time. Then, go for a ride and see how it feels. This will help you find the perfect pressure for your riding style and the terrain you ride. Knowing how to measure rear shock pressure accurately makes these small adjustments more effective.
Fun Fact or Stat: Some riders use a suspension calculator app to help them determine the ideal starting pressure for their rear shock based on their weight and bike model.
Troubleshooting Common Pressure Issues
Imagine you’re trying to start a car, but it won’t start. You need to figure out what’s wrong. Troubleshooting pressure issues with your rear shock is similar. Sometimes the pressure might not be right. Maybe it’s too high, too low, or keeps changing. Knowing how to troubleshoot these issues can save you time and frustration. First, check for leaks. Look for oil or air bubbles around the shock. If you see any, the shock might need to be repaired. Also, make sure your shock pump is working correctly. Sometimes the gauge can be inaccurate. Knowing how to measure rear shock pressure accurately includes knowing how to troubleshoot common problems.
- Check for air leaks around the shock valve and seals.
- Ensure the shock pump is functioning correctly.
- Inspect the shock for any signs of damage.
- Verify pressure readings with a different pump if possible.
- Consult a bike mechanic for persistent issues.
Think of your bike’s rear shock as a complex machine. Like any machine, it can have problems. One common problem is air leaks. The air can leak out slowly over time. This causes the pressure to drop. Another problem is an inaccurate shock pump. The gauge on the pump might not be showing the correct pressure. This can lead to incorrect adjustments. If you’re having trouble getting the pressure right, don’t give up. Check for leaks. Try a different shock pump. And if you’re still stuck, ask a bike mechanic for help. Knowing how to measure rear shock pressure accurately is important. But knowing how to troubleshoot problems is just as important.
Identifying Air Leaks
Have you ever had a flat tire? You can usually hear or see where the air is leaking out. Identifying air leaks in your rear shock can be a bit trickier. The leaks can be very small. Look closely at the shock valve and seals. Check for oil or air bubbles. You can also spray soapy water on the shock. If you see bubbles forming, that’s where the air is leaking. If you find a leak, you might need to replace the seals or have the shock repaired. Knowing how to measure rear shock pressure accurately includes knowing how to find leaks.
Checking the Shock Pump
Imagine you’re using a ruler to measure something. If the ruler is broken, your measurement will be wrong. The same is true for your shock pump. If the gauge is inaccurate, your pressure readings will be wrong. To check your shock pump, compare it to another pump. If the readings are different, your pump might need to be calibrated or replaced. A good shock pump is essential for measuring rear shock pressure accurately.
When to Seek Professional Help
Have you ever tried to fix something complicated, like a computer? Sometimes it’s best to ask an expert for help. The same is true for your bike’s rear shock. If you’ve tried everything and you’re still having problems, it’s time to see a bike mechanic. They have the tools and expertise to diagnose and fix complex issues. They can also help you set up your shock properly for your weight and riding style. Knowing how to measure rear shock pressure accurately is a great skill. But knowing when to ask for help is also important.
Fun Fact or Stat: Rear shocks typically need to be serviced every 50-100 hours of riding to maintain optimal performance and prevent damage.
Summary
How to measure rear shock pressure accurately is a skill every bike rider should learn. It helps you get the most out of your bike. It also keeps you safe and comfortable. First, you need the right tools. A shock pump is essential. Then, follow the steps carefully. Find the valve, attach the pump, and read the gauge. Understand the recommended pressure range for your weight and riding style. Adjust the pressure as needed. And don’t forget to troubleshoot common problems. With a little practice, you’ll be able to dial in your shock pressure like a pro. This will make your rides more enjoyable than ever.
Conclusion
Learning how to measure rear shock pressure accurately can really improve your riding. It makes your bike work better. It helps you stay safe. It also makes riding more fun. Take the time to learn the steps. Get the right tools. And practice regularly. You’ll be amazed at the difference it makes. Happy riding!
Frequently Asked Questions
Question No 1: Why is it important to measure rear shock pressure accurately?
Answer: Measuring rear shock pressure accurately is very important. It helps you get the best performance from your bike. The correct pressure makes your ride smoother and more comfortable. It also gives you better control. Plus, it helps your bike last longer. Knowing how to measure rear shock pressure accurately can prevent damage to your bike. Incorrect pressure can cause the shock to wear out faster. It can also affect other parts of your bike. So, taking the time to get it right is worth it.
Question No 2: What tools do I need to measure rear shock pressure accurately?
Answer: To measure rear shock pressure accurately, you need a few key tools. The most important tool is a shock pump. This is a special pump designed for rear shocks. It has a precise gauge that shows the pressure in PSI. You’ll also need a rag to wipe off any dirt. Your bike’s owner’s manual is helpful too. It tells you the recommended pressure range for your bike. Having these tools makes the job easier and ensures you get the most accurate reading. Remember, a regular tire pump won’t work for measuring shock pressure accurately.
Question No 3: How often should I check my rear shock pressure?
Answer: You should check your rear shock pressure regularly. A good habit is to check it before every ride. If you ride often, check it a few times a week. If you’re going on a big ride, definitely check it. Temperature changes can affect the pressure. Colder temperatures lower the pressure. Hotter temperatures increase it. Riding your bike also puts stress on the shock, which can cause small leaks. Knowing how to measure rear shock pressure accurately and checking it often will help you stay on top of these changes and ensure a smooth ride.
Question No 4: What happens if my rear shock pressure is too low?
Answer: If your rear shock pressure is too low, your bike will feel squishy. You might bottom out on bumps. This means the shock hits its limit. This can be uncomfortable and even damage your bike. Low pressure also makes it harder to control your bike. You might have trouble turning corners or jumping. It’s important to maintain the correct pressure for optimal performance and safety. Learning how to measure rear shock pressure accurately can help you avoid these problems and ensure a smoother, more controlled ride.
Question No 5: What happens if my rear shock pressure is too high?
Answer: If your rear shock pressure is too high, your bike will feel harsh. You’ll feel every little bump. This can be tiring and even painful. High pressure also reduces your bike’s ability to absorb shocks. This can make it harder to control your bike on rough terrain. It’s important to maintain the correct pressure for optimal comfort and control. Knowing how to measure rear shock pressure accurately can help you avoid these problems and ensure a more enjoyable ride.
Question No 6: How do I find the recommended pressure range for my rear shock?
Answer: The best place to find the recommended pressure range for your rear shock is in your bike’s owner’s manual. The manual will tell you the correct PSI range based on your weight and riding style. If you don’t have the manual, you can often find it online. You can also ask a bike mechanic for help. They can help you determine the right pressure for your specific bike and needs. Remember, the recommended range is just a starting point. You might need to adjust it slightly to find what works best for you. Understanding how to measure rear shock pressure accurately is key to making these adjustments.


