
How to Install Side-Arm Mount for Phone on Aero Bars: Easy!
Have you ever seen a cyclist with their phone on their bike? They use a special holder. It is called a phone mount. It lets them see maps or track their ride. But how do you install a side-arm mount for your phone on aero bars? It might seem tricky, but it is not! Let’s learn how to do it safely and easily.
Have you ever dropped something while riding your bike? It is not fun! A good phone mount keeps your phone safe. You do not want it to fall off. This guide will help you keep your phone secure. Then you can enjoy your ride without worry.
Aero bars are cool. They help you go faster on your bike. They also give you a place to put your phone. Let’s find out how to install a side-arm mount for your phone on aero bars. With the right tools, it’s a breeze!
Key Takeaways
- Installing a side-arm phone mount on aero bars lets you easily view your phone.
- Always use the right tools to ensure a secure and safe installation.
- Make sure the mount does not block your view or affect your steering.
- Check the mount regularly to ensure it stays tight and secure.
- Learning how to install a side-arm mount for phone on aero bars is simple.
Choosing the Right Side-Arm Phone Mount

Picking the right phone mount is super important. There are many types. Some are better for aero bars than others. You need one that fits your phone. You also need one that attaches well to your aero bars. Think about what you need the mount for. Do you want to see maps? Do you want to track your speed? Some mounts are simple. Others have extra features. Look for a mount that is strong and does not shake. Read reviews to see what other people think. Make sure it is easy to put your phone in and take it out. You do not want to struggle while riding. Choose a mount that makes your ride safer and more fun. Consider the size of your phone and the width of your aero bars to ensure a snug fit. A good mount will last a long time.
- Check the size of your phone.
- Make sure the mount fits your aero bars.
- Read reviews from other cyclists.
- Choose a strong and stable mount.
- Look for easy phone access.
After you pick your mount, check all the parts. Make sure you have everything you need. Read the instructions that come with the mount. This will help you understand how it works. It will also show you how to install it correctly. Do not rush the process. Take your time to do it right. A good mount will make your rides better. It will let you stay connected without being unsafe. Think about how often you will use it. A durable mount is worth the investment. A secure mount means you can focus on your ride. It can give you peace of mind knowing your phone is safe.
What Are the Best Mount Materials?
Have you ever wondered what makes a phone mount strong? The answer is the material. Some mounts are made of plastic. Others are made of metal. Metal mounts are often stronger. They can handle bumps and vibrations better. Plastic mounts can be lighter. But they might break more easily. Look for materials like aluminum or strong composites. These can handle tough conditions. They will keep your phone safe. Good materials also last longer. They will not rust or fade in the sun. So, picking a mount with good materials is a smart choice. It helps you avoid problems later. Think about where you ride. If you ride on rough roads, choose a stronger material. That way, your phone stays safe and secure.
How Important is Mount Adjustability?
Imagine you have a mount that does not move. It would be hard to see your phone. That is why adjustability is important. A good mount lets you change the angle. You can tilt it up or down. You can also turn it left or right. This helps you see the screen better. It also makes it easier to use your phone. Look for a mount with many adjustment options. Some mounts have a ball joint. This lets you move the phone in any direction. Adjustability also helps with glare. You can angle the phone to avoid the sun. This makes it easier to see the screen on bright days. A flexible mount makes your ride safer and more enjoyable.
What About Mount Aerodynamics?
Have you ever seen a race car? Everything on it is designed to be aerodynamic. This means it moves through the air easily. The same is true for bikes. An aerodynamic phone mount can help you go faster. It reduces wind resistance. This might not seem like much, but it can make a difference. Especially on long rides. Look for mounts that are shaped to cut through the air. Some are slim and streamlined. Others are integrated into the aero bars. These mounts can improve your speed. They also look cool. So, if you care about speed, choose an aerodynamic mount. It can give you an edge on the road. It’s a small detail that can make a big difference.
Fun Fact or Stat: Studies show that aerodynamic bike accessories can save cyclists up to 15 seconds per 40 kilometers!
Gathering the Necessary Tools and Materials

Before you start, gather all your tools. This makes the job easier. You will need a few things. First, get the phone mount itself. Make sure you have all its parts. Next, you will need some tools. A screwdriver is important. You might need different sizes. An Allen wrench is also useful. Some mounts use these. Check the instructions to see what you need. A clean cloth is helpful. You can use it to wipe your aero bars. This will help the mount stick better. Also, have some rubbing alcohol. This can clean the bars too. Make sure you have a safe place to work. A table or workbench is good. This will keep everything organized. Having the right tools makes the job go smoothly. It also helps you avoid mistakes. So, take a few minutes to get everything ready. Then you can start the installation with confidence.
- Phone mount with all parts
- Screwdriver set
- Allen wrench set
- Clean cloth
- Rubbing alcohol
- Work table
Once you have your tools, check the instructions again. Make sure you understand each step. This will prevent problems later. Look at the screws and bolts. Make sure they are the right size. If you are not sure, ask someone for help. It is better to be safe than sorry. Also, think about where you will put the mount. Choose a spot that is easy to see. Make sure it does not block your view of the road. Safety is the most important thing. A good location will make your ride safer and more enjoyable. So, plan ahead and be careful. This will help you install the mount correctly. It will also keep you safe on the road.
Why Is Cleaning the Aero Bars Important?
Imagine trying to stick something to a dirty surface. It probably won’t stick very well. That’s why cleaning your aero bars is important. Dirt and grime can prevent the mount from sticking properly. This can make it loose and unstable. Cleaning the bars removes this dirt. It creates a better surface for the mount to grip. Use a clean cloth and some rubbing alcohol. Wipe the area where you will attach the mount. Let it dry completely before you start. This will ensure a strong and secure connection. A clean surface makes a big difference. It helps the mount stay in place, even on bumpy roads. So, take a few minutes to clean your aero bars. It’s a simple step that can prevent problems later.
How Do I Choose the Right Screwdriver?
Choosing the right screwdriver might seem simple. But it is important to get it right. Using the wrong size can damage the screws. This can make them hard to tighten or loosen. Look at the screws that came with your mount. See what type they are. Are they Phillips head or flat head? Then, find a screwdriver that matches. Make sure it fits snugly in the screw head. If it is too small, it will slip. If it is too big, it won’t fit at all. A good fit prevents damage. It also makes it easier to tighten the screws. Keep a set of different screwdrivers handy. This will help you find the right one for the job. Using the correct screwdriver makes the installation easier and safer.
What If I Don’t Have an Allen Wrench?
Sometimes, phone mounts use Allen wrenches. These are also called hex keys. They have a special shape that fits into certain screws. If your mount needs an Allen wrench, you will need one. You can buy a set at most hardware stores. Make sure you get the right size. The wrench should fit snugly into the screw. If you don’t have one, you can try using pliers. But this is not a good idea. Pliers can damage the screw. It is better to buy an Allen wrench set. They are not expensive. They will make the job much easier. Plus, you can use them for other projects too. So, if your mount needs an Allen wrench, get one before you start. It will save you time and frustration.
Fun Fact or Stat: The Allen wrench was invented in the early 1900s and is named after the Allen Manufacturing Company!
Step-by-Step Guide: Installing the Mount
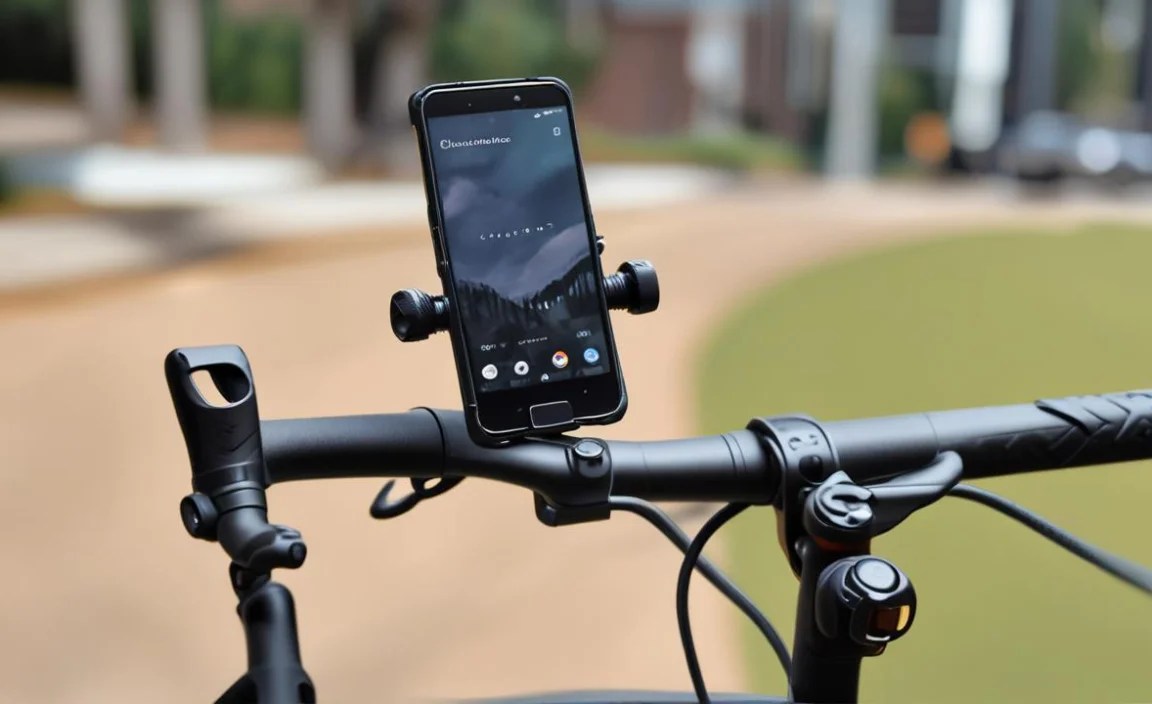
Now, let’s get to the fun part. Installing the mount! First, read the instructions carefully. Each mount is a little different. Make sure you understand the steps. Start by positioning the mount on your aero bars. Find the best spot for it. It should be easy to see. It should not block your view. Once you have the spot, start attaching the mount. Use the screws or clamps that came with it. Tighten them gently at first. Make sure the mount is straight. Then, tighten them a little more. Do not over-tighten them! This can damage the mount or the bars. Check that the mount is secure. It should not move or wobble. If it does, tighten the screws a bit more. But be careful not to overdo it. Once it is secure, you are done! Now you can enjoy your rides with your phone safely mounted.
- Read the instructions carefully.
- Position the mount on the aero bars.
- Attach the mount using screws or clamps.
- Tighten gently, then more securely.
- Check for wobbling or movement.
After you install the mount, test it out. Put your phone in it. See how it feels. Make sure you can see the screen easily. Check that you can reach your phone if you need to. Ride around a bit to see if it stays in place. If it moves or shakes, adjust it. You might need to tighten the screws more. Or you might need to reposition the mount. Keep adjusting until it feels perfect. A good mount should feel solid and secure. It should not distract you while you ride. It should make your rides safer and more enjoyable. So, take the time to test it out. This will help you get the most out of your new phone mount.
How Tight Should the Screws Be?
Tightening the screws is a key part of installing a phone mount. But how tight is too tight? You don’t want to break anything. The goal is to make the mount secure. But not to damage it. Start by tightening the screws gently. Use your fingers to turn them. Once they are snug, use a screwdriver or Allen wrench. Turn them a little more. Stop when you feel resistance. Do not force them. Over-tightening can strip the screws. It can also crack the mount. Check the instructions for the correct torque. This is a measure of how tight the screws should be. If you are not sure, ask a bike mechanic for help. They can show you how to tighten the screws correctly. A properly tightened mount will stay in place. It will keep your phone safe. It will also prevent damage to your bike.
What If the Mount Doesn’t Fit Properly?
Sometimes, a phone mount might not fit perfectly. This can be frustrating. But don’t give up! There are things you can do. First, check that you have the right mount. Make sure it is designed for your aero bars. If it is, check the instructions again. Make sure you are following the steps correctly. If the mount is too big, you might need to use shims. These are small pieces of rubber or plastic. They fill the gap between the mount and the bars. If the mount is too small, you might need a different one. It is important to get a mount that fits well. A loose mount can be dangerous. It can also damage your phone. If you are not sure what to do, ask a bike shop for help. They can help you find the right mount. They can also install it for you.
How Do I Prevent Scratches on My Aero Bars?
Scratches on your aero bars can be annoying. They can also reduce the value of your bike. Luckily, there are ways to prevent them. First, clean your aero bars before installing the mount. This removes dirt and grime that can cause scratches. Next, use protective tape. Apply it to the bars where the mount will attach. This creates a barrier between the mount and the bars. You can also use rubber shims. These can cushion the mount and prevent scratches. Be careful when tightening the screws. Over-tightening can cause the mount to dig into the bars. Check the mount regularly for wear. If you see any sharp edges, smooth them out. These simple steps can help you keep your aero bars looking new. They will also protect your investment.
Fun Fact or Stat: The average cyclist spends about $1,000 per year on bike maintenance and accessories!
Ensuring Stability and Security
Stability and security are key. You want your phone to stay put. A wobbly mount is not safe. It can also be distracting. So, how do you make sure your mount is stable? First, tighten the screws properly. Not too tight, but firm. Second, check the mount regularly. See if anything has come loose. Third, use a good quality mount. Cheap mounts might not be as stable. Fourth, consider adding extra support. Some mounts have straps or clamps. These can help hold the phone in place. Fifth, avoid riding on very rough roads. Bumps and vibrations can loosen the mount. By following these tips, you can ensure your phone stays safe and secure. You can also enjoy your ride without worry.
- Tighten screws properly.
- Check the mount regularly.
- Use a good quality mount.
- Add extra support if needed.
- Avoid very rough roads.
Another important thing is to position the mount correctly. It should be in a spot where you can see it easily. But it should not block your view of the road. It should also be easy to reach. You do not want to have to stretch or strain to use your phone. A good position will make your ride safer and more comfortable. Also, think about the weight of your phone. A heavy phone can make the mount wobble. If you have a heavy phone, choose a stronger mount. Or consider using a lighter phone case. Every little bit helps. By paying attention to these details, you can make sure your phone mount is stable and secure. You can also enjoy your rides with peace of mind.
What Are Common Causes of Mount Instability?
Mount instability can be caused by several things. Loose screws are a big one. If the screws are not tight, the mount will wobble. Another cause is poor quality materials. Cheap mounts might not be strong enough. They can break or bend easily. Vibrations from the road can also loosen the mount. Especially on rough surfaces. Overloading the mount with a heavy phone can also cause problems. The mount might not be able to handle the weight. Finally, improper installation can lead to instability. If the mount is not installed correctly, it will not be secure. By knowing these causes, you can take steps to prevent them. You can choose a good mount. You can install it correctly. You can also check it regularly. This will help you keep your phone safe and secure.
How Can I Add Extra Support to the Mount?
Sometimes, a standard mount might not be enough. You might need to add extra support. There are several ways to do this. One way is to use straps. These can wrap around the mount and the aero bars. They provide extra stability. Another way is to use clamps. These can grip the mount and the bars tightly. You can also use rubber bands. These can help absorb vibrations. Another option is to use adhesive pads. These stick to the mount and the bars. They provide a non-slip surface. Finally, you can use zip ties. These can secure the mount in place. By using these methods, you can add extra support to your mount. You can also make it more stable and secure. This will help keep your phone safe on your rides.
What Should I Do If the Mount Starts to Vibrate?
Vibration can be annoying and distracting. It can also damage your phone. If your mount starts to vibrate, take action. First, check the screws. Make sure they are tight. If they are loose, tighten them. Next, check the mount itself. See if anything is broken or worn. If it is, replace it. You can also try adding rubber bands. These can help absorb vibrations. Another option is to use a vibration dampener. This is a special pad that reduces vibrations. You can also try repositioning the mount. Sometimes, moving it to a different spot can help. Finally, avoid riding on very rough roads. These can cause excessive vibrations. By taking these steps, you can reduce vibration and keep your phone safe.
Fun Fact or Stat: Phone mounts experience vibrations of up to 20 Hz while cycling, which can damage phone cameras over time!
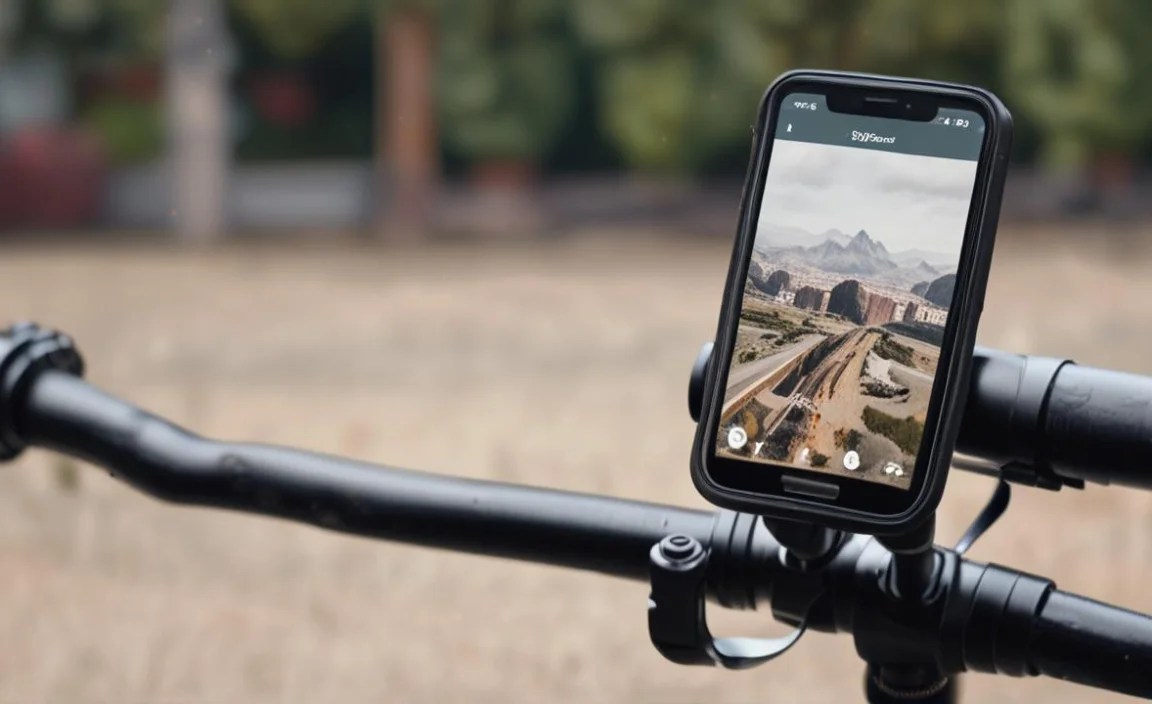
Adjusting the Mount for Optimal Viewing

Seeing your phone clearly is important. It helps you stay safe. It also lets you use your apps easily. That’s why adjusting the mount is key. First, position the mount where you can see it without straining. You should not have to look down too much. This can be dangerous. Next, adjust the angle of the phone. Tilt it up or down until you can see the screen clearly. Consider the glare from the sun. Angle the phone to reduce glare. This will make it easier to see on bright days. Also, think about the position of your hands. Make sure the mount does not get in the way. You should be able to reach your brakes easily. A good adjustment will make your ride safer and more enjoyable. It will also let you use your phone without distraction.
- Position the mount for easy viewing.
- Adjust the angle to reduce strain.
- Consider glare from the sun.
- Ensure the mount does not block your hands.
- Prioritize safety and comfort.
Another thing to consider is the size of your phone. A larger phone might need a different mount. It might also need a different position. Make sure the mount can support the weight of your phone. Also, think about how you will use your phone. If you will be using maps, position it where you can see them easily. If you will be tracking your speed, position it where you can glance at it quickly. A good adjustment will depend on your needs. It will also depend on your phone and your bike. So, take the time to experiment. Find the position that works best for you. This will make your rides safer and more enjoyable.
How Do I Minimize Glare on the Phone Screen?
Glare can make it hard to see your phone screen. This can be frustrating and dangerous. Luckily, there are ways to minimize it. First, adjust the angle of the phone. Tilt it away from the sun. This can reduce the amount of glare. Next, use a matte screen protector. This reduces reflections. You can also try using a sun visor. This is a small shield that blocks the sun. Another option is to increase the brightness of your screen. This can make it easier to see in bright sunlight. Finally, avoid riding in direct sunlight if possible. Choose routes that are shaded. By taking these steps, you can minimize glare and see your phone screen clearly.
What Is the Best Angle for Viewing the Phone?
The best angle for viewing your phone depends on your bike and your riding position. But there are some general guidelines. First, the phone should be at eye level. This reduces strain on your neck. Next, the screen should be tilted slightly upwards. This makes it easier to see. Avoid tilting the phone too much. This can make it hard to read the screen. Also, consider the distance between your eyes and the phone. The closer the phone is, the easier it will be to see. Experiment with different angles to find what works best for you. A good angle will make it easier to use your phone while riding. It will also reduce strain and fatigue.
How Do I Keep the Screen Visible in All Weather?
Keeping your screen visible in all weather can be a challenge. But there are ways to do it. In bright sunlight, use a matte screen protector. This reduces glare. In rain, use a waterproof phone case. This protects your phone from damage. You can also use a rain cover for the mount. This shields the phone from the rain. In cold weather, use gloves that work with touchscreens. This allows you to use your phone without taking off your gloves. Also, consider the temperature of your phone. Extreme temperatures can damage the battery. Try to keep your phone at a moderate temperature. By taking these precautions, you can keep your screen visible in all weather conditions.
Fun Fact or Stat: A cyclist can lose up to 8% of their body weight in sweat during a long, hot ride, so staying hydrated is crucial!
Maintaining Your Side-Arm Phone Mount
Taking care of your mount is important. It helps it last longer. It also keeps your phone safe. First, clean the mount regularly. Wipe it with a damp cloth. This removes dirt and grime. Next, check the screws regularly. Make sure they are tight. If they are loose, tighten them. Also, check the mount for wear. Look for cracks or damage. If you see any, replace the mount. Avoid exposing the mount to extreme temperatures. This can damage the materials. Also, avoid dropping the mount. This can break it. Finally, store the mount properly when you are not using it. Keep it in a cool, dry place. By following these tips, you can keep your mount in good condition. You can also ensure it lasts for a long time.
- Clean the mount regularly.
- Check the screws for tightness.
- Inspect for wear and damage.
- Avoid extreme temperatures.
- Store properly when not in use.
Another important thing is to use the mount correctly. Do not overload it with a heavy phone. This can strain the mount. Also, do not use the mount for purposes it was not designed for. This can damage it. If you have any problems with the mount, consult the instructions. Or contact the manufacturer. They can provide helpful tips. Finally, remember that safety is the most important thing. If you are not sure how to use the mount correctly, ask for help. It is better to be safe than sorry. By taking these precautions, you can keep your mount in good working order. You can also enjoy your rides with peace of mind.
How Often Should I Check the Screws?
Checking the screws is a key part of maintaining your phone mount. But how often should you do it? A good rule of thumb is to check them before each ride. This only takes a few seconds. It can prevent problems later. If you ride frequently, check them at least once a week. If you ride on rough roads, check them more often. Also, check them after any crashes or bumps. Loose screws can cause the mount to wobble. They can also cause your phone to fall off. Tightening them regularly will keep your phone safe. It will also extend the life of your mount. So, make it a habit to check the screws before each ride. It’s a simple step that can make a big difference.
What Type of Cleaner Should I Use on the Mount?
Cleaning your phone mount is important. But you need to use the right type of cleaner. Avoid using harsh chemicals or solvents. These can damage the materials. Instead, use a mild soap and water solution. Wet a clean cloth with the solution. Wipe the mount gently. This will remove dirt and grime. Avoid getting water inside the mount. This can damage the electronics. You can also use a special cleaner designed for electronics. These are safe and effective. After cleaning, dry the mount with a clean cloth. Do not use a hair dryer or other heat source. This can damage the mount. By using the right type of cleaner, you can keep your mount looking new. You can also extend its life.
How Do I Know When to Replace the Mount?
Knowing when to replace your phone mount is important. A worn-out mount can be dangerous. Look for signs of wear and tear. Cracks, breaks, and loose parts are all warning signs. Also, check the screws. If they are stripped or damaged, replace the mount. If the mount wobbles or vibrates excessively, replace it. If the mount no longer holds your phone securely, replace it. Also, consider the age of the mount. If it is several years old, it might be time for a new one. Even if it looks okay, the materials can degrade over time. Finally, if you are not sure, ask a bike shop for help. They can inspect the mount and tell you if it needs to be replaced. Replacing your mount when necessary will keep your phone safe. It will also give you peace of mind.
Fun Fact or Stat: The global market for bicycle accessories is expected to reach $30 billion by 2025!
| Feature | Importance | Why It Matters |
|---|---|---|
| Stability | High | Prevents phone from falling. |
| Adjustability | Medium | Allows optimal viewing angle. |
| Durability | High | Ensures the mount lasts long. |
| Ease of Installation | Medium | Makes setup quick and simple. |
| Compatibility | High | Guarantees it fits your phone and aero bars. |
Summary
Learning how to install a side-arm mount for phone on aero bars is easy. First, pick the right mount. Make sure it fits your phone and aero bars. Gather your tools. You will need a screwdriver and Allen wrench. Clean your aero bars. This helps the mount stick better. Position the mount on your bars. Tighten the screws gently. Check that the mount is stable. It should not wobble. Adjust the angle for easy viewing. Make sure you can see the screen clearly. Test the mount with your phone. Ride around a bit to see if it stays in place. Maintain your mount by cleaning it regularly. Check the screws for tightness. With these steps, you can enjoy your rides with your phone safely mounted.
Conclusion
Installing a side-arm phone mount on your aero bars is a great way to stay connected. It lets you see maps and track your rides. It also keeps your phone safe. Remember to choose the right mount. Follow the steps carefully. Check the mount regularly. This will ensure it stays stable. Now you know how to install a side-arm mount for phone on aero bars. Enjoy your rides!
Frequently Asked Questions
Question No 1: What tools do I need to install a side-arm mount on aero bars?
Answer: To install a side-arm mount, you will need a few basic tools. A screwdriver set is essential for tightening screws. An Allen wrench set might be needed for certain types of mounts. A clean cloth is helpful for wiping down the aero bars before installation. Rubbing alcohol can also be used to clean the bars for better adhesion. Having these tools ready will make the installation process smoother and more efficient. Make sure you have the right sizes for the screws and bolts that come with your mount to avoid any damage during installation. Properly preparing your tools is the first step in how to install a side-arm mount for phone on aero bars.
Question No 2: How do I choose the right size side-arm mount for my phone and aero bars?
Answer: Choosing the right size mount is crucial for a secure fit. First, measure the width of your phone. Make sure the mount can accommodate this width. Next, check the diameter of your aero bars. The mount should be compatible with this diameter. Read the product descriptions carefully. They should provide information on phone and bar compatibility. Look for mounts that are adjustable. These can fit a wider range of phone and bar sizes. If you are unsure, ask a bike shop for help. They can recommend the right mount for your needs. Ensuring the right size is a key part of how to install a side-arm mount for phone on aero bars safely and effectively.
Question No 3: How do I prevent my phone from falling out of the side-arm mount while riding?
Answer: Preventing your phone from falling out is a top priority. Make sure the mount has a secure grip on your phone. Some mounts have adjustable arms or clamps. These can be tightened to hold your phone firmly. Check the mount regularly to ensure it is still tight. Avoid riding on very rough roads. These can cause the phone to bounce out. Consider using a safety strap. This can attach your phone to the mount. This provides extra security. Choose a high-quality mount. Cheaper mounts might not have a strong grip. Following these tips will help keep your phone safe and secure. You will also have more confidence while riding. Knowing your phone is secure is important when learning how to install side-arm mount for phone on aero bars.
Question No 4: Can I use a side-arm mount on any type of aero bars?
Answer: Not all side-arm mounts are compatible with every type of aero bar. Some mounts are designed for specific shapes and sizes. Check the product description carefully. Make sure the mount is compatible with your aero bars. Some mounts use clamps that fit around the bars. Others use straps or adhesive. If you are unsure, ask the manufacturer. They can tell you if the mount will work with your bars. Using the wrong mount can be dangerous. It can also damage your bars. So, take the time to check compatibility before you buy. This will ensure a safe and secure installation. It’s important to know the limitations when considering how to install a side-arm mount for phone on aero bars.
Question No 5: How do I adjust the side-arm mount for the best viewing angle while cycling?
Answer: Adjusting the mount for the best viewing angle is important for safety and convenience. Position the mount where you can see the screen easily. You should not have to look down too much. This can be dangerous. Adjust the angle of the phone. Tilt it up or down until you can see the screen clearly. Consider the glare from the sun. Angle the phone to reduce glare. Also, think about the position of your hands. Make sure the mount does not get in the way. A good adjustment will make your ride safer and more enjoyable. Experiment with different angles until you find what works best for you. Proper adjustment is key when learning how to install a side-arm mount for phone on aero bars.
Question No 6: What should I do if the side-arm mount starts to wobble or loosen after installation?
Answer: If your side-arm mount starts to wobble, take action immediately. First, check the screws. Make sure they are tight. If they are loose, tighten them. Use the correct screwdriver or Allen wrench. Do not over-tighten the screws. This can damage the mount or the bars. If the screws are tight and the mount still wobbles, check the mount itself. Look for cracks or damage. If you see any, replace the mount. Consider adding extra support. Use straps or clamps to secure the mount. If the problem persists, ask a bike shop for help. They can inspect the mount and give you advice. Addressing wobbling is essential after you learn how to install a side-arm mount for phone on aero bars.


