
How to Power Cycle Water Pump: Easy Restart Guide
Quick Summary: Power cycling your water pump is like giving it a fresh start. Turn off the power source (breaker or switch), wait 15-30 seconds, and then turn it back on. This simple reset can clear minor glitches, resolve pressure issues, and get your water flowing smoothly again without needing a plumber.
Is your water pump acting up? Maybe it’s making strange noises, not providing enough pressure, or just seems stuck. Don’t panic! Often, a simple power cycle – basically, restarting it – can solve the problem. It’s like rebooting your computer. This quick fix can clear out temporary glitches and get your pump running efficiently again. This guide will walk you through each step, so let’s get started and get your water flowing!
What is Power Cycling and Why Do It?

Power cycling a water pump simply means turning it off and then turning it back on. This process allows the pump’s internal components to reset, clearing any temporary errors or glitches that might be affecting its performance. Think of it like restarting your smartphone when an app freezes—it often resolves the issue quickly and easily.
Here’s why power cycling is a good first step when troubleshooting water pump problems:
- Clears Temporary Errors: Like any electronic device, water pumps can experience temporary software or hardware glitches. Power cycling clears these errors.
- Resets Pressure Sensors: Many modern pumps have pressure sensors. A power cycle can reset these sensors, ensuring accurate readings.
- Simple and Free: It’s the easiest and most cost-effective troubleshooting step you can take.
- Prevents Unnecessary Repairs: Before calling a plumber or attempting more complex repairs, power cycling can often resolve the issue, saving you time and money.
Safety First
Before you begin, it’s important to prioritize safety. Working with electricity and water can be dangerous if you’re not careful.
- Turn off the Power: Always disconnect the power supply to the pump before inspecting or working on it. Locate the circuit breaker or disconnect switch that controls the pump and turn it off.
- Dry Environment: Ensure the area around the pump and electrical connections is dry. Never work with electrical components in wet conditions.
- Wear appropriate Personal Protective Equipment (PPE): While power cycling is a simple task, wearing rubber gloves can provide an extra layer of protection.
Tools You Might Need

The great thing about power cycling is that it requires very few tools! Here’s a list:
- Screwdriver (Optional): You might need a screwdriver to access the pump’s disconnect switch or circuit breaker panel.
- Flashlight or Work Light (Optional): If the area around the pump is poorly lit, a flashlight or work light can be helpful.
Step-by-Step Guide to Power Cycling Your Water Pump

Follow these simple steps to safely and effectively power cycle your water pump.
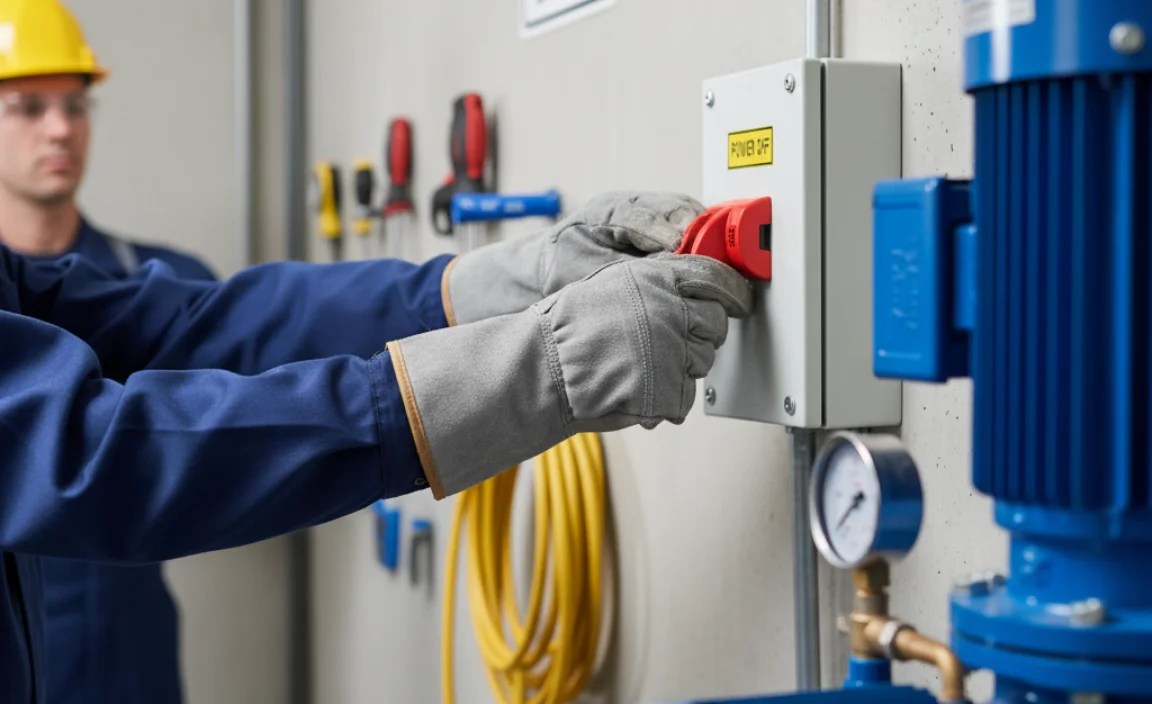
Step 1: Locate the Power Source
The first step is to identify where your water pump receives its power. This is usually either a circuit breaker in your electrical panel or a dedicated disconnect switch located near the pump.
- Circuit Breaker: Look for the breaker labeled “Water Pump,” “Well Pump,” or something similar. If you’re unsure, you may need to experiment by turning off breakers one at a time until you find the one that cuts power to the pump.
- Disconnect Switch: This is a switch, typically located near the pump, that allows you to easily disconnect the power. It might be a simple on/off switch or a pull-out type.
Step 2: Turn Off the Power
Once you’ve located the power source, turn it off. This is a crucial safety step. Double-check to ensure the pump is no longer running before proceeding.
- Circuit Breaker: Flip the breaker to the “Off” position.
- Disconnect Switch: Turn the switch to the “Off” position or pull out the disconnect.
Step 3: Wait
This is the most important step! Give the pump sufficient time to fully discharge any residual electricity. Waiting allows the internal components to completely reset.
- Recommended Wait Time: Wait at least 15-30 seconds. For older pumps, waiting a full minute is a good idea to ensure a complete reset.
Step 4: Turn the Power Back On
After waiting, restore power to the pump.
- Circuit Breaker: Flip the breaker back to the “On” position.
- Disconnect Switch: Turn the switch to the “On” position or push the disconnect back in.
Step 5: Observe the Pump’s Operation
Now, carefully observe the pump as it restarts. Listen for any unusual noises and check for proper water pressure.
- Normal Operation: The pump should start smoothly and begin pumping water.
- Unusual Noises: If you hear loud grinding, squealing, or other strange noises, immediately turn off the power and investigate further. These noises could indicate a more serious problem.
- Check Water Pressure: Turn on a faucet and check the water pressure. It should be consistent and adequate.
Troubleshooting Common Issues After Power Cycling

Sometimes, power cycling doesn’t solve the problem. Here are a few common issues you might encounter and how to address them.
Issue 1: Pump Still Doesn’t Start
If the pump doesn’t start after power cycling, check the following:
- Breaker Tripped Again: The pump may have tripped the breaker again. This could indicate an electrical problem or an overload. Check the breaker and reset it if necessary. If it trips repeatedly, consult an electrician.
- Disconnect Switch: Ensure the disconnect switch is fully engaged. Sometimes, these switches can be finicky.
- Wiring Issues: Check for loose or corroded wiring connections near the pump and at the breaker panel. If you’re comfortable doing so, tighten any loose connections. If you see corrosion, clean it off with a wire brush and apply a corrosion inhibitor. If you’re not comfortable working with electrical wiring, call a qualified electrician.
Issue 2: Low Water Pressure
If the pump starts but the water pressure is low, consider these possibilities:
- Clogged Well Screen or Filter: A clogged well screen or filter can restrict water flow. Check and clean these components as needed.
- Leak in the System: A leak in the pipes can reduce water pressure. Inspect the plumbing for any signs of leaks and repair them promptly.
- Pressure Tank Issues: The pressure tank might be waterlogged or have a faulty bladder. Consult a professional to diagnose and repair pressure tank problems.
Issue 3: Pump Cycles On and Off Frequently
This is known as “short cycling” and can damage the pump over time. Here’s what to investigate:
- Pressure Tank Problems: A faulty pressure tank is often the cause of short cycling. Check the air pressure in the tank and adjust it as needed. If the tank is waterlogged or the bladder is damaged, it may need to be replaced.
- Leaks: Small leaks in the plumbing can also cause short cycling. Inspect the system carefully for any leaks.
When to Call a Professional
While power cycling and basic troubleshooting can resolve many water pump issues, some problems require the expertise of a qualified professional. Here are some situations when you should call a plumber or electrician:
- Repeated Breaker Tripping: If the pump repeatedly trips the circuit breaker, there could be a serious electrical problem.
- Unusual Noises: Loud grinding, squealing, or other unusual noises coming from the pump could indicate a mechanical failure.
- No Water Despite Pump Running: If the pump is running but no water is being delivered, there could be a problem with the well, the pump itself, or the plumbing.
- Electrical Shock Hazard: If you notice any signs of electrical shock or exposed wiring, immediately turn off the power and call an electrician.
- You’re Not Comfortable: If you’re not comfortable working with electrical or plumbing systems, it’s always best to err on the side of caution and call a professional.
Preventative Maintenance Tips
Regular maintenance can help prevent water pump problems and extend the life of your system. Here are some tips:
- Regular Inspections: Periodically inspect the pump, wiring, and plumbing for any signs of wear, leaks, or corrosion.
- Clean Well Screen or Filter: Clean the well screen or filter regularly to prevent clogs.
- Monitor Water Pressure: Keep an eye on your water pressure and address any changes promptly.
- Professional Check-ups: Schedule regular check-ups with a qualified plumber or well service technician to ensure your system is in good working order.
Understanding Water Pump Types
There are several types of water pumps, each designed for specific applications. Understanding the type of pump you have can help you troubleshoot problems more effectively.
Here’s a brief overview of common water pump types:
| Pump Type | Description | Common Uses |
|---|---|---|
| Submersible Pumps | These pumps are designed to be submerged in the water source. They push water to the surface. | Wells, deep water sources |
| Jet Pumps | Jet pumps use a jet of water to create suction and draw water up from the source. They are typically located above ground. | Shallow wells, irrigation |
| Centrifugal Pumps | Centrifugal pumps use a rotating impeller to move water. | Boosting water pressure, irrigation, general water transfer |
| Sump Pumps | Sump pumps are designed to remove water that has accumulated in a sump basin, typically in a basement. | Flood control, basement waterproofing |
Understanding Water Pressure
Maintaining adequate water pressure is essential for the proper functioning of your plumbing system and appliances. Water pressure is measured in pounds per square inch (PSI). Here’s a general guide to understanding water pressure:
| PSI Range | Description | Potential Issues |
|---|---|---|
| Below 40 PSI | Low water pressure | Weak showers, appliances not functioning properly, potential pipe leaks |
| 40-60 PSI | Ideal water pressure | Good water flow for most household uses |
| Above 60 PSI | High water pressure | Risk of damage to pipes and appliances, potential for leaks |
If your water pressure is consistently outside the ideal range, it’s important to investigate the cause and take corrective action.
Power Cycling vs. Resetting: What’s the Difference?
While the terms “power cycling” and “resetting” are sometimes used interchangeably, they can refer to slightly different processes, depending on the specific device. In the context of water pumps, power cycling is the more general term and simply refers to turning the power off and back on.
Some water pumps, especially newer models with electronic controls, may have a dedicated “reset” button or procedure. This reset function might perform a more specific action, such as recalibrating sensors or clearing specific error codes. If your pump has a reset button, consult the manufacturer’s instructions for the proper procedure.
In most cases, power cycling is a good first step, even if your pump has a reset function. If power cycling doesn’t resolve the issue, then try the dedicated reset procedure, if available.
Optimizing Water Pump Efficiency
Beyond basic maintenance, there are several ways to optimize the efficiency of your water pump and reduce energy consumption.
- Use Water Wisely: Conserving water reduces the amount of work the pump has to do. Fix leaks promptly, install low-flow fixtures, and be mindful of your water usage.
- Proper Sizing: Ensure your pump is properly sized for your needs. An oversized pump will waste energy, while an undersized pump will struggle to meet demand.
- Variable Frequency Drives (VFDs): Consider installing a VFD, which adjusts the pump’s speed based on demand. This can significantly reduce energy consumption and extend the life of the pump.
- Insulation: Insulate water pipes to prevent freezing in cold climates. This reduces the amount of energy needed to heat the water.
Environmental Considerations
Water pumps consume energy and can have an environmental impact. Here are some ways to minimize your footprint:
- Energy-Efficient Pumps: Choose energy-efficient water pumps that are designed to use less electricity. Look for models with Energy Star certification.
- Reduce Water Waste: Conserving water reduces the energy needed to pump and treat it.
- Proper Disposal: Dispose of old pumps and components properly. Many components can be recycled. Contact your local recycling center for information.
FAQ: Power Cycling Water Pumps
Here are some frequently asked questions about power cycling water pumps.
- Q: How long should I wait before turning the power back on?
- A: Wait at least 15-30 seconds. For older pumps, waiting a full minute is a good idea.
- Q: Will power cycling fix all water pump problems?
- A: No, power cycling only resolves temporary glitches. More serious mechanical or electrical problems will require further diagnosis and repair.
- Q: Is it safe to power cycle my water pump myself?
- A: Yes, as long as you follow the safety precautions outlined in this guide. Always turn off the power before working on the pump.
- Q: What if my pump has a reset button? Should I use that instead?
- A: Power cycling is a good first step. If that doesn’t work, then try the dedicated reset button, following the manufacturer’s instructions.
- Q: How often should I power cycle my water pump?
- A: Only power cycle your pump when you’re experiencing problems. There’s no need to do it regularly.
- Q: What does it mean if the breaker trips again immediately after resetting it?
- A: This usually indicates a short circuit or overload. Do not keep resetting the breaker. Call an electrician to diagnose the problem.
- Q: Can a power cycle damage my water pump?
- A: No, power cycling is a safe procedure and will not damage your pump.
Conclusion
Power cycling your water pump is a simple yet effective first step in troubleshooting many common issues. By following the steps outlined in this guide, you can often resolve minor glitches and get your water flowing smoothly again. Remember to prioritize safety and don’t hesitate to call a professional if you encounter more serious problems. With a little preventative maintenance and a basic understanding of your system, you can keep your water pump running efficiently for years to come.
“`


