
How to Mount Bike Light & GPS on One Stem Mount: Easy!
Do you love riding your bike? Do you use a light and GPS? It can be tricky to fit them all. Is there a way to put them together? Yes! Let’s learn how to mount bike light and GPS on one stem mount. It’s easier than you think!
Key Takeaways
- Using a stem mount helps free up space on your handlebars.
- Proper installation ensures your light and GPS stay secure while riding.
- A stem mount keeps your devices visible and easy to reach.
- Learn how to mount bike light and GPS on one stem mount safely.
- Choosing the right mount is important for a secure fit.
How To Pick The Right Stem Mount
Choosing the right stem mount is important. Not all mounts are the same. Some are made for certain bikes. Others are made for specific devices. Think about what you need. Do you have a small GPS? Do you have a big light? Consider the size and weight. Make sure the mount can handle it. A good mount should be strong. It should also be easy to install. Look for mounts that are adjustable. This helps you get the perfect angle. Read reviews before you buy. See what other people say about the mount. This can help you make a good choice. The right mount makes riding safer and more fun.
- Check the size of your bike’s stem.
- Read reviews from other cyclists.
- Consider the weight limit of the mount.
- Choose a mount that fits your GPS and light.
- Look for adjustable mounts for better viewing.
Think about where you ride. Do you ride on bumpy roads? Then you need a strong mount. It will keep your light and GPS safe. A weak mount might break. This could damage your devices. It could also be dangerous. Imagine your light falling off at night! That would not be good. So, take your time and choose wisely. A little research can save you trouble later. A good stem mount is a great investment. It makes your rides safer and more enjoyable. It also helps you see better.
What Type of Bike Do You Have?
What kind of bike do you have? Is it a mountain bike? Or a road bike? Maybe it is a hybrid bike. Different bikes have different stems. Some stems are thick. Others are thin. You need a mount that fits your stem. Some mounts are universal. This means they fit most bikes. But it is still important to check. Look at the product description. See if it works with your bike type. If you are not sure, ask a bike shop. They can help you find the right mount. They know a lot about bikes. They can give you good advice. Getting the right fit is very important. It keeps your devices safe.
Will Your GPS and Light Fit?
Think about your GPS and light. Are they big or small? Some mounts are made for small devices. Others are made for bigger ones. Check the mount’s description. It will tell you what it can hold. Make sure your devices fit. You don’t want them to be too big. They might not fit on the mount. You don’t want them to be too small either. They might fall off. Some mounts have adjustable arms. These can fit different sizes. Look for these if you have different devices. This makes the mount more useful. It can also save you money.
How Adjustable Is the Mount?
How adjustable is the mount? Can you change the angle? This is important for seeing your GPS. It also helps you aim your light. Some mounts have a fixed position. Others can be moved around. Adjustable mounts are better. You can set them just right. This makes it easier to see. It also makes riding safer. You can adjust the light to shine where you need it. You can adjust the GPS to be easy to read. This is very helpful when you are riding. Look for mounts with good adjustment options.
Fun Fact or Stat: Did you know that using bike lights at night can reduce accidents by up to 70%?
Easy Steps: Mounting On Your Stem
Mounting devices on your stem is easy. First, gather your tools. You will need an Allen wrench. This helps tighten the screws. Make sure you have the right size. Next, loosen the screws on your stem. Don’t take them all the way out. Just loosen them enough to fit the mount. Place the mount on the stem. Make sure it is where you want it. Now, tighten the screws. Do not over-tighten them. This could damage the stem. Make sure the mount is secure. It should not move around. Attach your light and GPS to the mount. Test them to make sure they work. You are now ready to ride!
- Gather your tools, like an Allen wrench.
- Loosen the stem screws carefully.
- Position the mount where you want it.
- Tighten the screws securely.
- Attach your light and GPS to the mount.
Before you start, read the instructions. Every mount is a little different. The instructions will tell you exactly what to do. They will also tell you what tools you need. If you don’t have the right tools, get them. It is important to follow the instructions. This will keep you safe. It will also protect your bike. If you are not sure about something, ask for help. A bike shop can help you. They can show you how to mount the devices. They can also answer your questions. It is always better to be safe than sorry.
Getting Ready to Mount
Before you start, get everything ready. Find a clean workspace. This will help you keep track of the parts. Gather your tools. You will need an Allen wrench. Maybe you need a screwdriver too. Check the instructions. They will tell you what you need. Get your mount and devices ready. Make sure they are clean. This will help them attach better. Read the instructions carefully. Understand each step. If you are not sure about something, ask someone. It is better to be prepared. This makes the job easier. It also helps prevent mistakes.
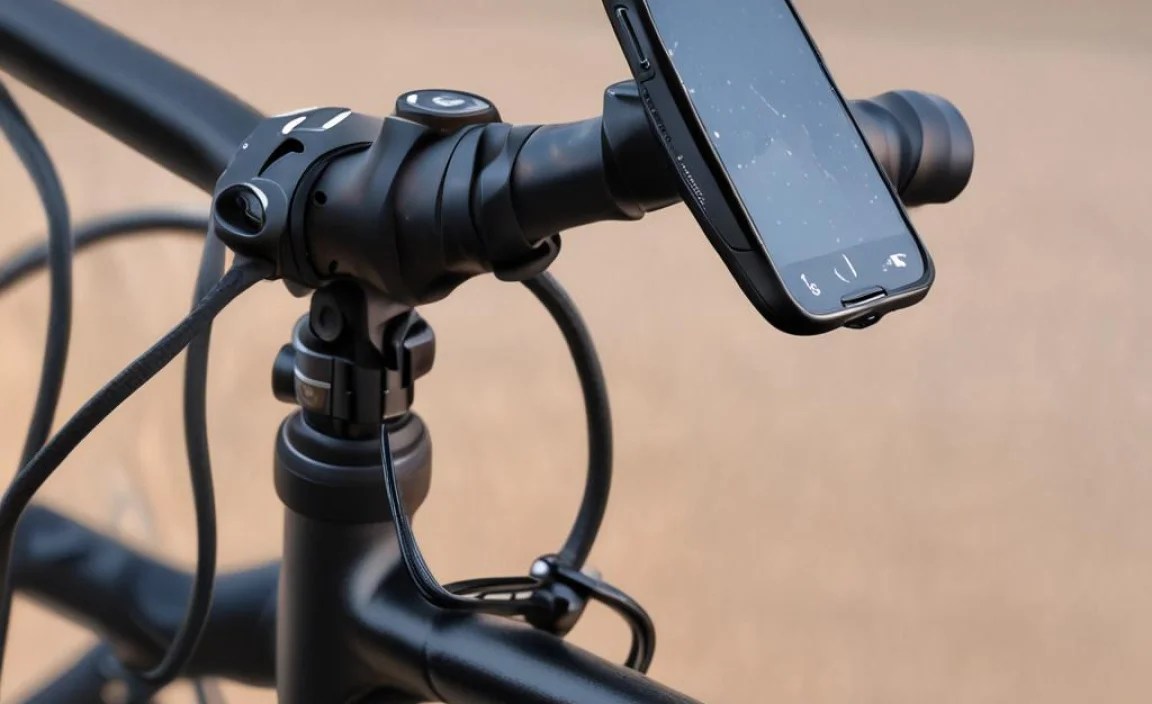
Attaching the Mount to the Stem
Now it’s time to attach the mount. Loosen the screws on your stem. Don’t take them all the way out. Just loosen them a little. Slide the mount over the stem. Make sure it fits snugly. Position the mount where you want it. Think about where you want your light and GPS. Tighten the screws a little bit. Check the position again. Make sure it is just right. Now tighten the screws all the way. Be careful not to over-tighten. This could damage the stem. Make sure the mount is secure. It should not move around.
Putting On Your Light and GPS
The mount is on. Now you can put on your light and GPS. Most lights and GPS devices have a clip. This clip attaches to the mount. Line up the clip with the mount. Push it in until it clicks. Make sure it is secure. Give it a little wiggle. It should not come loose. If it does, check the clip. Make sure it is lined up right. Some devices have screws. These screws tighten the device to the mount. Use the right size screwdriver. Tighten the screws gently. Do not over-tighten. Make sure the devices are secure.
Fun Fact or Stat: Some professional cyclists use stem mounts to reduce wind resistance.
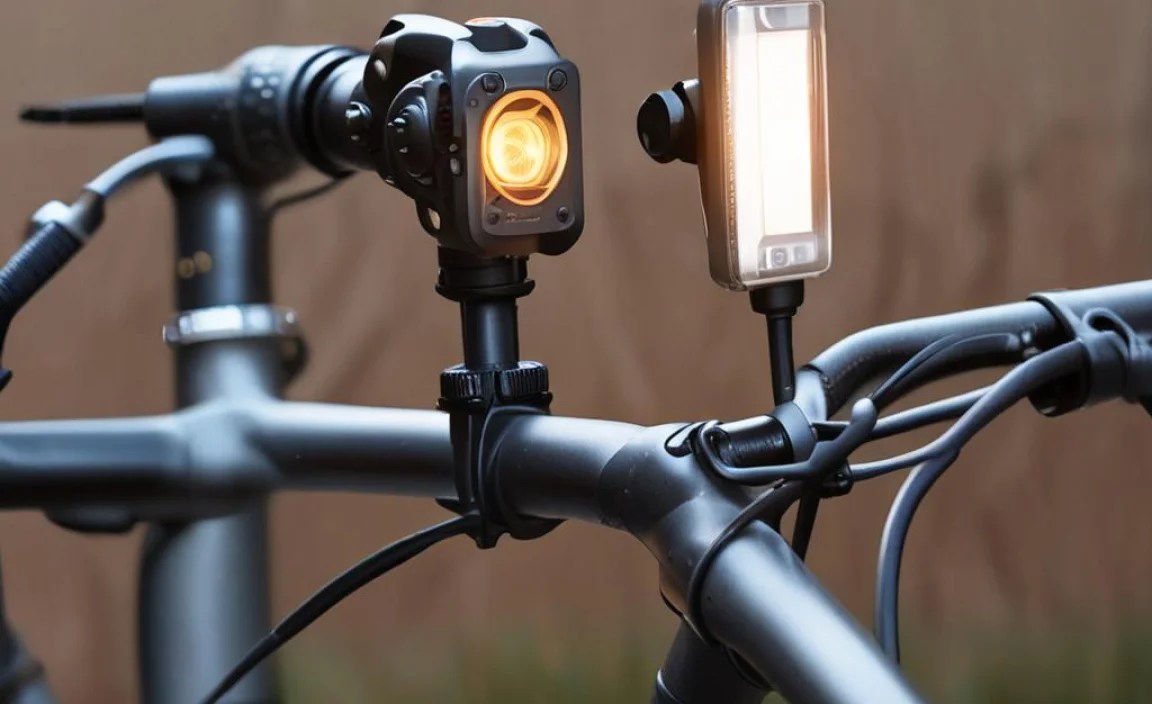
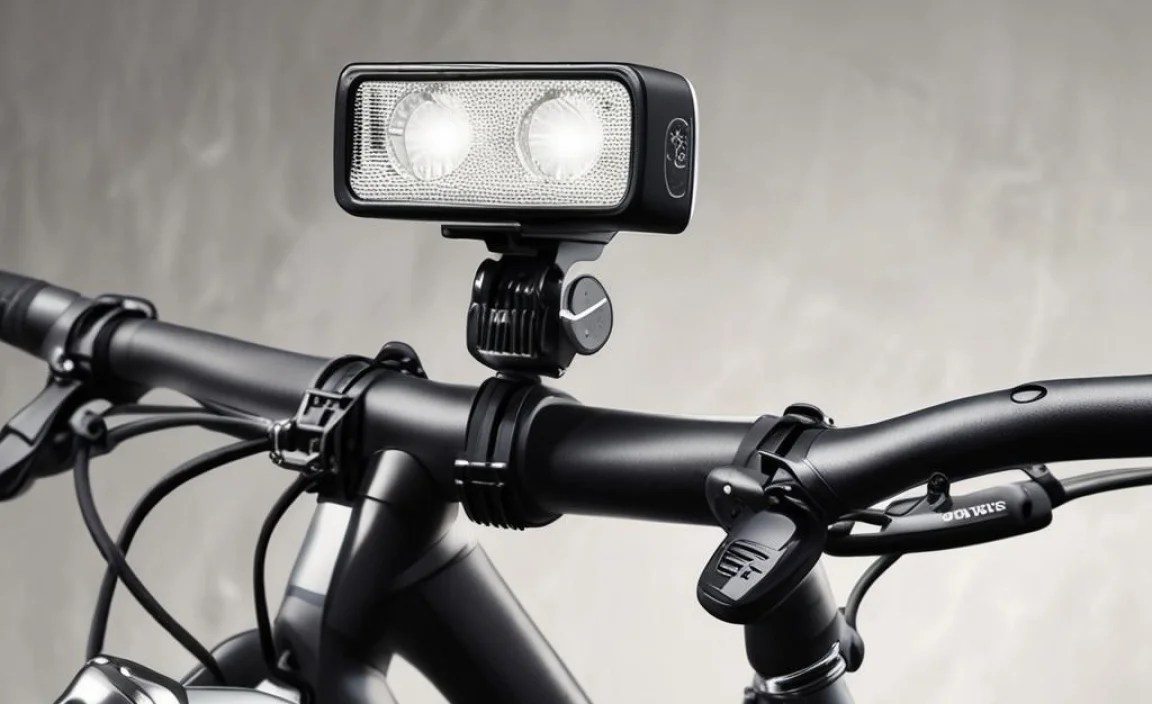
Why Use One Stem Mount?
Why use one stem mount? It saves space on your handlebars. Handlebars can get crowded. You might have brakes and shifters. You might also have a bell. Adding a light and GPS can make it hard to hold on. A stem mount puts everything in one place. It keeps your handlebars clear. This makes it easier to control your bike. It also looks cleaner. Some people like the way it looks. A stem mount can also be more aerodynamic. This means it helps you go faster. It reduces wind resistance. This is important for racing.
- Frees up handlebar space for better control.
- Keeps your bike looking neat and organized.
- Can improve aerodynamics for faster speeds.
- Positions devices for easy viewing.
- Reduces clutter on your handlebars.
Think about how often you use your light and GPS. If you use them every ride, a stem mount is great. It keeps them ready to go. You don’t have to worry about finding space. They are always in the same spot. This makes it easy to use them. If you only use them sometimes, a stem mount might not be needed. You can attach them when you need them. But if you like things to be organized, a stem mount is a good choice. It makes your bike look professional. It also makes riding more enjoyable.
Saving Space on Handlebars
Handlebars can get crowded quickly. Brake levers take up space. Shifters need room too. Some people add bells or mirrors. Where do you put your light and GPS? A stem mount solves this problem. It moves the devices to the stem. This frees up space on your handlebars. Now you have more room to hold on. This makes your bike safer. It also makes it more comfortable. You don’t have to squeeze your hands. You have plenty of space. This is especially important for long rides.
Keeping Things Organized
Do you like things to be neat? A stem mount helps you keep your bike organized. It puts everything in one place. Your light and GPS are always there. You don’t have to search for them. They are easy to find. This saves time. It also reduces stress. You know where everything is. This makes riding more enjoyable. A stem mount makes your bike look clean. It shows that you care about your bike. It also shows that you are organized.
Improving Aerodynamics
Do you want to go faster? A stem mount can help. It puts your light and GPS in a streamlined position. This reduces wind resistance. Wind resistance slows you down. The less wind resistance, the faster you go. This is important for racing. It can also help on regular rides. You will feel less tired. You will be able to ride farther. Every little bit helps. A stem mount is a small change that can make a big difference. It helps you ride faster and easier.
Fun Fact or Stat: Professional cyclists often spend hours optimizing their bike setup for aerodynamics.
Common Problems & Solutions
Sometimes, mounting devices can be tricky. One common problem is the mount slipping. This can happen if the screws are not tight enough. Make sure to tighten them properly. But don’t over-tighten them. Another problem is the devices shaking. This can happen on bumpy roads. Use a rubber垫片 to reduce vibration. Make sure the mount is compatible with your devices. Some mounts are only for certain brands. Check the specifications before you buy. If you have problems, ask a bike shop. They can help you find the right solution. They can also install the mount for you.
- Mount slipping: Tighten screws properly.
- Devices shaking: Use rubber 垫片.
- Incompatible mount: Check specifications.
- Difficult installation: Ask a bike shop.
- Broken mount: Replace with a stronger one.
Think about the weather. Does it rain a lot where you live? If so, you need a waterproof mount. This will protect your devices from damage. Also, think about the temperature. Some mounts can get hot in the sun. This can damage your devices. Choose a mount that can handle the heat. If you are not sure, ask a bike shop. They can recommend a good mount for your needs. They know a lot about bikes and accessories. They can help you make a good choice. It is always better to be safe than sorry.
Mount is Slipping
Is your mount slipping? This is a common problem. It can be annoying and dangerous. The first thing to check is the screws. Are they tight enough? Use an Allen wrench to tighten them. But be careful not to over-tighten. This can damage the stem. If the screws are tight, check the mount itself. Is it the right size for your stem? If it is too big, it will slip. You might need a different mount. You can also try using a rubber 垫片. This will help the mount grip better. It will also reduce vibration.
Devices Are Shaking
Are your devices shaking? This can make it hard to see them. It can also damage them. The first thing to check is the mount. Is it secure? Make sure it is tightened properly. If the mount is secure, check the devices themselves. Are they attached tightly to the mount? If not, tighten them. You can also try using a rubber 垫片. This will absorb some of the vibration. This will help keep your devices steady. It will also make them easier to see. Consider a higher quality mount if the shaking persists.
Mount Breaks Easily
Does your mount break easily? This can be very frustrating. It can also be dangerous. The first thing to check is the material. Is the mount made of strong material? Plastic mounts can break easily. Metal mounts are stronger. Aluminum is a good choice. It is strong and lightweight. If your mount keeps breaking, get a better one. It might cost more, but it will last longer. This will save you money in the long run. It will also keep your devices safe.
Fun Fact or Stat: High-quality mounts can withstand forces up to 20G, protecting your devices even on rough terrain.
How To Choose The Best Material

The material of your stem mount matters. Some mounts are made of plastic. Plastic is cheap and light. But it is not very strong. Plastic mounts can break easily. Other mounts are made of aluminum. Aluminum is strong and light. It is a good choice for bike mounts. It can handle bumps and vibrations. Some mounts are made of carbon fiber. Carbon fiber is very strong and light. But it is also very expensive. It is usually used on high-end bikes. Choose the material that is best for your needs. Think about how much you ride. Think about the type of riding you do. This will help you choose the right material.
- Plastic: Cheap but not very strong.
- Aluminum: Strong and lightweight.
- Carbon Fiber: Very strong but expensive.
- Steel: Very strong but heavy.
- Consider your riding style and budget.
Different materials have different properties. Plastic is easy to mold. This means it can be made into different shapes. Aluminum is resistant to rust. This is important if you ride in the rain. Carbon fiber is very stiff. This helps transfer power efficiently. Steel is very strong and durable. But it is also heavy. Think about what is important to you. Do you want something light? Do you want something strong? Do you want something cheap? These questions will help you choose the right material. Talk to a bike shop if you need help. They can give you advice based on your needs.
Plastic Mounts: Are They Good?
Plastic mounts are cheap. They are also lightweight. This makes them popular. But they are not very strong. They can break easily. This is especially true if you ride on bumpy roads. Plastic can also get brittle in the sun. This means it can crack. If you only ride occasionally, a plastic mount might be okay. But if you ride a lot, you should choose a stronger material. Aluminum is a better choice. It will last longer. It will also keep your devices safer.
Aluminum Mounts: A Solid Choice
Aluminum mounts are a good choice for most riders. They are strong and lightweight. They can handle bumps and vibrations. Aluminum is also resistant to rust. This means it will last a long time. Aluminum mounts are more expensive than plastic mounts. But they are worth the extra money. They will keep your devices safe. They will also last longer. This saves you money in the long run. Aluminum is a good balance of price and performance.
Carbon Fiber Mounts: For Pros?
Carbon fiber mounts are very strong. They are also very lightweight. This makes them popular with racers. Carbon fiber is very expensive. It is usually only used on high-end bikes. If you are a serious cyclist, a carbon fiber mount might be worth it. It will help you save weight. It will also improve performance. But for most riders, aluminum is a better choice. It is more affordable. It is also strong enough for most riding conditions. Carbon fiber is great, but not necessary for everyone.
Fun Fact or Stat: Carbon fiber can be five times stronger than steel and twice as stiff.
Maintaining Your Stem Mount
Taking care of your stem mount is important. This will help it last longer. Clean your mount regularly. Use a damp cloth to wipe off dirt and grime. Do not use harsh chemicals. These can damage the material. Check the screws regularly. Make sure they are tight. If they are loose, tighten them. If they are stripped, replace them. Inspect the mount for cracks or damage. If you see any damage, replace the mount. Store your bike in a safe place. This will protect the mount from damage. A little care can go a long way. It will keep your mount in good condition.
- Clean the mount regularly with a damp cloth.
- Check the screws for tightness.
- Inspect for cracks or damage.
- Store your bike in a safe place.
- Replace worn or damaged parts.
Think about where you ride. If you ride in dusty conditions, clean your mount more often. Dust can get into the screws. This can make them hard to tighten. If you ride in wet conditions, dry your mount after each ride. This will prevent rust. If you store your bike outside, cover it. This will protect the mount from the sun and rain. These simple steps will help your mount last longer. They will also keep your devices safe. A well-maintained mount is a safe mount.
Regular Cleaning Tips
Cleaning your mount is easy. All you need is a damp cloth. Wipe off any dirt or grime. Pay attention to the screws. Clean around them carefully. You can use a small brush to get into tight spaces. Do not use soap or harsh chemicals. These can damage the mount. Just use water. Dry the mount after cleaning. This will prevent rust. Clean your mount after every ride. This will keep it in good condition. It will also make it easier to see your devices.
Checking and Tightening Screws
The screws are important. They hold the mount together. Check them regularly. Make sure they are tight. Use an Allen wrench to tighten them. Be careful not to over-tighten. This can damage the screws. If a screw is stripped, replace it. You can buy new screws at a bike shop. Use the right size screw. This is important for safety. Loose screws can cause the mount to slip. This can be dangerous. Check the screws before every ride. This will keep you safe.
Inspecting for Damage
Look at your mount closely. Check for cracks or damage. Pay attention to the joints. These are weak spots. If you see any damage, replace the mount. Do not use a damaged mount. It could break while you are riding. This could cause an accident. It is better to be safe than sorry. Inspect your mount regularly. This will help you catch problems early. It will also keep you safe. A good mount is a safe mount. Take care of it.
Fun Fact or Stat: Regular maintenance can extend the lifespan of your stem mount by up to 50%.
Stem Mount Table: Comparisons
| Feature | Plastic Mount | Aluminum Mount | Carbon Fiber Mount |
|---|---|---|---|
| Strength | Low | Medium | High |
| Weight | Very Light | Light | Very Light |
| Durability | Low | Medium | High |
| Cost | Low | Medium | High |
| Best For | Casual Riders | Most Riders | Serious Cyclists |
Choosing the right stem mount can be tricky. There are many different options. Plastic mounts are cheap. But they are not very strong. Aluminum mounts are a good balance of price and performance. Carbon fiber mounts are very strong. But they are also very expensive. Think about your needs. How often do you ride? What kind of riding do you do? This will help you choose the right mount. A good mount will keep your devices safe. It will also make your rides more enjoyable.
Summary
Learning how to mount bike light and GPS on one stem mount is easy. First, pick the right mount. Think about your bike and devices. Then, follow the steps to attach the mount. Make sure it is secure. Finally, take care of your mount. This will help it last longer. Using a stem mount frees up space on your handlebars. It also keeps things organized. It can even improve aerodynamics. With a little effort, you can enjoy safer and more comfortable rides.
Conclusion
Knowing how to mount bike light and GPS on one stem mount is a great skill. It makes your bike safer and more fun. You can see your GPS easily. Your light shines where you need it. Plus, your handlebars are clear. So, choose the right mount. Follow the instructions carefully. And enjoy your next ride! You’ll be glad you learned how to do it.
Frequently Asked Questions
Question No 1: What tools do I need to mount a bike light and GPS on one stem mount?
Answer: You will usually need an Allen wrench set. The size depends on the screws on your bike’s stem. Sometimes, you might need a screwdriver. A Phillips head or flathead might be necessary. Always check the instructions for your specific mount. They will tell you exactly what tools you need. Having the right tools makes the job easier. It also helps prevent damage. Using the wrong tool can strip the screws. This can make it hard to remove them later. So, make sure you have the right tools before you start how to mount bike light and GPS on one stem mount.
Question No 2: How do I know if a stem mount is compatible with my bike?
Answer: Check the product description. It should list the types of bikes the mount fits. Look for information about stem size and shape. Some mounts are universal. This means they fit most bikes. But it is still important to check. Measure your bike’s stem. Compare it to the mount’s specifications. If you are not sure, ask a bike shop. They can help you find a compatible mount. They can also install it for you. Getting the right fit is important for safety. A loose mount can be dangerous. It can also damage your devices. So, take the time to find the right fit before you try how to mount bike light and GPS on one stem mount.
Question No 3: What is the best material for a stem mount?
Answer: Aluminum is a great choice for most riders. It is strong and lightweight. It can handle bumps and vibrations. It is also resistant to rust. Carbon fiber is even stronger and lighter. But it is also more expensive. Plastic is cheap, but not very durable. Choose the material that fits your needs and budget. If you ride a lot, aluminum is a good investment. It will last longer and keep your devices safe. If you are a serious cyclist, carbon fiber might be worth it. But for most people, aluminum is the best option when considering how to mount bike light and GPS on one stem mount. It offers a good balance of price and performance.
Question No 4: How do I prevent my bike light and GPS from shaking on the stem mount?
Answer: Make sure the mount is tightened properly. Use an Allen wrench to tighten the screws. But be careful not to over-tighten. This can damage the stem. Use rubber 垫片 to reduce vibration. Place them between the mount and the stem. Also, make sure your devices are securely attached to the mount. If they are loose, tighten them. A high-quality mount can also help reduce shaking. It will be more stable. Check the mount regularly for wear and tear. Replace it if necessary. These steps will help keep your devices steady while you ride. It is important to get the correct tools and be sure that your devices are tightly secured when thinking about how to mount bike light and GPS on one stem mount.
Question No 5: Can I use a stem mount for other devices besides a light and GPS?
Answer: Yes, you can often use a stem mount for other devices. Some mounts are designed for phones or action cameras. Just make sure the mount is compatible with the device. Check the weight limit of the mount. Do not overload it. This could damage the mount or your device. Also, consider the size of the device. It should not be too big or too small for the mount. Some mounts have adjustable arms. These can fit different sizes. Always follow the instructions for the mount. This will keep your devices safe. Many cyclists find these stem mounts to be very helpful when needing to add more to their bikes in addition to understanding how to mount bike light and GPS on one stem mount.
Question No 6: How often should I check and maintain my stem mount?
Answer: You should check your stem mount before every ride. Make sure the screws are tight. Inspect the mount for cracks or damage. Clean the mount regularly with a damp cloth. This will remove dirt and grime. If you ride in wet conditions, dry the mount after each ride. This will prevent rust. Replace any worn or damaged parts. A little maintenance can go a long way. It will keep your mount in good condition. It will also keep your devices safe. Regular maintenance is especially important if you ride often. Consider that if you are not keeping up with the required maintenance, you may have to learn how to mount bike light and GPS on one stem mount again with a new mount.


