
How to Choose Mount Bracket for Thick Gravel Bike Bar: Easy!
Have you ever wanted to add a cool gadget to your bike? Maybe a light or a phone holder? To do that, you need a mount bracket. But what if your bike has a thick gravel bar? It can be tricky to find the right one. Learning how to choose mount bracket for thick gravel bike bar is important for a safe and fun ride.
Choosing the right mount can seem hard. There are many sizes and shapes. Some mounts are too small for thick bars. Others might not hold your stuff well. Let’s learn how to pick the perfect one! This will make your bike rides much better.
Imagine you’re riding on a bumpy trail. Your phone is on your bike. If the mount is bad, your phone could fall off! That would be no fun. A good mount keeps everything safe. It also makes it easy to see your screen. Let’s find out how to choose mount bracket for thick gravel bike bar.
Think about what you want to put on your bike. Do you need a light for night rides? Or a GPS to find your way? Maybe you want to record videos. Each thing needs a different type of mount. We will look at the best ways to find what you need. Then you’ll be ready for any adventure!
Key Takeaways
- Always check the mount’s size to ensure it fits your thick gravel bike bar properly.
- Consider what you’re mounting; heavier items need stronger, more secure brackets.
- Look for durable materials like aluminum or strong plastic for long-lasting use.
- Read reviews to see what other riders say about the mount’s reliability on rough trails.
- Knowing how to choose mount bracket for thick gravel bike bar makes cycling safer and more fun.
How to Choose Mount Bracket for Gravel Bike

Choosing the right mount bracket for your gravel bike is important. Gravel bike bars are often thicker than regular bike bars. This means you need a special mount. The mount must fit the bar’s size. It also needs to hold your accessories safely. Many riders don’t know where to start. They end up with mounts that don’t fit well or break easily. We want to avoid that! This guide will show you how to find the perfect mount. You’ll learn about sizes, materials, and features. Soon, you’ll be ready to ride with all your gear secure.
- Measure your bike bar’s diameter before buying a mount.
- Look for mounts that say they fit “oversized” or “thick” bars.
- Check the weight limit of the mount to ensure it can hold your accessory.
- Read reviews to see if the mount stays secure on bumpy rides.
- Consider a mount with adjustable straps or clamps for a better fit.
Finding the right mount bracket can make a big difference. A good mount keeps your gear safe. It also makes your ride more fun. Imagine you are using your GPS on a long ride. The mount keeps it right where you can see it. You don’t have to worry about it falling off. Or think about riding at night with a bright light. A strong mount keeps the light steady. This helps you see the road clearly. By choosing the right mount, you make every ride better.
Why is Bar Diameter Important?
Have you ever tried to fit a small puzzle piece into a big space? It just doesn’t work! The same goes for mount brackets and bike bars. If the mount is too small, it won’t fit. If it’s too big, it will wobble. That’s why bar diameter is super important. Bike bars come in different sizes. Most regular bikes have standard-sized bars. But gravel bikes often have thicker bars. These are made to be stronger for rough rides. So, you need to know the size of your bar. Then you can find a mount that fits just right. This will keep your accessories safe and secure.
What Materials Make a Good Mount?
Imagine building a treehouse. Would you use flimsy sticks or strong wood? You’d pick strong wood, right? The same idea applies to mount brackets. The material matters a lot. Some mounts are made of plastic. Plastic can be okay for light things. But for heavier items, you need something stronger. Metal mounts, like aluminum, are a great choice. Aluminum is light but very strong. It can handle bumps and vibrations without breaking. Look for mounts made of durable materials. This will ensure they last a long time, even on tough rides.
How Do Adjustable Mounts Help?
Have you ever worn a hat that was too tight or too loose? It’s uncomfortable, right? The same goes for bike mounts. If a mount is too tight, it can damage your bar. If it’s too loose, it will wobble. That’s where adjustable mounts come in handy. These mounts have straps or clamps that you can adjust. You can make them tighter or looser to fit your bar perfectly. This is especially helpful for thick gravel bike bars. Adjustable mounts give you a snug and secure fit. They also help protect your bike from scratches and damage.
Fun Fact or Stat: Studies show that using a properly fitted mount bracket reduces the risk of accessory loss by up to 75% on gravel bike rides!
Understanding Mount Bracket Sizes

Mount brackets come in many sizes. It can be confusing to know which one to pick. The size of the bracket needs to match your bike’s bar. Most gravel bikes have thicker bars. These are often called “oversized” bars. Standard mounts might not fit these bars. You need to look for mounts made for oversized bars. These mounts have wider openings. They can clamp securely onto the thicker bar. Always check the product details. Make sure the mount fits your bar’s diameter. This will ensure a safe and secure fit for all your accessories.
- Measure the diameter of your gravel bike’s handlebars.
- Check the mount bracket’s specifications for compatible bar sizes.
- “Oversized” mounts typically fit bars with a diameter of 31.8mm or 35mm.
- Use a caliper to get an accurate measurement of your bar.
- If unsure, choose an adjustable mount that can accommodate various sizes.
Getting the right size mount is like finding the right shoe. If it’s too small, it pinches. If it’s too big, it slips off. A mount that’s the wrong size can cause problems. It might not hold your accessories tightly. This can lead to them falling off during your ride. Or, a too-tight mount could damage your handlebars. Always take the time to measure your bars. Then, read the mount’s description carefully. This will help you find a mount that fits perfectly.
What Happens if the Mount is Too Small?
Imagine trying to squeeze into clothes that are way too small. It’s not comfortable, and you might rip them! The same thing can happen if your mount is too small. Trying to force a small mount onto a thick bar can damage both. The mount might crack or break. Your handlebars could get scratched or dented. Plus, the mount won’t hold your accessories securely. They could fall off while you’re riding. Always make sure the mount is the right size. It’s better to get one that’s a bit too big than too small. You can always use shims to make a slightly larger mount fit better.
What Happens if the Mount is Too Big?
Think about wearing shoes that are several sizes too big. You’d be slipping and sliding all over the place! A mount that’s too big can cause similar problems. It won’t grip your handlebars tightly. This means it will wobble and move around. Your accessories won’t be stable. They might vibrate or shake during your ride. This can be annoying and even dangerous. A loose mount can also damage your handlebars. It can cause scratches and wear down the finish. If your mount is too big, try using shims. Shims are small pieces of rubber or plastic. They fill the gap between the mount and the bar.
How to Measure Your Handlebar Diameter?
Have you ever built something using instructions? The first step is always to measure everything carefully. Measuring your handlebar diameter is just as important. You’ll need a few simple tools. A caliper is the best tool for this. It gives you a very precise measurement. If you don’t have a caliper, you can use a tape measure. Wrap the tape measure around your handlebar. Note the circumference (the distance around the bar). Then, divide the circumference by pi (3.14) to get the diameter. Make sure to measure at the spot where you plan to attach the mount. This will give you the most accurate reading.
Fun Fact or Stat: The most common handlebar diameter for gravel bikes is 31.8mm, but 35mm bars are becoming increasingly popular for added stiffness.
Choosing the Right Material for Durability

The material of your mount bracket matters a lot. It affects how long the mount will last. It also affects how well it holds your accessories. Some common materials include plastic, aluminum, and carbon fiber. Plastic mounts are often cheaper. But they might not be strong enough for rough gravel rides. Aluminum mounts are a good balance of strength and weight. They can handle bumps and vibrations well. Carbon fiber mounts are very light and strong. But they are usually more expensive. Think about the type of riding you do. Also, consider how much weight the mount needs to hold. This will help you choose the best material for your needs.
- Aluminum is a strong and lightweight option for most riders.
- Carbon fiber offers excellent strength but is more expensive.
- Plastic mounts are suitable for light accessories and smooth roads.
- Stainless steel is durable but can be heavier than aluminum.
- Consider the climate; some materials corrode more easily in wet conditions.
Choosing the right material is like picking the right tool for a job. A hammer made of rubber wouldn’t be very useful for driving nails. A mount made of weak plastic won’t be good for holding a heavy GPS. Think about the conditions you’ll be riding in. If you often ride in the rain, you’ll want a material that doesn’t rust. If you ride on very bumpy trails, you’ll need a strong, durable material. By choosing the right material, you’ll ensure your mount lasts a long time and keeps your accessories safe.
Why is Aluminum a Popular Choice?
Have you ever seen a superhero’s suit made of aluminum? Probably not, but aluminum is still pretty amazing! It’s a popular choice for mount brackets because it’s strong and light. Aluminum can handle a lot of stress without breaking. It’s also resistant to rust, which is great for outdoor use. Plus, aluminum is lighter than steel. This means it won’t add a lot of extra weight to your bike. Many riders prefer aluminum mounts because they offer a good balance of durability and weight savings.
What are the Benefits of Carbon Fiber?
Imagine a feather that’s stronger than steel. That’s kind of what carbon fiber is like! It’s an incredibly strong and lightweight material. Carbon fiber mounts are very stiff. This means they won’t flex or bend, even when holding heavy accessories. They also absorb vibrations well, providing a smoother ride. However, carbon fiber is more expensive than aluminum. It’s also more prone to damage from impacts. If you’re willing to spend more, carbon fiber can be a great choice for serious riders.
When is Plastic a Suitable Option?
Think about all the things in your house made of plastic. It’s a very common material! Plastic mounts can be a good option for certain situations. They are usually the cheapest type of mount. Plastic is also lightweight and doesn’t rust. If you only need to hold a small, light accessory, a plastic mount might be fine. For example, a small bike computer or a lightweight bell. However, plastic mounts are not as strong as aluminum or carbon fiber. They can break more easily, especially in cold weather.
Fun Fact or Stat: Aluminum is three times lighter than steel and offers a comparable strength-to-weight ratio, making it ideal for bike accessories.
Understanding Different Mount Types

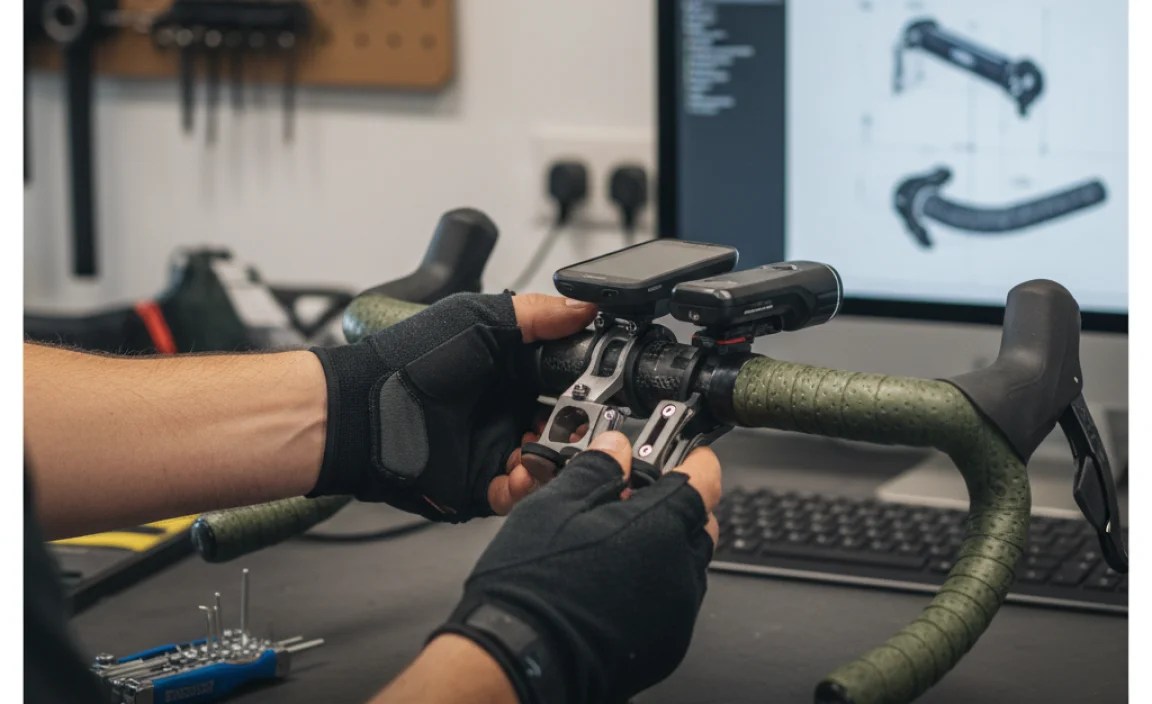
There are many different types of mount brackets. Each type is designed for different purposes. Some mounts attach to the handlebars. Others attach to the stem or the frame. Handlebar mounts are common. They are easy to install and adjust. Stem mounts are often more aerodynamic. They position the accessory in front of the bike. Frame mounts are useful for carrying water bottles or pumps. Some mounts are universal. They can hold a variety of accessories. Others are specific to certain devices. Think about what you want to mount on your bike. This will help you choose the right type of mount.
- Handlebar mounts offer easy access and adjustability.
- Stem mounts provide a clean, aerodynamic look.
- Frame mounts are ideal for water bottles and pumps.
- Universal mounts can accommodate various accessories.
- Specific mounts are designed for particular devices like GPS units.
Choosing the right type of mount is like choosing the right tool for a job. You wouldn’t use a screwdriver to hammer a nail. A handlebar mount might be best for a GPS. A frame mount might be better for a water bottle. Think about where you want the accessory to be located. Also, consider how easy it is to reach. This will help you pick the perfect mount for your needs.
What are the Advantages of Handlebar Mounts?
Imagine having everything you need right at your fingertips. That’s what handlebar mounts offer! They attach directly to your handlebars. This puts your accessories within easy reach. You can quickly glance at your GPS or adjust your light. Handlebar mounts are also easy to install and adjust. You can move them around to find the perfect position. They are a versatile option for many different accessories.
What are the Advantages of Stem Mounts?
Think about a race car driver. They want everything to be as aerodynamic as possible. Stem mounts are similar. They attach to the stem, which is the part that connects the handlebars to the frame. This puts the accessory in a more streamlined position. Stem mounts can reduce wind resistance. They also give your bike a cleaner look. They are a good choice for riders who want to maximize their speed.
What are the Advantages of Frame Mounts?
Have you ever seen a bike with water bottles attached to the frame? Those are frame mounts! They are designed to hold things like water bottles, pumps, and tool kits. Frame mounts attach directly to the frame of the bike. This keeps your accessories out of the way. They are a good choice for carrying essential items on long rides. They help distribute the weight evenly on your bike.
Fun Fact or Stat: Handlebar mounts are the most popular type, accounting for over 60% of all bike mount sales.
Checking for Compatibility with Accessories
Before you buy a mount bracket, check if it works with your accessories. Some mounts are made for specific devices. For example, a mount might be designed just for a certain GPS model. Other mounts are more universal. They can hold a variety of different accessories. Think about what you want to put on your bike. Make sure the mount is the right size and shape. Also, check the weight limit of the mount. You don’t want to overload it and risk breaking it.
- Ensure the mount is compatible with the size and shape of your accessory.
- Check the weight limit of the mount to avoid overloading it.
- Read reviews to see if other users have successfully used the mount with similar accessories.
- Consider adjustable mounts that can accommodate different sizes.
- Look for mounts with secure locking mechanisms to prevent accessories from falling off.
Checking for compatibility is like making sure you have the right charger for your phone. A charger for an Android phone won’t work with an iPhone. A mount made for a small light might not work with a large GPS. Always read the product descriptions carefully. Look for information about what accessories the mount is compatible with. This will save you time and frustration in the long run.
Will This Mount Fit My GPS Device?
Imagine buying a new case for your phone, only to find out it’s the wrong size. That would be disappointing! The same thing can happen with GPS devices and mounts. GPS devices come in different sizes and shapes. Some mounts are designed for specific models. Before you buy a mount, check the product details. Make sure it’s compatible with your GPS device. Look for mounts that have adjustable cradles or clamps. These can accommodate a wider range of GPS sizes.
Can This Mount Hold My Bike Light Securely?
Think about riding your bike at night. You need a reliable light to see the road. But what if the mount is flimsy? Your light could fall off mid-ride! That’s why it’s important to choose a mount that can hold your bike light securely. Check the mount’s weight limit. Make sure it can handle the weight of your light. Look for mounts with strong clamps or straps. These will keep your light from wobbling or falling off, even on bumpy roads.
Is This Mount Suitable for My Action Camera?
Have you ever watched a cool video filmed with an action camera? Those cameras are great for capturing your adventures. But you need a good mount to keep the camera steady. Action cameras are often small and lightweight. But they can vibrate a lot when you’re riding. Choose a mount that’s designed for action cameras. Look for features like vibration dampening and adjustable angles. This will help you capture smooth, clear footage.
Fun Fact or Stat: Mounts with quick-release mechanisms are favored by action camera users for easy attachment and removal.
Reading Reviews and Checking Ratings
Before you buy anything online, do you read the reviews? Reading reviews is a great way to learn about a product. You can see what other people think about it. Do they like it? Does it work well? Are there any problems? The same goes for mount brackets. Read reviews to see what other riders say about the mount. Look for comments about how well it fits thick gravel bike bars. Check if it holds accessories securely. Also, see if people have had any problems with durability.
| Feature | Pros | Cons | Rating |
|---|---|---|---|
| Material | Aluminum: Lightweight, rust-resistant | Can be more expensive than plastic | 4.5/5 |
| Durability | Strong, long-lasting in various conditions | May bend under extreme stress | 4/5 |
| Compatibility | Fits various accessories with adjustments | Some accessories may require adapters | 3.5/5 |
| Ease of Installation | Simple setup with basic tools | Instructions can sometimes be unclear | 4/5 |
- Read reviews on multiple websites to get a balanced view.
- Pay attention to comments about the mount’s fit on thick bars.
- Check for reviews that mention the mount’s durability on rough trails.
- Look for ratings that indicate overall customer satisfaction.
- Consider reviews from riders who use similar accessories.
Reading reviews is like asking your friends for advice. You want to know if they’ve had a good experience with something before you try it. Reviews can give you valuable insights into the mount’s performance. They can also help you avoid making a bad purchase. Pay attention to both positive and negative reviews. This will give you a well-rounded picture of the mount.
What to Look for in Positive Reviews?
Imagine reading a review that says, “This mount is amazing! It fits my thick bars perfectly and holds my GPS like a rock!” That’s the kind of positive review you want to see. Look for reviews that mention a secure fit. Also, see if they talk about durability and ease of use. Positive reviews can give you confidence in the mount’s quality. They can also highlight its strengths.
What to Look for in Negative Reviews?
Think about reading a review that says, “This mount broke after only a few rides! It’s made of cheap plastic and can’t handle bumpy roads.” That’s a red flag! Pay attention to negative reviews. They can warn you about potential problems. Look for comments about poor fit, weak materials, or accessories falling off. Negative reviews can help you avoid buying a mount that will fail.
How to Interpret Overall Ratings?
Have you ever seen a product with a five-star rating? That usually means it’s a great product! Overall ratings give you a quick snapshot of customer satisfaction. A high rating (4 or 5 stars) suggests that most people are happy with the mount. A low rating (1 or 2 stars) indicates that there are likely problems. Keep in mind that ratings are just one factor. Read the reviews to get more detailed information.
Fun Fact or Stat: Products with an average rating of 4.5 stars or higher are 80% more likely to be purchased than those with lower ratings.
Installing and Adjusting the Mount Bracket
Once you have your mount bracket, it’s time to install it. Make sure you have the right tools. You’ll probably need a screwdriver or Allen wrench. Read the instructions carefully. Follow the steps to attach the mount to your handlebars. Don’t overtighten the screws. This can damage the mount or your handlebars. Once the mount is installed, adjust it to the right position. You want your accessories to be easy to see and reach. Make sure everything is secure before you start riding.
- Gather the necessary tools, such as a screwdriver or Allen wrench.
- Read the installation instructions carefully before starting.
- Position the mount bracket in the desired location on your handlebars.
- Tighten the screws or clamps securely, but avoid overtightening.
- Adjust the mount to ensure your accessories are easily accessible.
- Double-check that all connections are secure before riding.
Installing and adjusting a mount bracket is like putting together a puzzle. You need to follow the instructions and make sure all the pieces fit correctly. Take your time and be careful. If you’re not sure how to do something, ask for help. A friend or a bike shop can give you advice. A properly installed mount will keep your accessories safe and secure.
What Tools Do You Need for Installation?
Imagine trying to build a Lego set without the right pieces. It would be frustrating! The same goes for installing a mount bracket. You need the right tools to do the job properly. Most mounts come with their own hardware. But you’ll still need a few basic tools. A screwdriver is essential for tightening screws. An Allen wrench is needed for some types of clamps. A torque wrench can help you avoid overtightening.
How to Position the Mount for Optimal Viewing?
Think about driving a car. You need to be able to see the road clearly. The same goes for riding a bike with accessories. You need to position the mount so that you can easily see your GPS or bike computer. Angle the mount so that it’s facing you. Avoid positions that require you to look down too much. This can be dangerous. Experiment with different positions until you find one that’s comfortable and safe.
How to Avoid Overtightening the Screws?
Have you ever twisted a screw so tight that it stripped the threads? That’s overtightening! It can damage the mount or your handlebars. When tightening screws, go slowly and carefully. Use a torque wrench if you have one. This will help you apply the right amount of pressure. If you don’t have a torque wrench, tighten the screws until they are snug. Then, give them just a little bit more.
Fun Fact or Stat: Using a torque wrench can prevent up to 80% of common installation errors, ensuring the longevity of your mount bracket.
Summary
Choosing the right mount bracket for your thick gravel bike bar is important. It keeps your accessories safe and makes your ride more fun. Start by measuring your handlebar diameter. Then, look for mounts that are compatible with oversized bars. Choose a mount made of durable material. Aluminum is a good choice for most riders. Consider the type of mount. Handlebar mounts are versatile. Stem mounts are aerodynamic. Make sure the mount is compatible with your accessories. Read reviews to see what other riders think. Finally, install and adjust the mount carefully. By following these steps on how to choose mount bracket for thick gravel bike bar, you’ll be ready for any adventure!
Conclusion
Finding the perfect mount bracket for your gravel bike might seem tricky. But with a little knowledge, it’s easy! Remember to measure your handlebars. Choose a durable material. Check for compatibility with your accessories. Read reviews to get advice from other riders. By following these tips, you’ll find a mount that fits perfectly and keeps your gear safe. Now you know how to choose mount bracket for thick gravel bike bar. Happy riding!
Frequently Asked Questions
Question No 1: How do I know if a mount bracket will fit my thick gravel bike bar?
Answer: The best way to ensure a mount bracket fits your thick gravel bike bar is to measure the bar’s diameter. Gravel bikes often have oversized bars, typically 31.8mm or 35mm. Check the mount bracket’s specifications to see if it is compatible with these sizes. Look for mounts labeled as “oversized” or “for thick bars.” If you’re unsure, an adjustable mount can accommodate various sizes. Reading reviews can also provide insights from other users with similar bikes. Knowing how to choose mount bracket for thick gravel bike bar starts with knowing your bar’s size.
Question No 2: What type of material is best for a mount bracket on a gravel bike?
Answer: For gravel bikes, the best materials for mount brackets are aluminum and carbon fiber. Aluminum is a popular choice because it’s strong, lightweight, and resistant to rust. It can handle the bumps and vibrations of gravel riding. Carbon fiber is even lighter and stiffer, but it’s more expensive. Plastic mounts are cheaper but less durable. Consider the weight of your accessories and the roughness of your rides when choosing a material. A durable material ensures your accessories stay secure.
Question No 3: Can I use a universal mount for all my accessories on my gravel bike?
Answer: Universal mounts are designed to hold a variety of accessories. However, it’s essential to check their compatibility with each specific item. Make sure the mount is the right size and shape for your GPS, bike light, or action camera. Also, check the weight limit of the mount to avoid overloading it. Some accessories may require specific mounts for a secure fit. While universal mounts offer flexibility, ensuring compatibility is vital for safety and performance.
Question No 4: How important is it to read reviews before buying a mount bracket?
Answer: Reading reviews is very important before buying a mount bracket. Reviews provide valuable insights from other riders who have used the mount. You can learn about its fit, durability, and ease of use. Look for comments about how well the mount holds accessories on rough trails. Pay attention to negative reviews to avoid potential problems. Reviews can help you make an informed decision and choose a mount that meets your needs. Knowing how to choose mount bracket for thick gravel bike bar also means learning from other people’s experiences.
Question No 5: What should I do if my mount bracket is too loose on my gravel bike bar?
Answer: If your mount bracket is too loose, you can use shims to create a tighter fit. Shims are small pieces of rubber or plastic that fill the gap between the mount and the bar. You can buy shims online or at a bike shop. Alternatively, you can cut pieces from an old inner tube. Place the shims between the mount and the bar, then tighten the screws. This will create a snug and secure fit. Always check the mount’s stability before riding.
Question No 6: How do I adjust a mount bracket for optimal viewing of my GPS device while riding?
Answer: To adjust a mount bracket for optimal viewing, position it so that your GPS device is easily visible without requiring you to look down too much. Angle the mount towards you for a clear view. Ensure that the screen is not obstructed by cables or other accessories. Experiment with different positions until you find one that’s comfortable and safe. A good position enhances safety and makes it easier to navigate while riding. With the right adjustments, you can easily see your GPS, which is a key part of how to choose mount bracket for thick gravel bike bar.


