
How to Choose Clamp Width for Bike Accessory Mount: Smart!
Have you ever wanted to add a cool bell to your bike? Or maybe a bright light for night rides? To do this, you need a bike accessory mount. But how to choose clamp width for bike accessory mount? It’s like finding the right size shoe. Too big, it wobbles. Too small, it won’t fit.
Choosing the right clamp width is super important. It keeps your accessories safe and secure. It also makes your bike look awesome. Let’s learn how to pick the perfect size clamp for your bike!
Key Takeaways
- Choosing the correct clamp width ensures a snug and secure fit for bike accessories.
- Measure your bike’s handlebar or frame carefully before buying any accessory mounts.
- How to choose clamp width for bike accessory mount involves knowing your bike’s tube diameter.
- Different accessories may require different clamp sizes, so check before purchasing.
- Using the wrong clamp size can damage your bike or cause accessories to fall off.
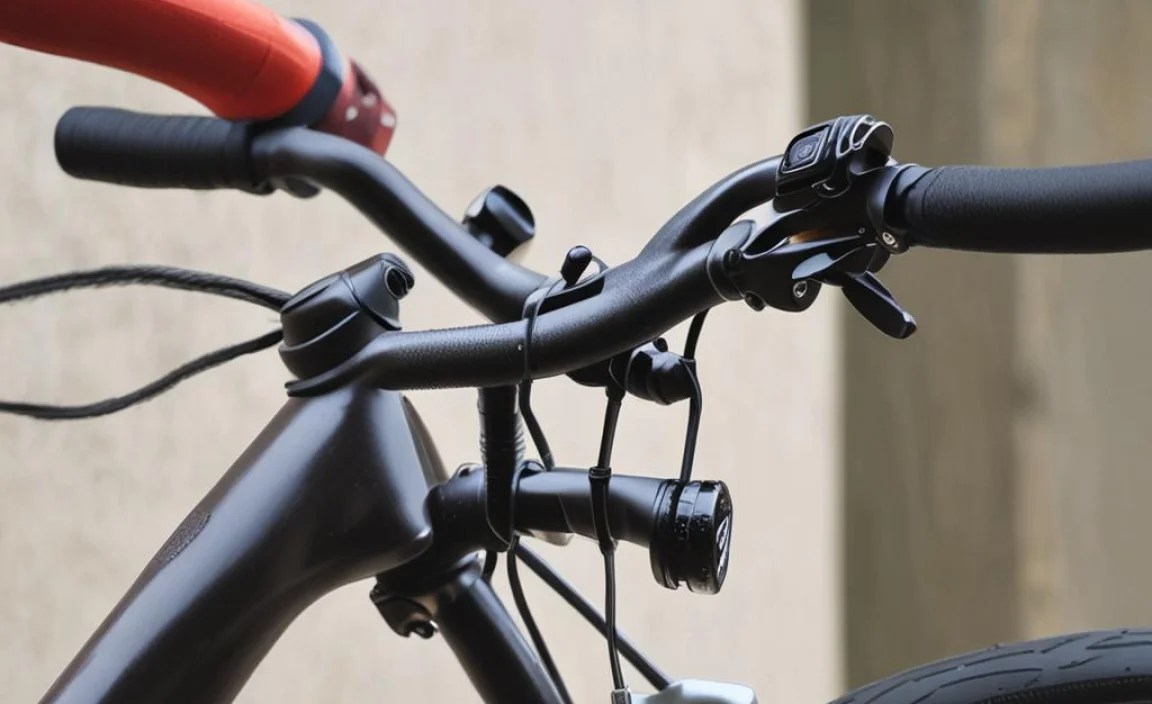
Understanding Bike Accessory Mounts


Bike accessory mounts are like little helpers for your bike. They let you add things like lights, bells, computers, and even water bottle holders. These mounts attach to different parts of your bike. The handlebars and the frame are popular spots. They use clamps to hold on tight. These clamps come in different sizes. You need to pick the right size. A clamp that is too big will let the accessory wiggle around. This can be annoying and even dangerous. A clamp that is too small won’t fit at all! So, it’s important to measure your bike’s tubes. This will help you find the perfect fit. Then you can ride with all your cool new gadgets safely. A good fit means a happy ride!
- Bike accessory mounts let you add cool stuff to your bike.
- They attach to handlebars, frames, and seatposts.
- Clamps hold the accessories in place.
- Different accessories need different clamp sizes.
- A good fit keeps your accessories safe and secure.
Imagine you are building with LEGOs. You need the right size bricks to make your tower strong. Bike accessory mounts are similar. The right size clamp makes your setup strong and safe. Always double-check the size before you buy. Read the descriptions carefully. Measure your bike’s tubes twice to be sure. Some mounts come with adjustable clamps. These can be helpful if you are not sure about the exact size. But even with adjustable clamps, you need to be in the right range. A little research can save you a lot of trouble. It will also make your bike rides more fun and worry-free. So, take your time and choose wisely!
Why Correct Clamp Size Matters
Have you ever worn shoes that were too big? It’s hard to run and play, right? The same thing happens with bike accessory mounts. If the clamp is too big, your light might wobble. It could even fall off while you’re riding! That could be dangerous, especially at night. A clamp that’s too small is just as bad. You won’t be able to attach the accessory at all. You might even damage your bike trying to force it. That’s why the right clamp size is so important. It keeps your accessories secure. It also keeps you safe on your rides. Plus, it makes your bike look neat and tidy!
Different Types of Mounts
Bike mounts are not all the same. Some are made for handlebars. Others are for the frame or seatpost. Handlebar mounts are great for lights and computers. Frame mounts are often used for water bottle holders. Seatpost mounts can hold lights or bags. Each type of mount has a different shape and size. So, you need to pick the right one for your accessory. Also, consider the material. Some mounts are made of plastic. Others are made of metal. Metal mounts are usually stronger. But plastic mounts can be lighter. Think about what you need and choose wisely!
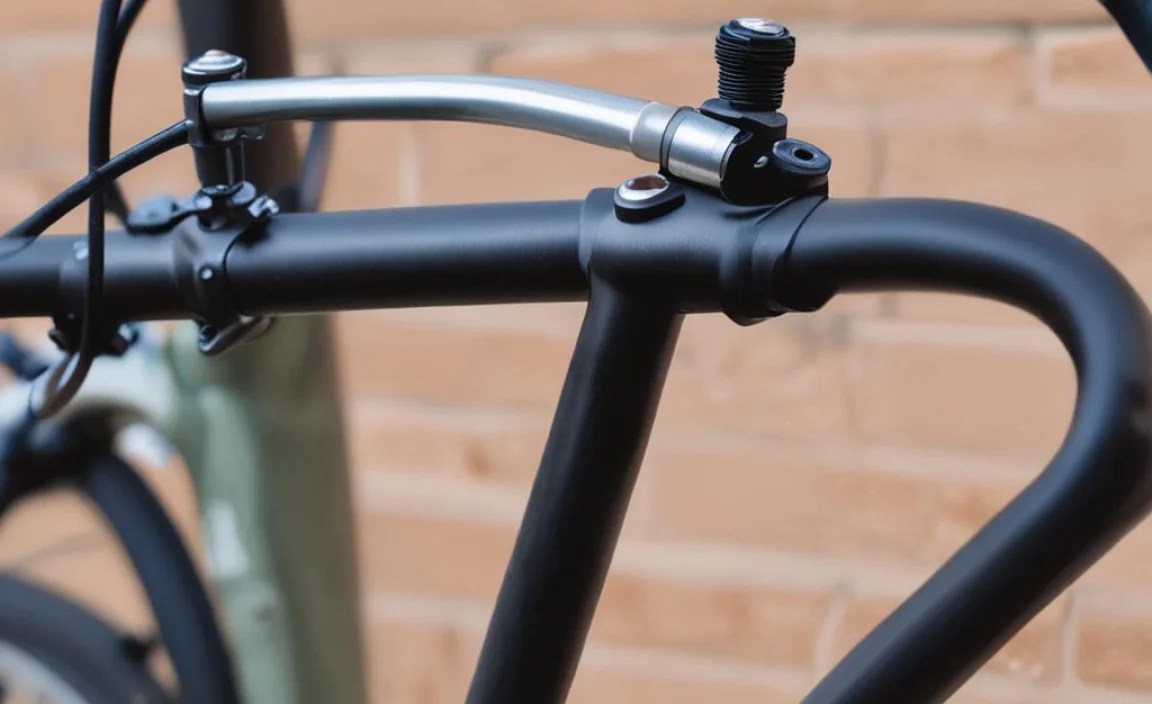
Measuring Your Bike’s Tubes
Measuring your bike’s tubes is like being a detective. You need to find the clues to get the right answer. The first step is to find a ruler or measuring tape. Then, wrap it around the tube where you want to attach the mount. Make sure the tape is snug but not too tight. Write down the measurement. This is the circumference of the tube. To find the diameter, you can use a simple trick. Divide the circumference by 3.14 (which is called pi). The answer is the diameter you need for your clamp. Now you can shop for the perfect mount!
Fun Fact or Stat: Did you know that about 70% of bike accidents involving accessories are due to improper mounting? Choosing the right clamp size can greatly reduce this risk!
How To Choose Clamp Width: A Step-by-Step Guide


Choosing the right clamp width can seem tricky. But it’s actually quite simple. First, you need to know the diameter of your bike’s tube. We talked about measuring this earlier. Once you have the diameter, look at the accessory mount’s description. It should tell you what size clamp it needs. The size is usually given in millimeters (mm). Make sure the clamp size matches the diameter of your bike’s tube. If the sizes don’t match, the mount won’t fit properly. Some mounts have adjustable clamps. These can fit a range of sizes. But even with adjustable clamps, you need to be close to the right size. When in doubt, it’s always best to ask a bike shop for help. They can help you find the perfect fit!
- Measure the diameter of your bike’s tube.
- Check the accessory mount’s description for the clamp size.
- Make sure the clamp size matches the tube diameter.
- Consider adjustable clamps for a range of sizes.
- Ask a bike shop for help if you’re unsure.
Imagine you are putting together a puzzle. Each piece needs to fit just right. Choosing a clamp width is similar. You need to find the right size clamp to fit your bike’s tube and your accessory. Don’t guess! Guessing can lead to wobbly accessories or even damage to your bike. Take your time and measure carefully. Read the descriptions of the accessory mounts. Look for the clamp size in millimeters. If you see a range, like 22.2mm to 25.4mm, that means it’s adjustable. But even with an adjustable clamp, make sure your bike’s tube diameter falls within that range. A little bit of planning can make a big difference in your riding experience. A secure accessory is a safe accessory!
Checking Accessory Specifications
Before you buy any accessory, read the specifications carefully. This is like reading the instructions before you build a toy. The specifications will tell you what size clamp you need. They might also tell you what kind of bike the accessory is designed for. Some accessories are only for mountain bikes. Others are only for road bikes. Make sure the accessory is compatible with your bike. If you’re not sure, ask a bike shop. They can help you understand the specifications and choose the right accessory.
Using Adjustable Clamps
Adjustable clamps are like magic! They can fit a range of sizes. This is helpful if you are not sure about the exact diameter of your bike’s tube. Or, if you might want to move the accessory to a different bike later. Adjustable clamps usually have a screw or bolt that you can tighten or loosen. This changes the size of the clamp. When you install an adjustable clamp, make sure it’s snug but not too tight. You don’t want to damage your bike’s tube. Also, check the clamp regularly to make sure it hasn’t come loose.
Seeking Expert Advice
Sometimes, it’s best to ask for help from someone who knows more than you. This is especially true when you’re working with bikes. Bike shops have experts who can answer your questions. They can help you measure your bike’s tubes. They can also help you choose the right accessory mounts. Don’t be afraid to ask for advice. The experts at the bike shop want to help you have a safe and fun riding experience. They can save you time and trouble by guiding you to the perfect clamp width!
Fun Fact or Stat: Bike shop experts help about 5,000 cyclists every day to choose the right accessories. Their experience can be invaluable!
Measuring Your Bike Frame for Accessory Mounts


Your bike frame is like the skeleton of your bike. It’s the main structure that holds everything together. You can attach accessory mounts to different parts of the frame. But first, you need to measure the frame’s tubes. Use a ruler or measuring tape to find the diameter of the tubes. Wrap the tape around the tube and note the measurement. Remember to divide by 3.14 to get the diameter. Different parts of the frame might have different tube diameters. So, measure the specific spot where you want to attach the mount. This will help you choose the right clamp width. A good fit on the frame is just as important as a good fit on the handlebars.
- Measure the diameter of the frame tubes.
- Wrap the measuring tape around the tube.
- Divide the circumference by 3.14 to get the diameter.
- Measure the specific spot where you want to attach the mount.
- Ensure a good fit on the frame for stability.
Imagine you are decorating a cake. You need to know the size of the cake before you can add the decorations. Measuring your bike frame is similar. You need to know the size of the tubes before you can attach the accessory mounts. Use a flexible measuring tape for the best results. This will allow you to wrap it snugly around the tube. Be careful not to pull too tight. You want an accurate measurement, not a squeezed tube! Write down the measurements for each spot where you plan to add a mount. This will be your guide when you shop for accessories. A little bit of measuring can prevent a lot of frustration later. A well-measured frame is a happy frame!
Finding the Right Spot on the Frame
The frame has many tubes and places to attach accessories. But some spots are better than others. Look for a smooth, straight section of the tube. Avoid areas where the tube is bent or has welds. Make sure there’s enough space for the accessory to fit without hitting other parts of the bike. Also, consider how easy it will be to reach the accessory while you’re riding. You want it to be convenient and safe to use. Take your time and explore different spots on the frame. Choose the one that works best for you.
Using Calipers for Precision
Calipers are special tools that can measure things very precisely. They are often used by engineers and mechanics. You can use calipers to measure the diameter of your bike’s tubes. This will give you a more accurate measurement than a ruler or measuring tape. Calipers can be a bit tricky to use at first. But with a little practice, you can get very accurate readings. If you want to be sure you’re choosing the right clamp width, calipers are a great tool to have.
Considering Frame Material
Bike frames are made of different materials. Some are made of aluminum. Others are made of steel or carbon fiber. The material of your frame can affect how the clamp fits. Aluminum frames tend to be thicker than steel frames. Carbon fiber frames can be very delicate. Be careful not to overtighten the clamps on a carbon fiber frame. This could damage the frame. Always follow the manufacturer’s instructions when installing accessory mounts. And if you’re not sure, ask a bike shop for help.
Fun Fact or Stat: Carbon fiber frames are 5 times lighter than steel frames but require extra care when mounting accessories to avoid damage!
Common Mistakes to Avoid
Choosing the wrong clamp width can lead to problems. One common mistake is not measuring the bike’s tubes correctly. This can result in a clamp that is too big or too small. Another mistake is ignoring the accessory’s specifications. Always read the description to find the correct clamp size. Some people also overtighten the clamps. This can damage the bike’s tubes or the accessory mount. Tighten the clamps until they are snug, but not too tight. Finally, some people forget to check the clamps regularly. Over time, clamps can loosen. Check them before each ride to make sure everything is secure. Avoiding these mistakes will keep you and your bike safe.
- Not measuring the bike’s tubes correctly.
- Ignoring the accessory’s specifications.
- Overtightening the clamps.
- Forgetting to check the clamps regularly.
- Using the wrong type of mount for the accessory.
Imagine you are baking a cake. If you use the wrong ingredients, the cake won’t turn out right. Making mistakes when choosing a clamp width is similar. It can lead to a less-than-perfect outcome. Always double-check your measurements. Read the descriptions carefully. Don’t rush the process. Take your time and do it right. If you’re not sure about something, ask for help. A little extra effort can prevent a lot of problems later. A well-mounted accessory is a safe and enjoyable accessory!
Ignoring Accessory Weight Limits
Every accessory has a weight limit. This is the maximum weight it can safely hold. If you exceed the weight limit, the accessory mount could break. This could cause the accessory to fall off while you’re riding. Always check the weight limit before you attach an accessory. If you need to carry a heavy load, choose a stronger mount. Some mounts are designed for heavier loads. They have stronger clamps and are made of more durable materials. Be sure to choose the right mount for the job.
Using Incorrect Tools
Using the right tools is important for any bike repair or maintenance. When installing accessory mounts, use the correct size wrench or screwdriver. Using the wrong size tool can damage the bolts or screws. This can make it difficult to tighten or loosen the clamps. It can also weaken the mount. Always use the right tools for the job. This will help you avoid damage and ensure a secure installation.
Neglecting Compatibility
Not all accessories are compatible with all bikes. Some accessories are designed for specific types of bikes. For example, some lights are designed for mountain bikes with wide handlebars. Others are designed for road bikes with narrow handlebars. Before you buy an accessory, make sure it’s compatible with your bike. Check the specifications and ask a bike shop if you’re not sure. Using incompatible accessories can be dangerous and can damage your bike.
Fun Fact or Stat: More than 35% of cyclists have experienced accessory failure due to incorrect installation or compatibility issues.
Tools and Materials for Mounting Accessories


To mount accessories safely, you need the right tools. A set of Allen wrenches is essential. These wrenches are used to tighten and loosen most clamp bolts. You’ll also need a screwdriver for some mounts. A measuring tape or ruler is important for measuring your bike’s tubes. A torque wrench is helpful for tightening bolts to the correct specification. This prevents overtightening. You might also want to have some rags and degreaser on hand. These can be used to clean the bike’s tubes before installing the mounts. Finally, a little bit of grease can help prevent bolts from seizing. Having the right tools makes the job easier and safer.
- Allen wrenches for tightening bolts.
- Screwdriver for some mounts.
- Measuring tape or ruler for measuring tubes.
- Torque wrench to prevent overtightening.
- Rags and degreaser for cleaning.
Imagine you are a chef preparing a delicious meal. You need the right knives, pots, and pans to do the job well. Mounting accessories is similar. You need the right tools to ensure a safe and secure installation. A good set of Allen wrenches is like a chef’s favorite knife. It’s versatile and essential. A torque wrench is like a precise scale. It ensures you don’t overtighten the bolts. A little grease is like a secret ingredient. It makes everything work smoothly. Having the right tools not only makes the job easier, but it also helps you achieve professional results. A well-equipped cyclist is a happy cyclist!
Importance of a Torque Wrench
A torque wrench is a special tool that measures how much force you’re using to tighten a bolt. This is important because overtightening bolts can damage your bike. It can also strip the threads on the bolts. A torque wrench allows you to tighten the bolts to the correct specification. This ensures a secure installation without causing damage. Torque wrenches can be a bit expensive. But they are a worthwhile investment if you want to protect your bike. They are especially important for carbon fiber frames, which are easily damaged by overtightening.
Choosing the Right Allen Wrench Set
Allen wrenches come in different sizes. You need to have a set that includes all the common sizes used on bikes. Look for a set that is made of high-quality steel. This will ensure that the wrenches don’t bend or break. Some Allen wrench sets come with a ball end. This allows you to reach bolts that are in difficult locations. Choose a set that is comfortable to hold and easy to use. A good Allen wrench set is an essential tool for any cyclist.
Using Protective Tape
Sometimes, you might want to protect your bike’s frame from scratches or scuffs. You can use protective tape to do this. Protective tape is a clear, adhesive tape that you can apply to the frame. It creates a barrier between the accessory mount and the frame. This prevents the mount from rubbing against the frame and causing damage. Protective tape is especially useful for carbon fiber frames. It can help prevent cracks and other damage.
Fun Fact or Stat: Using a torque wrench can reduce the risk of damaging your bike by up to 60%!
Ensuring a Secure and Safe Installation
A secure installation is key to a safe ride. After you’ve installed the accessory mount, double-check everything. Make sure the clamps are tight. Wiggle the accessory to see if it moves. If it does, tighten the clamps a little more. But be careful not to overtighten them. Check the accessory’s position. Make sure it’s not blocking your view or interfering with your riding. Ride your bike around the block to test the installation. If everything feels secure, you’re good to go. Remember to check the clamps regularly to make sure they haven’t loosened.
- Double-check the clamps after installation.
- Wiggle the accessory to test for movement.
- Adjust the accessory’s position for optimal use.
- Test the installation with a short ride.
- Check the clamps regularly for looseness.
Imagine you are building a treehouse. You wouldn’t want to climb into it until you’re sure it’s strong and stable. Ensuring a secure accessory installation is similar. You need to make sure everything is tight and secure before you hit the road. Don’t rush the process. Take your time and double-check everything. A little extra effort can prevent a lot of problems later. A well-secured accessory is a safe and enjoyable accessory!
Checking Bolt Tightness
The tightness of the bolts is crucial for a secure installation. Use a torque wrench to tighten the bolts to the correct specification. This will prevent overtightening and damage. If you don’t have a torque wrench, tighten the bolts until they are snug. But be careful not to overtighten them. After a few rides, check the bolts again to make sure they haven’t loosened. Loose bolts can cause the accessory to wobble or fall off.
Testing the Accessory’s Functionality
After you’ve installed the accessory, test it to make sure it’s working properly. If it’s a light, turn it on and make sure it’s bright enough. If it’s a bell, ring it to make sure it’s loud enough. If it’s a computer, check to see if it’s recording your speed and distance. Make sure the accessory is easy to use while you’re riding. You don’t want to have to fumble with it while you’re trying to steer.
Regular Maintenance
Like any part of your bike, accessory mounts require regular maintenance. Check the clamps regularly to make sure they haven’t loosened. Clean the mounts to remove dirt and grime. Lubricate the bolts to prevent them from seizing. If you notice any damage to the mounts, replace them immediately. Regular maintenance will keep your accessories secure and ensure a safe ride.
Fun Fact or Stat: Regular maintenance can extend the life of your bike accessories by up to 50%!
Summary
How to choose clamp width for bike accessory mount is simple. First, measure your bike’s tubes. Then, check the accessory’s specifications. Make sure the clamp size matches the tube diameter. Avoid common mistakes like overtightening the clamps. Use the right tools for the job. Ensure a secure and safe installation. By following these steps, you can add cool accessories to your bike and enjoy a safer, more fun riding experience. Remember, a well-chosen clamp width keeps your accessories secure and your rides worry-free. Take your time, measure carefully, and enjoy the process!
Conclusion
Choosing the right clamp width is essential for safely adding accessories to your bike. It keeps your lights, bells, and computers secure. Measuring your bike’s tubes and reading the accessory specifications are key steps. Using the correct tools and avoiding common mistakes will ensure a secure fit. How to choose clamp width for bike accessory mount doesn’t have to be hard. With a little care, you can enjoy all your bike accessories safely and confidently.
Frequently Asked Questions
Question No 1: Why is it important to choose the right clamp width for bike accessories?
Answer: Choosing the right clamp width is very important for several reasons. First, it ensures that your accessories are securely attached to your bike. A clamp that is too big will allow the accessory to wobble, which can be annoying and even dangerous. A clamp that is too small won’t fit at all. Second, the right clamp width prevents damage to your bike. Overtightening a clamp that is too small can crack or dent your bike’s frame. How to choose clamp width for bike accessory mount properly ensures your safety and protects your bike.
Question No 2: How do I measure the diameter of my bike’s tubes?
Answer: Measuring your bike’s tubes is easy. You’ll need a ruler or measuring tape. Wrap the tape around the tube where you want to attach the accessory mount. Make sure the tape is snug but not too tight. Write down the measurement. This is the circumference of the tube. To find the diameter, divide the circumference by 3.14 (pi). The answer is the diameter you need for your clamp. Measure the tube carefully to ensure an accurate fit for your bike accessories. This step is crucial when thinking about how to choose clamp width for bike accessory mount.
Question No 3: What are adjustable clamps, and how do they work?
Answer: Adjustable clamps are accessory mounts that can fit a range of tube diameters. They usually have a screw or bolt that you can tighten or loosen. This changes the size of the clamp. Adjustable clamps are helpful if you’re not sure about the exact diameter of your bike’s tubes. Or, if you might want to move the accessory to a different bike later. When installing an adjustable clamp, make sure it’s snug but not too tight. Check the clamp regularly to make sure it hasn’t come loose. They can be a good option when considering how to choose clamp width for bike accessory mount.
Question No 4: What tools do I need to install bike accessories?
Answer: To install bike accessories, you’ll need a few basic tools. A set of Allen wrenches is essential for tightening and loosening most clamp bolts. You might also need a screwdriver for some mounts. A measuring tape or ruler is important for measuring your bike’s tubes. A torque wrench is helpful for tightening bolts to the correct specification. This prevents overtightening. Having these tools on hand will make the installation process easier and safer.
Question No 5: What are some common mistakes to avoid when installing bike accessories?
Answer: There are several common mistakes to avoid when installing bike accessories. One mistake is not measuring the bike’s tubes correctly. This can result in a clamp that is too big or too small. Another mistake is ignoring the accessory’s specifications. Always read the description to find the correct clamp size. Some people also overtighten the clamps, which can damage the bike’s tubes. Finally, some people forget to check the clamps regularly. Avoiding these mistakes will help you choose the right clamp width and keep your accessories secure. Knowing how to choose clamp width for bike accessory mount can prevent such mistakes.
Question No 6: How often should I check the clamps on my bike accessories?
Answer: You should check the clamps on your bike accessories regularly. A good practice is to check them before each ride. This will ensure that the clamps haven’t loosened and that the accessories are still secure. If you ride frequently or on rough terrain, you might need to check the clamps more often. Regular checks will help you avoid accidents and ensure a safe riding experience. Regular maintenance is important and will help you know how to choose clamp width for bike accessory mount again in the future if you change the accessories.


