
How to Mount Cycling Computer on Aero TT Bike Stem: Easy!
Have you ever wondered how to mount a cycling computer? Do you have an aero TT bike stem? Many cyclists want to track their rides. Aero TT bikes are super fast. But their stems can be tricky. Let’s learn how to attach your computer!
Key Takeaways
- Knowing how to mount cycling computer on aero TT bike stem is important for cyclists.
- Choose the right mount that fits your aero TT bike stem properly.
- Make sure your cycling computer is secure during your ride.
- Follow the steps carefully to avoid damaging your bike or computer.
- Consider getting help from a bike shop if you are not sure.
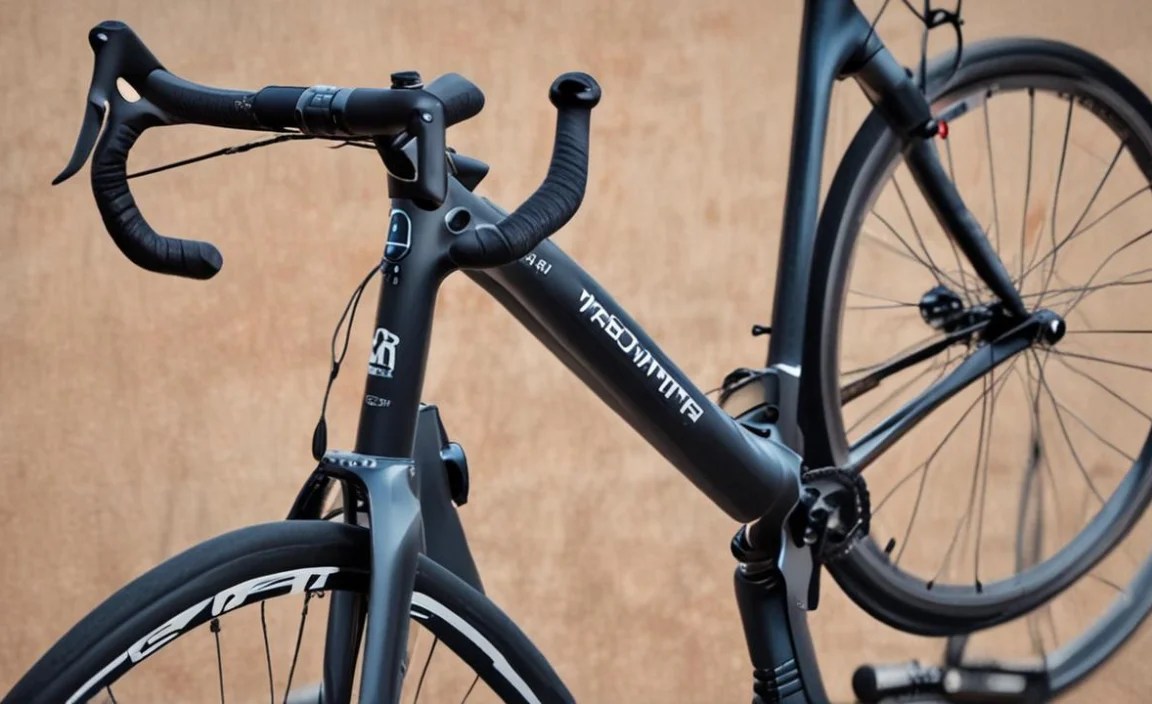
Choosing the Right Mount for Your Stem

Choosing the right mount is the first step. Aero TT bike stems are different. They are not like regular bike stems. Some mounts will not fit. Look for mounts made for aero TT bikes. These mounts often use straps or clamps. Check the size of your stem. Measure it if you can. Read reviews online. See what other cyclists say. A good mount will hold your computer tight. It will not shake or move. It will also keep your computer easy to see. This helps you track your speed and distance. A bad mount can be dangerous. It can cause your computer to fall off. This can distract you. Always pick a mount that is strong and safe.
- Check if the mount fits aero TT stems.
- Measure your stem’s size before buying a mount.
- Read reviews from other cyclists online.
- Choose a mount that holds your computer tightly.
- Make sure the computer is easy to see.
Think about where you want the computer. Some mounts put it in front of the stem. Others put it on top. Some even put it below. Consider how easy it is to see. Think about how it looks. Do you want it to match your bike? Some mounts are made of plastic. Others are made of metal. Metal mounts are often stronger. But they can be more expensive. Plastic mounts are lighter. They can be more affordable. Pick what works best for you. Make sure it is safe.
What Are the Best Mount Brands?
Are you wondering what brands make good mounts? Many brands make cycling computer mounts. Some are better than others. Look for brands that are known for quality. Some popular brands include Garmin, Wahoo, and K-Edge. These brands make mounts for different bikes. They also have mounts for aero TT bikes. Read reviews to see what people like. Check if the mount is easy to install. See if it is strong. A good brand will stand behind its product. They will offer support if you have problems. Do your research before you buy. This will help you get the best mount for your money.
How Much Should You Spend?
How much should you spend on a mount? Mounts can cost different amounts. Some are cheap. Others are very expensive. The price often depends on the quality. It also depends on the brand. You don’t need to buy the most expensive mount. But don’t buy the cheapest either. A cheap mount might break easily. It might not hold your computer well. Look for a mount that is good quality. But it should also be affordable. Read reviews to see if the mount is worth the price. Think about how much you use your computer. If you ride a lot, a better mount is worth it.
What Tools Will You Need?
What tools do you need to install a mount? You might need some tools. Some mounts use screws. You will need a screwdriver. Some mounts use straps. You might need scissors to trim the straps. A small wrench can also be helpful. Read the instructions that come with the mount. They will tell you what tools you need. Make sure you have the right tools before you start. This will make the job easier. It will also help you avoid damaging your bike. If you don’t have the tools, ask a friend. Or go to a bike shop.
Fun Fact or Stat: Aero TT bikes can save you up to 2 minutes per 40km compared to a regular road bike!
Preparing Your Aero TT Bike Stem

Before you start, prepare your aero TT bike stem. Make sure the stem is clean. Wipe off any dirt or grime. This will help the mount stick better. Check for any damage. Look for cracks or scratches. If you see any damage, don’t use the bike. Take it to a bike shop. Make sure the stem is tight. If it is loose, tighten the bolts. Use a torque wrench. This will help you tighten the bolts correctly. If you are not sure how to do this, ask a bike shop. A loose stem can be dangerous. It can cause you to lose control of the bike. Preparing your stem is important for safety.
- Clean the stem before you start.
- Check for any damage to the stem.
- Tighten the stem bolts with a torque wrench.
- Make sure the stem is not loose.
- Ask a bike shop if you need help.
Think about where you want the mount to go. Some stems have a specific spot. Others let you choose. Make sure the spot is easy to reach. You should be able to see the computer easily. It should not block your view. Also, think about the cables. Make sure the mount doesn’t get in the way of the cables. The cables need to move freely. If they are blocked, they can get damaged. They can also affect your brakes and gears. Take your time to find the best spot for the mount.
Why is Stem Preparation Important?
Why is stem preparation important? Preparing your stem is important for safety. A clean and tight stem is safer. It will hold the mount better. This will keep your computer secure. A loose stem can be dangerous. It can cause you to crash. Take the time to prepare your stem. It is worth it. It will make your ride safer and more enjoyable. It will also help your computer last longer. Don’t skip this step. It is a key part of the process.
How to Clean Your Stem Properly
How do you clean your stem properly? Cleaning your stem is easy. You only need a few things. You need a clean rag. You also need some soap and water. Use a mild soap. Don’t use anything too strong. Wet the rag with soapy water. Wipe the stem clean. Pay attention to any dirt or grime. Rinse the rag with clean water. Wipe the stem again to remove the soap. Let the stem dry completely. Now it is ready for the mount.
What to Do if You Find Damage
What should you do if you find damage? If you find damage, stop. Don’t try to install the mount. Take the bike to a bike shop. They can check the damage. They can tell you if it is safe to ride. Don’t risk your safety. A damaged stem can break. This can cause a serious accident. It is better to be safe than sorry. Let a professional look at the bike. They will know what to do.
Fun Fact or Stat: Aero TT bikes are designed to reduce wind resistance, making you faster with the same effort!
Installing the Mount on the Aero Stem

Now it’s time to install the mount. Follow the instructions that came with the mount. Each mount is different. Some use straps. Others use clamps. Make sure you understand the instructions. If you don’t, ask a friend. Or go to a bike shop. Start by attaching the mount to the stem. Make sure it is in the right spot. Tighten the screws or straps. Don’t over-tighten them. This can damage the stem or the mount. Check that the mount is secure. It should not move or shake. If it does, tighten it a little more. But be careful not to over-tighten.
- Read the instructions carefully.
- Attach the mount to the stem.
- Tighten the screws or straps.
- Don’t over-tighten the screws or straps.
- Check that the mount is secure.
Think about the angle of the mount. You want the computer to be easy to see. Adjust the angle as needed. Some mounts let you adjust the angle. Others don’t. If your mount doesn’t adjust, you might need a different mount. Make sure the computer is facing you. It should not be tilted too far up or down. It should be just right. This will help you see the screen easily. It will also help you stay safe.
How Tight Should the Mount Be?
How tight should the mount be? This is an important question. You want the mount to be tight enough. It should not move or shake. But you don’t want it too tight. Over-tightening can damage the stem. It can also damage the mount. A good rule of thumb is to tighten it until it is snug. Then tighten it a little more. Check if it is secure. If it is, you are done. If not, tighten it a little more. Be careful.
What If the Mount Doesn’t Fit?
What if the mount doesn’t fit? This can happen sometimes. Maybe you bought the wrong mount. Or maybe your stem is an unusual size. If the mount doesn’t fit, don’t force it. Forcing it can damage the stem. It can also damage the mount. Take the mount back to the store. Or return it online. Get a different mount that fits. Ask a bike shop for help. They can help you find the right mount.
How to Protect Your Stem From Scratches
How can you protect your stem from scratches? Scratches can happen when you install a mount. The screws or straps can rub against the stem. This can cause scratches. To protect your stem, use some tape. Put tape on the stem where the mount touches it. This will create a barrier. It will protect the stem from scratches. You can use electrical tape. Or you can use clear tape. Any tape will help. Just make sure it is clean.
Fun Fact or Stat: Some aero TT bikes cost more than a small car due to their advanced materials and design!
Attaching Your Cycling Computer to the Mount

Now it’s time to attach your cycling computer. Most computers slide into the mount. Some twist and lock. Make sure you know how your computer attaches. Line up the computer with the mount. Slide it in or twist it. You should hear a click. This means it is locked in place. Check that the computer is secure. It should not wiggle or fall out. If it does, take it off. Try again. Make sure it is locked in properly. A loose computer can be dangerous. It can fall off while you are riding.
- Line up the computer with the mount.
- Slide it in or twist it to lock it.
- Listen for a click.
- Check that the computer is secure.
- Try again if it is loose.
Think about the position of the computer. You want it to be easy to see. It should not block your view. Adjust the position as needed. Some mounts let you adjust the position. Others don’t. If your mount doesn’t adjust, you might need a different mount. Make sure the screen is facing you. It should not be tilted too far up or down. It should be just right. This will help you see the screen easily.
What If the Computer Doesn’t Lock In?
What if the computer doesn’t lock in? This can be frustrating. Make sure you are lining it up correctly. Check the mount for any damage. Sometimes the mount can be broken. If the mount is broken, you need a new one. If the computer is not locking in, don’t force it. Forcing it can damage the computer. It can also damage the mount. Take a closer look. See if you can figure out what is wrong.
How to Prevent the Computer From Falling Off
How can you prevent the computer from falling off? This is a big concern. You don’t want to lose your computer. Make sure the mount is secure. Check it before every ride. Make sure the computer is locked in. Listen for the click. You can also use a safety strap. A safety strap attaches the computer to the bike. If the computer falls off the mount, the strap will catch it. This will keep it from hitting the ground.
How to Adjust the Computer’s Angle
How can you adjust the computer’s angle? Some mounts let you adjust the angle. They have a small screw or lever. Loosen the screw or lever. Adjust the angle. Then tighten the screw or lever. Make sure it is tight. If your mount doesn’t adjust, you can try shims. Shims are small pieces of plastic or rubber. You put them between the mount and the stem. This can change the angle. You can buy shims online. Or you can make them yourself.
Fun Fact or Stat: Professional cyclists rely on cycling computers for real-time data during races!
Testing the Setup for Stability
Now it’s time to test the setup. Make sure everything is stable. Wiggle the computer. It should not move. Wiggle the mount. It should not move either. If anything is loose, tighten it. Take the bike for a short ride. See how it feels. Does the computer shake? Is it easy to see? If you have any problems, stop. Adjust the mount or computer. Then try again. Testing the setup is important. It will help you find any problems. It will also help you stay safe.
- Wiggle the computer to check for movement.
- Wiggle the mount to check for movement.
- Tighten anything that is loose.
- Take the bike for a short ride.
- Adjust as needed after the test ride.
Think about different riding conditions. Will you be riding on smooth roads? Or bumpy roads? Will you be riding in the rain? Or in the sun? The computer needs to stay secure in all conditions. If you are riding on bumpy roads, you might need a stronger mount. If you are riding in the rain, you might need a waterproof cover for your computer. Plan ahead for different conditions.
Why Is Testing Important?
Why is testing important? Testing is important for safety. A loose computer can be dangerous. It can fall off and distract you. It can also get damaged. Testing helps you find any problems before they cause an accident. It also helps you get used to the new setup. You will know how the computer feels. You will know how easy it is to see. Testing is a key part of the process.
What to Look for During the Test Ride
What should you look for during the test ride? Pay attention to the computer. Does it shake? Is it easy to see? Does it block your view? Also, pay attention to the mount. Does it move? Does it make any noise? If you notice anything unusual, stop. Check the mount and computer. Adjust them as needed. Take another test ride. Keep testing until everything feels right.
How Often Should You Check the Setup?
How often should you check the setup? You should check it before every ride. It only takes a few seconds. Wiggle the computer and the mount. Make sure they are secure. If you ride a lot, you should also check the mount regularly. Look for any signs of wear or damage. If you see any damage, replace the mount. It is better to be safe than sorry.
Fun Fact or Stat: Some cyclists use multiple computers on their bikes for different data metrics!
Maintaining Your Cycling Computer Mount
Taking care of your mount is important. It will help it last longer. Clean the mount regularly. Use a clean rag and some soapy water. Wipe off any dirt or grime. Check the screws or straps. Make sure they are tight. If they are loose, tighten them. Look for any signs of wear or damage. If you see any damage, replace the mount. Store your bike in a safe place. This will protect the mount from damage.
- Clean the mount regularly.
- Check the screws or straps.
- Tighten any loose screws or straps.
- Look for signs of wear or damage.
- Store your bike in a safe place.
Think about the weather. Rain and sun can damage the mount. If you ride in the rain, dry the mount afterwards. If you ride in the sun, the mount can get hot. This can weaken the plastic. Try to keep the mount out of direct sunlight. You can also use a cover to protect it. A little care will help your mount last longer.
How to Clean the Mount Properly
How do you clean the mount properly? Cleaning the mount is easy. You need a clean rag. You also need some soapy water. Use a mild soap. Don’t use anything too strong. Wet the rag with soapy water. Wipe the mount clean. Pay attention to any dirt or grime. Rinse the rag with clean water. Wipe the mount again to remove the soap. Let the mount dry completely.
When to Replace the Mount
When should you replace the mount? You should replace the mount if it is damaged. Look for cracks or breaks. Also, replace it if the screws or straps are worn. If the mount is loose, even after tightening, replace it. A damaged mount is not safe. It can cause your computer to fall off. It is better to replace it than to risk an accident.
How to Store Your Bike to Protect the Mount
How can you store your bike to protect the mount? Store your bike in a safe place. Keep it out of the rain and sun. Don’t lean it against anything that could damage the mount. If you are storing the bike for a long time, remove the computer. This will protect it from damage. You can also cover the mount. This will keep it clean.
Fun Fact or Stat: Some cycling computer mounts are made from carbon fiber, the same material used in race cars!
Troubleshooting Common Issues
Sometimes things go wrong. The mount might come loose. The computer might not lock in. The screen might be hard to see. Don’t panic. There are usually simple solutions. Check the screws or straps. Make sure they are tight. Adjust the angle of the computer. Clean the screen. If you still have problems, ask a friend. Or go to a bike shop. They can help you troubleshoot the issue.
- Check the screws or straps if the mount is loose.
- Adjust the angle if the screen is hard to see.
- Clean the screen if it is dirty.
- Ask a friend or bike shop for help.
- Don’t panic, most issues have simple solutions.
Think about the weather conditions. Rain can make the screen hard to see. Sun can make it too bright. There are things you can do to help. Use a screen protector. This will reduce glare. Use a waterproof cover. This will keep the screen dry. Adjust the brightness of the screen. This will make it easier to see in different conditions.
Why Is My Mount Coming Loose?
Why is your mount coming loose? There are several reasons. The screws or straps might not be tight enough. The stem might be dirty. The mount might be worn out. Check the screws or straps. Make sure they are tight. Clean the stem. Replace the mount if it is worn out. Also, make sure you are using the right mount for your stem.
Why Is My Screen Hard to See?
Why is your screen hard to see? The screen might be dirty. The angle might be wrong. The brightness might be too low. The weather might be affecting it. Clean the screen. Adjust the angle. Adjust the brightness. Use a screen protector. Also, make sure you are wearing sunglasses.
What If I Can’t Fix the Problem?
What if you can’t fix the problem? Don’t give up. Ask for help. Go to a bike shop. They have seen it all before. They can help you troubleshoot the issue. They can also install the mount for you. It is better to ask for help than to risk an accident.
Fun Fact or Stat: Some cycling computers can track over 100 different data points during a ride!
Summary
Knowing how to mount cycling computer on aero TT bike stem is very useful for cyclists. It helps you track your rides and improve your performance. First, you need to choose the right mount. Aero TT bike stems are different from regular stems. Make sure the mount fits properly. Then, prepare your stem by cleaning it. Install the mount carefully, following the instructions. Attach your computer to the mount. Test the setup to make sure it is stable. Finally, maintain your mount by cleaning it regularly.
Remember to troubleshoot any issues that come up. If the mount is loose, tighten the screws or straps. If the screen is hard to see, adjust the angle or brightness. If you can’t fix the problem, ask a bike shop for help. With the right mount and a little care, you can enjoy using your cycling computer on your aero TT bike.
Conclusion
How to mount cycling computer on aero TT bike stem might seem tricky. But it is not that hard. Choose the right mount. Prepare your stem. Follow the instructions. Test the setup. Maintain the mount. If you do these things, you will be fine. You will be able to track your rides. You will also be able to improve your performance. Enjoy your cycling!
Frequently Asked Questions
Question No 1: What is an aero TT bike stem?
Answer: An aero TT bike stem is a special type of stem used on time trial and triathlon bikes. These bikes are designed to be very fast and aerodynamic. The stem is the part that connects the handlebars to the frame. Aero TT bike stems are shaped to reduce wind resistance. This helps cyclists go faster. They are often flatter and wider than regular stems. This shape helps the bike cut through the air more easily. That is why knowing how to mount cycling computer on aero TT bike stem is very important.
Question No 2: Why is it important to use the right mount?
Answer: It is important to use the right mount for several reasons. First, the right mount will fit your stem properly. This will keep your computer secure. A loose computer can be dangerous. It can fall off and distract you. Second, the right mount will put the computer in the right position. This will make it easy to see the screen. Third, the right mount will be strong and durable. It will last a long time. Finally, using the right mount shows that you care about your equipment. This will motivate you to care more about how to mount cycling computer on aero TT bike stem.
Question No 3: Can I use any mount for my aero TT bike stem?
Answer: No, you cannot use any mount for your aero TT bike stem. Aero TT bike stems are different from regular stems. They are often flatter and wider. This means that some mounts will not fit. You need to choose a mount that is specifically designed for aero TT bike stems. These mounts often use straps or clamps to attach to the stem. Check the product description. Make sure the mount is compatible with your stem before you buy it. If you are not sure, ask a bike shop for help. It is important to follow instructions on how to mount cycling computer on aero TT bike stem.
Question No 4: What tools do I need to install the mount?
Answer: The tools you need will depend on the mount. Some mounts use screws. You will need a screwdriver. Some mounts use straps. You might need scissors to trim the straps. A small wrench can also be helpful. Read the instructions that come with the mount. They will tell you what tools you need. Make sure you have the right tools before you start. This will make the job easier. It will also help you avoid damaging your bike. Having all tools will help with how to mount cycling computer on aero TT bike stem.
Question No 5: How do I know if the mount is tight enough?
Answer: You want the mount to be tight enough. It should not move or shake. But you don’t want it too tight. Over-tightening can damage the stem. It can also damage the mount. A good rule of thumb is to tighten it until it is snug. Then tighten it a little more. Check if it is secure. If it is, you are done. If not, tighten it a little more. Be careful not to over-tighten. One way to test how to mount cycling computer on aero TT bike stem is to put some weight on it and see if it wobbles.
Question No 6: What should I do if the computer falls off?
Answer: If the computer falls off, stop riding. Pick up the computer. Check it for damage. If it is damaged, take it to a bike shop. If it is not damaged, try to reattach it. Make sure the mount is secure. Make sure the computer is locked in. If it keeps falling off, you might need a different mount. Or you might need to tighten the screws or straps. You can also use a safety strap. A safety strap attaches the computer to the bike. This will keep it from hitting the ground. It is also important to remember steps on how to mount cycling computer on aero TT bike stem.


