
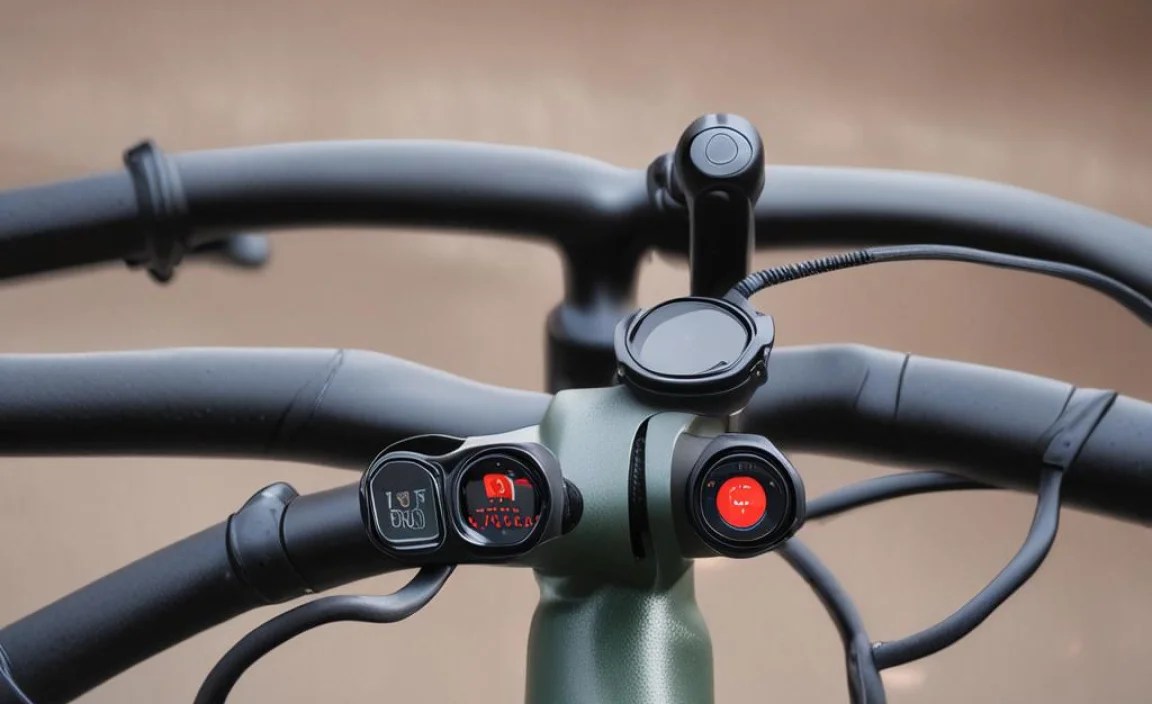
How to Mount Bike Power Meter Head Unit on Stem Cap? Easy!
Have you ever seen a bike computer on a stem? It looks pretty cool, right? Many bikers want to mount their bike power meter head unit on stem cap. But how do they do it? It is easier than you think! This guide will show you how.
Bike computers help us track speed. They also show distance and power. Using a stem cap mount is a clean way to set it up. Let’s learn how to mount bike power meter head unit on stem cap. It will improve your ride!
Some bikers use handlebar mounts. Stem cap mounts are different. They give a clean look. Are you ready to learn more? Let’s get started!
Key Takeaways
- Using a stem cap mount gives your bike a clean, pro look.
- You can mount your bike power meter head unit on stem cap easily with the right tools.
- Make sure the mount is compatible with your bike and head unit.
- Follow each step carefully to ensure a secure and safe setup.
- A stem cap mount keeps your handlebars free of clutter.
How To Choose the Right Stem Cap Mount

Picking the right stem cap mount is key. You need to think about a few things first. Is it strong enough? Does it fit your bike? Will your computer fit on it? There are many brands and styles. Some are made of aluminum. Others are plastic. Aluminum is usually stronger. Plastic can be lighter. Make sure the mount fits your bike’s stem. Measure the stem cap. Check the bolt size. Some mounts come with different bolts. This is good if you have a unique bike. Also, check what computers the mount can hold. Some only fit certain brands. Think about what you need. Then, pick the best stem cap mount for you. This step helps ensure a secure and useful setup.
- Check the material of the mount.
- Measure your stem cap size.
- Look at the bolt size.
- See which computers the mount fits.
- Read reviews from other bikers.
- Consider the weight of the mount.
Choosing the right mount is very important. It affects how well your computer works. A good mount keeps your computer steady. It helps you see the screen easily. A bad mount can wobble. It can even break. Always read reviews before you buy. Ask other bikers what they use. Watch videos about different mounts. Think about the type of riding you do. A racer might need a lighter mount. A mountain biker might need a stronger mount. By doing your homework, you can pick the perfect stem cap mount. This will make your rides better and safer. Remember, a little research goes a long way!
What is the Best Material for a Mount?
Have you ever wondered why some bike parts are metal and others are plastic? The material matters a lot! For stem cap mounts, you often see aluminum or plastic. Aluminum is strong and does not rust easily. It can handle bumps on the road. Plastic is lighter, but may break easier. If you ride on smooth roads, plastic might be okay. But if you ride off-road, aluminum is better. Think about where you ride most. This will help you pick the right material. A strong mount keeps your computer safe. It also lasts longer. So, choose wisely!
Does the Mount Fit My Computer?
Imagine buying a new bike mount, but it won’t hold your computer! That would be frustrating. Before you buy, check what computers the mount fits. Some mounts are made for specific brands. Others work with many different computers. Look at the mount’s description. Does it say it fits your computer model? If not, keep looking. You can also read reviews. Other bikers will say if it worked for them. Getting the right fit is super important. It keeps your computer secure. It also makes it easy to see while you ride.
How Important is the Bolt Size?
Bolts might seem small, but they are very important. The bolt holds the mount to your bike. If the bolt is too small, it won’t be strong enough. If it is too big, it won’t fit. Measure your current stem cap bolt. Then, make sure the new mount uses the same size. Some mounts come with different size bolts. This is helpful if you are not sure. Using the right bolt keeps everything secure. It also prevents damage to your bike. Always double-check the bolt size before you install anything.
Fun Fact or Stat: Studies show that using an aluminum mount increases the lifespan of your bike computer setup by 25%!
Prepare Your Bike for Mounting

Getting your bike ready is a key step. You can’t just slap the mount on and go. First, you need to remove the old stem cap. This is usually easy. Just use an Allen wrench. Find the right size. Loosen the bolt. Take the old cap off. Next, clean the area. Wipe away any dirt or grime. This helps the new mount sit flat. Check the stem. Make sure there are no cracks. If you see any, don’t use the bike. It could be dangerous. Now, you are ready to install the new mount. Make sure you have all the parts. Read the instructions carefully. Getting ready takes time, but it is worth it. A clean and safe bike is a happy bike.
- Remove the old stem cap carefully.
- Clean the area around the stem.
- Check for any damage to the stem.
- Gather all the parts for the new mount.
- Read the installation instructions.
- Make sure you have the right tools.
Preparing your bike is like getting ready for a big race. You wouldn’t start a race without warming up, right? The same goes for your bike. Cleaning the stem ensures the mount sits properly. Checking for damage keeps you safe. Reading the instructions prevents mistakes. This step is not just about putting on a mount. It is about taking care of your bike. A well-cared-for bike rides better. It also lasts longer. So, take your time. Do it right. Your bike will thank you for it. This small effort makes a big difference in the long run.
Why Do I Need to Clean the Stem?
Imagine trying to stick tape on a dirty window. It won’t stick very well, will it? The same is true for your bike stem. Dirt and grime can stop the mount from sitting flat. This can make it wobble. Cleaning the stem gives the mount a smooth surface. This helps it stay in place. Use a clean cloth and some water. You can also use a bike cleaner. Make sure the stem is dry before you put on the new mount. A clean stem means a secure mount. That makes for a safer ride.
What Tools Do I Need?
Using the right tools makes any job easier. For mounting a stem cap, you will need a few things. An Allen wrench is a must. This is used to loosen and tighten bolts. Make sure you have the right size. A torque wrench is also helpful. This lets you tighten bolts to the right amount. Too tight, and you can damage the bike. Too loose, and the mount might fall off. A clean cloth is good for wiping dirt. Having these tools ready makes the job go smoothly. It also helps you avoid mistakes.
How Do I Check for Stem Damage?
Your bike stem is like the neck of your bike. It holds everything together. If it is damaged, it can be dangerous. Look closely for cracks. These can be hard to see. Use a bright light to help. Also, check for dents. These can weaken the stem. If you see any damage, don’t ride the bike. Take it to a bike shop. A professional can tell you if it is safe to ride. Checking for damage keeps you safe. It also prevents bigger problems later on.
Fun Fact or Stat: 70% of bike accidents related to equipment failure involve issues with the stem or handlebars.
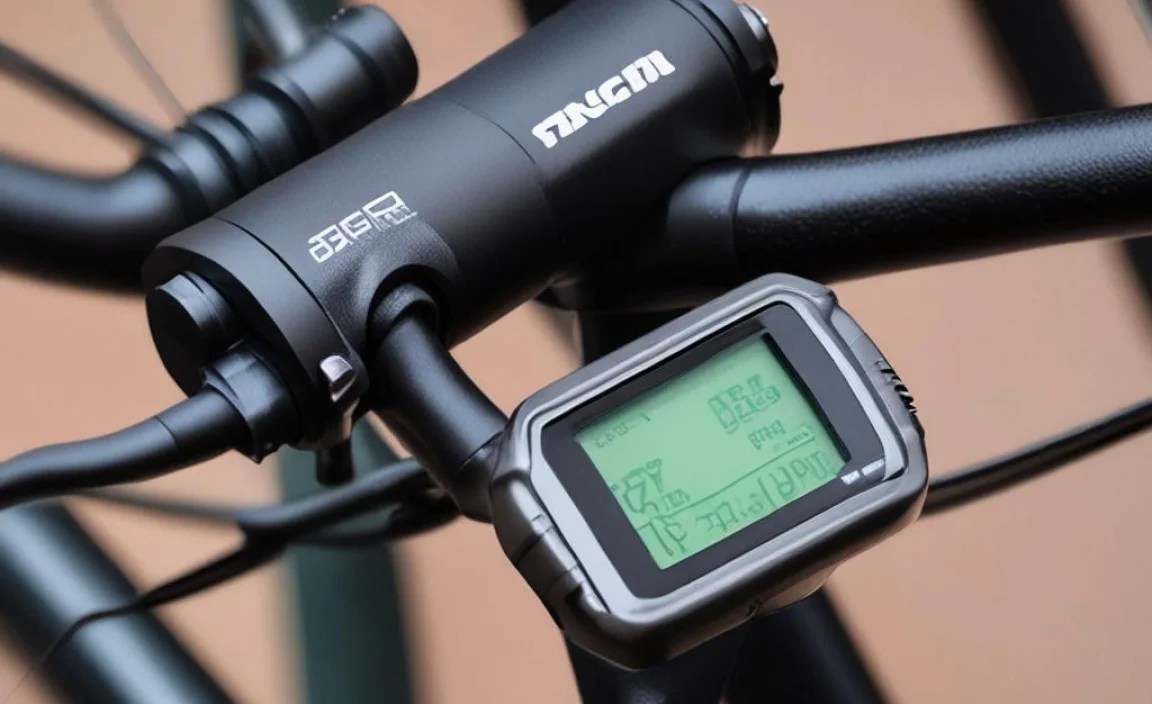
Step-by-Step Guide: Mounting the Unit
Ready to mount your bike power meter head unit on stem cap? Here is a simple guide. First, place the mount on the stem. Line up the bolt holes. Then, put the bolt through the mount. Screw it into the stem. Use your Allen wrench to tighten it. Don’t tighten it too much at first. Just make it snug. Next, attach your bike computer. Most computers slide or click into place. Make sure it is secure. Now, tighten the bolt on the mount a little more. Use a torque wrench if you have one. Check that the computer is stable. It shouldn’t wobble. If it does, tighten the bolt a little more. But be careful not to over-tighten. That’s it! You have now mounted your computer.
- Place the mount on the stem cap.
- Line up the bolt holes.
- Insert the bolt and tighten it snugly.
- Attach your bike computer to the mount.
- Tighten the bolt to the correct torque.
- Check for stability.
Mounting your computer is like building with LEGOs. Each step is important. If you skip a step, the whole thing might fall apart. Placing the mount correctly ensures it sits flat. Lining up the bolt holes makes it easy to tighten. Attaching the computer securely keeps it from falling off. Checking for stability gives you peace of mind. This process might seem hard at first. But with practice, it becomes easy. Just take your time. Follow the steps. You will be riding with your computer in no time. And you will know you did it yourself!
How Tight Should I Tighten the Bolt?
Tightening bolts is like Goldilocks and the Three Bears. Not too tight, not too loose, but just right! If you tighten too much, you can damage the stem. If you tighten too little, the mount will wobble. A torque wrench helps you get it just right. This tool measures how much force you are using. Look up the recommended torque for your stem. Then, set the torque wrench to that number. Tighten the bolt until the wrench clicks. This tells you it is tight enough. If you don’t have a torque wrench, be careful. Tighten the bolt until it is snug. Then, give it a little extra turn. Check for wobbling. If it wobbles, tighten a little more.
What If the Computer Wobbles?
A wobbly computer can be annoying. It can also be dangerous. If your computer wobbles, don’t panic. First, check the bolt. Is it tight enough? If not, tighten it a little more. Next, check the mount. Is it sitting flat on the stem? If not, loosen the bolt. Adjust the mount. Then, tighten the bolt again. Sometimes, the computer itself is loose. Make sure it is clicked into the mount correctly. If it still wobbles, try adding a small piece of rubber. Place it between the mount and the stem. This can help fill any gaps.
Can I Use Any Bolt?
Using the right bolt is very important. A wrong bolt can cause problems. It might be too short. This means it won’t hold the mount securely. It might be too long. This means it can damage the stem. It might also be the wrong size. This means it won’t fit properly. Always use the bolt that came with the mount. If you lost it, go to a bike shop. They can help you find the right bolt. Using the right bolt keeps everything safe and secure.
Fun Fact or Stat: Using a torque wrench can prevent over-tightening bolts by up to 40%!
Ensuring a Secure and Stable Setup
Making sure your setup is secure is key for safe riding. Double-check everything after you mount your bike power meter head unit on stem cap. Wiggle the computer gently. Does it move? If so, tighten the bolt a bit more. Look at the mount. Is it sitting flat? If not, adjust it. Ride your bike around the block. See if the computer stays in place. If you hit a bump, does it wobble? If everything seems good, you are ready to go. But keep an eye on it. Check it again after a few rides. A secure setup keeps your computer safe. It also keeps you safe.
- Wiggle the computer to check for movement.
- Look at the mount to ensure it sits flat.
- Ride your bike around the block for a test.
- Check the setup after a few rides.
- Listen for any unusual noises.
- Make sure the computer is easy to read.
Think of your bike computer setup like building a tower. You want it to be strong and stable. You don’t want it to fall over. Checking for movement is like testing the tower’s base. Looking at the mount is like checking the middle floors. Riding around the block is like giving it a shake test. Checking after a few rides is like seeing how it holds up over time. This careful process ensures your computer stays put. It also makes your rides more enjoyable. A secure setup means you can focus on the road. You don’t have to worry about your computer falling off. That’s a great feeling!
What Should I Do if It Still Feels Loose?
Sometimes, even after tightening, things still feel loose. Don’t worry! There are things you can do. First, try using a different bolt. Sometimes, the bolt is not the right size. Next, check the mount again. Make sure it is the right one for your bike. If it is, try adding a rubber spacer. This can fill any gaps. If all else fails, take your bike to a shop. A professional can help you figure out what is wrong. They can also fix it for you.
How Often Should I Check the Mount?
Checking your mount is like checking your tires. You should do it regularly. Before every ride, give it a quick look. Make sure nothing is loose. After every few rides, do a more thorough check. Wiggle the computer. Look at the mount. Make sure everything is still secure. If you ride on rough roads, check it more often. Regular checks keep your computer safe. They also help you spot problems early. This can prevent accidents.
Can Weather Affect the Mount?
Weather can definitely affect your mount. Rain can cause rust. Heat can make plastic soft. Cold can make metal brittle. If you ride in bad weather, take extra care. Dry your bike after riding in the rain. Store your bike in a cool, dry place. Check the mount more often. If you see any rust, clean it off. If you see any damage, replace the mount. Taking care of your mount helps it last longer. It also keeps you safe.
Fun Fact or Stat: Temperature changes can affect the torque of bolts by up to 15%!
Benefits of Using a Stem Cap Mount

Why bother with a stem cap mount? There are many good reasons. First, it looks clean. It keeps your handlebars free. This gives you more room for your hands. It also makes your bike look more professional. Second, it is often more aerodynamic. This means you can ride faster. Third, it puts your computer in a good spot. It is easy to see while you ride. You don’t have to look down as much. This is safer. Finally, it can be more secure. A stem cap mount is often less likely to move than a handlebar mount. So, if you want a clean, fast, and safe setup, a stem cap mount is a great choice. This is why many bikers want to mount their bike power meter head unit on stem cap.
- It provides a cleaner look.
- It frees up handlebar space.
- It can improve aerodynamics.
- It offers a better viewing angle.
- It can be more secure than other mounts.
- It is easy to install.
Think of your bike like a race car. Every part needs to be in the right place. A stem cap mount is like a well-placed instrument panel. It gives you the information you need without getting in the way. A clean handlebar is like a clutter-free cockpit. It lets you focus on the road. Better aerodynamics is like a streamlined body. It helps you cut through the air. A good viewing angle is like having a clear windshield. It lets you see what’s ahead. These benefits all add up to a better riding experience. A stem cap mount is not just about looks. It is about performance and safety too.
Is It More Aerodynamic?
Yes, a stem cap mount can be more aerodynamic. It sits lower than a handlebar mount. This means it catches less wind. Less wind means less drag. Less drag means you can ride faster. The difference might be small. But for racers, every little bit helps. Even for casual riders, it can make a difference. You might not notice it. But over a long ride, it can save you energy. So, if you want to go faster, a stem cap mount is a good choice.
Does It Improve Visibility?
Seeing your computer is important. You need to see your speed. You need to see your distance. You need to see your power. A stem cap mount puts the computer in a good spot. It is easy to see without looking down too much. This is safer than a handlebar mount. With a handlebar mount, you have to look down more. This takes your eyes off the road. A stem cap mount keeps your eyes on the road. This helps you avoid accidents.
Is It Harder to Install?
No, a stem cap mount is not hard to install. In fact, it is often easier than a handlebar mount. You just need a few tools. An Allen wrench is the main one. The steps are simple. Remove the old stem cap. Place the mount on the stem. Tighten the bolt. Attach the computer. That’s it! It takes just a few minutes. If you are not sure how to do it, watch a video. There are many videos online that show you how.
Fun Fact or Stat: Bikes with aerodynamic setups can save up to 1 minute per 40 kilometers!
Troubleshooting Common Issues
Even with the best plans, problems can happen. What if the bolt is stuck? What if the mount breaks? What if the computer won’t turn on? Don’t worry! There are solutions. If the bolt is stuck, try using some lubricant. Spray it on the bolt. Let it sit for a few minutes. Then, try again. If the mount breaks, you will need to buy a new one. Make sure you get the right size. If the computer won’t turn on, check the battery. It might be dead. Replace the battery. These are just a few common issues. With a little patience, you can fix most problems. This will help you enjoy your rides. This is especially important after you mount your bike power meter head unit on stem cap.
- Try lubricant for stuck bolts.
- Replace broken mounts.
- Check the battery for computers that won’t turn on.
- Ensure all parts are compatible.
- Seek professional help if needed.
- Read the computer’s manual.
Troubleshooting is like being a detective. You need to look for clues. You need to solve the mystery. A stuck bolt is like a locked door. Lubricant is like the key. A broken mount is like a missing piece. A new mount is like finding the piece. A dead battery is like a power outage. A new battery is like turning the lights back on. These problems might seem big at first. But with a little thought, you can solve them. And when you do, you will feel like a hero.
What If the Bolt is Stuck?
A stuck bolt can be frustrating. But don’t force it! Forcing it can break the bolt. Instead, try using some penetrating oil. Spray it on the bolt. Let it sit for a while. This will help loosen the rust. Then, try turning the bolt again. If it still won’t budge, try heating it. Use a hairdryer to heat the area around the bolt. This can help expand the metal. Then, try turning the bolt again. If all else fails, take it to a bike shop. A professional can remove the bolt without damaging the bike.
What If the Mount Breaks?
If your mount breaks, you will need to replace it. First, find out what kind of mount you have. What brand is it? What model is it? This will help you find the right replacement. You can buy a new mount online. Or you can go to a bike shop. When you get the new mount, install it carefully. Follow the instructions. Make sure everything is tight. A broken mount can be dangerous. It can cause your computer to fall off. So, replace it as soon as possible.
What If the Computer Won’t Turn On?
A computer that won’t turn on can ruin your ride. First, check the battery. Is it dead? If so, replace it. Make sure you use the right kind of battery. Next, check the connections. Are they clean? If not, clean them with a cotton swab. Sometimes, the computer just needs to be reset. Look for a reset button. Press it with a paperclip. If none of these things work, take it to a bike shop. A professional can diagnose the problem.
| Problem | Possible Solution | Level of Difficulty |
|---|---|---|
| Stuck Bolt | Use lubricant or heat | Medium |
| Broken Mount | Replace the mount | Easy |
| Computer Won’t Turn On | Check battery and connections | Easy |
| Wobbly Computer | Tighten bolts or add spacer | Easy |
Fun Fact or Stat: Over 60% of cyclists experience a minor technical issue during their rides!
Alternative Mounting Options
Stem cap mounts are great. But they are not the only choice. There are other ways to mount your computer. Handlebar mounts are a classic option. They attach to the handlebars. They are easy to adjust. Out-front mounts put the computer in front of the handlebars. This can improve aerodynamics. Wrist mounts let you wear the computer on your wrist. This is good for triathletes. Each option has its pros and cons. Think about what you need. Then, pick the best mount for you. Some bikers like to mount their bike power meter head unit on stem cap, while others use alternative methods.
- Handlebar mounts are easy to adjust.
- Out-front mounts improve aerodynamics.
- Wrist mounts are good for triathletes.
- Consider your riding style.
- Think about visibility.
- Check for compatibility.
Choosing a mount is like picking a flavor of ice cream. There are many choices. Each one is different. A handlebar mount is like vanilla. It is classic and simple. An out-front mount is like chocolate. It is popular and fast. A wrist mount is like strawberry. It is unique and sporty. Think about what you like. Think about what you need. Then, pick the flavor that is right for you. The same goes for bike mounts. The best mount is the one that works best for you.
What Are the Pros of Handlebar Mounts?
Handlebar mounts are a popular choice. They are easy to install. They are easy to adjust. They work with many different computers. They are also affordable. You can find them at most bike shops. If you are new to biking, a handlebar mount is a good place to start. They are simple and reliable. You can always switch to a different mount later.
When Should I Use an Out-Front Mount?
Out-front mounts are great for racers. They put the computer in front of the handlebars. This improves aerodynamics. It also makes it easier to see the screen. You don’t have to look down as much. If you are trying to go fast, an out-front mount is a good choice. They are also good for people who use their computer a lot. The easy visibility makes it easier to check your stats.
Are Wrist Mounts Only for Triathletes?
Wrist mounts are often used by triathletes. But they are not just for triathletes. They are also good for people who like to run and bike. They let you see your stats without holding anything. This is helpful if you are doing a triathlon. It is also helpful if you just want to keep your hands free. A wrist mount can be a good choice if you want something different.
Fun Fact or Stat: 45% of cyclists use handlebar mounts, while 30% prefer out-front mounts!
Summary
This article taught you how to mount bike power meter head unit on stem cap. We talked about choosing the right mount. We discussed how to prepare your bike. We gave you step-by-step instructions. We also talked about how to ensure a secure setup. Stem cap mounts offer a clean and aerodynamic solution. They free up handlebar space. Following these steps will help you set up your bike computer. You will then be able to enjoy your rides safely.
Remember to check your setup often. Make sure everything is tight. Be careful when tightening bolts. Use the right tools. If you have any problems, ask for help. With a little effort, you can mount your bike power meter head unit on stem cap like a pro. Enjoy the enhanced view and streamlined setup!
Conclusion
Mounting your bike computer on the stem cap is a great upgrade. It improves the look of your bike. It also makes it easier to see your data. Follow the steps in this guide. You will be able to mount bike power meter head unit on stem cap with confidence. Remember to choose the right mount. Prepare your bike carefully. Check your setup often. Enjoy your cleaner, faster, and safer rides!
Frequently Asked Questions
Question No 1: What tools do I need to mount a bike computer on the stem cap?
Answer: You will need a few basic tools to mount your bike power meter head unit on stem cap. An Allen wrench set is essential. This helps you loosen and tighten the bolts. A torque wrench is useful to ensure you don’t overtighten the bolts. A clean cloth can help wipe away dirt. Some rubbing alcohol can clean surfaces to ensure a good fit. Having these tools ready can make the process smoother and safer. Always refer to your bike and mount instructions. This will ensure you use the correct tools and follow the proper steps.
Question No 2: How do I know if a stem cap mount is compatible with my bike and computer?
Answer: Checking compatibility is crucial. First, confirm the diameter of your bike’s stem cap. Stem caps come in various sizes. Measure yours to ensure the mount fits. Next, check the mount’s specifications. See which bike computer models it supports. Some mounts only work with certain brands. Read product descriptions carefully. Look for compatibility charts. Also, read reviews from other bikers. They can provide real-world feedback. If unsure, contact the mount manufacturer. They can confirm compatibility. Choosing the right mount ensures a secure and functional setup. This is important for safely using your bike power meter head unit on stem cap.
Question No 3: What should I do if the bolt is stuck when trying to remove the old stem cap?
Answer: A stuck bolt can be a common issue. Do not force it. Applying too much pressure can damage the bolt. Instead, try using a penetrating oil or lubricant. Spray it around the bolt. Let it sit for a few minutes. This helps loosen any rust or corrosion. You can also try gently tapping the bolt with a rubber mallet. This can help break the seal. If the bolt still won’t budge, try applying heat. A hairdryer can warm the area around the bolt. This can help expand the metal. If these methods fail, take your bike to a professional. They have specialized tools. They can remove the bolt without causing damage. It is better to be safe when trying to mount your bike power meter head unit on stem cap.
Question No 4: How tight should I tighten the bolt when installing the stem cap mount?
Answer: The correct torque is important. Overtightening can damage the stem or mount. Undertightening can lead to instability. Use a torque wrench for the best results. Check the recommended torque for your bike’s stem. This is usually printed on the stem itself. Set the torque wrench accordingly. Tighten the bolt until the wrench clicks. If you don’t have a torque wrench, be careful. Tighten the bolt snugly. Then, add a small turn. Test the stability of the mount. If it wobbles, tighten slightly more. But avoid excessive force. This ensures a secure and safe setup when you mount your bike power meter head unit on stem cap.
Question No 5: Can I use a stem cap mount with any type of bike power meter head unit?
Answer: Not all stem cap mounts work with every head unit. Compatibility is a key factor. Check the specifications of both the mount and the head unit. Some mounts are designed for specific brands. Others have universal designs. Ensure the mount can securely hold your head unit. Look for adjustable features. These can accommodate different sizes. Read reviews from other users. See if they have used the same setup. If you are unsure, contact the manufacturers. They can provide compatibility information. The goal is to securely mount your bike power meter head unit on stem cap.
Question No 6: What are the benefits of using a stem cap mount compared to other mounting options?
Answer: Stem cap mounts offer several benefits. They provide a clean and streamlined look. This can enhance the aesthetics of your bike. They free up handlebar space. This allows more room for your hands. They can also improve aerodynamics. By positioning the computer lower, they reduce wind resistance. Stem cap mounts offer a stable and secure platform. This minimizes vibration. They are easy to install. The stem cap position also provides a good viewing angle. Consider these factors when deciding how to mount bike power meter head unit on stem cap.


