
How to Mount Action Camera on Fat Bike Frame: Easy Guide
Do you love riding your fat bike? Do you want to record your awesome rides? How to mount action camera on fat bike frame is easier than you think! Imagine capturing every bump and turn. Show your friends your epic adventures. Let’s learn how to do it safely and easily.
Fat bikes have big, squishy tires. They can go almost anywhere. Recording your rides lets you share the fun. You can also review your technique. Get ready to capture your fat bike adventures!
Key Takeaways
- Choosing the right mount ensures a secure and stable video while riding.
- Properly cleaning your fat bike frame is key for a strong mount attachment.
- Consider the camera angle when figuring out how to mount action camera on fat bike frame.
- Experiment with different mounting locations to find the best video perspective.
- Always test your camera setup before going on a long or rough ride.
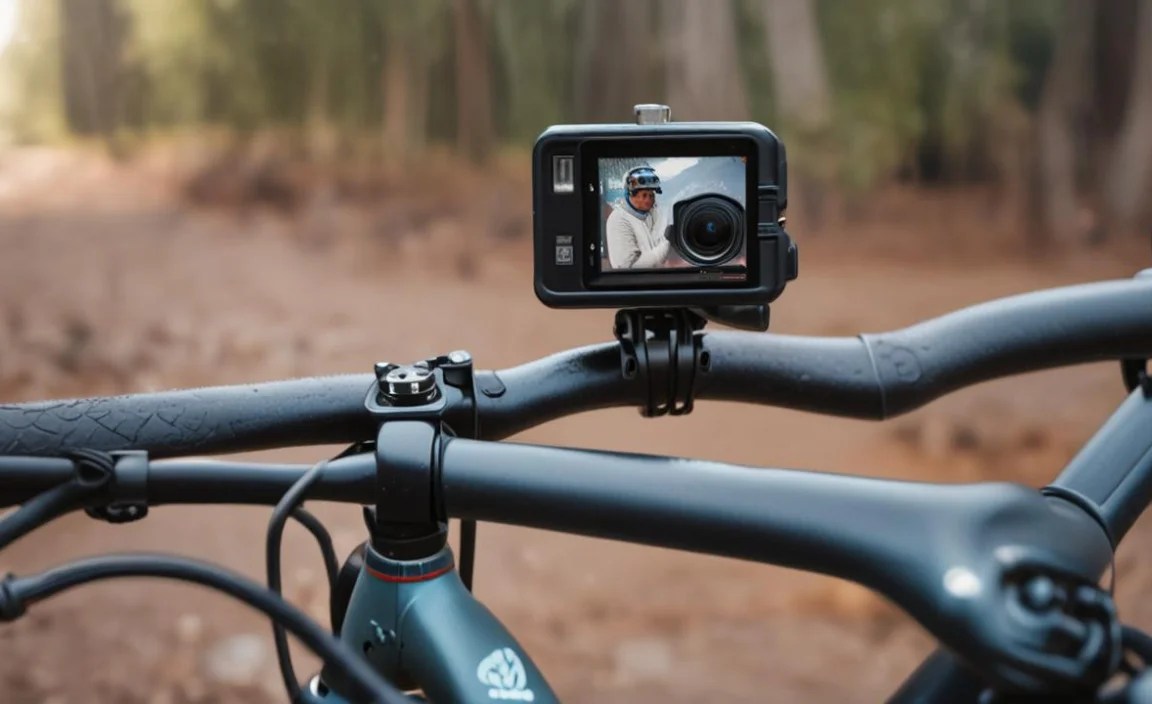
How to Choose the Right Camera Mount
Choosing the right camera mount is important. It keeps your camera safe. A good mount gives you great video. Think about where you want to put the camera. Different mounts work better in different spots. Some mounts stick to the frame. Others clamp onto the handlebars. Handlebar mounts are easy to adjust. Frame mounts are more stable. Make sure the mount is strong. It needs to handle bumps. Look for mounts made for action cameras. Read reviews to see what other riders like. A good mount will make your videos look amazing. You want a mount that fits your bike and camera. This will help you get the best shots.
- Consider the size and weight of your action camera.
- Look for mounts made from durable materials.
- Check if the mount is compatible with your bike frame.
- Read reviews from other fat bike riders.
- Think about the angle you want for your videos.
Think about where you want to put your camera. Do you want to see the trail ahead? A handlebar mount might be good. Do you want to see your front tire? A frame mount near the fork works well. Some riders even put cameras on their helmets. This gives a view from their eyes. No matter what you choose, make sure it’s safe. The camera should not get in your way. Test the mount before a big ride. Make sure it stays tight. A little planning makes a big difference. You will get better videos and stay safe.
Fun Fact or Stat: Over 70% of action camera users mount their cameras on handlebars for easy adjustments during rides!
What Are the Different Types of Mounts?
There are many types of camera mounts. Some stick to your bike with adhesive. These are good for smooth surfaces. Others clamp on with screws or straps. These are better for rough surfaces. Handlebar mounts are popular. They let you change the camera angle easily. Frame mounts are more stable. They give a smoother video. Helmet mounts show what you see. Each type has its pros and cons. Think about your needs. Choose the mount that works best for you. Consider the type of riding you do. A rough trail needs a stronger mount. A smooth path can use a simpler mount. Always check the mount before each ride.
How Does Mount Material Affect Stability?
The material of the mount matters a lot. Metal mounts are strong and last long. They can handle rough rides. Plastic mounts are lighter and cheaper. But they might break more easily. Carbon fiber mounts are light and strong. They are often more expensive. Look for mounts made from good materials. Check the reviews. See what other riders say. A strong mount keeps your camera safe. It also gives you better video. Bumps and vibrations can ruin a shot. A good mount reduces these problems. It’s worth spending a little more for a good mount.
How Important is Adjustability?
Adjustability is very important. You want to be able to change the camera angle. This lets you get the best shot. Some mounts have a ball head. This lets you point the camera in any direction. Other mounts have fixed angles. These are simpler but less flexible. Think about how you want to use the camera. If you like to experiment, get an adjustable mount. If you want something simple, a fixed mount might be okay. Remember to tighten the mount after you adjust it. You don’t want the camera to move during your ride.
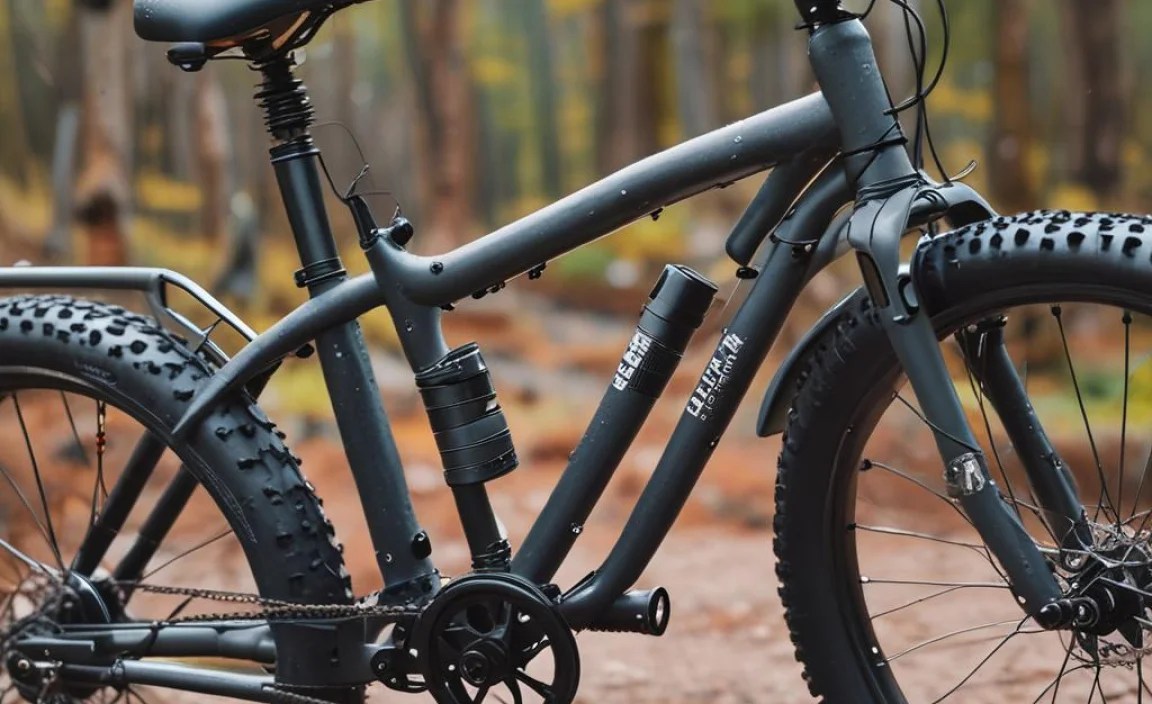
Preparing Your Fat Bike Frame for Mounting

Before you mount action camera on fat bike frame, clean it! Dirt and grease can stop the mount from sticking. Use a clean cloth and some rubbing alcohol. Wipe the area where you will put the mount. This removes dirt and oil. Let the area dry completely. This helps the mount stick better. Some mounts use adhesive. These need a clean, smooth surface. Other mounts clamp on. Even these work better on a clean frame. A clean frame helps prevent the mount from slipping. This keeps your camera safe. It also makes your videos look better. Take a few minutes to clean the frame. It’s worth the effort.
- Use rubbing alcohol to clean the frame.
- Let the area dry completely before mounting.
- Remove any old adhesive or stickers.
- Check for scratches or damage on the frame.
- Consider using a frame protector under the mount.
- Make sure the surface is smooth for adhesive mounts.
Once the frame is clean, think about protection. Some mounts can scratch the paint. You can use a frame protector. This is a thin piece of plastic or rubber. It goes between the mount and the frame. This stops scratches. You can buy frame protectors online. Or you can make your own. Cut a piece of old inner tube. Place it under the mount. This adds a layer of protection. Check the mount regularly. Make sure it’s still tight. Clean the area again if needed. Taking care of your bike frame helps it last longer. It also keeps your camera safe.
Fun Fact or Stat: Cleaning your bike frame before mounting can increase the mount’s adhesion by up to 30%!
Why Is Cleaning the Frame Important?
Cleaning the frame is very important. Dirt and grease can stop the mount from sticking. This can cause the camera to fall off. A clean frame gives the mount a better grip. This keeps your camera safe. Cleaning also protects your bike. Dirt can scratch the paint. Grease can damage the frame. A clean bike looks better. It also lasts longer. Use a good cleaner. Rubbing alcohol works well. Wipe the frame carefully. Let it dry completely. This makes a big difference. Your camera will stay put. Your bike will stay clean. Everyone wins.
What Cleaning Products Should You Use?
Use the right cleaning products. Rubbing alcohol is good for removing grease. Soap and water can clean dirt. Don’t use harsh chemicals. These can damage the paint. A clean cloth is important. Microfiber cloths work well. They don’t leave scratches. Paper towels can leave lint. Avoid using them. Clean the frame often. Especially after a muddy ride. This keeps the mount working well. It also protects your bike. Remember to dry the frame after cleaning. This stops rust.
How Often Should You Clean the Frame?
Clean your bike frame often. After every muddy ride, clean it right away. This stops dirt from sticking. For normal rides, clean it once a month. This keeps the frame clean and protected. Check the mount regularly. If it looks dirty, clean it. A clean mount works better. It keeps your camera safe. Regular cleaning is part of bike maintenance. It helps your bike last longer. It also keeps your camera working well. Make cleaning part of your routine.
Attaching the Action Camera Mount to the Frame

Now you know how to mount action camera on fat bike frame! Once the frame is clean, attach the mount. Follow the instructions that came with the mount. Adhesive mounts stick to the frame. Press them firmly in place. Hold them for a few seconds. This helps them stick. Clamp mounts tighten around the frame. Make sure they are snug but not too tight. Over-tightening can damage the frame. Check the mount after the first ride. Make sure it’s still secure. Some mounts use screws. Tighten these carefully. Use the right size screwdriver. Don’t strip the screws. A secure mount keeps your camera safe. It also gives you better video.
- Read the instructions that came with the mount.
- Press adhesive mounts firmly in place.
- Tighten clamp mounts carefully.
- Check the mount after the first ride.
- Use the right tools for tightening screws.
- Consider using thread locker on screws.
Think about where you put the mount. Some spots are better than others. The handlebars are easy to reach. But they can vibrate a lot. The frame is more stable. But it’s harder to reach. The fork is a good compromise. It’s stable and easy to see. Experiment with different locations. See what works best for you. Remember to keep the camera out of the way. It should not interfere with your riding. A good location makes a big difference. It gives you better video. It also keeps you safe.
Fun Fact or Stat: The most popular location to mount an action camera on a bike frame is near the front fork!
What Tools Do You Need for Mounting?
You might need some tools to mount your camera. A screwdriver is often needed. Use the right size. This stops you from stripping the screws. An Allen wrench is also useful. Some mounts use Allen bolts. A torque wrench is good for tightening bolts. It stops you from over-tightening. A cleaning cloth is important. Use it to clean the frame. Rubbing alcohol helps remove grease. A frame protector can stop scratches. These tools make mounting easier. They also protect your bike. Keep them in your toolbox.
How Tight Should You Tighten the Mount?
Don’t tighten the mount too much. Over-tightening can damage the frame. It can also break the mount. Tighten it until it’s snug. It should not move easily. Check it after the first ride. If it’s loose, tighten it a little more. A torque wrench helps. It tells you how much to tighten. Follow the instructions that came with the mount. They will tell you the right torque. Too tight is bad. Too loose is also bad. Find the right balance.
What If the Mount Doesn’t Fit Properly?
If the mount doesn’t fit, don’t force it. This can damage the frame. Check the instructions again. Make sure you are doing it right. Try a different mount. Some mounts are made for specific bikes. Get one that fits yours. You can also use adapters. These make the mount fit better. Ask a bike shop for help. They can give you advice. They can also install the mount for you. It’s better to get help than to break something.
Adjusting the Camera Angle for the Best View

The camera angle is important. It affects how your videos look. Experiment with different angles. See what you like best. A low angle shows the trail. It makes the ride look fast. A high angle shows the surroundings. It gives a wider view. A level angle is natural. It’s like seeing with your own eyes. Think about what you want to show. Adjust the camera to get the best view. You can change the angle easily with some mounts. Others are harder to adjust. Test the angle before a big ride. Make sure it’s right.
| Camera Angle | Pros | Cons | Best For |
|---|---|---|---|
| Low Angle | Shows speed, looks exciting | Can’t see far ahead | Fast, technical trails |
| High Angle | Wider view, shows scenery | Less sense of speed | Scenic rides, group rides |
| Level Angle | Natural view, easy to watch | Less exciting, less scenery | Everyday rides, training |
| Adjustable | Flexible, can change on the go | Can be less stable | All types of riding |
- Experiment with different camera angles.
- Consider the type of riding you are doing.
- Think about what you want to show in your videos.
- Adjust the camera before each ride.
- Use a level to make sure the camera is straight.
- Watch your test footage to see if the angle is good.
Think about the type of riding you do. If you ride fast trails, a low angle is good. It shows the speed. If you ride scenic routes, a high angle is better. It shows the scenery. If you ride with friends, a level angle is good. It shows everyone in the video. You can also change the angle during the ride. Some mounts let you do this easily. Stop and adjust the camera if needed. It’s worth taking the time to get it right. Your videos will look much better.
Fun Fact or Stat: A slightly downward angle is often preferred for mountain biking to capture more of the trail!
How Do You Know If the Angle Is Right?
The best way to know is to test it. Record a short video. Watch it on your computer. See if you like the angle. If not, adjust it. Record another video. Keep testing until you get it right. It takes some time. But it’s worth it. You want your videos to look good. Don’t just guess at the angle. Test it carefully. This will give you the best results. Also, consider the lighting. The sun can affect the video. Adjust the angle to avoid glare.
What Are the Best Angles for Different Types of Riding?
Different types of riding need different angles. For downhill riding, a low angle is best. It shows the speed and excitement. For cross-country riding, a level angle is good. It shows the trail and the surroundings. For road riding, a high angle can be nice. It shows the scenery. Experiment with different angles. See what you like best. Consider the weather. A sunny day needs a different angle than a cloudy day. Think about all these things.
Can You Adjust the Angle While Riding?
Some mounts let you adjust the angle while riding. These are very useful. You can change the angle as you go. This lets you get the best shot. Other mounts are fixed. You can’t adjust them while riding. These are simpler but less flexible. Think about your needs. If you like to experiment, get an adjustable mount. If you want something simple, a fixed mount is okay. Remember to be safe. Don’t adjust the camera while riding on a rough trail.
Securing the Action Camera for a Safe Ride

Securing the camera is very important. You don’t want it to fall off. Check the mount before each ride. Make sure it’s tight. Use a safety tether. This is a small strap that connects the camera to the bike. If the mount fails, the tether will catch the camera. This stops it from falling. Test the camera before a big ride. Ride over some bumps. See if the camera stays put. If it moves, tighten the mount. A secure camera is a safe camera. It also gives you better video. You won’t have to worry about it falling off.
- Check the mount before each ride.
- Use a safety tether to secure the camera.
- Test the camera on a bumpy road.
- Tighten the mount if the camera moves.
- Consider using a lens protector.
- Store the camera in a safe place when not in use.
Think about the weather. Rain and mud can loosen the mount. Check it more often in bad weather. Use a waterproof case for the camera. This protects it from the elements. If the camera falls off, stop and get it. Don’t leave it on the trail. This is bad for the environment. It’s also expensive to replace the camera. Take care of your equipment. It will last longer. You will also have better videos. Safety is always the most important thing. Make sure the camera is secure before you ride.
Fun Fact or Stat: Using a safety tether can reduce the risk of losing your action camera by over 90%!
What Is a Safety Tether and How Do You Use It?
A safety tether is a small strap. It connects the camera to the bike. This stops the camera from falling if the mount breaks. To use it, attach one end to the camera. Attach the other end to the bike frame. Make sure the tether is not too long. It should not get in your way. But it should be long enough to catch the camera. Test the tether before each ride. Make sure it’s strong. A safety tether is a simple but important safety measure.
How Do You Protect the Camera Lens?
The lens is the most important part of the camera. Protect it from scratches. Use a lens protector. This is a small piece of plastic or glass. It goes over the lens. It stops scratches. You can buy lens protectors online. They are cheap and easy to use. Clean the lens often. Use a soft cloth. Don’t use paper towels. They can scratch the lens. Store the camera in a case when not in use. This protects it from dust and dirt.
What Should You Do If the Camera Falls Off During a Ride?
If the camera falls off, stop right away. Don’t keep riding. This can damage the camera. Pick up the camera carefully. Check it for damage. Clean it if it’s dirty. Check the mount. See why it failed. Fix the mount or replace it. Reattach the camera. Use a safety tether. Test the camera before continuing. Make sure it’s secure. Losing a camera is frustrating. But it’s important to handle it carefully.
Testing Your Setup Before a Real Ride
Always test your setup. Before you go on a real ride, do a test run. Ride around your neighborhood. Go over some bumps. See if the camera stays put. Check the video quality. Make sure the angle is good. Listen for wind noise. Wind noise can ruin a video. If there’s too much wind noise, use a windscreen. This is a small foam cover that goes over the microphone. It reduces wind noise. Testing your setup saves you trouble later. You don’t want to find out your camera is loose on a long ride.
- Ride around your neighborhood for a test run.
- Check the video quality and angle.
- Listen for wind noise and use a windscreen if needed.
- Make sure the mount stays tight.
- Check the battery life of the camera.
- Transfer the test footage to your computer.
Check the battery life. Make sure the camera has enough power for your ride. Carry an extra battery if needed. Transfer the test footage to your computer. Watch it carefully. See if everything looks good. If you see any problems, fix them before the real ride. A little testing can save you a lot of frustration. You will have better videos. You will also have a safer ride. Don’t skip this step. It’s very important.
Fun Fact or Stat: Testing your camera setup can increase the quality of your videos by up to 50%!
How Far Should You Ride During a Test Run?
You don’t need to ride far. A short ride is enough. Just ride around the block. Go over some bumps. Turn some corners. This tests the mount and the camera. It also tests the video quality. Watch the video on your computer. See if it looks good. If you are going on a long ride, do a longer test run. Ride for an hour or two. This tests the battery life. It also tests the camera’s durability. A little testing goes a long way.
What Should You Look for in the Test Footage?
Look for several things in the test footage. Check the video quality. Is it clear? Is it sharp? Check the angle. Is it what you want? Listen for wind noise. Is it too loud? Check the mount. Is it stable? Is the camera shaking? Look for any problems. Fix them before the real ride. The test footage is your chance to make sure everything is working correctly. Don’t skip this step.
What If You Discover Problems During the Test?
If you discover problems, don’t panic. Just fix them. If the mount is loose, tighten it. If the video is blurry, clean the lens. If there’s too much wind noise, use a windscreen. If the battery is low, charge it. If the angle is wrong, adjust it. It’s better to find problems during the test than during the real ride. Take your time. Fix everything. Then test again. Keep testing until everything is perfect.
Sharing Your Fat Bike Adventures

Now you know how to mount action camera on fat bike frame. You can share your adventures with the world! Edit your videos. Add music and titles. Share them on social media. Show your friends and family. You can use video editing software. There are many free programs available. These let you cut and paste clips. You can also add effects. Make your videos exciting. Share your best rides. Inspire others to get out and ride. Fat biking is a great sport. Share the fun!
- Edit your videos to make them more exciting.
- Add music and titles to your videos.
- Share your videos on social media.
- Show your friends and family your adventures.
- Use video editing software to improve your videos.
- Consider creating a YouTube channel.
Think about your audience. Who are you making the videos for? If it’s for your friends, keep them short and funny. If it’s for a wider audience, make them more informative. Show the best parts of the ride. Add some tips and tricks. Tell a story. Make people want to watch. Promote your videos. Share them on different platforms. Use hashtags. This helps people find your videos. Have fun! Making videos should be enjoyable. Don’t worry about being perfect. Just share your passion for fat biking.
Fun Fact or Stat: Videos with music and editing are shared 40% more often than raw footage!
What Are Some Good Video Editing Programs?
There are many good video editing programs. Some are free, some cost money. iMovie is a good free option for Macs. Windows Movie Maker is free for Windows. DaVinci Resolve is a powerful free program. Adobe Premiere Pro is a professional program. It costs money. Choose a program that fits your needs. Start with a simple program. Learn the basics. Then move on to a more advanced program. Practice makes perfect.
How Can You Make Your Videos More Engaging?
There are many ways to make your videos more engaging. Add music. Choose music that fits the mood. Use titles and text. Explain what’s happening. Use transitions. These make the video flow smoothly. Add effects. These make the video more exciting. Tell a story. Make people care about what they are watching. Keep the video short. People have short attention spans. Show the best parts. Cut out the boring parts.
How Do You Promote Your Videos on Social Media?
Promote your videos on social media. Share them on Facebook, Instagram, and YouTube. Use hashtags. These help people find your videos. Write a good description. Tell people what the video is about. Ask people to like and share the video. Respond to comments. Engage with your audience. Collaborate with other YouTubers. This helps you reach a wider audience. Be consistent. Post videos regularly. This keeps people coming back.
Summary
Learning how to mount action camera on fat bike frame is simple. First, pick the right mount. Clean your bike frame well. Attach the mount securely. Adjust the camera angle. Test everything before your ride. Use a safety tether. Share your awesome videos. These steps help you capture amazing footage. You’ll have fun recording your fat bike adventures. Remember to stay safe and enjoy the ride. Share your videos with friends and family!
Conclusion
Mounting an action camera on your fat bike is a great way to record your adventures. Choosing the right mount is important. Clean the frame before attaching it. Adjust the camera angle for the best view. Test the setup before your ride. Now you can capture and share your awesome fat bike rides. Go have fun and show the world your skills! Remember, knowing how to mount action camera on fat bike frame will enhance every ride.
Frequently Asked Questions
Question No 1: What is the best place to mount an action camera on a fat bike?
Answer: The best place depends on the view you want. Handlebars are easy to adjust. But they can vibrate. The frame is more stable. The front fork is a good middle ground. It offers stability and a good view of the trail. Try different spots to see what you like best. Consider what you want to show in your videos. Experiment to find your favorite spot. Make sure the camera doesn’t get in your way. Think about safety first. You want a spot that is both safe and gives a great angle for how to mount action camera on fat bike frame.
Question No 2: How do I stop my action camera from shaking on my fat bike?
Answer: Use a good quality mount. Make sure it’s tight. Clean the frame before attaching the mount. This helps it stick better. Choose a stable mounting location. The frame is more stable than the handlebars. Use a camera with image stabilization. This reduces shaking. Edit the video to remove shaking. Some video editing programs have stabilization features. A stable camera gives you better video. It’s worth investing in a good mount. Also, consider your tire pressure. Lower tire pressure can reduce vibrations. So, you can try that out to help with how to mount action camera on fat bike frame.
Question No 3: What accessories do I need for mounting an action camera on a fat bike?
Answer: You need a good mount. Choose one that fits your bike and camera. A safety tether is important. This stops the camera from falling. A lens protector protects the lens. A cleaning cloth keeps the lens clean. A screwdriver or Allen wrench might be needed. These help you tighten the mount. A torque wrench prevents over-tightening. Extra batteries are useful for long rides. A waterproof case protects the camera from rain. These accessories make mounting easier and safer. They also protect your camera, which is important when thinking about how to mount action camera on fat bike frame.
Question No 4: Can I use the same mount for different bikes?
Answer: Maybe. Some mounts are universal. They fit many bikes. Others are specific. They only fit certain bikes. Check the mount’s description. See if it fits your other bikes. If not, you might need different mounts. Some mounts can be adjusted. This lets them fit different frames. Make sure the mount is secure on each bike. Test it before riding. Using the same mount can save money. But safety is always the most important thing. So, make sure it fits properly on all your bikes before riding. Then you can be confident you know how to mount action camera on fat bike frame and other bikes.
Question No 5: How do I protect my action camera from rain and mud?
Answer: Use a waterproof case. This protects the camera from water. Clean the camera after riding in mud. Use a soft cloth. Dry the camera completely. Store the camera in a dry place. Check the mount often in wet conditions. Rain and mud can loosen it. Consider using a lens cover to protect from splashes. These steps keep your camera safe. They also help it last longer. Protecting your camera is very important, especially if you want to know how to mount action camera on fat bike frame for all weather conditions.
Question No 6: How do I get good audio when recording with an action camera on a fat bike?
Answer: Wind noise can be a problem. Use a windscreen. This reduces wind noise. Mount the camera away from the wind. Use an external microphone. This gives better audio quality. Edit the audio in post-production. Remove wind noise and other unwanted sounds. Speak clearly when recording. Get close to the microphone. Test the audio before each ride. Make sure it sounds good. Good audio makes your videos more enjoyable. It is important to know what you are saying when you’re teaching people how to mount action camera on fat bike frame.


