
How to Use a Floor Pump for Bikes: Easy Guide
Have you ever seen a bike with a flat tire? It can be a bummer! You can’t ride it. The tires need air to work right. That’s where a floor pump comes in. Do you know how to use a floor pump for bikes? It’s easier than you think!
Imagine your bike is a balloon. A floor pump helps fill it with air. This makes the tires hard and ready to roll. Let’s learn how to do it.
Key Takeaways
- Using a floor pump is the best way to keep your bike tires properly inflated.
- Make sure the pump head is locked onto the valve stem tightly to avoid leaks.
- Check the tire pressure regularly using the gauge on the floor pump.
- How to use a floor pump for bikes involves a few simple steps you can master.
- Knowing the correct PSI for your tires will improve your ride and safety.
How To Choose The Right Floor Pump

Choosing the right floor pump is important. Not all pumps are the same. Some are for different types of valves. The two main types are Schrader and Presta. Schrader valves are like the ones on car tires. Presta valves are thinner and have a little nut on the end. Most floor pumps can handle both. Look for a pump with a gauge. The gauge tells you how much air is in the tire. This helps you avoid over-inflating. Over-inflating can cause a blowout. Consider the size of the pump too. A taller pump can be easier to use. It lets you use your body weight to pump. A good floor pump will last a long time. It will make inflating your tires much easier. Think about what kind of bike you have. This will help you pick the best pump.
- Consider the valve type your bike uses.
- Look for a pump with a clear pressure gauge.
- Choose a comfortable height for easy pumping.
- Check if the pump has a stable base.
- Read reviews to find a reliable floor pump.
Picking the right floor pump means your tires will always be ready. Think about the features that matter most to you. Do you want a digital gauge? Or maybe a pump with extra attachments? Some pumps even have a built-in storage compartment. This is great for keeping track of small parts. Don’t be afraid to spend a little more on a quality pump. It will save you time and frustration in the long run. Taking care of your tires is part of taking care of your bike. When you know you have the right tools, it makes everything easier. A good floor pump is a must-have for any bike owner. Enjoy the ride!
What are the Different Types of Valves?
Have you ever looked closely at your bike tire valve? There are two main types. One is called Schrader, and the other is Presta. Schrader valves are wider. They are like the ones you see on car tires. You can even use the same pump. Presta valves are thinner and have a small nut on top. You need to unscrew the nut before you pump air in. Why are there two types? Presta valves are often used on road bikes. They can handle higher pressures. Schrader valves are common on mountain bikes and kids’ bikes. It is important to know which type your bike has. This way, you can use the right pump and avoid problems. Always check before you start pumping!
How Does a Pressure Gauge Help?
Imagine trying to guess how much air is in your tires. It would be hard, right? A pressure gauge takes away the guesswork. It tells you exactly how much air is inside. The measurement is usually in PSI (pounds per square inch). Your tires have a recommended PSI range. This is printed on the side of the tire. Using a gauge helps you stay within that range. Too little air and your ride will be slow. Too much air and your tire could burst. A gauge ensures you get it just right. Some gauges are digital, and some are analog. Both work well. The most important thing is to use one!
What Makes a Floor Pump High Quality?
Have you ever used a cheap, flimsy pump? It can be frustrating. A high-quality floor pump makes a big difference. The materials are stronger. The pump head seals better. The gauge is more accurate. A good pump also feels better in your hands. It pumps smoothly and efficiently. You won’t have to work as hard to get the right pressure. Look for pumps with a sturdy base. This keeps the pump from tipping over. Also, check the reviews. See what other people say about the pump’s durability. Investing in quality will save you money in the long run. You won’t have to replace it as often!
Fun Fact or Stat: The ideal tire pressure can increase your cycling speed by up to 20%!
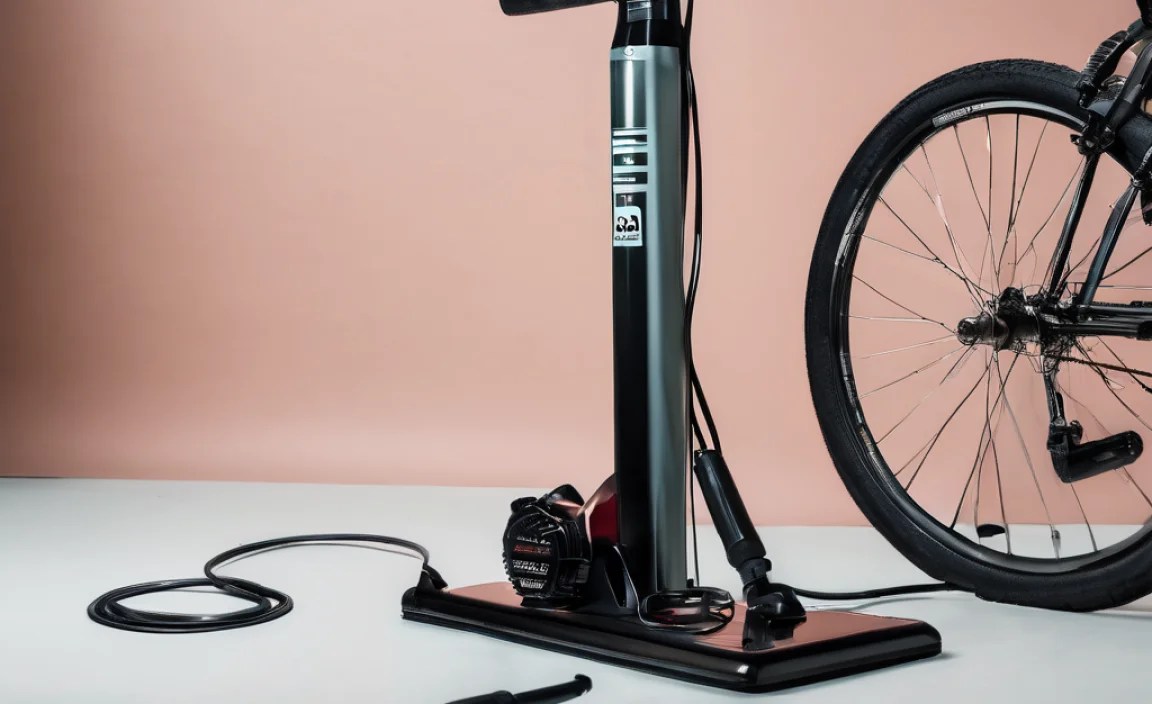
How To Attach The Pump Head Correctly
Attaching the pump head correctly is key. If you don’t, air will leak out. This makes pumping much harder. First, find the valve on your tire. Remove the valve cap. Now, take the pump head. Make sure it’s set to the right valve type. Some pumps have a switch for Schrader or Presta. Others auto-adjust. Place the pump head over the valve. Push it on firmly. Now, lock the lever. This secures the pump head. If you hear air leaking, it’s not on tight enough. Adjust and try again. A good seal is important. It lets you pump air efficiently. Always double-check before you start pumping. A secure connection is the first step to properly inflated tires.
- Remove the valve cap before attaching the pump.
- Ensure the pump head matches your valve type.
- Push the pump head straight onto the valve.
- Lock the lever to secure the connection.
- Listen for air leaks; adjust if needed.
Think of attaching the pump head like connecting a puzzle piece. It needs to fit just right. If it’s crooked, it won’t work. Sometimes, the pump head can be tricky. Don’t force it. Make sure it’s lined up correctly. If you’re having trouble, try wiggling it gently. A little bit of patience can make a big difference. Once the pump head is secure, you’re ready to start pumping. Remember, a good connection means less work for you. It also means your tires will inflate faster. Taking a moment to do it right will save you time and energy in the long run. You will also keep your tires in the best condition.
What if the Pump Head Won’t Fit?
Sometimes, the pump head just won’t seem to fit. Don’t worry, this is common. First, double-check that you have the right setting. Is it set to Schrader or Presta? If it’s on the wrong setting, it won’t fit. Next, make sure the valve is clean. Dirt can sometimes block the pump head. Use a cloth to wipe it off. If it still doesn’t fit, check the pump head itself. Is there any damage? Is anything blocking the opening? If you’ve tried everything and it still doesn’t fit, you might need a new pump head. They can wear out over time. Don’t give up! With a little troubleshooting, you can usually get it to work.
How Tight Should the Lever Be?
The lever on the pump head is important. It locks the pump head onto the valve. But how tight should it be? Too loose, and air will leak out. Too tight, and you might damage the valve. The goal is to find the sweet spot. The lever should be snug. It should hold the pump head firmly in place. You shouldn’t have to force it. If you do, it might be too tight. Experiment a little. Try different positions until you find the one that works best. You’ll know it’s right when there are no air leaks. Remember, practice makes perfect. With a little experience, you’ll get the hang of it.
Can I Damage the Valve?
Yes, you can damage the valve if you’re not careful. Being gentle is key. Don’t force the pump head onto the valve. Don’t overtighten the lever. If you do, you could bend or break the valve. This is especially true for Presta valves. They are more delicate than Schrader valves. If you think you’ve damaged the valve, stop pumping. Check it carefully. If it’s bent or broken, you’ll need to replace it. Replacing a valve is easier than replacing a whole tire. So, take your time and be gentle. Your tires will thank you!
Fun Fact or Stat: A loose pump head can cause up to 30% loss of air pressure while pumping!
Understanding Tire Pressure (PSI)

Understanding tire pressure is super important. PSI means “pounds per square inch.” It tells you how much air is in your tire. Every tire has a recommended PSI range. This range is printed on the side of the tire. Why is this important? Too little air, and your ride will be slow and bumpy. You could also damage the rim. Too much air, and your tire could explode. The right PSI makes your ride smooth and fast. It also helps your tires last longer. Use the gauge on your floor pump to check the PSI. Inflate your tires to the recommended pressure. Check the pressure before every ride. This keeps you safe and happy!
- Find the recommended PSI range on your tire.
- Use the pump’s gauge to measure tire pressure.
- Adjust pressure based on riding conditions.
- Check tire pressure before each bike ride.
- Avoid over-inflating or under-inflating your tires.
Imagine your tires are like shoes. If your shoes are too loose, you might trip. If they’re too tight, your feet will hurt. The right tire pressure is like having shoes that fit just right. It makes everything more comfortable. Different types of bikes need different pressures. Road bikes usually need higher pressures. Mountain bikes often need lower pressures. Experiment a little to find what works best for you. Pay attention to how your bike feels. If it feels sluggish, add more air. If it feels harsh, let some air out. Finding the right pressure is part of becoming a better cyclist. It’s important to keep your bike tires in tip-top shape. Ride on!
What Happens if I Over-Inflate?
Over-inflating your tires can be dangerous. Think of your tire like a balloon. If you blow it up too much, it will pop! The same thing can happen to your tire. Over-inflation can cause a blowout. This is when the tire bursts suddenly. It can be scary and cause you to lose control. It can also damage your bike. Always stay within the recommended PSI range. Check the gauge carefully as you pump. If you accidentally over-inflate, let some air out. It’s better to be safe than sorry. A blowout can ruin your ride and even cause an accident. So, pay attention to the pressure!
What Happens if I Under-Inflate?
Under-inflating your tires is also not a good idea. It can make your ride slow and difficult. Think of trying to run with flat shoes. It’s hard work! Under-inflated tires have more rolling resistance. This means it takes more effort to pedal. It can also damage your rims. The rims are the metal part of the wheel. If the tire is too soft, the rim can hit the ground. This can cause dents or cracks. Check your tire pressure regularly. Keep your tires properly inflated. It will make your ride more enjoyable and protect your bike.
How Does Weather Affect Tire Pressure?
Did you know that weather can affect tire pressure? It’s true! When it’s hot, the air inside your tires expands. This means the pressure goes up. When it’s cold, the air contracts. This means the pressure goes down. You might need to adjust your tire pressure depending on the weather. Check your tires more often in extreme temperatures. In hot weather, you might want to let a little air out. In cold weather, you might need to add some air. Paying attention to the weather can help you maintain the right tire pressure. It will also keep you safe and comfortable.
Fun Fact or Stat: Tire pressure can change by about 1 PSI for every 10 degrees Fahrenheit change in temperature!
Steps on How To Use The Floor Pump

Okay, let’s learn how to use a floor pump for bikes! First, find the valve on your tire. Remove the valve cap. Next, attach the pump head. Make sure it’s on tight. Lock the lever. Now, stand with your feet on the pump’s base. Grip the pump handle firmly. Push down on the handle. Use your body weight. Watch the gauge as you pump. Stop when you reach the right PSI. Unlock the lever. Remove the pump head. Put the valve cap back on. That’s it! You’ve successfully inflated your tire. Practice makes perfect. Soon, you’ll be a pro!
- Remove the valve cap from the tire.
- Attach the pump head securely.
- Lock the lever on the pump head.
- Pump until you reach the desired PSI.
- Remove the pump head and replace the cap.
Think of using a floor pump like learning to ride a bike. At first, it might seem tricky. But with practice, it becomes easy. The key is to be smooth and steady. Don’t jerk the pump handle. Use your body weight to help you. Watch the gauge carefully. Don’t over-inflate. If you do, just let some air out. Remember, every bike is different. You might need to experiment a little to find what works best for you. But with a little patience, you’ll master the art of using a floor pump. And you’ll be ready to hit the road in no time!
How Often Should I Pump My Tires?
How often should you pump your tires? That’s a great question! It depends on a few things. How often do you ride? What kind of tires do you have? As a general rule, you should check your tire pressure before every ride. If they need air, pump them up. Some tires lose air faster than others. Road bike tires often need to be pumped more often. Mountain bike tires can usually go longer between pumps. Get in the habit of checking your tires regularly. It will keep you safe and make your ride more enjoyable.
What If the Pump Isn’t Pumping Air?
Sometimes, you might try to pump, but no air comes out. What do you do? First, make sure the pump head is attached correctly. Is the lever locked? Is the pump head lined up with the valve? If everything looks good, check the pump itself. Is the hose cracked? Is the pump head damaged? Sometimes, the pump needs to be lubricated. Use a little bit of oil to grease the moving parts. If you’ve tried everything and it’s still not working, you might need a new pump. Don’t get frustrated. Troubleshooting is part of bike maintenance.
Can Kids Use a Floor Pump?
Yes, kids can use a floor pump! But they might need some help from an adult. Floor pumps can be a bit big and heavy. It’s important to use the pump safely. Make sure the child can reach the handle comfortably. Show them how to attach the pump head correctly. Teach them how to read the gauge. Supervise them while they pump. With a little guidance, kids can learn to take care of their own bikes. It’s a great way to teach them responsibility. And it’s fun to get them involved in bike maintenance.
Fun Fact or Stat: Regular pumping can extend the life of your tires by up to 50%!
Troubleshooting Common Pump Problems
Even with a good floor pump, problems can happen. Air leaks are a common issue. This means the pump head isn’t sealed properly. Make sure it’s attached tightly. Check the lever. Is it locked? If the pump is hard to push, it might need lubrication. Use a little oil on the moving parts. Sometimes, the gauge doesn’t work. This could mean it’s broken. You might need to replace the gauge. If you’re having trouble, check the pump’s instructions. Many problems have simple solutions. Don’t be afraid to ask for help from a bike shop. They can diagnose and fix more serious issues. Remember, a little maintenance can keep your pump working well.
- Check for air leaks around the pump head.
- Lubricate the pump if it’s hard to push.
- Replace a broken or inaccurate pressure gauge.
- Inspect the hose for cracks or damage.
- Consult a bike shop for complex repairs.
Imagine your floor pump is like a car. It needs regular check-ups. Just like you change the oil in your car, you need to maintain your pump. Keep it clean. Wipe off any dirt or grime. Store it in a dry place. This will prevent rust. If you take care of your pump, it will take care of you. It will be there when you need it. It will help you keep your tires properly inflated. And it will make your bike rides more enjoyable. A little bit of maintenance goes a long way. You will be able to avoid problems and keep your bike in its best shape.
Why is Air Leaking When I Pump?
Air leaking while you pump is frustrating. Where is the air coming from? Usually, it’s from around the pump head. This means the seal isn’t tight. Make sure the pump head is pushed on all the way. Lock the lever. If it’s still leaking, try adjusting the position. Sometimes, the rubber seal inside the pump head wears out. You can usually replace this seal. Check your pump’s instructions. They will tell you how. A new seal can make a big difference. It will stop the leaks and make pumping easier.
The Gauge Isn’t Moving. What Now?
A gauge that isn’t moving can be confusing. Is the pump broken? Not necessarily. First, make sure the pump head is attached correctly. If it’s not, the gauge won’t register anything. Next, check the gauge itself. Is it stuck? Tap it gently to see if it moves. If it’s still not working, the gauge might be broken. You can buy replacement gauges online or at a bike shop. Replacing a gauge is usually pretty easy. Follow the instructions that come with the new gauge. Soon, you’ll be able to see your tire pressure again.
How Do I Lubricate My Floor Pump?
Lubricating your floor pump is important. It keeps it working smoothly. What kind of lubricant should you use? A light oil works well. You can use bike chain oil or even a silicone spray. Where should you apply the oil? Focus on the moving parts. Put a few drops on the piston rod. This is the long metal rod that goes up and down. Also, lubricate the joints where the handle connects. Wipe off any excess oil. You don’t want it to drip. Lubricating your pump regularly will keep it working like new.
Fun Fact or Stat: Regular lubrication can extend the life of your floor pump by up to two years!
Maintaining Your Floor Pump For Longevity
Taking care of your floor pump is important. It will last longer if you do. Keep it clean. Wipe off any dirt or grime. Store it in a dry place. This prevents rust. Check the hose regularly. Look for cracks or damage. Replace the hose if needed. The pump head is another important part. Make sure it’s in good condition. Replace the rubber seal if it wears out. Lubricate the pump regularly. This keeps it working smoothly. A little bit of care goes a long way. Your floor pump will be ready when you need it. And you’ll save money in the long run.
- Clean the pump regularly to remove dirt.
- Store the pump in a dry, safe place.
- Inspect the hose for cracks and replace if needed.
- Replace worn-out seals in the pump head.
- Lubricate moving parts to ensure smooth operation.
Think of your floor pump as a friend. If you treat it well, it will be a reliable friend. It will be there to help you keep your tires inflated. It will make your bike rides more enjoyable. But if you neglect it, it might break down. Then you’ll be stuck with flat tires. So, take a little time to maintain your pump. It’s a small investment that pays off big time. You can keep your bike in great shape for years to come. And you’ll always be ready for your next adventure.
What Cleaning Products Can I Use?
When cleaning your floor pump, use gentle products. You don’t want to damage the pump. A damp cloth works well for most surfaces. For tougher grime, use mild soap and water. Avoid harsh chemicals. They can corrode the metal and plastic parts. Don’t spray water directly into the pump. This can cause rust. Wipe the pump dry after cleaning. This will prevent water spots. Regular cleaning will keep your pump looking and working its best.
How Should I Store My Floor Pump?
Proper storage is important for your floor pump. Store it in a dry place. This prevents rust. Avoid storing it in direct sunlight. The sun can damage the hose and plastic parts. Hang it on a hook or store it upright. This keeps it from getting bent or damaged. Don’t store it under heavy objects. This can also damage the pump. A little bit of care will keep your pump in good condition for years to come.
When Should I Replace Parts?
Knowing when to replace parts is important. Check the hose regularly. If it’s cracked or brittle, replace it. The pump head is another common part to replace. If it’s leaking or doesn’t fit tightly, replace it. The gauge can also wear out over time. If it’s inaccurate, replace it. You can usually find replacement parts online or at a bike shop. Replacing parts is cheaper than buying a new pump. It will also keep your pump working like new.
Fun Fact or Stat: Properly maintained floor pumps can last over a decade!
| Feature | Benefit | Maintenance Tip | Replacement Time |
|---|---|---|---|
| Hose | Delivers air to tire | Check for cracks | Every 2-3 years |
| Pump Head | Connects to valve | Clean regularly | Every 1-2 years |
| Gauge | Measures pressure | Ensure accuracy | Every 3-5 years |
| Piston | Compresses air | Lubricate regularly | Every 5+ years |
Summary
How to use a floor pump for bikes is a simple skill. First, choose the right pump for your bike’s valves. Next, attach the pump head securely. Make sure it’s locked in place. Then, use your body weight to pump. Watch the gauge to reach the right PSI. After pumping, remove the pump head carefully. Finally, put the valve cap back on. Regular maintenance will keep your pump working well. It will also make inflating your tires easier. Keep your tires properly inflated for a safe and fun ride. A good floor pump is a must-have tool for every cyclist.
Conclusion
Learning how to use a floor pump for bikes is easy. It is important for every bike rider. You can keep your tires inflated. This makes your rides safer and more fun. Remember to choose the right pump. Always check your tire pressure. Keep your pump in good condition. With a little practice, you’ll be a pro. Now, go enjoy your bike!
Frequently Asked Questions
Question No 1: Why is my bike tire going flat so quickly?
Answer: There are several reasons why your bike tire might be losing air quickly. One common reason is a puncture from a small object like a thorn or piece of glass. These punctures can be tiny and hard to see. Another reason could be a leaky valve. Make sure the valve core is tightened properly. Also, check the tire for any cuts or damage. If you find a puncture, you’ll need to patch or replace the tube. Keeping your tires properly inflated can also help prevent flats. Regularly checking your tire pressure and using a floor pump to maintain the correct PSI will help keep you rolling smoothly.
Question No 2: Can I use a car tire pump on my bike?
Answer: You might be wondering if you can use a car tire pump on your bike. The answer is sometimes, but it’s not always the best idea. Car tire pumps are designed for Schrader valves. Some bikes also use Schrader valves. If your bike has Schrader valves, you can use a car tire pump. However, be very careful not to over-inflate the tire. Car tire pumps often inflate very quickly. Bike tires require much lower pressure than car tires. It’s easy to accidentally put too much air in and cause a blowout. Using a floor pump designed for bikes is a much safer and more accurate way to inflate your tires. A floor pump lets you control the pressure and see the PSI on a gauge.
Question No 3: How do I know what PSI my tires should be?
Answer: Finding the right PSI for your tires is important for a comfortable and safe ride. The recommended PSI range is usually printed on the sidewall of your tire. Look for numbers followed by “PSI.” The range might be something like “35-65 PSI.” This means you should inflate your tire to somewhere between 35 and 65 PSI. The exact pressure you choose depends on a few things. Your weight, the type of riding you’re doing, and the weather all play a role. Heavier riders usually need higher pressure. Riding on rough terrain might require lower pressure. Experiment a little to find what works best for you. Use a floor pump with a gauge to accurately measure the pressure.
Question No 4: What’s the difference between Schrader and Presta valves?
Answer: Schrader and Presta valves are the two main types of valves you’ll find on bike tires. Schrader valves are wider and sturdier. They are the same type of valve used on car tires. Presta valves are thinner and have a small nut on the end. You need to unscrew the nut before you inflate the tire. Presta valves are often used on road bikes. They can handle higher pressures. Schrader valves are common on mountain bikes and kids’ bikes. Most floor pumps can be used with both types of valves. Some pumps have a switch to select the valve type. Others automatically adjust. Knowing which type of valve your bike has is important when learning how to use a floor pump for bikes.
Question No 5: Can I use a floor pump on a tubeless tire?
Answer: Yes, you can use a floor pump on a tubeless tire. However, it can sometimes be tricky to seat the tire initially. Seating the tire means getting the tire beads to lock into the rim. This requires a quick burst of air. Sometimes, a regular floor pump can’t deliver enough air fast enough. If you’re having trouble seating a tubeless tire with a floor pump, try removing the valve core. This allows more air to flow in quickly. You can also try using a tubeless inflator pump. These pumps are designed to deliver a large volume of air quickly. Once the tire is seated, you can use a floor pump to adjust the pressure to the desired PSI.
Question No 6: How do I prevent my floor pump from breaking?
Answer: Taking care of your floor pump will help it last longer. One of the best ways to prevent your floor pump from breaking is to store it properly. Keep it in a dry place to prevent rust. Avoid storing it in direct sunlight. The sun can damage the hose and plastic parts. Also, be sure to clean your pump regularly. Wipe off any dirt or grime. Lubricate the moving parts with a light oil. This will keep it working smoothly. Check the hose and pump head regularly for damage. Replace any worn or broken parts. By following these tips, you can keep your floor pump in good condition for years to come. You will also always know how to use a floor pump for bikes.


