
How to Match Shock Pump Head to Suspension Valve: Easy!
Have you ever seen a bike with squishy parts? These are called suspensions. They make the ride smooth. But what if you need to add air? You need a special pump. Do you know how to match shock pump head to suspension valve? It’s easier than you think. Let’s learn how to do it right!
These pumps help keep your bike riding smoothly. You want to make sure you get the right fit.
It’s important to learn about this. You can keep your bike in good shape. This will make riding more fun. Let’s jump in and learn together.
Key Takeaways
- Knowing how to match shock pump head to suspension valve ensures proper inflation.
- Always check valve type (Schrader or Presta) before connecting the pump.
- Use gentle pressure to avoid damaging the suspension valve.
- Make sure the pump head is securely attached to prevent air leaks.
- Regularly check your suspension pressure for optimal performance.
Understanding Suspension Valves

First, let’s talk about the valves on your bike. A valve is like a door for air. There are two main types: Schrader and Presta. Schrader valves are like the ones on car tires. They are wider and have a pin in the middle. Presta valves are thinner and have a nut you need to open. Knowing which one you have is the first step. Look closely at your suspension. Does it look like a car tire valve? Or is it thin with a little nut? Once you know the type, you’re ready to pick the right pump head. This makes sure you can add air easily. Using the wrong pump head can damage the valve. This can make it hard to keep your suspension working well. So, take a good look and learn the difference.
- Identify the type of valve on your suspension.
- Schrader valves are wider, like car tires.
- Presta valves are thinner with a locking nut.
- Check the valve before each ride.
- Clean the valve to remove dirt.
Now that you know the valve types, let’s think about why this matters. Imagine trying to put a square peg in a round hole. It just won’t work! The same goes for pump heads and valves. If you use the wrong one, you won’t be able to add air. You might even break something. That’s why it’s super important to match the pump head to the valve. When they fit together just right, adding air is easy and safe. This keeps your suspension working great. Then you can have more fun riding your bike! Always double-check before you start pumping. Make sure everything lines up correctly. This small step can save you a lot of trouble later.
Fun Fact or Stat: Most mountain bikes use either Schrader or Presta valves, but some high-end bikes might use a different valve type. Always consult your bike’s manual!
Why Valve Type Matters
Have you ever tried to blow up a balloon with a hole in it? It’s super hard, right? The same thing happens if your pump doesn’t fit your valve. Air will leak out. You won’t get the right pressure in your suspension. This means your bike won’t ride as smoothly. The suspension might feel too soft or too hard. That’s why knowing your valve type is important. It helps you pick the right pump. Then you can get the perfect pressure every time. This makes your rides more fun and comfortable. Always take a second to check the valve before you start pumping. It makes a big difference!
Checking for Damage
Imagine your bike valve is like a tiny gatekeeper. It lets air in but keeps it from escaping. But what if that gatekeeper is hurt? If the valve is bent or broken, it won’t work right. It might leak air or not let air in at all. That’s why it’s important to check your valves regularly. Look for any signs of damage. Are they straight? Are they clean? If you see something wrong, don’t try to force it. Get it fixed first. A healthy valve means a healthy suspension. And a healthy suspension means a fun, smooth ride. Always treat your valves with care!
Valve Cap Importance
Think of a valve cap like a little hat for your valve. It might seem small and unimportant. But it actually does a big job. The valve cap keeps dirt and water out of your valve. This helps keep the valve clean and working well. Without a cap, your valve could get clogged. It might even rust. Then it won’t work right. So, always make sure your valve cap is on tight. It’s a simple way to protect your suspension. And it helps keep your bike riding smoothly for longer. Don’t forget to put the hat back on after you pump up your tires!
Choosing the Right Shock Pump

Now you know your valve type. It’s time to pick the right shock pump. A shock pump is special. It’s made just for suspension systems. It has a gauge to show you how much air is inside. This helps you get the perfect pressure. Look for a pump that matches your valve type. Some pumps work with both Schrader and Presta. These pumps have two different sides. Make sure you pick the right side for your valve. Read the instructions that come with the pump. They will show you how to match the pump head to the suspension valve. Using the right pump makes a big difference. It makes adding air easy and safe. Plus, it helps you keep your suspension in top shape.
- Use a shock pump designed for suspensions.
- Check the pump head compatibility with your valve.
- Look for a pump with a pressure gauge.
- Read the pump instructions carefully.
- Store the pump in a safe, dry place.
- Consider a digital pump for more accuracy.
Imagine trying to fill a swimming pool with a teacup. It would take forever, right? A regular tire pump is like that teacup. It’s not made to fill suspension systems. A shock pump is designed to add small amounts of air. It also has a gauge to measure the pressure. This is super important. You don’t want to add too much air. Too much air can damage your suspension. The gauge helps you get the pressure just right. This makes your ride comfortable and safe. Always use a shock pump for your suspension. It’s the right tool for the job. This helps you take care of your bike.
Fun Fact or Stat: Shock pumps can measure pressure up to 300 PSI (pounds per square inch) or more, while regular tire pumps usually max out at a lower pressure.
Pump Features to Consider
Think about your favorite toy. What makes it so fun? Maybe it has cool features or special buttons. Shock pumps are the same! Some have fancy features that make them easier to use. Look for a pump with a swivel head. This lets you connect to the valve at different angles. Some pumps have a bleed valve. This lets you release small amounts of air. This helps you fine-tune the pressure. A good grip is important too. You want a pump that feels comfortable in your hand. These features can make a big difference. They can make pumping up your suspension easier and more accurate. So, take a look at the features before you choose a pump.
Digital vs. Analog Pumps
Have you ever seen a digital clock and an analog clock? One shows the time with numbers. The other uses hands. Shock pumps come in digital and analog versions too. Digital pumps show the pressure on a screen. They are usually very accurate. Analog pumps have a needle that points to the pressure. They are often cheaper. Which one is better? It depends on what you like. If you want the most accurate reading, go for digital. If you want something simple and affordable, analog is a good choice. Both types will help you keep your suspension in good shape.
Pump Maintenance Tips
Imagine your bike pump is like a little friend. You want to take good care of it, right? Just like any tool, your shock pump needs some love. Keep it clean and dry. Wipe it down after each use. Store it in a safe place. Check the hose for cracks or leaks. If you see any problems, get them fixed. A well-maintained pump will last longer. It will also work better. This makes it easier to keep your suspension in top shape. Taking care of your pump is a simple way to take care of your bike.
Connecting the Pump Head
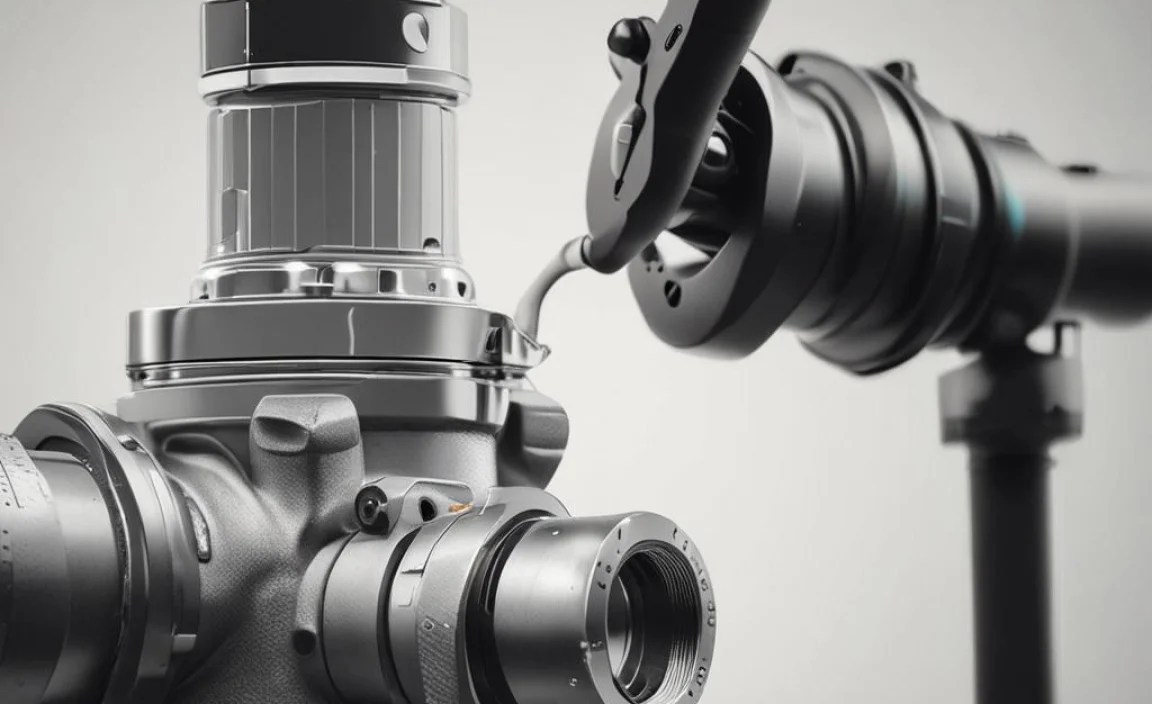
Okay, you’ve got your pump. Now, let’s connect it! First, take off the valve cap. Now, look closely at the pump head. Make sure it’s set for the right valve type. If it’s a Schrader valve, just push the pump head straight onto the valve. Make sure it’s on tight. If it’s a Presta valve, you need to unscrew the little nut first. Then, push the pump head on. Flip the lever on the pump head to lock it in place. This makes sure no air leaks out. Now, you’re ready to start pumping. Go slow and easy. Watch the gauge to see how much air you’re adding. Matching the pump head to the suspension valve might seem tricky at first. But with a little practice, you’ll get it right every time.
- Remove the valve cap before connecting.
- Ensure the pump head is set for the correct valve.
- Push the pump head firmly onto the valve.
- Lock the pump head lever for a secure fit.
- Check for air leaks before pumping.
Imagine you’re trying to connect two Lego blocks. If they don’t line up, they won’t stick together, right? The same goes for the pump head and valve. If they’re not connected properly, air will leak out. You won’t be able to add pressure to your suspension. That’s why it’s so important to get a good connection. Push the pump head on straight. Make sure it’s snug. Listen for any hissing sounds. Hissing means air is leaking. If you hear hissing, try again. A good connection means you can add air easily. It also means you’ll get the right pressure in your suspension. This makes your bike ride better.
| Valve Type | Pump Head Connection | Locking Mechanism | Common Bike Types |
|---|---|---|---|
| Schrader | Push-on | None (tight fit) | Some Mountain Bikes, Kids’ Bikes |
| Presta | Push-on | Lever or Screw | Road Bikes, High-End Mountain Bikes |
| Dunlop | Push-on | None (rubber seal) | Older Bikes, European City Bikes |
| Threaded Schrader | Screw-on | Threaded connection | E-bikes, Heavy-Duty Applications |
Fun Fact or Stat: A loose pump head connection can cause a loss of up to 10 PSI (pounds per square inch) of pressure during inflation!
Proper Alignment Techniques
Think of your bike valve as a target. You want to hit it right in the center with your pump head. If you’re off to the side, it won’t work. Make sure the pump head is straight. Line it up with the valve. Push it on gently but firmly. Wiggling it around can damage the valve. If it doesn’t seem to fit, don’t force it. Check the valve type again. Make sure you’re using the right pump head. Proper alignment is key. It makes connecting the pump easy and safe. It also helps you avoid damaging your suspension.
Locking Mechanism Importance
Imagine you’re building a tower of blocks. You need to lock each block in place, right? Otherwise, the tower will fall down. The locking mechanism on your pump head is like that. It keeps the pump connected to the valve. It stops air from leaking out. Some pumps have a lever. You flip the lever to lock the pump in place. Other pumps have a screw. You tighten the screw to lock the pump. Make sure the locking mechanism is secure. This will help you add air to your suspension without any problems.
Troubleshooting Connection Issues
Have you ever tried to plug in a phone charger, but it just won’t go in? Sometimes things don’t work right away. If you’re having trouble connecting your pump, don’t worry. Take a deep breath and try again. Check the valve type. Make sure you’re using the right pump head. Look for any dirt or damage on the valve. Clean it off if needed. Try pushing the pump head on with a little more force. If it still doesn’t work, ask a grown-up for help. Sometimes a fresh set of eyes can spot the problem.
Pumping Air into the Suspension

You’ve connected the pump. Now it’s time to add air. Pump slowly and steadily. Watch the gauge. You want to add the right amount of air. Too much air can make your suspension too stiff. Too little air can make it too soft. Check your bike’s manual. It will tell you the right pressure for your suspension. If you don’t have the manual, ask a bike shop for help. They can tell you the right pressure. As you pump, the gauge will move. When it reaches the right number, stop pumping. Matching the pump head to the suspension valve is important. But getting the right pressure is even more important. It makes your ride safe and comfortable.
- Pump air slowly and steadily.
- Watch the pressure gauge carefully.
- Check your bike’s manual for the correct pressure.
- Avoid over-pumping the suspension.
- Release air slowly if you add too much.
Imagine you’re baking a cake. You need to add just the right amount of each ingredient. Too much sugar, and it will be too sweet. Too little flour, and it will be too runny. Getting the pressure right in your suspension is like that. You need just the right amount of air. Too much air, and your ride will be bumpy. Too little air, and your suspension will bottom out. The gauge on your pump is like a recipe. It tells you how much air to add. Follow the instructions, and you’ll get it just right. This will make your ride smooth and comfortable.
Fun Fact or Stat: Suspension pressure is usually measured in PSI (pounds per square inch), and the ideal pressure can vary greatly depending on the rider’s weight and riding style.
Reading the Pressure Gauge
Think of the pressure gauge as a speedometer for your suspension. It tells you how much air is inside. Most gauges have numbers around the edge. The needle points to the number that shows the pressure. Some gauges have two scales. One is for PSI, and the other is for BAR. PSI is more common in the United States. BAR is used in other countries. Make sure you’re reading the right scale. The gauge will help you add the right amount of air. This will keep your suspension working well.
Avoiding Over-Inflation
Imagine blowing up a balloon too much. It will pop! The same thing can happen to your suspension. If you add too much air, you can damage it. The seals might break, or the suspension might stop working. That’s why it’s important to avoid over-inflation. Watch the gauge carefully as you pump. Stop when it reaches the right pressure. If you accidentally add too much air, don’t worry. Most shock pumps have a bleed valve. This lets you release small amounts of air. Use the bleed valve to get the pressure just right.
Finding the Right Pressure
Have you ever tried different flavors of ice cream to find your favorite? Finding the right suspension pressure is like that. It might take some experimenting. Start with the pressure recommended in your bike’s manual. Then, go for a ride. How does it feel? If it feels too stiff, let out a little air. If it feels too soft, add a little air. Keep adjusting until it feels just right. Everyone is different. The perfect pressure for you might be different than the perfect pressure for someone else. Don’t be afraid to try different settings until you find what works best.
Disconnecting the Pump Head
You’ve added air. Now it’s time to disconnect the pump. This part is important. You want to do it carefully. If it’s a Schrader valve, just pull the pump head straight off. Some air might escape. That’s okay. It won’t affect the pressure much. If it’s a Presta valve, flip the lever on the pump head. Then, pull the pump head off. Put the valve cap back on. This keeps dirt out. Disconnecting the pump head might seem simple. But doing it right helps protect your valve. It also helps keep your suspension working well. Remember, how to match shock pump head to suspension valve includes disconnecting it properly.
- Disconnect the pump head gently.
- Release the locking lever before removing.
- Replace the valve cap to protect the valve.
- Check the valve for any signs of damage.
- Wipe the pump head clean after use.
Imagine you’re taking apart a toy. You don’t want to rip it apart, right? You want to take it apart carefully so you don’t break anything. Disconnecting the pump head is like that. You want to do it gently so you don’t damage the valve. Pull the pump head off straight. Don’t wiggle it around. This can bend the valve. If you have a Presta valve, make sure to flip the lever first. This releases the pressure. Then you can pull the pump head off easily. Taking care when disconnecting the pump head will help your valve last longer.
Fun Fact or Stat: A quick disconnect can cause a loss of 1-2 PSI (pounds per square inch), but this is normal and usually doesn’t affect performance.
Avoiding Air Loss
Think of your suspension as a balloon filled with air. You don’t want to let the air out, right? When you disconnect the pump, a little bit of air might escape. But you can minimize the air loss. Be quick and smooth. Don’t hesitate. Pull the pump head off in one swift motion. This will help keep the pressure in your suspension. Also, make sure the pump head is in good condition. A worn-out pump head might leak more air. Keeping your pump in good shape helps you avoid air loss.
Checking the Valve After Disconnection
Imagine you’re a doctor checking a patient. You want to make sure everything is okay, right? After you disconnect the pump, take a look at the valve. Is it straight? Is it clean? Do you see any damage? If everything looks good, you’re all set. If you see something wrong, get it fixed. A healthy valve means a healthy suspension. And a healthy suspension means a fun, smooth ride. Always give your valve a quick check after disconnecting the pump.
Storing the Pump Head Properly
Think of your pump head as a valuable tool. You want to keep it safe, right? After you disconnect the pump, wipe the pump head clean. This will remove any dirt or grime. Store the pump in a safe place. Keep it away from water and extreme temperatures. A well-stored pump head will last longer. It will also be ready to use the next time you need it. Taking care of your pump head is a simple way to take care of your bike.
Regular Suspension Maintenance
Keeping your suspension in good shape is important. It’s like taking care of a pet. You need to give it regular attention. Check the pressure before each ride. This makes sure it’s at the right level. Clean your suspension regularly. Dirt and grime can damage the seals. Lubricate the seals with special suspension fluid. This keeps them working smoothly. If you notice any problems, get them fixed right away. Regular maintenance will help your suspension last longer. It will also keep your bike riding smoothly. Knowing how to match shock pump head to suspension valve is just one part of taking care of your suspension.
- Check the suspension pressure before each ride.
- Clean the suspension components regularly.
- Lubricate the seals with suspension fluid.
- Inspect for any signs of damage or wear.
- Follow the manufacturer’s maintenance schedule.
Imagine your suspension is like a car engine. If you don’t change the oil, the engine will break down. The same goes for your suspension. If you don’t take care of it, it will stop working well. Regular maintenance is like giving your suspension a tune-up. It keeps everything running smoothly. This will make your rides more fun and comfortable. Plus, it will save you money in the long run. A little bit of maintenance now can prevent big problems later. So, make sure to take care of your suspension.
Fun Fact or Stat: Regular suspension maintenance can extend the lifespan of your suspension components by up to 50%!
Checking for Leaks
Think of your suspension as a tire. If it has a leak, it will go flat. The same thing can happen to your suspension. Air can leak out over time. That’s why it’s important to check for leaks. Look for bubbles around the seals. Listen for hissing sounds. If you suspect a leak, take your bike to a shop. They can find the leak and fix it. Catching leaks early can prevent bigger problems. It will also keep your suspension working well.
Cleaning and Lubrication
Imagine your suspension is covered in mud. It won’t work very well, right? Dirt and grime can damage the seals and other parts. That’s why it’s important to clean your suspension regularly. Use a soft cloth and some mild soap. Wipe away any dirt or mud. Then, lubricate the seals with special suspension fluid. This will keep them working smoothly. Cleaning and lubrication are simple ways to keep your suspension in good shape.
Professional Servicing
Have you ever taken your bike to a shop for a tune-up? Sometimes it’s good to get a professional opinion. Suspension systems are complex. They have lots of small parts. A bike shop can take apart your suspension. They can clean it and replace any worn parts. This will keep your suspension working like new. Professional servicing is a good idea every year or two. It will help your suspension last longer and perform better.
Summary
Learning how to match shock pump head to suspension valve is key for bike maintenance. It ensures you can properly inflate your suspension. This keeps your ride smooth and comfortable. First, know your valve type: Schrader or Presta. Choose the right shock pump. Connect the pump head securely. Pump air slowly, watching the gauge. Disconnect carefully and maintain regularly. These steps keep your suspension in top condition. This makes your bike rides more enjoyable and safe.
Conclusion
Understanding bike suspension and how to match shock pump head to suspension valve is crucial. It helps you maintain your bike properly. Correct pressure ensures a smooth, safe ride. Regular checks and proper inflation keep your suspension working. This knowledge empowers you to care for your bike. Now you can enjoy every ride to the fullest!
Frequently Asked Questions
Question No 1: What is a Schrader valve, and how do I identify it?
Answer: A Schrader valve is a type of valve commonly found on car tires and some bike suspensions. It is wider than a Presta valve and has a pin in the center. To identify a Schrader valve, look for its robust, circular shape and the small pin that you can press to release air. When figuring out how to match shock pump head to suspension valve, this is important. Make sure your pump has the correct attachment for this style of valve. It’s the first step to getting your suspension properly inflated.
Question No 2: What is a Presta valve, and how does it differ from a Schrader valve?
Answer: A Presta valve is a thinner valve often found on higher-end bicycles and some bike suspensions. Unlike the Schrader valve, it has a small nut at the top that you need to unscrew before inflating. Presta valves are designed for higher pressure. They are more common on road bikes and performance mountain bikes. When you think about how to match shock pump head to suspension valve, remember that Presta valves need a specific pump head to create a seal. Ensure your pump is compatible with Presta valves to avoid air leaks and frustration.
Question No 3: How do I know what pressure to put in my bike’s suspension?
Answer: The correct pressure for your bike’s suspension depends on several factors. These factors include your weight, riding style, and the type of suspension. Consult your bike’s manual or the suspension manufacturer’s recommendations for a starting point. Many manufacturers also provide online calculators or charts to help you determine the ideal pressure. Experimenting within the recommended range is important to find the perfect feel for your riding conditions. Don’t overinflate. Overinflating can damage the suspension. Remember, knowing how to match shock pump head to suspension valve is only the beginning. The right pressure is what truly optimizes your ride.
Question No 4: What tools do I need to inflate my bike’s suspension?
Answer: To inflate your bike’s suspension, you will need a shock pump. A shock pump is a special type of pump designed for the high pressures required by suspension systems. Unlike regular tire pumps, shock pumps have a gauge that allows you to accurately measure and adjust the pressure. You might also want to have a valve core tool on hand. This helps in case you need to tighten or replace the valve core. Understanding how to match shock pump head to suspension valve means having the right tools ready. This makes the process smooth and efficient.
Question No 5: How often should I check and adjust the pressure in my bike’s suspension?
Answer: It’s a good idea to check and adjust the pressure in your bike’s suspension before each ride, especially if you’re a serious rider. Suspension pressure can fluctuate due to changes in temperature and altitude. Regular checks ensure that your suspension is performing optimally. If you notice a significant drop in pressure between rides, it could indicate a leak. In this case, you should inspect the suspension for damage or take it to a bike shop for servicing. Keep in mind that how to match shock pump head to suspension valve correctly can also prevent slow leaks by insuring a tight seal.
Question No 6: What should I do if my pump head doesn’t fit my suspension valve?
Answer: If your pump head doesn’t fit your suspension valve, first double-check that you have the correct type of pump head for your valve (Schrader or Presta). Some pumps have adapters or dual heads that can accommodate both valve types. If you’re using an adapter, make sure it’s properly installed. If your pump doesn’t have the right adapter or head, you’ll need to purchase one that is compatible with your valve. Forcing the wrong pump head onto the valve can damage both the pump and the valve. So, knowing how to match shock pump head to suspension valve is crucial. Always use the right equipment to avoid problems.


