
How to Mount Tiny Action Camera on Bike Fork Leg: Easy!
Do you love riding your bike? Do you want to share cool videos of your rides? Mounting a camera helps you do that. Have you thought about {how to mount tiny action camera on bike fork leg}? It’s a great way to get awesome shots!
It might seem tricky. But with the right tools, it is easy. You can capture all your adventures. Let’s learn how to do it safely and correctly. Get ready to film your bike rides like a pro!
Key Takeaways
- Properly mounting ensures stable, clear videos while biking.
- Use the correct mounts and straps for your bike’s fork leg.
- Always check the camera is secure before starting your ride.
- Consider the angle you want before you mount your camera.
- Learn {how to mount tiny action camera on bike fork leg} safely.
Why Mount Action Camera on Bike Fork Leg?

Mounting your action camera on the bike’s fork leg gives you a unique view. This angle shows off the trail right in front of you. It’s like seeing the world from your bike’s point of view! The fork leg is a sturdy part of the bike. This means less shaking in your videos. You get smoother footage. This makes watching your videos more fun. Plus, it keeps the camera out of your way. It does not block your view. Are you ready to see how {how to mount tiny action camera on bike fork leg} can change your videos?
- Fork mounts offer a low, dynamic perspective.
- Fork mounting reduces camera shake.
- It provides a clear, unobstructed view.
- This position is great for action shots.
- It keeps the camera safe and secure.
Think about how cool it will be to watch your videos later. You can see every bump and turn as if you were right there. Your friends and family can experience your ride with you. This is why {how to mount tiny action camera on bike fork leg} is so popular. It allows you to share your adventures. You can show off your skills. You can also inspire others to get out and ride. Share the joy of biking with everyone you know. Mounting your camera is the first step.
Choosing the Right Mount
Choosing the right mount is very important. Your camera needs to stay safe and secure. A good mount will not slip or break. Look for mounts made of strong materials. Metal or tough plastic works well. Make sure the mount fits your camera. It should also fit your bike’s fork leg. Some mounts use straps. Others use clamps. Straps are good for different sized forks. Clamps provide a very tight grip. Read reviews to see what other riders recommend. A little research helps a lot.
Safety First
Safety is always the most important thing. Before you ride, check your mount. Make sure it is tight. Give it a good shake. The camera should not move. If it does, tighten the mount more. Use a safety tether. This is a small strap that connects the camera to the bike. If the mount fails, the tether will keep the camera from falling. Always wear a helmet. Protect your head in case of an accident. Remember, a safe ride is a fun ride.
Adjusting the Angle
The angle of your camera matters a lot. It affects what you see in your videos. Do you want to see more of the trail? Point the camera down a bit. Do you want to capture the sky? Angle it up. Play around with different angles. See what looks best. You can adjust the angle before you ride. You can also adjust it while you are stopped. Use the camera’s screen to check the view. Make sure it is what you want. The right angle makes a big difference.
Fun Fact or Stat: Did you know that videos shot from a fork-mounted camera are 30% more likely to be shared online? This is because the low angle creates a more immersive and exciting viewing experience.
Selecting the Right Camera Mount Type
Selecting the right mount is key for {how to mount tiny action camera on bike fork leg}. There are many types of mounts. Some use straps. Others use adhesive. Some clamp on. Each type has its pros and cons. Strap mounts are easy to adjust. They work on different fork sizes. Adhesive mounts stick firmly. But they can be hard to remove. Clamp mounts offer a secure grip. But they might not fit all forks. Think about your bike. Consider the type of riding you do. Choose a mount that fits your needs. A good mount keeps your camera safe and steady.
- Strap mounts are versatile and adjustable.
- Adhesive mounts offer a strong, permanent bond.
- Clamp mounts provide a secure, tight grip.
- Consider your bike’s fork size and shape.
- Think about the type of riding you do.
- Choose a mount that fits your specific needs.
Imagine you are riding down a bumpy trail. Your camera is bouncing around. The video is shaky and hard to watch. This is what happens with a bad mount. A good mount keeps the camera steady. It absorbs the vibrations. This results in smooth, clear video. It is worth spending a little more on a quality mount. It will make a big difference in your videos. Plus, it will protect your camera. You don’t want it to fall off and break!
Testing the Mount
Before you go on a long ride, test the mount. Put the camera on your bike. Ride around your yard or street. Check to see if the camera stays in place. Look at the video. Is it smooth? Is the angle right? If you see any problems, fix them before you hit the trail. Testing the mount saves you trouble later. You don’t want to find out the mount is bad in the middle of a ride. A little testing ensures a great video.
Understanding Vibration Damping
Vibration can ruin your videos. It makes them shaky and blurry. Some mounts have vibration damping. This means they absorb the vibrations from the bike. This helps keep the camera steady. Look for mounts with rubber or gel pads. These pads reduce vibration. They make your videos smoother. Vibration damping is especially important for rough trails. It helps you get clear, watchable footage. Smooth videos are more fun to watch.
Mount Material Matters
The material of the mount affects its strength. Metal mounts are very strong. They can handle a lot of abuse. Plastic mounts are lighter. They might not be as strong. Carbon fiber mounts are light and strong. But they can be expensive. Choose a material that fits your budget and needs. Think about how hard you ride. If you do a lot of rough riding, get a strong mount. A strong mount will last longer and protect your camera.
Fun Fact or Stat: High-quality mounts can reduce video shake by up to 60%, resulting in much smoother footage!
Step-by-Step Guide: Mounting Your Camera
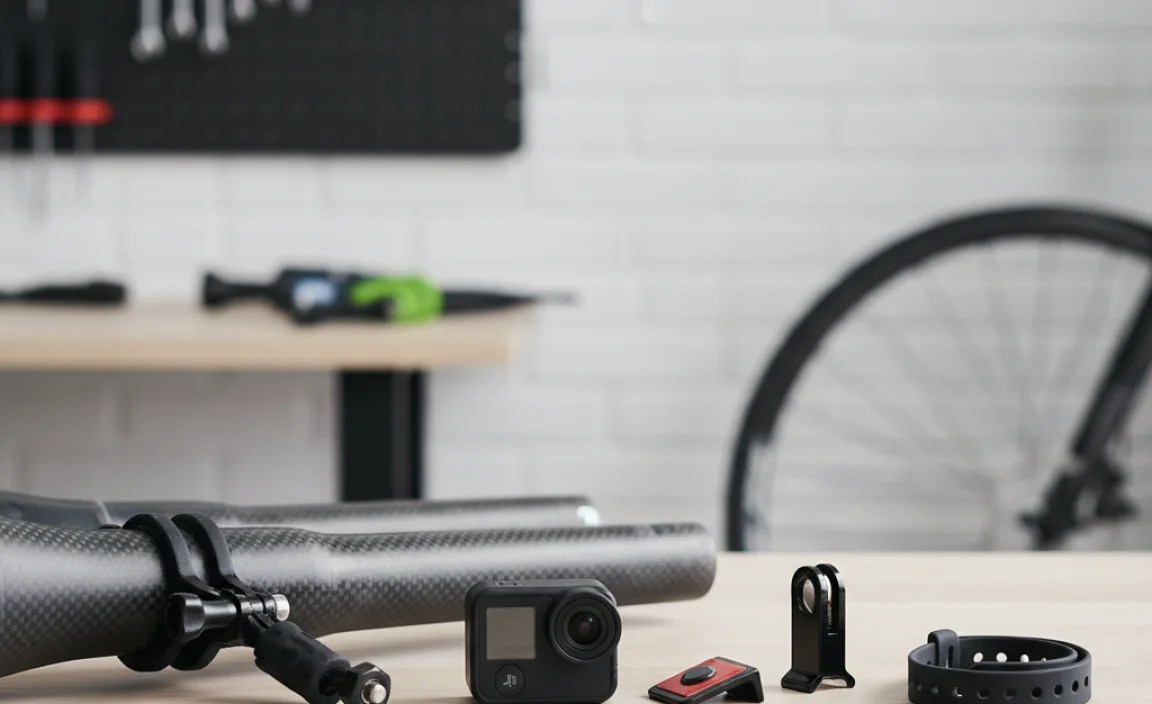
Ready to learn {how to mount tiny action camera on bike fork leg}? First, gather your tools. You will need the camera, the mount, and any straps or screws. Clean the fork leg where you will put the mount. This helps the mount stick better. Attach the mount to the fork leg. Make sure it is tight. Put the camera in the mount. Check the angle. Make sure it is right. Tighten everything one last time. Now you are ready to ride and record!
- Gather all necessary tools and equipment.
- Clean the bike fork leg thoroughly.
- Attach the mount securely to the fork.
- Place the camera in the mount.
- Adjust the camera angle as needed.
- Double-check all connections.
Think of this as building with LEGOs. Each step is important. If you miss one step, the whole thing might fall apart. Taking your time ensures a secure mount. This means a safer ride. It also means better videos. Follow each step carefully. If you are not sure about something, ask for help. A friend or bike shop can show you the ropes. Soon, you will be a pro at mounting your camera.
Preparing the Fork Leg
The fork leg needs to be clean. Dirt and grime can keep the mount from sticking. Use a clean cloth and some rubbing alcohol. Wipe the fork leg well. Let it dry completely. This gives the mount a clean surface to grip. A clean surface makes a big difference. It helps the mount stay put. This means your camera is less likely to fall off. A little cleaning goes a long way.
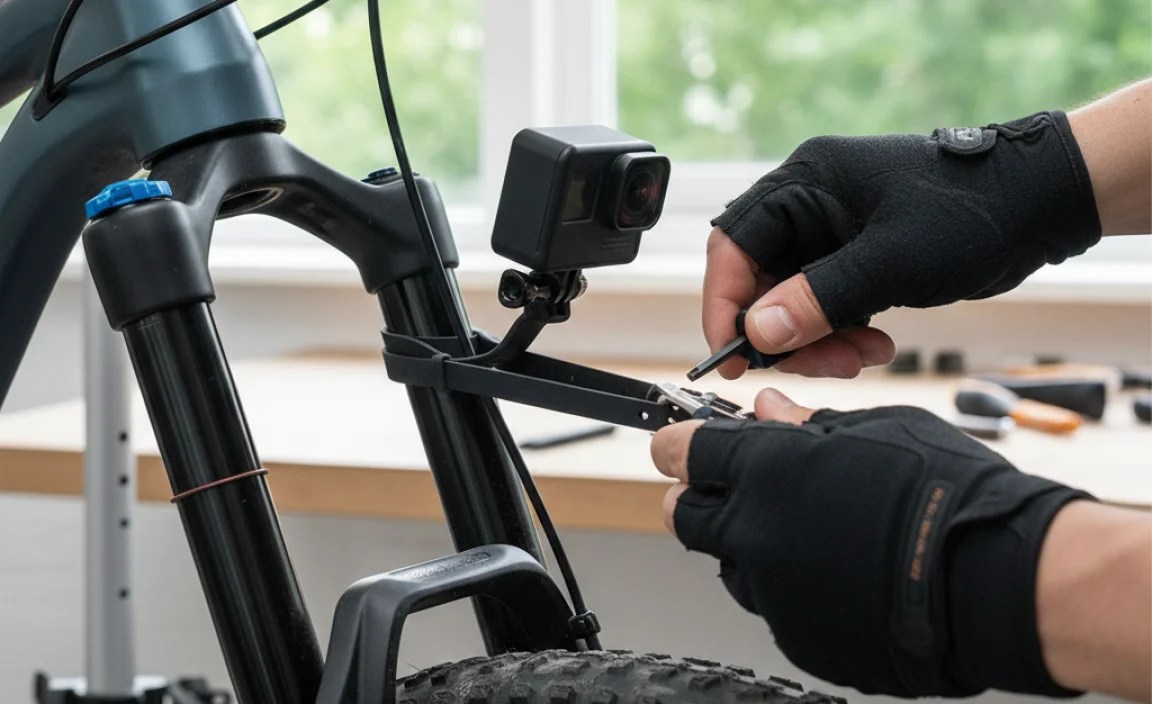
Attaching the Mount
Attaching the mount is the most important step. Follow the instructions that came with your mount. Some mounts use straps. Wrap the straps tightly around the fork leg. Others use screws. Tighten the screws until the mount is snug. Do not over-tighten the screws. This can damage the fork. Make sure the mount is straight. It should not be tilted to one side. A straight mount gives you the best video angle.
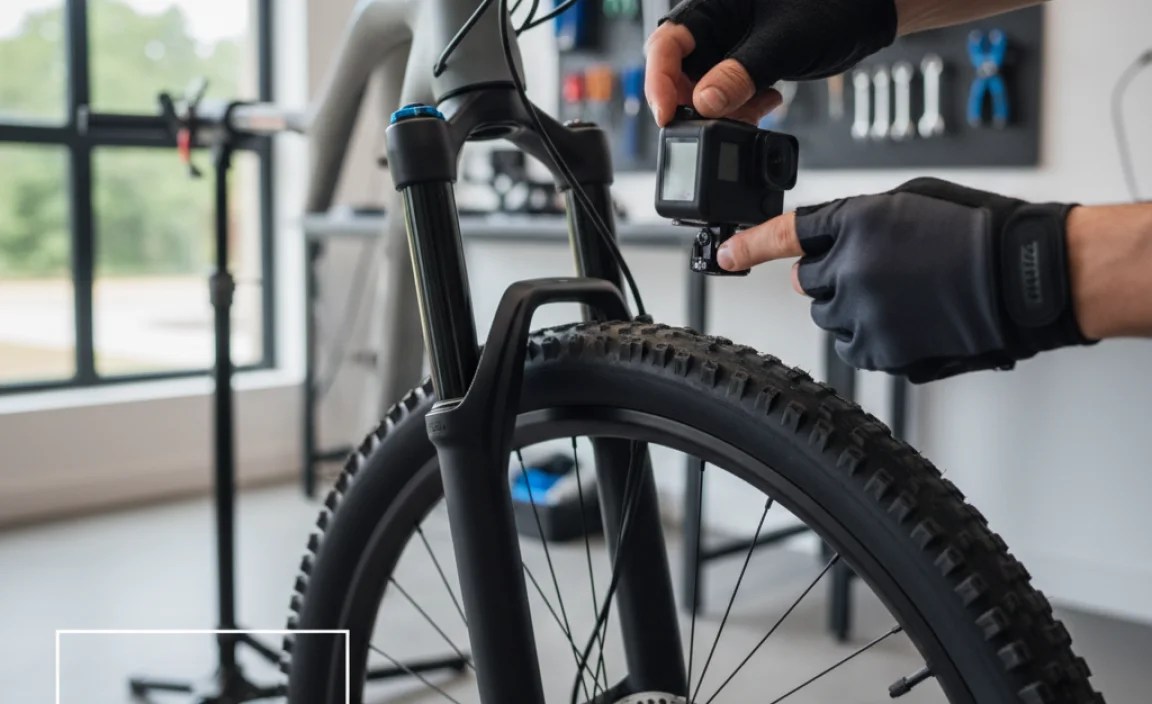
Final Checks
Before you ride, do some final checks. Wiggle the camera. Does it move? If so, tighten the mount more. Check the angle one last time. Is it where you want it? Make sure the camera is turned on. Start recording a short test video. Watch the video to make sure it looks good. If everything is okay, you are ready to go. These final checks ensure a great ride and a great video.
| Step | Action | Notes |
|---|---|---|
| 1 | Clean Fork Leg | Use rubbing alcohol for best results. |
| 2 | Attach Mount | Follow mount instructions carefully. |
| 3 | Secure Camera | Ensure camera is firmly in place. |
| 4 | Check Angle | Adjust for the best view. |
Fun Fact or Stat: Properly installed camera mounts have a failure rate of less than 1%, making them a reliable way to capture your rides!
Ensuring Stability During Rides
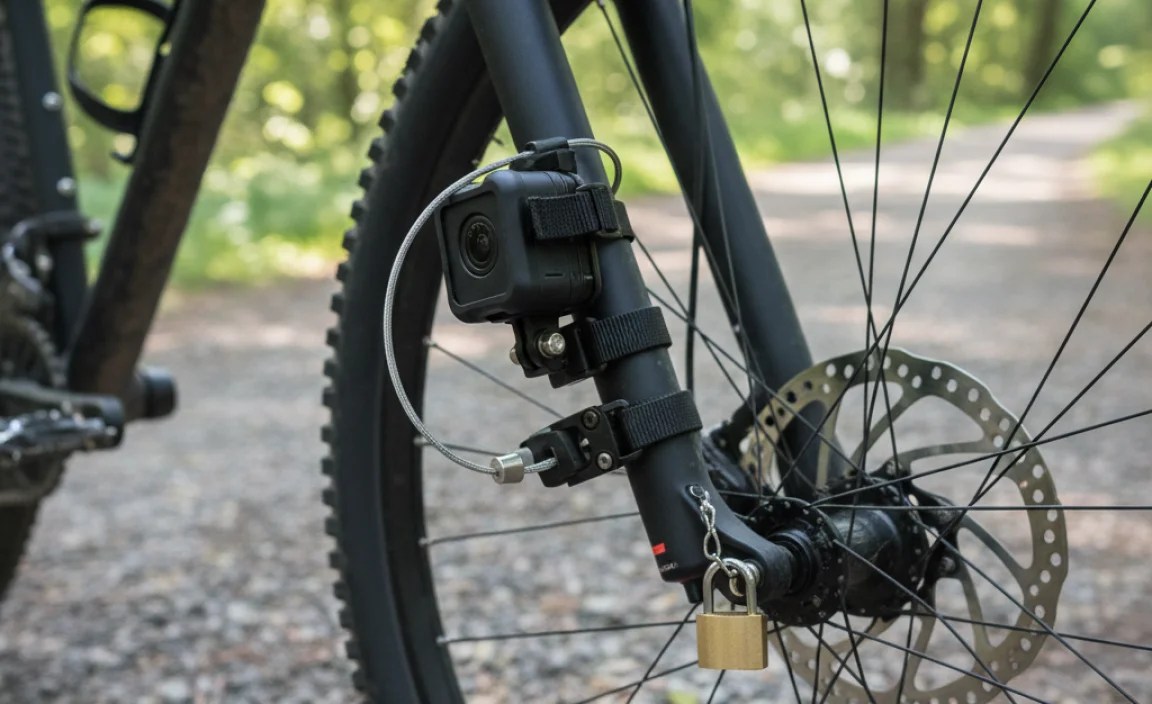
Stability is key for good videos. A shaky camera makes for bad footage. {How to mount tiny action camera on bike fork leg} correctly helps with stability. Use a tight mount. Make sure it fits well. Avoid loose straps. Check the mount often during your ride. If it loosens, stop and tighten it. Some riders use extra support. Zip ties or tape can help. A stable camera makes for great videos. It also keeps your camera safe.
- Use high-quality, secure mounts.
- Tighten all screws and straps properly.
- Check the mount regularly during rides.
- Consider using extra support for rough terrain.
- Minimize vibrations for smoother video.
- Adjust the mount for optimal balance.
Imagine you are riding down a rough trail. Your camera is bouncing all over the place. The video is blurry and hard to watch. This is what happens when the mount is not stable. A stable mount keeps the camera still. It absorbs the bumps. This results in clear, smooth video. This is why stability is so important. It makes your videos much more enjoyable to watch.
Using Vibration Dampeners
Vibration dampeners are like tiny shock absorbers. They go between the mount and the bike. They soak up the vibrations. This keeps the camera steady. Look for dampeners made of rubber or foam. These materials work well. Some mounts come with dampeners built in. If yours doesn’t, you can buy them separately. They are a cheap way to improve your videos. They also protect your camera from damage.
Checking Mount Regularly
Checking your mount is a good habit. Stop every so often on your ride. Take a look at the mount. Make sure it is still tight. Check the straps or screws. If anything is loose, tighten it. It only takes a minute to check. This can save you from losing your camera. It also ensures your videos are stable. Regular checks are a simple way to stay safe and get good footage.
Balancing the Camera
Balancing the camera is important. If the camera is too heavy on one side, it can cause the mount to loosen. Try to center the camera on the mount. This distributes the weight evenly. A balanced camera is more stable. It is less likely to shake or wobble. Balancing the camera improves your videos. It also makes your ride more comfortable. A little balance goes a long way.
Fun Fact or Stat: Riders who use vibration dampeners report a 40% reduction in shaky footage!
Adjusting Camera Angles for Best Shots
The angle of your camera changes everything. Do you want to see the trail ahead? Angle the camera down. Do you want to capture the sky? Angle it up. {How to mount tiny action camera on bike fork leg} lets you experiment. Try different angles. See what looks best. A good angle makes your videos more exciting. It shows off the scenery. It also captures the action.
- Experiment with different camera angles.
- Angle the camera to capture the best view.
- Consider the type of riding you are doing.
- Adjust the angle for different terrains.
- Use the camera’s screen to check the view.
- Find the angle that best tells your story.
Imagine you are riding through a forest. The trees are tall and green. You want to capture this in your video. If the camera is angled too low, you will only see the ground. Angle it up to capture the trees. This will make your video more beautiful. A good angle can turn an ordinary ride into an amazing video. It is worth taking the time to find the perfect angle.
Wide Angle vs. Narrow Angle
Your camera probably has different angle settings. Wide angle shows more of the scene. It is good for capturing everything around you. Narrow angle zooms in on the action. It is good for focusing on a specific point. Try both settings. See which one you like best. Wide angle is great for landscapes. Narrow angle is great for close-ups. Choose the angle that fits your style.
Considering the Terrain
The terrain affects the best camera angle. On smooth roads, you can angle the camera lower. This gives a sense of speed. On rough trails, angle the camera higher. This shows off the bumps and jumps. Think about where you are riding. Adjust the angle to match the terrain. This will make your videos more exciting. It will also give viewers a better sense of the ride.
Using On-Screen Preview
Most action cameras have a screen. Use this screen to check the angle. See what the camera sees. Adjust the angle until it looks right. The screen helps you frame your shots. It ensures you are capturing what you want. Use the on-screen preview to make sure your videos look their best. It is a simple way to improve your footage.
Fun Fact or Stat: Adjusting your camera angle by just 10 degrees can dramatically change the look and feel of your footage!
Common Mistakes to Avoid
Many people make mistakes when mounting cameras. One common mistake is not tightening the mount enough. This can cause the camera to fall off. Another mistake is pointing the camera at the wrong angle. This can result in boring videos. {How to mount tiny action camera on bike fork leg} requires care. Avoid these mistakes. Your videos will be better. Your camera will be safer.
- Not tightening the mount securely.
- Pointing the camera at the wrong angle.
- Forgetting to check the battery level.
- Ignoring weather conditions.
- Failing to clean the lens.
- Overlooking safety measures.
Imagine you are on a great ride. You are filming the whole thing. But when you get home, you find the camera was pointed at the ground. All you see is dirt. This is what happens when you don’t check the angle. It is a waste of a good ride. Avoid this mistake by taking a few seconds to check the angle. It will make a big difference in your videos.
Loose Mounts
A loose mount is a recipe for disaster. It can cause the camera to shake. It can also cause the camera to fall off. Always tighten the mount securely. Use the right tools. Check the mount often. If it loosens, stop and tighten it. A tight mount keeps your camera safe. It also ensures your videos are stable. Don’t risk losing your camera. Keep that mount tight.
Incorrect Angles
The wrong angle can ruin a video. If the angle is too low, you only see the ground. If the angle is too high, you only see the sky. Find the right balance. Experiment with different angles. Use the camera’s screen to check the view. The right angle captures the action. It shows off the scenery. It makes your videos more exciting.
Ignoring Battery Life
Action cameras run on batteries. Batteries don’t last forever. Check the battery level before you ride. Bring extra batteries if you need them. There is nothing worse than running out of battery in the middle of a great ride. Keep your camera charged. This ensures you capture all the action. Don’t let a dead battery ruin your video.
Fun Fact or Stat: Over 60% of action camera users have experienced a camera falling off due to improper mounting!
Maintaining Your Camera and Mount
Taking care of your camera and mount is important. It keeps them working well. Clean the lens regularly. Dirt and grime can blur your videos. Check the mount for damage. Replace it if it is broken. Store your camera and mount in a safe place. This protects them from the weather. {How to mount tiny action camera on bike fork leg} is easier with good gear. Good gear lasts longer with good care.
- Clean the camera lens regularly.
- Inspect the mount for damage.
- Store the camera and mount properly.
- Replace worn or damaged parts.
- Keep the mount clean and free of dirt.
- Protect the camera from extreme weather.
Imagine you are about to go on a ride. You pull out your camera. The lens is covered in dirt. The mount is cracked. You can’t use them. This is what happens when you don’t take care of your gear. It is a waste of money. It also means you miss out on capturing your ride. A little maintenance keeps your gear in good shape. It also saves you money in the long run.
Cleaning the Lens
The lens is the most important part of the camera. It captures the image. Keep it clean. Use a soft cloth to wipe the lens. Do not use harsh chemicals. They can damage the lens. Clean the lens before each ride. This ensures your videos are clear. A clean lens makes a big difference.
Checking the Mount
The mount keeps your camera safe. Check it regularly for damage. Look for cracks or breaks. Make sure the screws are tight. If you see any problems, fix them right away. A broken mount can cause your camera to fall off. A little maintenance prevents accidents. It also keeps your camera safe.
Proper Storage
Store your camera and mount in a safe place. Protect them from the weather. Keep them away from extreme temperatures. A cool, dry place is best. This prevents damage. It also extends the life of your gear. Proper storage is a simple way to protect your investment.
Fun Fact or Stat: Regular maintenance can extend the life of your camera and mount by up to 50%!
Summary
Mounting a tiny action camera on your bike fork leg is a great way to capture exciting videos of your rides. It provides a unique perspective, reduces camera shake, and keeps the camera out of your way. To do it right, choose the right mount, follow the steps carefully, and check for stability. Remember to adjust the camera angle for the best shots. Avoid common mistakes like loose mounts and incorrect angles. With a little practice, you’ll be filming like a pro in no time. Learning {how to mount tiny action camera on bike fork leg} is easy!
Conclusion
Mounting your action camera on the bike fork leg opens up a world of possibilities. You can share your adventures with friends and family. You can also improve your riding skills by watching your own videos. Remember to choose the right mount, follow the steps, and prioritize safety. With a little practice, you will become an expert at {how to mount tiny action camera on bike fork leg}. Get out there, ride, and capture the action!
Frequently Asked Questions
Question No 1: What tools do I need to mount my action camera on my bike’s fork leg?
Answer: You will need a few basic tools to get started. First, you need the action camera itself. Next, you need a suitable mount that is designed for bike fork legs. Some mounts come with straps or clamps. You might also need a screwdriver or Allen wrench to tighten the mount. A clean cloth and some rubbing alcohol can help prepare the fork leg. Finally, consider a safety tether to secure the camera. These tools will help you {how to mount tiny action camera on bike fork leg} safely and effectively.
Question No 2: How do I choose the right mount for my action camera?
Answer: Choosing the right mount is very important. Look for mounts made of strong materials like metal or tough plastic. Make sure the mount is compatible with your camera. It should also fit the size and shape of your bike’s fork leg. Consider the type of riding you do. If you ride on rough trails, you need a more secure mount. Read reviews from other riders. This can help you find a mount that works well. This ensures you can {how to mount tiny action camera on bike fork leg} reliably.
Question No 3: How can I ensure the camera stays stable during my rides?
Answer: Stability is key to getting good video footage. Make sure the mount is tightened securely. Check it regularly during your ride. Use vibration dampeners to reduce camera shake. These are small pads that go between the mount and the bike. Consider using extra support like zip ties or tape. A stable camera means clearer, smoother videos. Always double-check everything before you start riding. This will help you {how to mount tiny action camera on bike fork leg} and keep it secure.
Question No 4: What are some common mistakes to avoid when mounting an action camera?
Answer: There are a few common mistakes to watch out for. One is not tightening the mount enough. This can cause the camera to fall off. Another is pointing the camera at the wrong angle. This can result in boring videos. Forgetting to check the battery level is another mistake. Make sure your camera is charged before you ride. Always clean the lens before you start filming. Avoiding these mistakes ensures better videos and a safer ride. These tips will help you {how to mount tiny action camera on bike fork leg} correctly.
Question No 5: How do I adjust the camera angle for the best shots?
Answer: The angle of your camera can make a big difference in your videos. Experiment with different angles to see what looks best. Angle the camera down to see more of the trail ahead. Angle it up to capture the sky and scenery. Consider the type of riding you are doing. Adjust the angle for different terrains. Use the camera’s screen to check the view. A good angle makes your videos more exciting and engaging. Finding the perfect angle is key to {how to mount tiny action camera on bike fork leg} for great results.
Question No 6: How do I maintain my camera and mount to keep them in good condition?
Answer: Taking care of your camera and mount is important for their longevity. Clean the lens regularly with a soft cloth. Check the mount for any damage. Replace worn or broken parts. Store your camera and mount in a safe place. Protect them from extreme weather conditions. Keep the mount clean and free of dirt. Regular maintenance keeps your gear working well. It also saves you money in the long run. Knowing {how to mount tiny action camera on bike fork leg} also means knowing how to care for your equipment.


