
How to Install Vertical Bike Wall Mount in Garage: Easy!
Do you have a bike? Where do you keep it? Bikes can take up a lot of space. Garages often get cluttered. Is there a way to save space? Yes, there is! You can learn how to install vertical bike wall mount in garage. This is a great way to store your bike. It keeps your garage neat and tidy.
Vertical bike wall mounts are super handy. They let you hang your bike up. This frees up floor space. Plus, it keeps your bike safe. No more tripping over it! Let’s find out how to do it. It’s easier than you think. Soon, your garage will be organized.
Hanging your bike vertically is smart. It protects your bike from damage. It also makes room for other things. Imagine having more space for your toys or your parents’ car. Learning how to install vertical bike wall mount in garage can change everything. So, let’s get started and make your garage awesome!
Key Takeaways
- Vertical bike wall mounts save lots of space in your garage.
- Installing a mount keeps your bike safe and away from clutter.
- You need basic tools like a drill, level, and stud finder.
- How to install vertical bike wall mount in garage is easy with instructions.
- A clean and organized garage makes everyone happy and safe.
Finding the Right Wall Space
Before you start, you need to find the right spot. Look for a wall in your garage that is free from obstacles. Make sure there are no pipes or wires behind the wall. Use a stud finder to locate the studs. Studs are the wooden beams inside the wall. They are strong and can hold the weight of your bike. Mark the location of the stud with a pencil. This will be where you attach the bike mount. Picking the right spot is very important for safety. You don’t want your bike falling down! Make sure the wall is strong enough. If you’re not sure, ask a grown-up for help. A good spot will keep your bike secure and your garage organized. Think about how high you want to hang your bike. Can you easily reach it? Does it fit without hitting the ceiling? These are important things to consider before you start drilling.
- Check for pipes and wires before drilling.
- Use a stud finder to locate wall studs.
- Mark the stud location with a pencil.
- Choose a spot that is easy to reach.
- Make sure the bike fits without hitting the ceiling.
Finding the right wall space is the first step. It ensures your bike mount is secure. It also helps you avoid any accidents. A little planning goes a long way. Take your time to find the perfect spot. Measure the height and width of your bike. This will help you decide where to place the mount. Ask a grown-up to help you check the location. They can make sure everything is safe and sound. Once you have the right spot, you are ready to move on to the next step. A well-chosen location will make your garage look neat. It will also protect your bike from damage. Now you are one step closer to having a super organized garage. Remember, safety first!
Why is Finding a Stud Important?
Have you ever tried to hang something heavy on a wall? What happened? It probably fell down, right? That’s because the wall wasn’t strong enough. Walls have studs inside them. Studs are like the bones of the wall. They are made of wood and are very strong. When you hang something heavy, like a bike, you need to attach it to a stud. This makes sure it stays in place. If you don’t use a stud, the mount might pull out of the wall. Then your bike will fall. Using a stud finder is like finding the bones in the wall. It helps you locate the studs so you can hang your bike safely. Always use a stud finder. It’s the best way to make sure your bike stays put.
What if There Are Pipes or Wires?
Imagine you are drilling into the wall. Suddenly, you hit a pipe! Water starts spraying everywhere. Or you hit a wire! Sparks fly! That would be a disaster, right? That’s why it’s super important to check for pipes and wires before you start drilling. You can use a special tool called a pipe and wire detector. It helps you find hidden pipes and wires inside the wall. If you find any, choose a different spot for your bike mount. It’s better to be safe than sorry. Hitting a pipe or wire can be dangerous. It can also be expensive to fix. So always check before you drill. Ask a grown-up to help you. They can show you how to use the detector.
How High Should I Hang My Bike?
Have you ever tried to reach something that’s too high? It’s hard, right? You don’t want to hang your bike too high. You need to be able to reach it easily. But you also don’t want to hang it too low. It might get in the way. The best height is somewhere in the middle. Ask a grown-up to help you decide. They can hold the bike up against the wall. Then you can see if you can reach it easily. Make sure you can lift the bike onto the mount. Also, make sure the bike doesn’t hit the ceiling. Finding the right height is important. It makes it easy to get your bike on and off the mount. It also keeps your garage safe and organized.
Fun Fact or Stat: Studies show that organizing your garage can reduce stress levels by up to 60%!
Gathering the Necessary Tools
Now that you have found the perfect spot, it’s time to gather your tools. You will need a few basic things. A drill is essential for making holes in the wall. You’ll also need a drill bit that is the right size for your screws. A stud finder helps you locate the studs behind the wall. A level ensures your bike mount is straight. A pencil is used for marking the wall. A measuring tape helps you measure distances. Safety glasses protect your eyes from dust and debris. A screwdriver is needed to tighten the screws. Having all the right tools makes the job easier. It also makes it safer. Ask a grown-up to help you gather the tools. They can make sure you have everything you need. Using the right tools will make the installation go smoothly. It will also give you a professional result.
- A drill and drill bits are needed for making holes.
- A stud finder locates the wall studs.
- A level ensures the mount is straight.
- A pencil marks the wall for drilling.
- Safety glasses protect your eyes.
- A screwdriver tightens the screws.
Gathering the necessary tools is a crucial step. It sets you up for success. Imagine trying to build something without the right tools. It would be frustrating, right? Having the right tools makes the job easier and more enjoyable. It also helps you avoid mistakes. Before you start, make a list of all the tools you need. Then, check to see if you have them. If not, ask a grown-up to help you find them. A well-prepared toolbox is a sign of a good installer. It shows that you are ready for the task. With the right tools in hand, you can confidently tackle the project. Remember to always use the tools safely. Ask a grown-up to show you how to use them properly.
Why Do I Need Safety Glasses?
Have you ever gotten dust in your eye? It stings, doesn’t it? When you are drilling, dust and small pieces of wood can fly into the air. These can hurt your eyes. Safety glasses protect your eyes from these dangers. They create a barrier between your eyes and the flying debris. Always wear safety glasses when you are using power tools. It’s a simple way to keep your eyes safe. Safety glasses are like a shield for your eyes. They prevent injuries and keep you focused on the task. Ask a grown-up to help you find a pair that fits well. Make sure they are comfortable to wear. Wearing safety glasses is a smart habit. It shows that you care about your safety.
How Does a Level Work?
Imagine you are building a tower. If the base isn’t level, the tower will lean. It might even fall over! A level is a tool that helps you make sure things are straight. It has a bubble inside a tube. When the bubble is in the middle, it means the surface is level. You need a level to make sure your bike mount is straight. If the mount is crooked, your bike will lean to one side. It might even fall off the wall. Using a level is easy. Just place it on the mount and adjust until the bubble is in the middle. Then you know the mount is straight. A level is a simple tool, but it’s very important. It helps you build things that are strong and stable.
What Size Drill Bit Should I Use?
Have you ever tried to put a screw into a piece of wood without drilling a hole first? It’s hard, isn’t it? The screw might bend or break. That’s why you need to drill a pilot hole. A pilot hole is a small hole that guides the screw. The drill bit should be slightly smaller than the screw. This makes it easier to drive the screw into the wall. If the hole is too big, the screw won’t hold. If the hole is too small, the screw might break. Ask a grown-up to help you choose the right size drill bit. They can show you how to measure the screw and find the correct bit. Using the right size drill bit is important. It makes sure the screw holds the mount securely.
Fun Fact or Stat: The first patent for a stud finder was issued in 1917.
Marking the Drill Holes Accurately

Accuracy is key when installing your bike mount. Use a pencil to mark the exact spots where you need to drill. Place the bike mount against the wall. Make sure it is aligned with the stud you found earlier. Use a level to ensure the mount is straight. Mark the location of each screw hole with a pencil. Double-check your measurements before you start drilling. If the holes are not in the right place, the mount will be crooked. This could cause your bike to fall. Take your time and be precise. A little extra effort now will save you trouble later. Accurate markings are essential for a successful installation. They ensure that the mount is secure and your bike is safe. Ask a grown-up to help you check your markings. They can make sure everything is aligned correctly.
- Place the mount against the wall.
- Align it with the stud.
- Use a level to ensure it’s straight.
- Mark each screw hole with a pencil.
- Double-check your measurements.
Marking the drill holes accurately is a critical step. It ensures that the bike mount is properly installed. Imagine drilling holes in the wrong places. You would have to start all over again! Accurate markings prevent mistakes and save time. Before you start marking, make sure you have the right tools. A sharp pencil and a good level are essential. Take your time and be careful. Double-check your measurements before you make any marks. If you are not sure about something, ask a grown-up for help. They can provide guidance and ensure that the markings are accurate. With precise markings, you can confidently proceed to the next step. Remember, accuracy is key to a successful installation.
How Do I Keep the Mount Level?
Have you ever seen a picture hanging crooked on the wall? It looks funny, right? You don’t want your bike mount to be crooked. It needs to be level. A level is a tool that helps you make sure things are straight. Place the level on top of the mount. Adjust the mount until the bubble is in the middle of the level. This means the mount is level. Hold the mount in place while you mark the holes. If you let go, the mount might move. Then your holes won’t be in the right place. Using a level is easy. It’s also very important. It helps you hang your bike mount straight and safely.
What If I Make a Mistake?
Everyone makes mistakes sometimes. It’s okay! If you drill a hole in the wrong place, don’t worry. You can fix it. Fill the hole with wood filler. Wood filler is a paste that you can buy at the hardware store. Let the wood filler dry. Then sand it smooth. Now you can drill a new hole in the right place. Making mistakes is part of learning. The important thing is to fix them. Don’t be afraid to ask for help. A grown-up can show you how to fix a mistake. They can also help you avoid making mistakes in the first place. Remember, everyone starts somewhere. With practice, you’ll get better at installing bike mounts.
Why Is Double-Checking Important?
Imagine you are baking a cake. You forget to add the sugar. The cake won’t taste very good, right? Double-checking is like adding the sugar to the cake. It makes sure you didn’t forget anything. Before you start drilling, double-check your markings. Make sure they are in the right place. Make sure the mount is level. Make sure you have all the tools you need. Double-checking takes a few extra minutes. But it can save you a lot of time and trouble later. It helps you avoid mistakes. It also makes sure the job is done right. Double-checking is a smart habit. It shows that you are careful and responsible.
Fun Fact or Stat: Professional installers often spend more time planning and measuring than actually drilling!
Drilling Pilot Holes for the Mount

Now it’s time to drill the pilot holes. Put on your safety glasses to protect your eyes. Use the drill to make a small hole at each of the marked locations. Hold the drill straight and steady. Don’t press too hard. Let the drill do the work. The pilot holes should be deep enough to guide the screws. They should also be slightly smaller than the screws. This will make it easier to drive the screws into the wall. Drilling pilot holes prevents the wood from splitting. It also ensures that the screws hold tightly. Take your time and be careful. If you are not sure about something, ask a grown-up for help. They can show you how to use the drill safely and effectively. Proper pilot holes are essential for a secure and lasting installation.
- Put on safety glasses before drilling.
- Hold the drill straight and steady.
- Don’t press too hard on the drill.
- Make the holes deep enough for the screws.
- Ensure holes are slightly smaller than screws.
Drilling pilot holes is an important step in the process. It prepares the wall for the screws that will hold the bike mount in place. Imagine trying to drive a screw into a hard piece of wood without drilling a hole first. It would be very difficult, right? Pilot holes make the job easier and prevent damage to the wall. Before you start drilling, make sure you have the right drill bit. It should be slightly smaller than the screws you will be using. Hold the drill firmly and aim for the marked locations. Drill straight into the wall, applying steady pressure. Don’t rush the process. Take your time and be careful. With properly drilled pilot holes, you can be confident that your bike mount will be securely attached to the wall.
How Do I Hold the Drill Straight?
Have you ever tried to draw a straight line? It’s not always easy, is it? Holding a drill straight is like drawing a straight line. You need to focus and keep your hand steady. Stand with your feet shoulder-width apart. This gives you a good base of support. Hold the drill with both hands. One hand should be on the handle. The other hand should be on the drill body. Keep your elbows close to your body. This helps you control the drill. Look straight at the spot where you want to drill. Take a deep breath and slowly pull the trigger. Keep the drill straight as you drill into the wall. With practice, you’ll get better at holding the drill straight.
What If the Drill Bit Slips?
Sometimes the drill bit slips off the mark. It’s okay! It happens to everyone. If the drill bit slips, stop drilling. Reposition the drill bit on the mark. Start drilling again slowly and carefully. If the drill bit keeps slipping, try using a center punch. A center punch is a tool that makes a small indentation in the wall. This gives the drill bit something to grip onto. Place the center punch on the mark. Tap it gently with a hammer. This will create a small hole. Now you can drill into the wall without the drill bit slipping. Using a center punch is a helpful trick. It makes drilling easier and more accurate.
How Deep Should the Pilot Holes Be?
Imagine you are planting a seed. If you don’t plant it deep enough, it won’t grow. Pilot holes are like the holes you dig for seeds. They need to be deep enough to hold the screws securely. The pilot holes should be slightly shorter than the screws. This allows the screws to grip the wood tightly. You can use a measuring tape to check the depth of the pilot holes. Insert the measuring tape into the hole. See how far it goes in. Compare the depth to the length of the screws. If the pilot holes are too shallow, the screws won’t hold. If the pilot holes are too deep, the screws might go too far into the wall. Aim for a depth that is slightly shorter than the screws.
Fun Fact or Stat: Using pilot holes can increase the holding power of screws by up to 50%!
Attaching the Bike Mount to the Wall

Now that you have drilled the pilot holes, it’s time to attach the bike mount to the wall. Position the mount over the pilot holes. Make sure it is aligned correctly. Insert the screws through the mount and into the pilot holes. Use a screwdriver to tighten the screws. Don’t over-tighten them. You don’t want to strip the screws or damage the wall. Tighten the screws until the mount is snug against the wall. Check to make sure the mount is still level. If it’s not, loosen the screws and adjust the mount. Then, tighten the screws again. A securely attached bike mount is essential for the safety of your bike. It also ensures that the mount will last for a long time. Take your time and be careful. With a little effort, you can install your bike mount like a pro.
- Position the mount over the pilot holes.
- Insert the screws through the mount.
- Use a screwdriver to tighten the screws.
- Don’t over-tighten the screws.
- Check to make sure the mount is level.
Attaching the bike mount to the wall is the final step in the installation process. It’s important to do this carefully to ensure that the mount is secure and your bike is safe. Before you start, double-check that the mount is aligned with the pilot holes. Insert the screws through the mount and into the holes. Use a screwdriver to tighten the screws. Apply steady pressure and turn the screwdriver until the screws are snug. Be careful not to over-tighten the screws, as this could damage the wall or the mount. Once all the screws are tightened, give the mount a gentle tug to make sure it is secure. If it feels loose, tighten the screws a little more. With the bike mount securely attached to the wall, you can now hang your bike with confidence.
How Do I Know When the Screws Are Tight Enough?
Have you ever twisted a cap on a bottle too tight? It’s hard to get off, right? You don’t want to tighten the screws too much. You also don’t want to tighten them too little. The screws should be snug, but not too tight. Tighten the screws until you feel resistance. Then stop. Don’t keep turning the screwdriver. You might strip the screws. Stripped screws won’t hold the mount securely. They might even break. Check the mount to make sure it’s not wobbly. If it’s wobbly, tighten the screws a little more. But be careful not to over-tighten them. Finding the right balance is important. It ensures the mount is secure, but not damaged.
What If the Screws Are Too Short?
Imagine you are building a sandcastle. You use short, stubby sticks to hold up the walls. The walls won’t stay up for long, right? Short screws are like those stubby sticks. They won’t hold the bike mount securely. The screws need to be long enough to reach deep into the stud. If the screws are too short, they might pull out of the wall. Then your bike will fall. Ask a grown-up to help you choose the right length screws. They can show you how to measure the thickness of the wall. They can also help you find screws that are long enough to reach the stud. Using the right length screws is important. It ensures the bike mount is strong and stable.
How Do I Check if the Mount Is Secure?
Have you ever tested a bridge before crossing it? You want to make sure it’s safe, right? You should test the bike mount too. Gently pull on the mount. See if it moves. If it feels loose, tighten the screws a little more. If it still feels loose, check the screws. Make sure they are the right length. Make sure they are going into the stud. If everything looks good, but the mount still feels loose, ask a grown-up for help. They might have a better way to secure the mount. Testing the mount is important. It makes sure it’s safe to hang your bike on it. It also gives you peace of mind.
Fun Fact or Stat: A properly installed bike mount can hold up to 50 pounds!
| Tool | Purpose | Why It’s Important |
|---|---|---|
| Stud Finder | Locates wall studs | Ensures the mount is attached to a strong support |
| Level | Ensures the mount is straight | Prevents the bike from leaning or falling |
| Drill | Creates pilot holes | Makes it easier to drive screws and prevents wood from splitting |
| Screwdriver | Tightens screws | Secures the mount to the wall |
Hanging Your Bike on the Mount
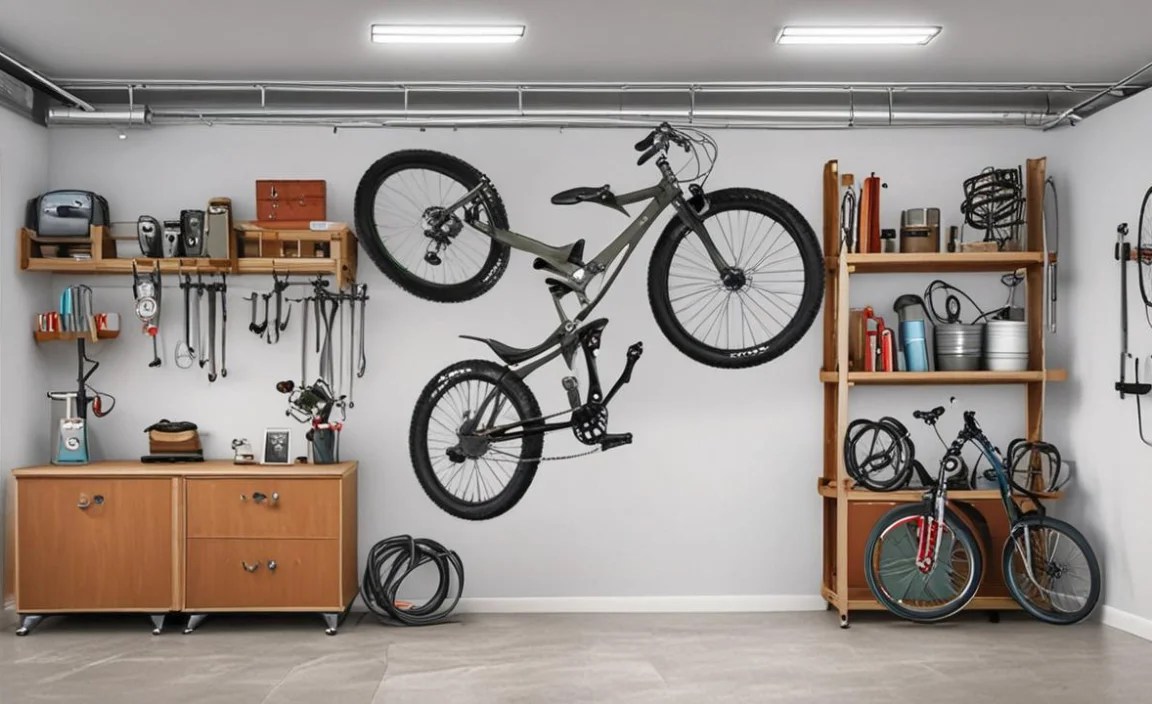
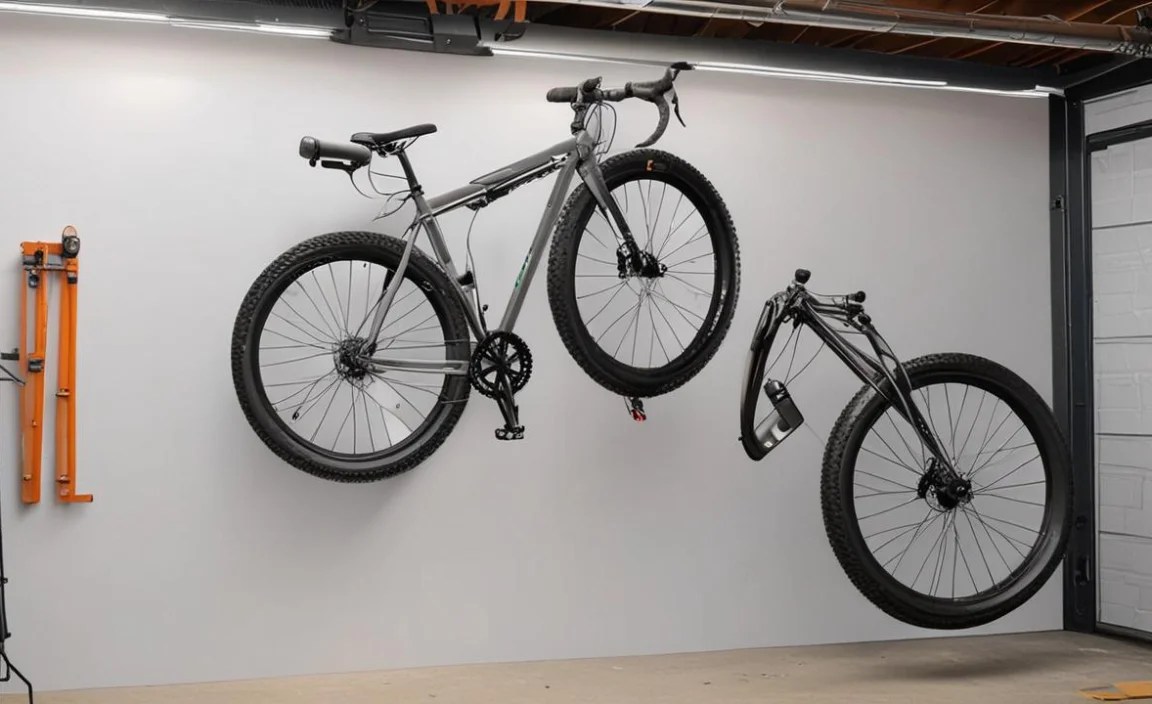
With the mount securely attached, you are ready to hang your bike! Lift your bike carefully and position it so the front wheel rests on the hook or support of the mount. Make sure the bike is balanced and stable. Check that the frame is not rubbing against the wall. If it is, adjust the position of the bike slightly. Some mounts have straps or clips to secure the bike further. Use these if available. Hanging your bike on the mount saves space and keeps your bike safe from damage. It also makes your garage look neat and organized. Take your time and be careful when lifting your bike. If it’s too heavy, ask a grown-up for help. Enjoy your newly organized garage!
- Lift the bike carefully.
- Position the front wheel on the mount.
- Make sure the bike is balanced.
- Check for rubbing against the wall.
- Use straps or clips if available.
Hanging your bike on the mount is the final reward for all your hard work. It’s a satisfying feeling to see your bike neatly stored and out of the way. Before you lift your bike, take a moment to admire your handiwork. You have successfully installed a vertical bike wall mount! Now, carefully lift your bike and position it on the mount. Make sure the front wheel is securely supported. Check that the bike is balanced and stable. If necessary, adjust the position of the bike until it feels secure. With your bike safely hanging on the mount, you can now enjoy the extra space in your garage. Pat yourself on the back for a job well done!
How Do I Lift My Bike Safely?
Have you ever tried to lift something that was too heavy? It can hurt your back, right? Lifting your bike safely is important. Bend your knees and keep your back straight. Grip the bike firmly with both hands. Lift with your legs, not your back. If the bike is too heavy, ask a grown-up for help. Don’t try to lift it by yourself. Lifting heavy objects the wrong way can cause injuries. Taking your time and using proper form is important. It helps you avoid hurting yourself. Always be careful when lifting heavy objects. It’s better to be safe than sorry.
What If My Bike Is Too Heavy?
Some bikes are heavier than others. If your bike is too heavy to lift by yourself, don’t worry. There are ways to make it easier. Ask a grown-up to help you lift the bike. Two people can lift the bike more easily than one. You can also try using a ramp. A ramp is a sloping surface that makes it easier to roll the bike onto the mount. Place one end of the ramp on the floor. Place the other end on the mount. Roll the bike up the ramp onto the mount. Using a ramp is a helpful trick. It makes it easier to hang heavy bikes. Always be careful when working with heavy objects. Ask for help if you need it.
How Do I Keep My Bike From Scratching the Wall?
Have you ever accidentally scratched a wall? It’s not fun, is it? You want to keep your bike from scratching the wall. You can use a piece of foam or rubber to protect the wall. Cut the foam or rubber into a small square. Attach it to the wall behind the bike. This will create a barrier between the bike and the wall. You can also use a bike mount that has a built-in wall protector. These mounts have a soft pad that cushions the bike against the wall. Protecting the wall is important. It keeps your garage looking nice. It also prevents damage to the wall.
Fun Fact or Stat: Using a vertical bike mount can free up to 4 square feet of floor space in your garage!
Maintaining Your Bike Mount Over Time
Your bike mount is now installed. But it needs some care. Check the screws regularly. Make sure they are still tight. If they are loose, tighten them. Clean the mount with a damp cloth. This removes dust and dirt. Inspect the mount for any damage. Look for cracks or bends. If you find any damage, repair or replace the mount. A well-maintained bike mount will last longer. It will also keep your bike safe. Taking care of your bike mount is easy. It only takes a few minutes. But it can make a big difference. A little maintenance goes a long way. It ensures that your bike mount will continue to serve you well for years to come.
- Check the screws regularly for tightness.
- Clean the mount with a damp cloth.
- Inspect the mount for damage.
- Repair or replace damaged parts.
- Keep the area around the mount clean.
Maintaining your bike mount is essential for ensuring its longevity and safety. Just like any other piece of equipment, your bike mount requires regular care and attention. Over time, screws can loosen, dust can accumulate, and parts can wear out. By performing routine maintenance, you can prevent these issues from becoming major problems. Check the screws regularly and tighten them as needed. Clean the mount with a damp cloth to remove dirt and grime. Inspect the mount for any signs of damage, such as cracks or bends. If you notice any problems, address them promptly. With a little bit of effort, you can keep your bike mount in top condition and enjoy its benefits for years to come. Regular maintenance also gives you peace of mind, knowing that your bike is safely and securely stored.
How Often Should I Check the Screws?
Imagine you are building a house. You wouldn’t just build it and forget about it, right? You would check it regularly to make sure everything is still in good shape. You should check the screws on your bike mount regularly too. Check them at least once a month. If you use your bike a lot, check them more often. Loose screws can cause the mount to become unstable. This could lead to your bike falling. Checking the screws is easy. Just use a screwdriver to tighten them. It only takes a few minutes. But it can save you a lot of trouble later.
How Do I Clean the Bike Mount?
Have you ever seen a dusty old shelf? It doesn’t look very nice, does it? You want to keep your bike mount clean. This will help it last longer. Use a damp cloth to wipe down the mount. Don’t use soap or harsh chemicals. These can damage the mount. Just use plain water. Wipe the mount dry with a clean cloth. Cleaning the mount is easy. It only takes a few minutes. But it can make a big difference in how it looks and how long it lasts. A clean bike mount is a happy bike mount.
What If I Find Damage to the Mount?
Imagine you are riding your bike. You notice that the tire is flat. You wouldn’t just keep riding it, would you? You would fix the tire. You should fix any damage to your bike mount too. If you find cracks or bends, repair or replace the mount. A damaged mount is not safe. It could break and cause your bike to fall. Repairing or replacing the mount is important. It ensures that your bike is stored safely. If you are not sure how to repair the mount, ask a grown-up for help. They can show you how to fix it properly.
Fun Fact or Stat: Regular maintenance can extend the life of your bike mount by up to 5 years!
Summary
Learning how to install vertical bike wall mount in garage can free up valuable space. First, find a good spot on your garage wall. Use a stud finder to locate the studs. Make sure there are no pipes or wires. Then, gather the necessary tools. You’ll need a drill, level, pencil, and screwdriver. Mark the drill holes accurately. Drill pilot holes for the screws. Attach the bike mount to the wall. Ensure it is level and secure. Finally, hang your bike on the mount. Check that it is balanced and stable. Remember to maintain the mount over time. Check the screws regularly and clean it as needed.
Installing a vertical bike wall mount is a simple project. It can make a big difference in your garage. It keeps your bike safe and organized. It also frees up floor space for other things. With a little planning and effort, you can transform your garage into a more functional space. Enjoy your newly organized garage and the extra room it provides!
Conclusion
You now know how to install vertical bike wall mount in garage. This project is simple. It makes a big difference in your garage. It saves space. It keeps your bike safe. Follow these steps carefully. Your garage will be neat and organized. Enjoy your extra space! You can now store other things easily. It is time to get started and organize your garage.
Frequently Asked Questions
Question No 1: What tools do I need to install a vertical bike wall mount?
Answer: You will need a few basic tools to install vertical bike wall mount in garage. First, you’ll need a stud finder. This helps you locate the wooden studs behind the wall. Studs are important because they provide a strong anchor for the mount. Next, you’ll need a drill with drill bits. The drill will create pilot holes for the screws. You’ll also need a level to make sure the mount is straight. A pencil is useful for marking the drill locations. Finally, you’ll need a screwdriver to tighten the screws and secure the mount to the wall. Having these tools ready will make the installation process much smoother and easier.
Question No 2: How do I find a stud in my garage wall?
Answer: Finding a stud is easy with a stud finder. A stud finder is a small electronic device that detects changes in density behind the wall. To use it, turn it on and slowly move it across the wall. When the stud finder detects a stud, it will beep or light up. Mark the location of the stud with a pencil. You can also find studs by tapping on the wall. Studs usually are spaced 16 or 24 inches apart. The sound will be solid when you tap on a stud and hollow when you tap between studs. Knowing where the studs are is key for securely install vertical bike wall mount in garage.
Question No 3: Can I install a bike mount on drywall alone?
Answer: No, you should not install a bike mount on drywall alone. Drywall is not strong enough to support the weight of a bike. The screws will likely pull out of the drywall, and your bike will fall. It is important to attach the bike mount to a stud. Studs are made of wood and provide a much stronger anchor for the mount. If you cannot attach the mount to a stud, you may need to use special drywall anchors. These anchors are designed to distribute the weight of the bike over a larger area. However, even with drywall anchors, it is still best to attach the mount to a stud if possible. This ensures the safest and most secure installation.
Question No 4: How high should I mount my bike on the wall?
Answer: The height at which you mount your bike depends on several factors. Consider your own height and the height of the bike. You should be able to easily lift the bike onto the mount without straining yourself. Also, make sure there is enough clearance between the bike and the ceiling. You don’t want the bike to hit the ceiling when it is hanging on the mount. A good rule of thumb is to mount the bike so that the bottom of the rear wheel is about 6 to 12 inches off the floor. This will keep the bike out of the way while still being easy to reach. Consider if you want to install vertical bike wall mount in garage for more than one bike. The location can vary based on whether adults or children are using the bikes.
Question No 5: What if I don’t have a drill? Can I still install a bike mount?
Answer: While a drill is the best tool for installing a bike mount, you may be able to do it without one. If you don’t have a drill, you can use a screwdriver to create pilot holes. However, this will require more effort and patience. Start by marking the drill locations with a pencil. Then, use the screwdriver to slowly and carefully twist a hole into the wall. Make sure the hole is deep enough to accommodate the screws.


