
How to Mount Action Camera on Mountain Bike: Easy Guide
Do you love riding your mountain bike? Do you want to share your awesome rides with friends? You can! Learning how to mount action camera on mountain bike is easier than you think. Imagine showing everyone your cool jumps and fast turns.
It is super fun to record your bike rides. You can watch them later and see how you did. You can also share them online for others to enjoy. Let’s learn how to set up your camera safely.
Key Takeaways
- Properly mounting ensures your camera stays secure and captures great footage.
- Choose the right mount for your handlebars, helmet, or chest for best views.
- Always check the camera angle before you start riding to get the perfect shot.
- Knowing how to mount action camera on mountain bike helps you create exciting videos.
- Make sure your mount is tight to avoid shaky video while riding trails.
Choosing the Right Action Camera Mount

Selecting the right mount is important. It will keep your camera safe. It will also give you the best view. There are many different types of mounts. Some attach to your handlebars. Others attach to your helmet. Chest mounts are also available. Think about what you want to record. Do you want to see the trail? Or do you want to see yourself riding? This will help you pick the perfect mount. Make sure the mount is strong and fits your camera. A good mount will make your videos look awesome!
- Handlebar mounts are great for seeing the trail.
- Helmet mounts show what you are looking at.
- Chest mounts give a view of your arms and the bike.
- Consider the type of riding you will be doing.
- Make sure the mount is compatible with your camera.
Different mounts offer different perspectives. Handlebar mounts are good for showing the trail ahead. They give a stable view. Helmet mounts let you record exactly what you see. This is great for showing off your skills. Chest mounts offer a unique view. You can see your arms and the bike as you ride. Each type of mount has its own benefits. Try different ones to see what you like best. A good mount is important for capturing great video. It also keeps your camera safe from damage.
What Are The Best Camera Angles?
Do you want to make your videos look amazing? The camera angle matters a lot. A high angle can show more of the trail. A low angle can make your ride look more exciting. Think about what you want to show. Are you riding a fast downhill? A low angle might be best. Are you climbing a steep hill? A higher angle could be better. Test different angles before you start your ride. This will help you find the perfect shot. Remember, the right angle can make your video stand out.
How Secure Is the Mount?
Imagine your camera falling off during a ride! That would be terrible. You need to make sure your mount is very secure. Check the screws and straps. Make sure everything is tight. A loose mount can cause shaky video. It can also let your camera fall off. Before each ride, give the mount a good shake. If it moves at all, tighten it more. A secure mount will keep your camera safe. It will also give you better video quality. Always double-check before you hit the trails.
Can I Adjust the Mount Easily?
Sometimes you need to change the camera angle while you are riding. An adjustable mount makes this easy. You can quickly tilt the camera up or down. You can also turn it to the side. This is great for capturing different views. Look for a mount that is easy to adjust. You should be able to do it without stopping. Some mounts have quick-release levers. These make adjustments very fast. An adjustable mount gives you more control over your video.
Fun Fact or Stat: GoPro is the most popular action camera brand, with over 65% of the market share!
Step-by-Step Guide: Mounting on Handlebars
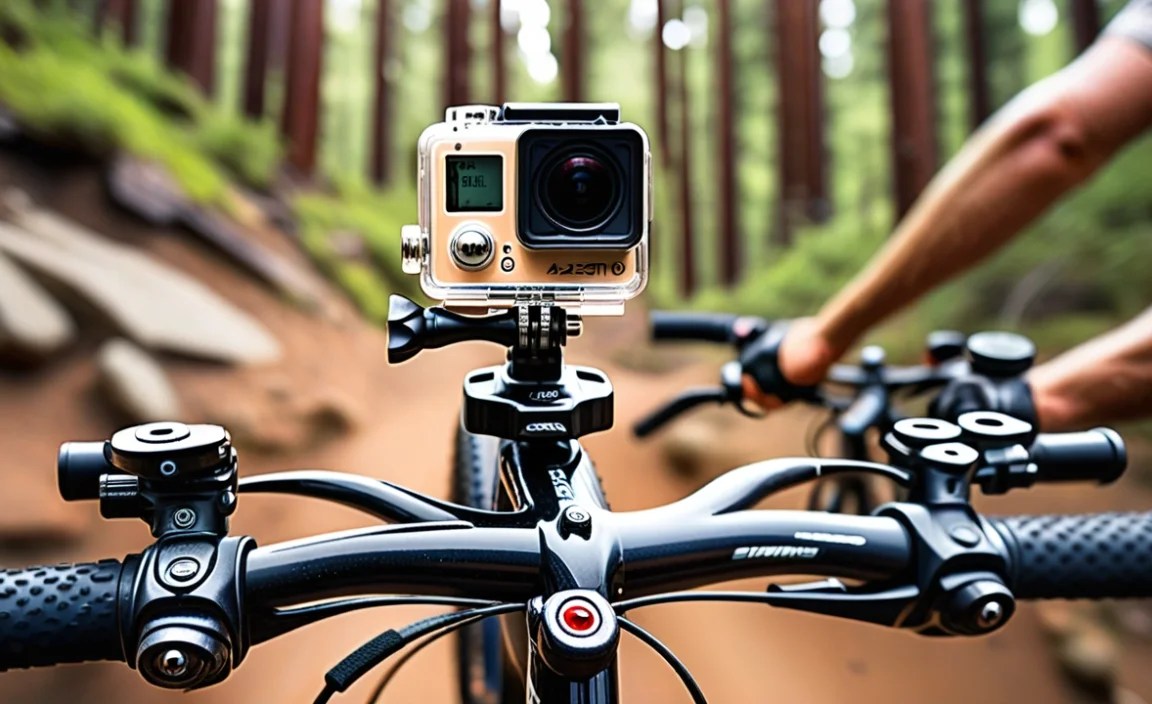
Using handlebars is a common way to mount your action camera. It gives you a clear view of the trail. First, choose a handlebar mount that fits your camera. Make sure it is the right size for your handlebars. Next, attach the mount to your handlebars. Tighten the screws so it is secure. Do not over-tighten, or you could damage your handlebars. Now, attach your camera to the mount. Make sure it clicks into place. Check the angle and adjust it if needed. Test the camera before you start riding.
- Choose a handlebar mount that fits your camera.
- Attach the mount securely to your handlebars.
- Do not over-tighten the screws.
- Attach your camera to the mount.
- Adjust the angle for the best view.
- Test the camera before riding.
Handlebar mounts are great because they are easy to use. You can quickly attach and remove your camera. They also provide a stable view of the trail. This is important for getting clear video. Some handlebar mounts have vibration dampeners. These help reduce shaking. This makes your videos even smoother. Make sure your mount is strong enough to hold your camera. A weak mount can break during a rough ride. Always check the mount before each ride to ensure it is secure.
What Tools Do I Need?
To mount your camera, you might need a few tools. A screwdriver is often needed to tighten the screws. An Allen wrench can also be helpful. Some mounts come with their own tools. Check the instructions to see what you need. It is a good idea to keep these tools with you. That way, you can make adjustments on the trail. A small toolkit can be very useful. It can help you fix any problems that come up. Always be prepared for anything!
How Do I Prevent Vibrations?
Vibrations can make your video look shaky. This is not good! To prevent vibrations, use a good quality mount. Some mounts have special features to reduce shaking. You can also try adding some padding. A small piece of foam can help absorb vibrations. Make sure your mount is very tight. A loose mount will vibrate more. Test your setup before you start riding. If you see vibrations, try adjusting the mount.
What If My Handlebars Are Too Thick?
Some handlebars are thicker than others. If your mount does not fit, you might need an adapter. An adapter can make the mount fit properly. You can find adapters online or at a bike shop. Make sure you get the right size. The adapter should fit both your handlebars and your mount. Using the wrong adapter can be dangerous. It can cause the mount to come loose. Always double-check the fit before you ride.
Fun Fact or Stat: Handlebar mounts are the most popular choice for mountain bikers recording their rides, accounting for 40% of all action camera mounts used.
Helmet Mounting: A Rider’s Eye View

Helmet mounts give you a rider’s eye view. This means you see exactly what the rider sees. This can make your videos very exciting. First, choose a helmet mount that fits your helmet. Some mounts attach with straps. Others use adhesive. Make sure the mount is secure. You do not want it to fall off during a ride. Attach your camera to the mount. Adjust the angle so you can see the trail. Test the camera before you start riding. Remember to be safe and wear your helmet!
- Choose a helmet mount that fits your helmet.
- Attach the mount securely with straps or adhesive.
- Adjust the angle for the best view.
- Make sure the camera does not block your vision.
- Test the camera before riding.
Helmet mounts are great for capturing the action. They show exactly what you are looking at. This can make your videos very immersive. However, helmet mounts can also be more shaky. This is because your head moves around a lot. To reduce shaking, use a good quality mount. Also, try to keep your head still. Look ahead and focus on the trail. Remember to always wear your helmet. Safety is the most important thing. A helmet can protect you from serious injury.
| Mount Type | Pros | Cons | Best For |
|---|---|---|---|
| Handlebar Mount | Stable view, easy to install | Can be blocked by cables | General trail riding |
| Helmet Mount | Rider’s eye view, immersive | Can be shaky, affects balance | Technical trails, showing off skills |
| Chest Mount | Unique perspective, shows bike and arms | Can be uncomfortable, limited view | Downhill riding, capturing body movement |
| Frame Mount | Very stable, low profile | Limited adjustability, harder to install | Racing, minimizing obstructions |
How Do I Choose the Right Spot on My Helmet?
Picking the right spot on your helmet is important. You want to make sure the camera does not block your vision. You also want it to be in a place that is stable. The top of your helmet is a common choice. This gives you a good view of the trail. The side of your helmet is another option. This can give you a different perspective. Try different spots to see what you like best. Make sure the mount is secure no matter where you put it.
What If the Adhesive Mount Won’t Stick?
Sometimes adhesive mounts do not stick well. This can be frustrating. Make sure the surface of your helmet is clean. Use alcohol to clean it before applying the mount. Also, make sure the adhesive is fresh. Old adhesive might not be as sticky. You can also try using a stronger adhesive. There are special adhesives made for action cameras. Follow the instructions carefully when applying the adhesive. Let it dry completely before attaching your camera.
Will a Camera Affect My Balance?
A camera on your helmet can affect your balance. It adds weight to your head. This can make it harder to stay balanced. Start with a lightweight camera. Also, make sure the camera is mounted securely. A loose camera will make it even harder to balance. Practice riding with the camera on your helmet. This will help you get used to the feeling. Be careful when riding on technical trails.
Fun Fact or Stat: Studies show that using a helmet camera can increase rider awareness and caution on trails!
Using Chest Mounts for Unique Perspectives
Chest mounts offer a unique perspective. They show your arms and the bike as you ride. This can make your videos very dynamic. First, adjust the straps so the mount fits snugly. It should not be too tight or too loose. Attach your camera to the mount. Adjust the angle so you can see the trail. Make sure the camera does not block your vision. Test the camera before you start riding. Chest mounts are great for showing off your riding style.
- Adjust the straps for a snug fit.
- Attach your camera to the mount.
- Adjust the angle to see the trail.
- Make sure the camera does not block your vision.
- Test the camera before riding.
Chest mounts are great for showing your body movement. You can see how you handle the bike. This can be very helpful for improving your skills. However, chest mounts can also be uncomfortable. The straps can rub against your skin. To prevent this, wear a comfortable shirt. You can also try padding the straps. Make sure the mount is not too tight. It should allow you to breathe easily. Chest mounts are a good option for riders who want a different view.
Are Chest Mounts Comfortable?
Chest mounts can be comfortable if you adjust them properly. Make sure the straps are not too tight. They should fit snugly but not restrict your breathing. Wear a comfortable shirt to prevent rubbing. You can also add padding to the straps. Some chest mounts are made of soft materials. These can be more comfortable to wear. Try different chest mounts to find one that fits you well.
How Do I Stop the Mount From Moving?
A chest mount that moves around can be annoying. To stop it from moving, tighten the straps. Make sure they are snug but not too tight. You can also try using a non-slip pad. This will help the mount stay in place. Wear a tight-fitting shirt to hold the mount in place. Check the mount before each ride to make sure it is secure. A stable mount will give you better video quality.
What Kind of Riding Is Best for Chest Mounts?
Chest mounts are best for certain types of riding. They are great for downhill riding. You can see your arms and the bike as you go down the hill. They are also good for showing off your riding style. Chest mounts are not as good for climbing. They can block your view of the trail. Consider the type of riding you will be doing when choosing a mount.
Fun Fact or Stat: Chest mounts provide a field of view that is 20% wider than helmet mounts, capturing more of the rider’s body and bike.
Adjusting Camera Settings for Best Footage
Adjusting your camera settings is important. It can make your video look much better. Think about the lighting conditions. If it is bright, you might need to lower the exposure. If it is dark, you might need to raise the exposure. Also, think about the resolution. Higher resolution means better quality. But it also means bigger files. Experiment with different settings to see what works best. A good camera setup can make a big difference.
- Adjust the exposure for different lighting conditions.
- Choose the right resolution for your needs.
- Use image stabilization to reduce shaking.
- Adjust the field of view to capture more of the scene.
- Experiment with different settings to find what works best.
Image stabilization can help reduce shaking. This is important for getting clear video. Most action cameras have image stabilization built in. Turn it on to improve your video quality. Field of view is another important setting. A wider field of view captures more of the scene. A narrower field of view focuses on a smaller area. Choose the field of view that works best for your riding style. Remember to test your settings before you start riding.
What Resolution Should I Use?
The resolution you use depends on what you want to do with your video. If you plan to share it online, 1080p is a good choice. It is high quality but not too big. If you want the best possible quality, use 4K. But be aware that 4K files are very large. They will take up a lot of space on your memory card. Choose the resolution that works best for your needs.
How Do I Adjust the Exposure?
Exposure controls how bright or dark your video is. If your video is too bright, lower the exposure. If your video is too dark, raise the exposure. Most action cameras have an automatic exposure setting. This can be helpful in most situations. But sometimes you might need to adjust it manually. Experiment with different exposure settings to see what works best.
Should I Use Image Stabilization?
Yes, you should almost always use image stabilization. It helps reduce shaking in your video. This makes your video look much smoother. Most action cameras have image stabilization built in. Turn it on to improve your video quality. Some cameras have even better image stabilization than others. Look for a camera with good image stabilization if you want the smoothest video.
Fun Fact or Stat: Videos shot in 4K resolution have four times the detail of 1080p, making them incredibly sharp and lifelike!
Safety Tips for Action Camera Use
Safety is the most important thing when using an action camera. Always wear a helmet. A helmet can protect you from serious injury. Make sure your camera mount is secure. You do not want it to fall off during a ride. Do not let the camera distract you. Focus on the trail and your surroundings. Be aware of other riders and obstacles. Follow all traffic laws and trail rules. Ride safely and have fun!
- Always wear a helmet.
- Make sure your camera mount is secure.
- Do not let the camera distract you.
- Be aware of your surroundings.
- Follow all traffic laws and trail rules.
Before each ride, check your camera and mount. Make sure everything is working properly. Charge your batteries so you do not run out of power. Bring extra memory cards so you can record everything. Tell someone where you are going. This is important in case of an emergency. Carry a first aid kit with you. Be prepared for anything that might happen. Safety should always be your top priority.
What If My Camera Falls Off?
If your camera falls off, stop riding. Find a safe place to pull over. Retrieve your camera and inspect it for damage. Check the mount to see if it is broken. If the camera is damaged, you might need to replace it. If the mount is broken, replace it before your next ride. Make sure the new mount is secure. Always be careful when retrieving your camera.
How Do I Keep My Camera From Overheating?
Action cameras can overheat in hot weather. To prevent this, avoid using your camera in direct sunlight. Keep it in a shaded area when not in use. You can also try using a heat sink. A heat sink helps dissipate heat. Turn off unnecessary features, such as Wi-Fi. This will reduce the amount of heat the camera generates. If your camera overheats, let it cool down before using it again.
What Should I Do in an Accident?
If you are in an accident, your safety is the most important thing. Check yourself for injuries. If you are seriously injured, call for help. If you are able to, check on others involved in the accident. Once everyone is safe, you can retrieve your camera. Inspect it for damage. If the camera recorded the accident, save the footage. It might be helpful for insurance purposes.
Fun Fact or Stat: Wearing a helmet reduces the risk of head injury by 85% in the event of a bicycle accident!
Maintaining Your Action Camera and Mount
Taking care of your action camera and mount is important. It will help them last longer. After each ride, clean your camera and mount. Remove any dirt or mud. Use a soft cloth to wipe them down. Store your camera in a safe place. Protect it from dust and moisture. Check your mount regularly for wear and tear. Replace any worn parts. Proper maintenance will keep your camera and mount in good condition.
- Clean your camera and mount after each ride.
- Store your camera in a safe place.
- Check your mount regularly for wear and tear.
- Replace any worn parts.
- Keep your camera’s software updated.
Keep your camera’s software updated. This will ensure it is working properly. Check the manufacturer’s website for updates. Download and install any new software. Also, keep your memory cards organized. Label them so you know what is on each card. Delete any unwanted files. This will free up space for new videos. A well-maintained camera will give you the best performance.
How Often Should I Clean My Camera?
You should clean your camera after each ride. This will remove any dirt or mud. Use a soft cloth to wipe down the lens. Be careful not to scratch the lens. You can also use a lens cleaning solution. Follow the instructions on the solution. Clean the camera body as well. Remove any fingerprints or smudges. A clean camera will give you clearer videos.
How Do I Store My Camera Properly?
Store your camera in a cool, dry place. Protect it from dust and moisture. You can use a camera case to protect it from damage. Remove the battery before storing the camera for a long time. This will prevent the battery from leaking. Store the battery in a separate container. Proper storage will help your camera last longer.
When Should I Replace My Mount?
You should replace your mount if it is damaged or worn. Check the mount regularly for cracks or breaks. If the mount is loose, tighten the screws. If the screws are stripped, replace the mount. A worn mount can be dangerous. It can cause your camera to fall off during a ride. Replace your mount as soon as you notice any problems.
Fun Fact or Stat: Regular maintenance can extend the life of your action camera by up to 50%!
Summary
Learning how to mount action camera on mountain bike is easy. First, pick the right mount. Handlebar mounts show the trail. Helmet mounts show what you see. Chest mounts show your arms and bike. Next, attach the mount securely. Make sure it is tight. Adjust the camera angle. Test the camera before you ride. Remember to adjust the camera settings. This will make your videos look better. Always be safe and wear a helmet. Have fun recording your awesome bike rides.
Taking good care of your camera is important. Clean it after each ride. Store it in a safe place. Check the mount for damage. Replace worn parts. Keep the software updated. Following these tips will help your camera last longer.
Conclusion
Now you know how to mount action camera on mountain bike. Choose the right mount for your needs. Secure it tightly and adjust the camera angle. Remember to adjust camera settings. Always prioritize safety. Have fun capturing your exciting rides. Share your adventures with the world!
Frequently Asked Questions
Question No 1: What is the best type of mount for mountain biking?
Answer: The best type of mount depends on your personal preference and the type of footage you want to capture. Handlebar mounts are popular because they provide a stable view of the trail ahead. Helmet mounts offer a rider’s-eye perspective, showing exactly what you see as you navigate the terrain. Chest mounts give a unique view of your arms, bike, and the trail, capturing your body movements. Experiment with different mounts to find the one that suits your style and provides the best footage for your needs when thinking about how to mount action camera on mountain bike.
Question No 2: How do I prevent my action camera from shaking while riding?
Answer: To minimize shaking, ensure your mount is securely fastened and tightened properly. Using a high-quality mount with vibration dampening features can also help reduce unwanted movement. Additionally, consider using your camera’s image stabilization feature, which electronically smooths out shaky footage. Adjusting the camera’s settings, such as increasing the shutter speed, can also help reduce motion blur. By combining these techniques, you can achieve smoother, more professional-looking videos while riding on rough terrain. Thinking about the stability is key when learning how to mount action camera on mountain bike.
Question No 3: Can I use any action camera for mountain biking?
Answer: While most action cameras can be used for mountain biking, some are better suited than others. Look for cameras that are durable, waterproof, and have good image stabilization. A wide field of view is also beneficial for capturing more of the trail. Consider the battery life, as longer rides may require a camera with extended battery capabilities or the option to connect an external power source. Research different models and read reviews to find an action camera that meets your specific needs and budget.
Question No 4: How do I ensure my camera stays secure on my helmet?
Answer: To ensure your camera stays secure on your helmet, choose a helmet mount that is specifically designed for action cameras and is compatible with your helmet type. Clean the surface of your helmet before attaching the mount to ensure a strong adhesive bond. If using a strapped mount, make sure the straps are properly adjusted and tightened. Regularly check the mount for any signs of wear or looseness, and replace it if necessary. Always test the mount before each ride to confirm it is secure and won’t come loose during your adventure. Taking these precautions is essential when deciding how to mount action camera on mountain bike.
Question No 5: What camera settings are best for mountain biking videos?
Answer: The best camera settings for mountain biking videos depend on the lighting conditions and the desired look of your footage. In bright daylight, use a lower ISO setting to reduce noise and overexposure. In low-light conditions, increase the ISO, but be mindful of added noise. Choose a resolution and frame rate that suits your needs, such as 1080p at 60fps for smooth, detailed video. Enable image stabilization to minimize shaking. Experiment with different settings to find what works best for your camera and riding style. Remember, good camera settings are crucial when learning how to mount action camera on mountain bike.
Question No 6: How do I transfer my videos from the action camera to my computer?
Answer: There are several ways to transfer videos from your action camera to your computer. The most common method is to connect the camera to your computer using a USB cable. Your computer should recognize the camera as a storage device, allowing you to access and copy the video files. Alternatively, you can remove the memory card from the camera and insert it into a card reader connected to your computer. Some cameras also offer wireless transfer options via Wi-Fi or Bluetooth. Choose the method that is most convenient for you and ensures a reliable transfer of your valuable footage.


