
How to Mount Cadence Sensor on Bicycle: Easy Guide
Do you love riding your bike? Have you ever wondered how fast you pedal? A cadence sensor can help. It tells you how many times your pedals go around. Knowing this helps you ride better. It can even make biking more fun. But how to mount cadence sensor on bicycle? It might seem tricky. Don’t worry, it’s easier than you think! Let’s learn how.
Key Takeaways
- Mounting a cadence sensor helps track your pedaling speed for better cycling.
- You need zip ties or rubber bands to attach the sensor to your bike.
- Make sure the sensor is close enough to the magnet for accurate readings.
- Knowing how to mount cadence sensor on bicycle improves your training.
- Proper installation ensures the sensor works well and lasts longer.
Understanding Cadence Sensors on Bicycles

A cadence sensor is a small tool. It measures how fast you pedal your bike. This is called your cadence. It’s measured in revolutions per minute (RPM). Knowing your cadence helps you ride more efficiently. It can also prevent injuries. Many cyclists use cadence sensors to improve their performance. These sensors send data to your bike computer or phone. They use Bluetooth or ANT+ technology. This lets you see your cadence in real-time. Cadence sensors are small and lightweight. They attach to your bike’s crank arm or shoe. A magnet attaches to the pedal or chainstay. The sensor counts each time the magnet passes by. This gives you an accurate cadence reading. So, how to mount cadence sensor on bicycle correctly?
- Cadence sensors measure your pedaling speed.
- They help you ride more efficiently.
- Sensors send data to your computer or phone.
- They use Bluetooth or ANT+ technology.
- Sensors are small and easy to install.
- A magnet is used to count pedal rotations.
Cadence sensors are helpful for all types of cyclists. Beginners can use them to find a comfortable pedaling speed. Experienced riders can use them to optimize their training. For example, a mountain biker might want a higher cadence on steep climbs. A road cyclist might focus on maintaining a consistent cadence. No matter your skill level, a cadence sensor can improve your cycling. It helps you understand your body better. You can adjust your riding style for better results. It’s a simple tool that makes a big difference. Learning how to mount cadence sensor on bicycle is the first step.
Fun Fact or Stat: Did you know that professional cyclists often maintain a cadence between 80 and 100 RPM for optimal performance?
Why Use a Cadence Sensor?
Have you ever felt tired too quickly while biking? A cadence sensor can help. It tells you if you’re pedaling too hard or too slow. Knowing your cadence helps you use your energy better. It can also prevent sore muscles and injuries. By monitoring your cadence, you can find the most efficient way to pedal. This means you can ride longer and faster without getting as tired. Many coaches recommend using a cadence sensor for training. It helps you track your progress. You can see how your cadence changes over time. This information can help you adjust your training plan. Ultimately, a cadence sensor is a valuable tool for any cyclist who wants to improve. So, how to mount cadence sensor on bicycle and start seeing these benefits?
Choosing the Right Sensor
There are many different cadence sensors available. Some attach to your crank arm. Others attach to your shoe. Some use Bluetooth, and others use ANT+. Which one is right for you? Think about your needs and budget. Crank arm sensors are usually easier to install. Shoe sensors might be more accurate. Bluetooth sensors work with most smartphones. ANT+ sensors are compatible with many bike computers. Read reviews and compare prices before you buy. Make sure the sensor is compatible with your bike and devices. A good cadence sensor should be durable and reliable. It should also be easy to use. Learning how to mount cadence sensor on bicycle is important. But choosing the right sensor is the first step.
Understanding RPM and Cycling Efficiency
What exactly is RPM, and why does it matter? RPM stands for revolutions per minute. It measures how many times your pedals go around in one minute. A higher RPM means you’re pedaling faster. A lower RPM means you’re pedaling slower. Finding the right RPM is key to cycling efficiently. Most cyclists aim for a cadence between 80 and 100 RPM on flat roads. Uphill, you might use a lower cadence. Downhill, you might use a higher cadence. Experiment to find what works best for you. A cadence sensor helps you track your RPM. This allows you to make adjustments as needed. By understanding RPM, you can ride smarter and more efficiently. Remember, how to mount cadence sensor on bicycle is just the beginning. You also need to understand the data it provides.
Tools You’ll Need for Mounting
Before you start, gather your tools. You’ll need a few simple things. First, you’ll need the cadence sensor itself. Make sure you have all the parts. This includes the sensor, the magnet, and zip ties or rubber bands. You might also need a screwdriver. This depends on the type of sensor. A clean cloth can be helpful. Use it to wipe the area where you’ll attach the sensor. A pair of scissors or wire cutters can trim the zip ties. Having these tools ready will make the process easier. It will also help you avoid mistakes. Take your time and be careful. Rushing can damage the sensor or your bike. So, what tools do you need when learning how to mount cadence sensor on bicycle?
- Cadence sensor kit (sensor, magnet, zip ties).
- Screwdriver (if needed for your sensor type).
- Clean cloth for wiping surfaces.
- Scissors or wire cutters for zip ties.
- Bike stand (optional, but helpful).
Having a bike stand is optional. However, it can make the job easier. A bike stand holds your bike upright. This allows you to work on it more comfortably. If you don’t have a bike stand, you can lean your bike against a wall. Just make sure it’s stable and won’t fall over. Good lighting is also important. You want to be able to see what you’re doing clearly. Work in a well-lit area or use a flashlight. Remember to read the instructions that came with your sensor. Each sensor is slightly different. The instructions will provide specific guidance for your model. With the right tools and preparation, how to mount cadence sensor on bicycle becomes much simpler.
Fun Fact or Stat: The first bicycle was invented in the early 1800s, but it didn’t have pedals! People pushed it along with their feet.
Gathering the Right Equipment
The first step is to make sure you have everything you need. This includes the cadence sensor, the magnet, and the mounting hardware. Check the box to make sure nothing is missing. Read the instructions carefully. This will help you understand how the sensor works. It will also show you how to mount cadence sensor on bicycle correctly. The instructions usually include diagrams or pictures. These can be very helpful. If you’re missing any parts, contact the manufacturer. Don’t try to install the sensor without all the necessary pieces. This could damage the sensor or your bike. Once you have everything, lay it out on a clean surface. This will make it easier to find what you need.
Preparing Your Bike Frame
Before you attach the sensor, you need to prepare your bike. Clean the area where you’ll be attaching the sensor and magnet. Use a clean cloth to wipe away dirt and grime. This will help the sensor stick better. Make sure the area is dry before you proceed. Check for any scratches or damage to the frame. If you find any, be extra careful when attaching the sensor. You don’t want to make the damage worse. If necessary, use a protective layer. This could be a piece of tape or rubber. This will protect your frame from scratches. Taking the time to prepare your bike ensures a secure and safe installation. This is important when learning how to mount cadence sensor on bicycle.
Understanding Sensor Placement
Where you place the sensor is very important. The sensor needs to be close enough to the magnet. If they’re too far apart, the sensor won’t work. The instructions will tell you the ideal distance. Usually, it’s just a few millimeters. Experiment with different positions to find the best spot. Make sure the sensor doesn’t interfere with your pedaling. It shouldn’t rub against your shoe or the crank arm. Also, make sure it’s protected from the elements. Water and dirt can damage the sensor. Consider the placement carefully. This will ensure accurate readings and a long lifespan for your sensor. Understanding sensor placement is key when learning how to mount cadence sensor on bicycle.
Step-by-Step Guide to Mounting the Sensor
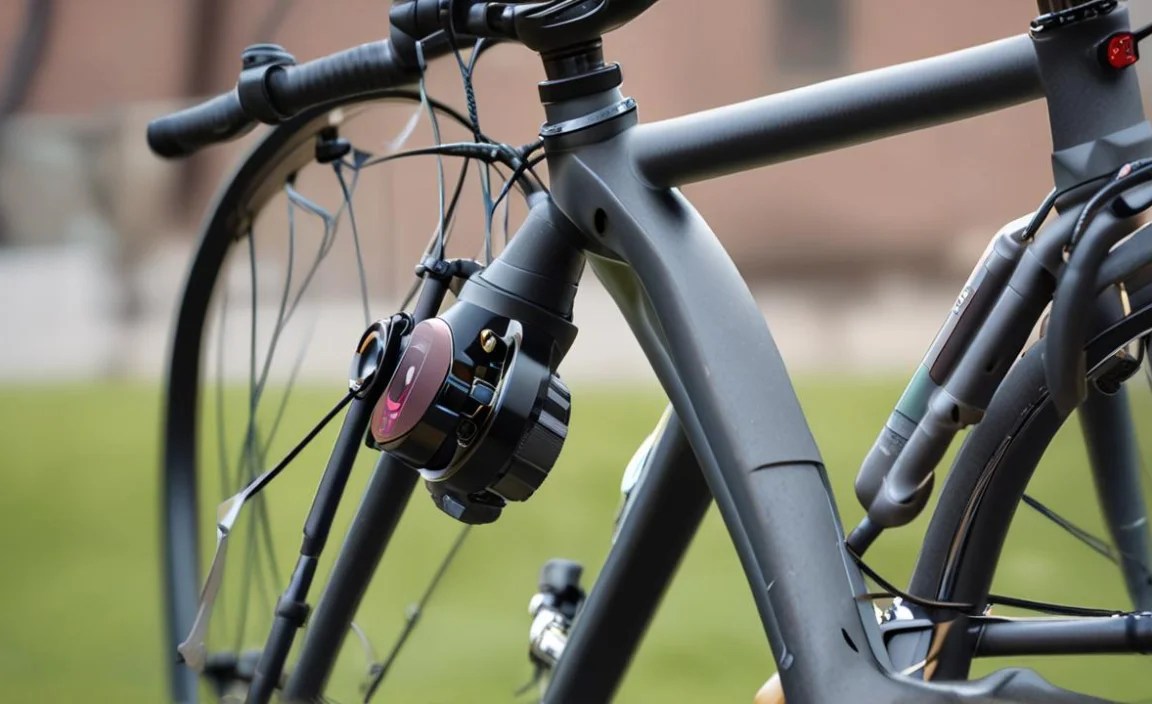
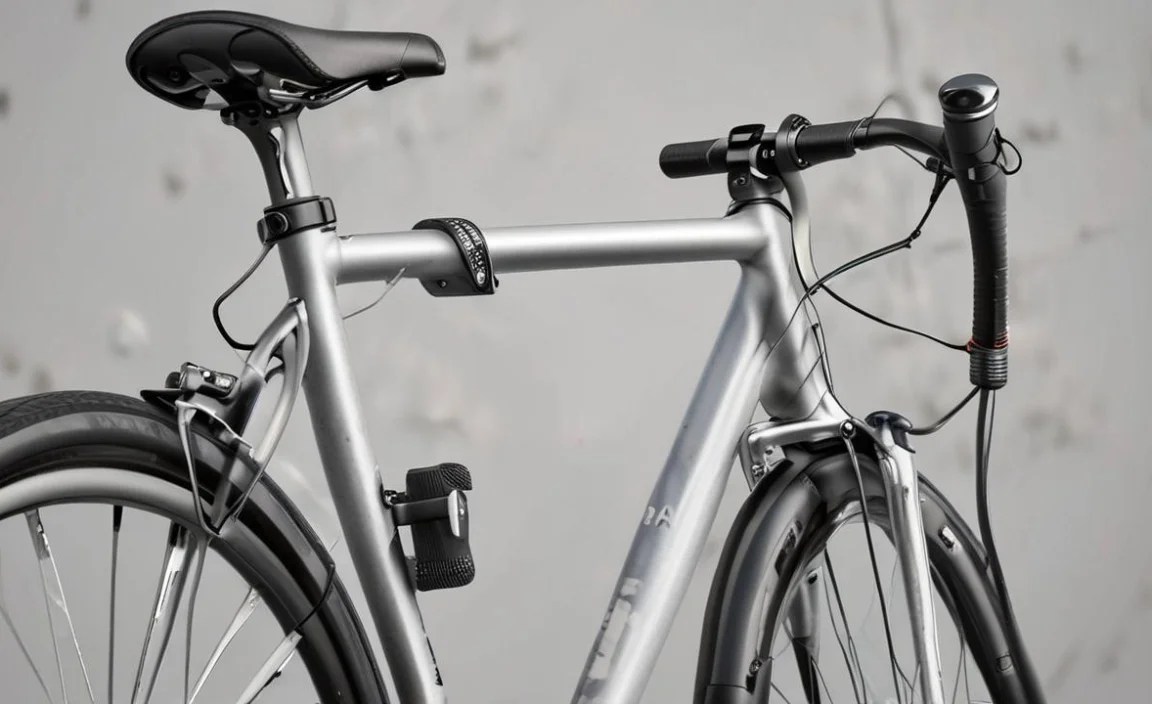
Now it’s time to get started! First, find the right spot on your bike. The cadence sensor usually goes on the inside of your left crank arm. The magnet goes on the chainstay. This is the part of the frame near the pedals. Make sure the sensor and magnet line up. They should be close, but not touching. Use zip ties or rubber bands to attach the sensor. Wrap them tightly around the crank arm. Trim the excess zip tie length. Attach the magnet to the chainstay. Some magnets have adhesive backing. Others use zip ties. Make sure the magnet is secure. Spin the pedals to test the sensor. Check your bike computer or phone to see if it’s working. If not, adjust the position of the sensor and magnet. So, what’s the actual process when learning how to mount cadence sensor on bicycle?
- Find the correct location on the crank arm.
- Attach the sensor using zip ties or bands.
- Secure the magnet to the chainstay.
- Align the sensor and magnet properly.
- Test the sensor by spinning the pedals.
- Adjust if needed for accurate readings.
| Step | Action | Tools Needed |
|---|---|---|
| 1 | Locate sensor and magnet positions. | None |
| 2 | Attach sensor to crank arm. | Zip ties or rubber bands |
| 3 | Attach magnet to chainstay. | Zip ties or adhesive |
| 4 | Align sensor and magnet. | None |
| 5 | Test sensor function. | Bike computer or phone |
Take your time and be patient. It might take a few tries to get it right. Don’t force anything. If you’re having trouble, consult the instructions. You can also watch videos online. There are many tutorials that show how to mount cadence sensor on bicycle. Remember to double-check everything before you ride. Make sure the sensor and magnet are secure. You don’t want them to fall off while you’re biking. A properly installed cadence sensor will provide accurate data. This will help you improve your cycling performance. Enjoy the ride!
Fun Fact or Stat: The Tour de France is the most famous bicycle race in the world, covering about 3,500 kilometers (2,200 miles)!
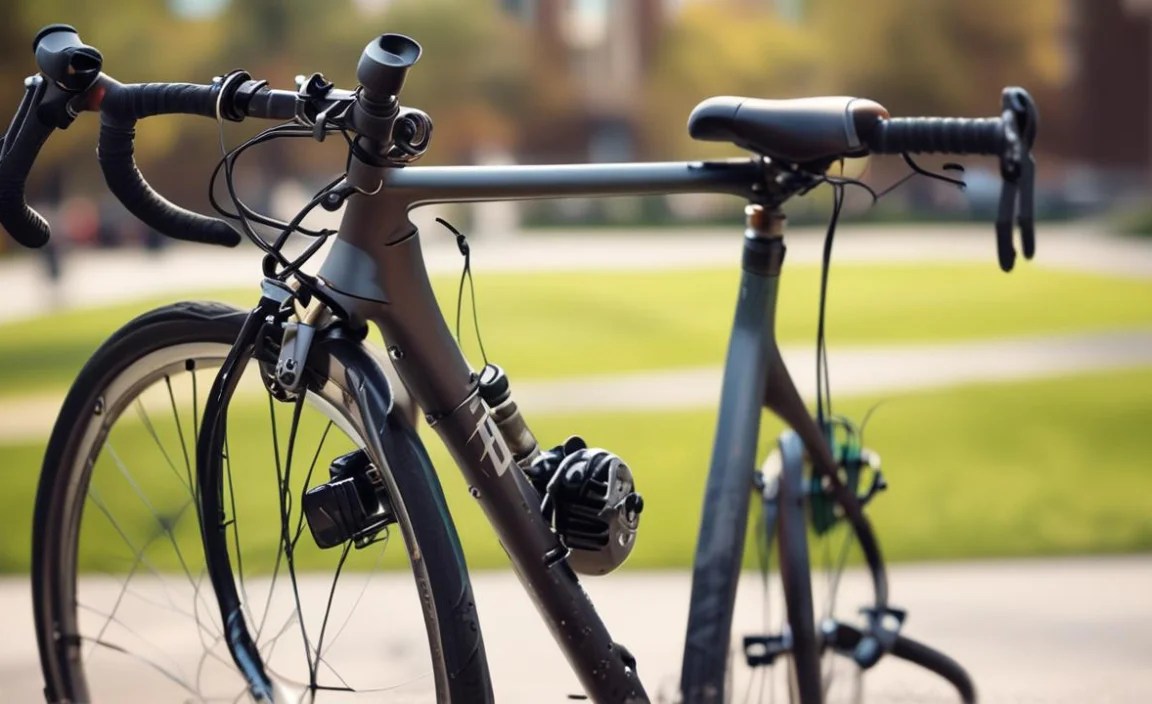
Attaching the Sensor to the Crank Arm
The crank arm is the part of your bike that the pedals attach to. Most cadence sensors are designed to fit on the inside of the left crank arm. This keeps them out of the way and prevents them from being damaged. Use zip ties or rubber bands to attach the sensor. Wrap them tightly around the crank arm. Make sure the sensor is secure and doesn’t move around. Trim the excess length of the zip ties. Be careful not to cut yourself. If you’re using rubber bands, make sure they’re strong enough to hold the sensor in place. Replace them if they become worn or stretched. Attaching the sensor securely to the crank arm is essential when learning how to mount cadence sensor on bicycle.
Securing the Magnet to the Chainstay
The chainstay is the part of the frame that runs from the rear axle to the bottom bracket. The magnet needs to be close to the sensor. It needs to pass by the sensor each time you pedal. Some magnets have adhesive backing. Others use zip ties. If you’re using adhesive, clean the chainstay first. Then, peel off the backing and stick the magnet in place. If you’re using zip ties, wrap them around the chainstay and the magnet. Make sure the magnet is secure and doesn’t move around. Adjust the position of the magnet if necessary. The magnet should be close enough to the sensor. Securing the magnet properly is crucial for accurate readings. This is a key step in learning how to mount cadence sensor on bicycle.
Aligning the Sensor and Magnet Correctly
Alignment is key to getting accurate readings. The sensor and magnet need to be close together. They shouldn’t be too far apart. The instructions will tell you the ideal distance. Usually, it’s just a few millimeters. Make sure the sensor and magnet are aligned vertically. They should be at the same height. Also, make sure they’re aligned horizontally. They should pass each other closely as you pedal. If the sensor isn’t working, check the alignment first. This is often the cause of the problem. Adjust the position of the sensor or magnet as needed. Getting the alignment right ensures that the sensor counts each pedal stroke accurately. This is a vital part of learning how to mount cadence sensor on bicycle.
Testing and Adjusting the Sensor
After you’ve mounted the cadence sensor, it’s time to test it. Spin the pedals and watch your bike computer or phone. You should see a cadence reading. If you don’t, check the alignment of the sensor and magnet. They might be too far apart. Adjust their position and try again. Make sure the sensor is securely attached. It shouldn’t move around while you’re pedaling. If the reading is inconsistent, check the battery in the sensor. A low battery can cause problems. If you’re still having trouble, consult the instructions or watch a video. It might take a few tries to get it right. Don’t give up! Once it’s working, you’ll be able to track your cadence and improve your cycling. So, after the install, what’s next when learning how to mount cadence sensor on bicycle?
- Spin the pedals to test the sensor.
- Check your bike computer or phone for readings.
- Adjust sensor and magnet alignment if needed.
- Ensure the sensor is securely attached.
- Replace the sensor battery if necessary.
- Consult instructions or videos for help.
It’s also a good idea to test the sensor on a short ride. This will give you a better sense of how it works. Pay attention to the cadence readings. Do they seem accurate? Are they consistent? If you notice any problems, make adjustments. It’s better to fix them now than to wait until you’re on a long ride. Remember, a cadence sensor is a tool to help you improve. It’s not a magic solution. You still need to put in the effort to pedal efficiently. But with a properly installed and tested sensor, you’ll be well on your way to becoming a better cyclist. The final check will help you when learning how to mount cadence sensor on bicycle.
Fun Fact or Stat: Some bicycles are made of bamboo! Bamboo is strong, lightweight, and environmentally friendly.
Checking for Accurate Readings
The most important thing is to make sure the sensor is giving you accurate readings. Compare the readings to your own perception of your pedaling speed. Does it feel like the cadence number matches how fast you’re pedaling? If not, there might be a problem. Try counting your pedal strokes for a minute. Compare that number to the cadence reading on your bike computer or phone. If they’re very different, adjust the sensor and magnet. Make sure they’re properly aligned. Also, check the settings on your bike computer or phone. Make sure they’re set up to receive data from the cadence sensor. Accurate readings are essential for effective training. This ensures you are learning how to mount cadence sensor on bicycle correctly.
Troubleshooting Common Issues
Sometimes, things don’t go as planned. You might encounter problems with your cadence sensor. The most common issue is that the sensor doesn’t work at all. This is usually caused by a misalignment of the sensor and magnet. Make sure they’re close enough together and properly aligned. Another common issue is that the readings are inconsistent. This could be due to a low battery. Replace the battery and try again. If the sensor keeps falling off, make sure it’s securely attached. Use stronger zip ties or rubber bands. If you’re still having trouble, search online for solutions. There are many forums and websites that offer help with cadence sensors. Addressing issues is part of learning how to mount cadence sensor on bicycle.
Maintaining Your Cadence Sensor
To keep your cadence sensor working well, you need to maintain it. Clean the sensor and magnet regularly. Dirt and grime can interfere with the signal. Check the zip ties or rubber bands. Replace them if they become worn or stretched. Store your bike in a dry place. Moisture can damage the sensor. Replace the battery when needed. A low battery can cause inaccurate readings. Handle the sensor carefully. Don’t drop it or expose it to extreme temperatures. By following these tips, you can extend the life of your cadence sensor. This will also help ensure accurate readings for years to come. Maintenance is important for continued learning on how to mount cadence sensor on bicycle.
Benefits of Using a Cadence Sensor

Using a cadence sensor can greatly improve your cycling. It helps you find the most efficient pedaling speed. This can save energy and prevent fatigue. A cadence sensor can also help you avoid injuries. Pedaling too hard or too slow can strain your muscles and joints. By monitoring your cadence, you can stay within a safe range. This reduces the risk of injury. Cadence sensors are also useful for training. They allow you to track your progress and make adjustments. You can see how your cadence changes over time. This information can help you optimize your training plan. So, what are the actual advantages of knowing how to mount cadence sensor on bicycle?
- Improves pedaling efficiency and saves energy.
- Helps prevent muscle strain and injuries.
- Tracks progress and optimizes training.
- Provides real-time feedback on pedaling speed.
- Helps maintain consistent effort levels.
Many cyclists use cadence sensors to achieve specific goals. For example, they might want to increase their average cadence. This can help them ride faster and more efficiently. Or they might want to maintain a consistent cadence on long rides. This can help them avoid fatigue. Whatever your goals, a cadence sensor can be a valuable tool. It provides you with the data you need to make informed decisions. It helps you understand your body better. You can adjust your riding style for better results. Learning how to mount cadence sensor on bicycle is the first step toward unlocking these benefits.
Fun Fact or Stat: The fastest speed ever recorded on a bicycle is over 180 miles per hour (290 kilometers per hour)!
Improving Cycling Efficiency
One of the biggest benefits of using a cadence sensor is improved efficiency. When you pedal at the right cadence, you use less energy. This means you can ride longer and faster without getting as tired. Experiment with different cadences to find what works best for you. Most cyclists aim for a cadence between 80 and 100 RPM on flat roads. Uphill, you might use a lower cadence. Downhill, you might use a higher cadence. A cadence sensor helps you track your RPM. This allows you to make adjustments as needed. By improving your efficiency, you can enjoy your rides more. You can also achieve better results. Learning how to mount cadence sensor on bicycle helps you achieve this goal.
Preventing Injuries While Riding
Pedaling at the wrong cadence can lead to injuries. Pedaling too hard can strain your muscles and joints. Pedaling too slow can also cause problems. A cadence sensor helps you avoid these issues. By monitoring your cadence, you can stay within a safe range. This reduces the risk of injury. If you feel pain or discomfort, check your cadence. You might need to adjust your pedaling speed. Listen to your body and make changes as needed. Preventing injuries is essential for long-term cycling success. A cadence sensor can help you stay healthy and enjoy your rides. This is a major benefit of learning how to mount cadence sensor on bicycle.
Tracking Progress and Setting Goals
A cadence sensor is a valuable tool for tracking your progress. You can see how your cadence changes over time. This information can help you set realistic goals. For example, you might want to increase your average cadence by 5 RPM. Or you might want to maintain a consistent cadence on long rides. By tracking your progress, you can stay motivated. You can also see the results of your hard work. A cadence sensor helps you stay on track and achieve your cycling goals. This is a great reason to learn how to mount cadence sensor on bicycle.
Other Types of Bike Sensors
Cadence sensors are just one type of bike sensor. There are many other sensors that can provide valuable data. Speed sensors measure how fast you’re going. Heart rate monitors track your heart rate. Power meters measure how much power you’re generating. GPS units track your location and distance. Some sensors combine multiple functions. For example, some units measure both cadence and speed. Others combine heart rate monitoring with GPS tracking. The type of sensor you choose depends on your needs and goals. Consider what data is most important to you. Then, select the sensor that provides that information. Are there other types of sensors besides learning how to mount cadence sensor on bicycle?
- Speed sensors measure your cycling speed.
- Heart rate monitors track your heart rate.
- Power meters measure your power output.
- GPS units track location and distance.
- Some sensors combine multiple functions.
Many cyclists use a combination of sensors. For example, they might use a cadence sensor, a heart rate monitor, and a GPS unit. This provides a comprehensive picture of their performance. They can track their cadence, heart rate, speed, and distance. This information can help them optimize their training. They can also monitor their progress over time. Experiment with different sensors to find what works best for you. Each sensor provides unique data that can help you improve your cycling. Understanding these sensors can complement your knowledge of how to mount cadence sensor on bicycle.
Fun Fact or Stat: The longest bicycle in the world is over 135 feet (41 meters) long and requires multiple people to ride it!
Exploring Speed Sensors
Speed sensors are a simple and effective way to track your speed. They attach to your bike’s wheel or hub. They measure how fast the wheel is turning. This information is then sent to your bike computer or phone. Speed sensors can be very useful for training. They allow you to track your speed over time. You can also see how fast you’re going at any given moment. Some speed sensors also measure distance. This can be helpful for tracking your mileage. If you’re interested in tracking your speed, a speed sensor is a great option. This adds to your knowledge of how to mount cadence sensor on bicycle.
Understanding Heart Rate Monitors
Heart rate monitors track your heart rate during exercise. They usually consist of a chest strap and a watch or bike computer. The chest strap measures your heart rate. The watch or bike computer displays the data. Heart rate monitors can be very useful for training. They allow you to see how hard you’re working. This can help you avoid overtraining. You can also use heart rate data to optimize your training plan. For example, you might want to train at a certain heart rate range to improve your endurance. If you’re serious about training, a heart rate monitor is a valuable tool. This complements your understanding of how to mount cadence sensor on bicycle.
The Role of Power Meters
Power meters measure how much power you’re generating while pedaling. This is a more direct measure of your effort than heart rate. Power meters are often used by serious cyclists and racers. They provide very precise data that can be used to optimize training. Power meters are usually more expensive than other types of sensors. However, they can be a worthwhile investment if you’re serious about improving your performance. They offer a different dimension to the knowledge you gain about how to mount cadence sensor on bicycle.
Summary
A cadence sensor is a valuable tool for any cyclist. It helps you track your pedaling speed. This can improve your efficiency and prevent injuries. Learning how to mount cadence sensor on bicycle is a simple process. You need a few basic tools. These include zip ties, rubber bands, and a screwdriver. Attach the sensor to your crank arm. Attach the magnet to your chainstay. Make sure the sensor and magnet are aligned. Test the sensor to make sure it’s working. Adjust the position if necessary. With a properly installed cadence sensor, you can take your cycling to the next level.
Remember to choose the right sensor for your needs. Consider the type of sensor, the compatibility with your devices, and the price. There are many different options available. Do your research and find the one that’s right for you. Once you have your sensor, follow the instructions carefully. Take your time and be patient. It might take a few tries to get it right. But with a little effort, you’ll be able to enjoy the benefits of a cadence sensor. It is a simple add-on that will improve your riding.
Conclusion
Installing a cadence sensor on your bicycle is easy. It requires only a few simple steps. It provides valuable data. You can use this information to improve your cycling. A cadence sensor helps you pedal more efficiently. It helps prevent injuries. It can also help you track your progress. Take the time to learn how to mount cadence sensor on bicycle. You will get faster and enjoy your rides more. You can unlock your full potential as a cyclist.
Frequently Asked Questions
Question No 1: What is a cadence sensor and why do I need one?
Answer: A cadence sensor measures how fast you pedal your bike. It tells you how many times your pedals go around each minute. This is called revolutions per minute (RPM). Knowing your cadence helps you ride more efficiently. It prevents injuries and improves your performance. A cadence sensor can help you find the best pedaling speed for different situations. It is a valuable tool for both beginners and experienced cyclists. If you want to improve your cycling, a cadence sensor is a great investment. It is also essential to know how to mount cadence sensor on bicycle for the full benefit.
Question No 2: Where exactly on my bicycle should I mount the cadence sensor?
Answer: The cadence sensor typically mounts on the inside of your left crank arm. The magnet attaches to the chainstay. This is the part of the frame near the pedals. Make sure the sensor and magnet line up correctly. They should be close, but not touching. Check the instructions that came with your sensor. They will provide specific guidance for your model. Proper placement is crucial for accurate readings. If the sensor is not working, check the alignment first. You may need to adjust the position of the sensor and magnet. This is key for how to mount cadence sensor on bicycle correctly.
Question No 3: What tools do I need to mount a cadence sensor on my bike?
Answer: You’ll need a few simple tools. These include the cadence sensor kit, zip ties or rubber bands, a screwdriver (if needed), and a clean cloth. Scissors or wire cutters can trim the zip ties. A bike stand is optional. However, it can make the job easier. Make sure you have all the parts of the cadence sensor kit. This includes the sensor, the magnet, and the mounting hardware. Read the instructions carefully. This will help you understand how to mount cadence sensor on bicycle correctly. Having the right tools will make the process smoother.
Question No 4: How do I know if the cadence sensor is working correctly after mounting it?
Answer: After mounting the cadence sensor, spin the pedals and watch your bike computer or phone. You should see a cadence reading. If you don’t, check the alignment of the sensor and magnet. They might be too far apart. Adjust their position and try again. Make sure the sensor is securely attached. It shouldn’t move around while you’re pedaling. If the reading is inconsistent, check the battery in the sensor. A low battery can cause problems. Take a short ride to see if the cadence seems correct. Knowing how to mount cadence sensor on bicycle and test it is very important.
Question No 5: Can a cadence sensor help me improve my cycling performance?
Answer: Yes, a cadence sensor can greatly improve your cycling performance. It helps you find the most efficient pedaling speed. This can save energy and prevent fatigue. A cadence sensor can also help you avoid injuries. Pedaling too hard or too slow can strain your muscles and joints. By monitoring your cadence, you can stay within a safe range. This reduces the risk of injury. Cadence sensors are useful for tracking your progress and making adjustments. Learning how to mount cadence sensor on bicycle is the first step toward these improvements.
Question No 6: Are there different types of cadence sensors available?
Answer: Yes, there are different types of cadence sensors. Some attach to your crank arm. Others attach to your shoe. Some use Bluetooth, and others use ANT+. Think about your needs and budget. Crank arm sensors are usually easier to install. Shoe sensors might be more accurate. Bluetooth sensors work with most smartphones. ANT+ sensors are compatible with many bike computers. Read reviews and compare prices before you buy. Make sure the sensor is compatible with your bike and devices. Remember, knowing how to mount cadence sensor on bicycle of any type is beneficial.


