
Easy Install: Action Camera Mount on Carbon Seat Post
Do you love bike rides? Do you want to record your cool tricks? Lots of people use action cameras for this. But how to install action camera mount on carbon seat post can be tricky. This article will show you how. Let’s get started!
First, you need the right tools. Then, you need to be careful. Carbon fiber can break if you are not gentle. Follow these steps to keep your bike safe and your videos awesome. Let’s learn how to do it right.
Key Takeaways
- Always use a torque wrench to avoid overtightening bolts on your carbon seat post.
- Protect your carbon seat post with protective tape before installing any mount.
- Choose a lightweight and secure action camera mount designed for carbon fiber.
- Knowing how to install action camera mount on carbon seat post ensures safe, stable footage.
- Regularly check the mount and bolts to ensure everything stays tight and secure.
Understanding Carbon Fiber Seat Posts

Carbon fiber seat posts are great. They are light and strong. But they need special care. Carbon fiber can crack more easily than metal. You have to be very careful when you tighten bolts. Overtightening can damage the carbon. Always use a torque wrench. A torque wrench measures how tight the bolt is. This helps you avoid breaking the seat post. It is important to use the right tools. Using the wrong tools can cause problems. Also, check your seat post often. Make sure the mount is still tight. This will keep your camera safe and your bike in good shape. Always read the instructions that come with your mount and torque wrench.
- Carbon fiber is light but can be fragile.
- Use a torque wrench for tightening bolts.
- Check the mount regularly for tightness.
- Read instructions carefully before you start.
- Protect carbon with tape to prevent scratches.
When working with carbon fiber, think of it like glass. It’s strong, but it can shatter if you drop it. The same goes for your seat post. If you tighten the bolts too much, it can crack. That’s why a torque wrench is your best friend. It tells you exactly how much force you are using. Also, use protective tape. This will stop the mount from scratching the carbon. Remember, a little care goes a long way. Taking your time will help you avoid costly mistakes. It will also keep you safe on your rides. Taking care of your bike means you can enjoy it for longer!
Why Is Carbon Fiber So Popular?
Have you ever wondered why so many bikes use carbon fiber? It is because carbon fiber is super light. Lighter bikes are faster. They are also easier to ride uphill. Carbon fiber is also very strong. This means it can handle bumps and jumps. But, carbon fiber is not like steel or aluminum. It can crack if you are not careful. This is why you need to use a torque wrench. A torque wrench helps you tighten bolts just right. Not too tight, and not too loose. Carbon fiber is also good at absorbing vibrations. This makes your ride smoother and more comfortable. So, carbon fiber makes bikes faster, stronger, and more comfortable. That is why it is so popular.
What Happens if You Overtighten Bolts?
Imagine you are squeezing a balloon. If you squeeze too hard, it pops! Overtightening bolts on carbon fiber is similar. Carbon fiber can crack or break if you put too much pressure on it. This is because carbon fiber is made of tiny fibers. These fibers can break if you squeeze them too much. That is why it is super important to use a torque wrench. A torque wrench tells you exactly how much pressure you are using. If you don’t have a torque wrench, be very careful. Tighten the bolts slowly. Check them often. If you hear a creaking sound, stop! You might be overtightening them. Overtightening can ruin your seat post and make it unsafe to ride.
How Does Protective Tape Help?
Think of protective tape like a bandage for your bike. It protects the carbon fiber from scratches and dents. When you install an action camera mount, it can rub against the seat post. This rubbing can scratch the carbon fiber. Protective tape creates a barrier. It stops the mount from directly touching the carbon. This keeps your seat post looking new. It also helps prevent damage that can weaken the carbon. Protective tape is cheap and easy to use. Just cut a small piece and stick it to the seat post where the mount will go. It is a simple way to protect your investment. A little tape can make a big difference in the long run.
Fun Fact or Stat: Carbon fiber is five times stronger than steel but weighs much less! That’s why it’s used in race cars and airplanes too.
Choosing the Right Action Camera Mount

Picking the right action camera mount is important. You need one that fits your carbon seat post well. Look for mounts made for carbon fiber. These mounts are designed to be gentle. They spread the pressure evenly. This stops the seat post from cracking. The mount should also be lightweight. A heavy mount can add extra stress. Make sure the mount is secure. You don’t want your camera to fall off! Read reviews before you buy. See what other riders say. A good mount will keep your camera safe and your videos clear. It will also protect your carbon seat post from damage. Choose wisely to enjoy your rides and capture great footage.
- Look for mounts made for carbon fiber.
- Choose a lightweight mount to reduce stress.
- Make sure the mount is very secure.
- Read reviews from other bike riders.
- Check if the mount fits your seat post size.
- Consider a mount with vibration dampening.
Imagine your camera is a little bird. You want it to have a safe and sturdy nest. The action camera mount is that nest. If the nest is wobbly, the bird might fall. If the mount is not right for carbon fiber, it could squeeze and crack the seat post. That is why you need to find the perfect fit. Look for mounts that have rubber padding. This padding protects the carbon. Also, check how easy it is to adjust the mount. You want to be able to change the camera angle quickly. A good mount makes recording your rides easy and safe. It gives you peace of mind so you can focus on the fun!
What Makes a Mount “Carbon Fiber Friendly?”
What does it mean for a mount to be “carbon fiber friendly?” It means the mount is designed not to damage the carbon. These mounts often have wider clamps. Wider clamps spread the pressure over a larger area. This prevents the pressure from集中in one spot. Carbon fiber friendly mounts also have rubber padding. The padding acts like a cushion. It stops the mount from scratching or denting the carbon. Look for mounts that say they are specifically for carbon fiber. These mounts have been tested to ensure they are safe. Using the right mount will protect your investment and keep your bike in top condition.
How Important Is Weight?
Imagine you are running with a backpack. A heavy backpack makes you tired faster. The same thing happens with your bike. A heavy action camera mount adds extra weight. This can slow you down. It can also make it harder to climb hills. Lightweight mounts are better. They don’t add much extra weight. This means you can ride faster and longer. Look for mounts made of lightweight materials. Aluminum and strong plastics are good choices. Every little bit of weight savings helps. A lighter bike is a faster, more fun bike. So, choose a lightweight mount for the best riding experience.
How Can You Tell if a Mount Is Secure?
You don’t want your camera falling off mid-ride! A secure mount is essential. Check the mount’s locking mechanism. Does it have a strong clamp? Does it have a safety strap? A good mount will have multiple ways to keep your camera in place. Read reviews to see if other riders have had problems with the mount slipping. Test the mount before you go on a long ride. Make sure it stays tight and doesn’t wobble. A secure mount gives you peace of mind. You can focus on enjoying your ride, knowing your camera is safe.
Fun Fact or Stat: Some professional cyclists use camera mounts that weigh less than 30 grams! That’s lighter than a AA battery.
Preparing Your Carbon Seat Post

Before you install anything, get your seat post ready. Clean it with a soft cloth. Remove any dirt or grime. This will help the mount grip better. Next, apply protective tape. Place the tape where the mount will touch the seat post. The tape will protect the carbon from scratches. Measure the area where you will put the mount. Make sure the tape covers the entire area. Use good quality tape that won’t leave sticky residue. Now, your seat post is ready. You can install the action camera mount without worrying about damage. Taking these steps ensures a clean and safe installation.
- Clean the seat post with a soft cloth first.
- Apply protective tape to prevent scratches.
- Measure the area for the mount placement.
- Use good quality, residue-free tape.
- Make sure the tape is smooth and secure.
- Check for any existing damage beforehand.
Think of preparing your seat post like getting ready for a paint job. You wouldn’t paint a dirty wall, right? You need to clean it first. The same goes for your seat post. Cleaning it removes dirt that can scratch the carbon. The protective tape is like primer. It creates a smooth surface for the mount. It also stops the mount from damaging the carbon. Take your time with this step. A little preparation makes a big difference. It will protect your seat post and ensure a secure mount. A clean and protected seat post is key to a successful installation.
Why Is Cleaning Important?
Imagine you are trying to stick a sticker on a dusty window. It won’t stick very well, right? The same is true for your action camera mount. Dirt and grime can prevent the mount from gripping properly. This can make the mount loose and wobbly. Cleaning the seat post removes this dirt. It creates a clean surface for the mount to grip. Use a soft cloth and mild soap. Avoid harsh chemicals. These can damage the carbon fiber. A clean seat post ensures a secure and stable mount. This keeps your camera safe and your videos clear.
What Kind of Tape Should You Use?
Not all tape is created equal! You need to use the right kind of tape to protect your carbon seat post. Avoid using duct tape or electrical tape. These tapes can leave sticky residue. This residue is hard to remove. Look for tapes specifically designed for protecting surfaces. Painter’s tape or clear protective tape are good choices. These tapes are gentle and won’t damage the carbon. They also come off easily without leaving a mess. Choose a tape that is strong enough to protect the carbon but gentle enough to remove cleanly.
How Do You Apply the Tape Correctly?
Applying the tape correctly is important. Start by cutting a piece of tape slightly larger than the mount area. This ensures full coverage. Smooth the tape onto the seat post. Use your finger to press out any air bubbles. Air bubbles can prevent the tape from sticking properly. Overlap the edges of the tape slightly. This creates a stronger barrier. Make sure the tape is smooth and secure. A properly applied tape will protect your carbon seat post from scratches and damage.
Fun Fact or Stat: Some bike shops offer professional carbon fiber protection services. They use special films to protect your frame from scratches and damage.
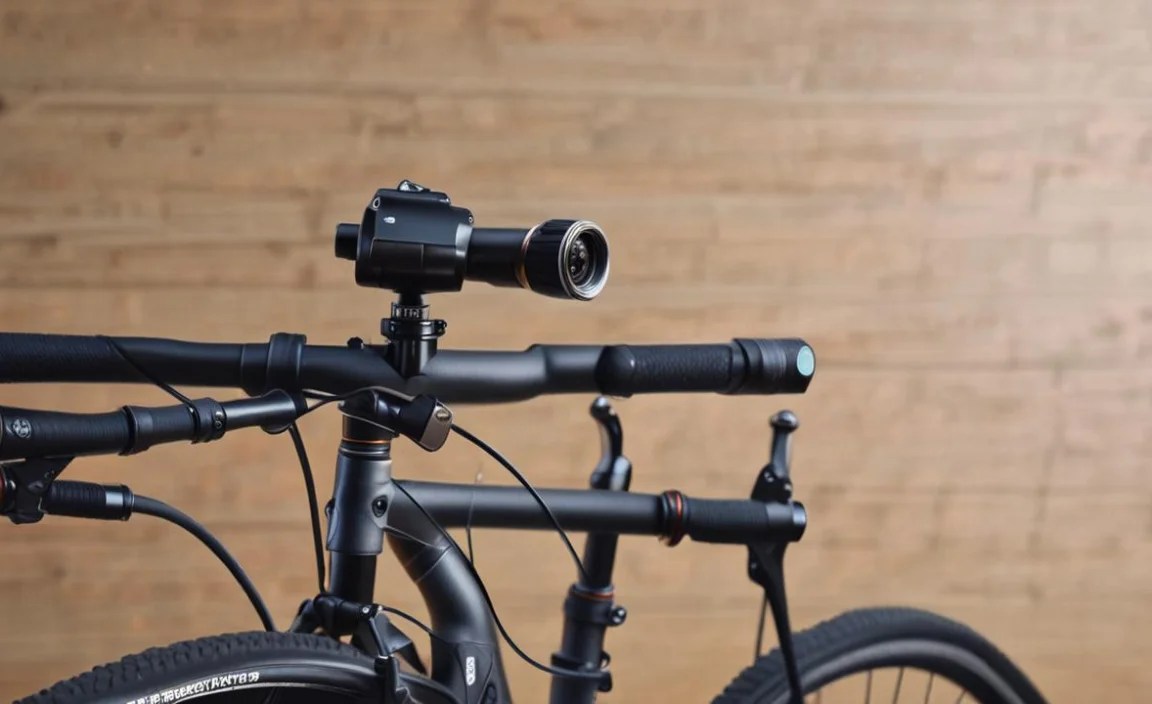
Installing the Action Camera Mount

Now it’s time to install the mount. Place the mount on the prepared seat post. Make sure it is in the right position. Use a torque wrench to tighten the bolts. Check the instructions for the correct torque setting. Tighten the bolts slowly. Alternate between bolts to ensure even pressure. Do not overtighten! This can damage the carbon. Once the bolts are snug, check the mount. Make sure it is secure and doesn’t wobble. If it feels loose, tighten the bolts a little more. But be careful not to overtighten. Now, your action camera mount is installed. You are ready to record your rides!
- Position the mount correctly on the seat post.
- Use a torque wrench to tighten the bolts.
- Tighten the bolts slowly and evenly.
- Check the mount for security and wobble.
- Refer to the instructions for torque settings.
- Double-check everything before your first ride.
Imagine you are building a Lego castle. You wouldn’t just smash the pieces together, would you? You would carefully connect each piece. Installing an action camera mount is similar. You need to be precise and careful. Use a torque wrench to tighten the bolts to the right level. This ensures the mount is secure without damaging the carbon. Alternate between bolts to spread the pressure evenly. This prevents any one area from being stressed too much. Taking your time and being precise will result in a safe and secure mount. It will also protect your carbon seat post from damage.
How Do You Use a Torque Wrench?
A torque wrench is your best friend when working with carbon fiber. It helps you tighten bolts to the correct level. First, find the recommended torque setting for your mount. This is usually in the instructions. Set the torque wrench to that setting. Place the wrench on the bolt. Slowly tighten the bolt until the wrench clicks. The click means you have reached the correct torque. Do not tighten further! Repeat this process for all the bolts. A torque wrench ensures you don’t overtighten and damage your carbon seat post.
What If You Don’t Have a Torque Wrench?
If you don’t have a torque wrench, be extra careful. Tighten the bolts slowly and gently. Use a regular wrench or Allen key. Tighten the bolts until they are snug. Do not overtighten! Check the mount for wobble. If it feels loose, tighten the bolts a little more. But be very careful not to overtighten. It is better to have the mount slightly loose than to damage your carbon seat post. Consider borrowing a torque wrench from a friend or bike shop. It is a worthwhile investment to protect your bike.
How Do You Know If It’s Too Tight?
Knowing when to stop tightening is crucial. If you hear a creaking sound, stop immediately! This could mean the carbon fiber is being stressed. Overtightening can cause cracks or breaks. The bolts should be snug but not overly tight. If you are unsure, it is better to err on the side of caution. Loosen the bolts slightly. Check the mount for wobble. If it feels secure, you are good to go. Remember, it is better to be safe than sorry. Protecting your carbon seat post is worth the extra effort.
Fun Fact or Stat: Professional bike mechanics often use special carbon paste. This paste increases friction. It helps prevent slippage at lower torque settings.
| Tool | Description | Why You Need It |
|---|---|---|
| Torque Wrench | Measures bolt tightness | Prevents overtightening |
| Protective Tape | Protects carbon surface | Stops scratches and damage |
| Soft Cloth | Cleans seat post | Ensures good mount grip |
| Allen Key Set | Tightens and loosens bolts | Essential for mount install |
| Mild Soap | Cleans dirt and grime | Prepares surface properly |
Testing the Mount’s Stability
Before you hit the road, test the mount. Make sure it is stable. Attach your action camera to the mount. Gently wiggle the camera. The mount should not move or wobble. If it does, tighten the bolts a little more. But be careful not to overtighten. Ride your bike around the block. Check the mount frequently. Make sure it stays in place. If everything feels secure, you are ready for a longer ride. Testing the mount ensures your camera stays safe and your videos are clear. It also gives you peace of mind while riding.
- Attach your camera and gently wiggle it.
- Ride around the block and check stability.
- Tighten bolts slightly if there is movement.
- Ensure the camera angle stays consistent.
- Look for any vibrations or shaking.
- Re-check after the first few miles.
Imagine you are building a tower of blocks. You wouldn’t just build it and walk away, would you? You would give it a little shake to make sure it is stable. Testing your action camera mount is similar. You need to make sure it can handle the bumps and vibrations of your ride. A wobbly mount will ruin your videos. It can also cause your camera to fall off. Take the time to test the mount thoroughly. A little testing can save you from a lot of headaches later. It will also ensure you capture amazing footage of your rides.
What Should You Look for During the Test?
During the test, pay close attention to the mount. Does it move or wobble? Does the camera angle change? Are there any unusual vibrations? These are all signs that the mount is not stable. If you notice any of these issues, stop and adjust the mount. Tighten the bolts a little more. Check the position of the camera. Make sure everything is secure. A stable mount is essential for capturing clear and steady videos. It also protects your camera from damage.
How Often Should You Re-Check the Mount?
It is a good idea to re-check the mount regularly. After the first few miles of your ride, stop and check the bolts. Make sure they are still tight. Check the position of the camera. Make sure it hasn’t moved. Continue to check the mount periodically throughout your ride. This is especially important on rough terrain. Vibrations can loosen the bolts over time. Regular checks ensure your camera stays safe and your videos stay clear. A little maintenance goes a long way.
What If the Mount Keeps Coming Loose?
If the mount keeps coming loose, there might be a problem. Check the bolts for damage. Make sure they are not stripped. Check the mount for cracks or breaks. If you find any damage, replace the mount. You might also try using carbon paste. This paste increases friction. It helps prevent slippage. Make sure you are using the correct torque setting. If the problem persists, consult a bike mechanic. They can help you diagnose the issue and find a solution.
Fun Fact or Stat: Some action camera mounts have built-in vibration dampeners. These reduce shaking and produce smoother videos.
Maintaining Your Action Camera Mount
Taking care of your mount will make it last longer. Clean the mount regularly. Use a soft cloth and mild soap. Remove any dirt or grime. Check the bolts for rust or corrosion. If you find any, replace them. Inspect the mount for cracks or breaks. Replace the mount if you see any damage. Store the mount in a safe place when not in use. This will protect it from damage. Regular maintenance ensures your mount stays in good condition. It will also keep your camera safe and your videos clear.
- Clean the mount regularly with mild soap.
- Check bolts for rust and replace if needed.
- Inspect for cracks or any damage.
- Store the mount in a safe, dry place.
- Tighten bolts periodically to maintain stability.
- Replace the mount if you find damage.
Think of your action camera mount like a car. You wouldn’t just drive it and never change the oil, would you? You need to maintain it to keep it running smoothly. Cleaning the mount removes dirt that can cause wear and tear. Checking the bolts prevents them from rusting or breaking. Inspecting the mount ensures there are no hidden cracks. Taking care of your mount extends its life. It also keeps your camera safe and your videos clear. A little maintenance goes a long way in keeping your equipment in top condition.
How Often Should You Clean the Mount?
How often you clean the mount depends on how often you ride. If you ride in muddy or dusty conditions, clean the mount after every ride. If you ride in clean conditions, you can clean it less often. A good rule of thumb is to clean the mount at least once a month. Use a soft cloth and mild soap. Rinse the mount thoroughly with water. Dry it completely before storing it. Regular cleaning prevents dirt and grime from building up. It also keeps the mount looking new.
What Kind of Soap Should You Use?
When cleaning your action camera mount, use a mild soap. Dish soap or car wash soap are good choices. Avoid using harsh chemicals or abrasive cleaners. These can damage the mount. They can also remove the finish. Mix the soap with water. Use a soft cloth to clean the mount. Rinse the mount thoroughly with water. Dry it completely before storing it. A mild soap will clean the mount effectively without causing damage.
How Should You Store the Mount?
Storing the mount properly will protect it from damage. Keep it in a dry place. Avoid storing it in direct sunlight. Sunlight can fade the color and weaken the plastic. Store the mount in a case or bag. This will protect it from scratches. Keep it away from sharp objects. These can damage the mount. Storing the mount properly will extend its life. It will also keep it looking new.
Fun Fact or Stat: Some action camera mounts come with a lifetime warranty. This shows the manufacturer’s confidence in their product.
Troubleshooting Common Problems
Sometimes things go wrong. The mount might come loose. The camera angle might shift. The videos might be shaky. Don’t worry, these problems are usually easy to fix. Check the bolts. Make sure they are tight. Adjust the camera angle. Make sure it is secure. Use a vibration dampener. This will reduce shaking. If you are still having problems, consult a bike mechanic. They can help you diagnose the issue. They can also recommend a solution. Troubleshooting common problems will help you keep your camera safe and your videos clear.
- Check bolts if the mount comes loose.
- Adjust the camera angle if it shifts.
- Use a vibration dampener for shaky videos.
- Consult a mechanic for persistent issues.
- Ensure the mount is compatible with your camera.
- Replace damaged parts immediately.
Imagine you are driving a car and the tire goes flat. You wouldn’t just keep driving, would you? You would pull over and change the tire. Troubleshooting your action camera mount is similar. You need to address problems as they arise. Ignoring problems can lead to more serious issues. A loose mount can cause your camera to fall off. A shaky mount can ruin your videos. Take the time to troubleshoot any problems you encounter. This will keep your camera safe and your videos clear. It will also ensure you enjoy your rides.
What If the Mount Keeps Slipping?
If the mount keeps slipping, there could be several reasons. The bolts might be loose. The carbon fiber might be slippery. The mount might not be compatible with your seat post. Tighten the bolts. Use carbon paste to increase friction. Make sure the mount is the right size for your seat post. If the problem persists, try a different mount. A more secure mount will prevent slipping and keep your camera safe.
Why Are Your Videos Shaky?
Shaky videos can be frustrating. There are several reasons why your videos might be shaky. The mount might be loose. Your bike might be vibrating. The camera might not have image stabilization. Tighten the bolts. Use a vibration dampener. Enable image stabilization on your camera. These steps will help reduce shaking and produce smoother videos. Clear videos make your rides more enjoyable to watch.
What If You Can’t Remove the Mount?
Sometimes, removing the mount can be difficult. The bolts might be stuck. The mount might be corroded. Use a lubricant to loosen the bolts. Gently wiggle the mount. Do not force it. If you can’t remove the mount, consult a bike mechanic. They have the tools and expertise to remove it safely. Forcing the mount can damage your seat post. It is better to seek professional help than to risk damaging your bike.
Fun Fact or Stat: Some action cameras have built-in accelerometers. These detect bumps and automatically stabilize the video.
Summary
Installing an action camera mount on a carbon seat post needs care. Carbon fiber is strong but fragile. Use a torque wrench to avoid overtightening bolts. This prevents cracks. Protect the seat post with tape. This stops scratches. Choose a lightweight mount made for carbon fiber. These mounts spread pressure evenly. Test the mount for stability. Make sure it doesn’t wobble. Maintain the mount regularly. Clean it and check for damage. Knowing how to install action camera mount on carbon seat post correctly keeps your bike safe. It also helps you record great videos.
Conclusion
Installing an action camera mount on your bike is easy. You can record your rides and share your adventures. Remember to be careful with carbon fiber. Use the right tools. Follow the steps in this article. Soon, you will be capturing amazing footage. You will be able to show your friends how awesome your rides are. Knowing how to install action camera mount on carbon seat post safely is important. Now get out there and ride!
Frequently Asked Questions
Question No 1: What tools do I need to install an action camera mount on a carbon seat post?
Answer: You need a few essential tools. First, you need a torque wrench. A torque wrench helps you tighten bolts to the correct level. This is very important for carbon fiber. Overtightening can cause damage. Next, you need an Allen key set. This will help you tighten and loosen the bolts on the mount. You also need protective tape. This tape protects the carbon from scratches. Finally, you need a soft cloth and mild soap. This will help you clean the seat post before installation. Having these tools ensures a safe and successful installation. You will be able to record your rides in no time!
Question No 2: How do I know if I am overtightening the bolts on my carbon seat post?
Answer: Overtightening bolts on carbon fiber can be a big problem. It can cause cracks or breaks. The best way to avoid this is to use a torque wrench. A torque wrench tells you exactly how much pressure you are using. If you don’t have a torque wrench, be very careful. Tighten the bolts slowly. Check them often. If you hear a creaking sound, stop immediately! This is a sign that you are overtightening the bolts. Remember, it is better to have the mount slightly loose than to damage your seat post. Always follow the manufacturer’s instructions for torque settings. This will help you avoid overtightening and keep your bike safe.
Question No 3: What kind of action camera mount is best for a carbon seat post?
Answer: When choosing an action camera mount for a carbon seat post, look for a few key features. First, choose a mount made specifically for carbon fiber. These mounts are designed to be gentle and distribute pressure evenly. They often have wider clamps and rubber padding. This protects the carbon from damage. Next, choose a lightweight mount. A heavy mount can add extra stress to the seat post. Finally, make sure the mount is secure. You don’t want your camera to fall off mid-ride! Read reviews and choose a mount that is known for its stability. A good mount will keep your camera safe and your seat post in good condition. Knowing how to install action camera mount on carbon seat post is important.
Question No 4: How do I protect my carbon seat post from scratches when installing a mount?
Answer: Protecting your carbon seat post from scratches is easy. Before installing the mount, apply protective tape. Place the tape where the mount will touch the seat post. The tape will create a barrier. It will stop the mount from directly rubbing against the carbon. Use good quality tape that won’t leave sticky residue. Painter’s tape or clear protective tape are good choices. Make sure the tape is smooth and secure. This simple step will prevent scratches and keep your seat post looking new. It is a small effort that makes a big difference in protecting your investment. This is especially important when thinking about how to install action camera mount on carbon seat post.
Question No 5: What should I do if my action camera mount keeps coming loose?
Answer: If your action camera mount keeps coming loose, there are a few things you can try. First, check the bolts. Make sure they are tight. Use a torque wrench to ensure they are tightened to the correct level. Next, check the mount for damage. Look for cracks or breaks. If you find any damage, replace the mount. You can also try using carbon paste. This paste increases friction. It helps prevent the mount from slipping. If the problem persists, consult a bike mechanic. They can help you diagnose the issue and find a solution. Keeping your mount secure is important for the safety of your camera and other riders. Knowing how to install action camera mount on carbon seat post properly will help.
Question No 6: How often should I check the stability of my action camera mount?
Answer: It is a good idea to check the stability of your action camera mount regularly. Before each ride, give the mount a quick check. Make sure the bolts are tight. Wiggle the camera to see if there is any movement. After the first few miles of your ride, stop and check the mount again. Make sure it is still secure. Continue to check the mount periodically throughout your ride. This is especially important on rough terrain. Vibrations can loosen the bolts over time. Regular checks ensure your camera stays safe and your videos stay clear. A little maintenance goes a long way. This is especially important when thinking about how to install action camera mount on carbon seat post.


