
How to Use Mini Hand Pump Correctly: Easy Guide
Using a mini hand pump correctly involves securely attaching the pump head to your tire’s valve, using a stable stance, and pumping with consistent strokes. Make sure the pump is properly connected to avoid air leaks. It might take some effort, but you’ll get your tire inflated enough to get back on the road or trail.
Ever been stuck on the side of the road with a flat tire and a mini hand pump that just won’t seem to work? It’s a common frustration for cyclists. These little pumps are great for emergencies, but they can be tricky to use if you’re not familiar with the right techniques. Don’t worry, you’re not alone! Many riders struggle at first.
In this guide, I’ll walk you through the steps to use a mini hand pump correctly, so you can quickly inflate your tire and get back to enjoying your ride. We’ll cover everything from choosing the right pump to mastering the pumping motion. Let’s get started!
Choosing the Right Mini Hand Pump

Before we dive into how to use a mini hand pump, it’s important to make sure you have the right one for your needs. Not all pumps are created equal, and selecting the right one can make a big difference in how easy it is to inflate your tires. Here’s what to consider:
Valve Compatibility
The first thing to check is whether the pump is compatible with your bike’s valves. There are primarily two types of valves:
- Presta Valves: These are common on road bikes and some high-performance mountain bikes. They have a small, narrow valve stem with a locking nut at the tip.
- Schrader Valves: These are the same type of valves you find on car tires. They are wider and more robust than Presta valves, and are common on mountain bikes, hybrid bikes, and some commuter bikes.
Many mini pumps come with a dual-head design that can accommodate both Presta and Schrader valves. If your pump doesn’t have this feature, make sure you choose one that matches your bike’s valve type.
Pump Size and Weight
Mini pumps are designed to be compact and lightweight, but there’s still some variation in size and weight. Consider how you plan to carry the pump:
- Frame Mount: Some pumps come with a bracket that allows you to attach them to your bike frame. This is a convenient option if you don’t want to carry the pump in your bag.
- Pocket or Bag: If you prefer to carry the pump in your cycling jersey pocket or a small bag, look for a model that is small and lightweight.
Inflation Efficiency
The efficiency of a mini pump refers to how much air it can deliver with each stroke. Some pumps are designed for high volume, meaning they can inflate tires quickly but require more effort. Others are designed for high pressure, making them suitable for road bikes that require higher PSI (pounds per square inch).
Look for pumps that have a good balance of volume and pressure. Reading reviews and comparing specifications can help you find a pump that suits your riding style and tire requirements.
Materials and Durability
The materials used in a mini pump can affect its durability and lifespan. Look for pumps made from high-quality materials like aluminum alloy or reinforced plastic. These materials can withstand the rigors of regular use and exposure to the elements.
Features to Consider
Here are some extra features that can make a mini pump more user-friendly:
- Extendable Hose: A flexible hose can make it easier to attach the pump to the valve, especially in tight spaces.
- Pressure Gauge: A built-in pressure gauge allows you to monitor the tire pressure as you inflate, helping you avoid over- or under-inflation.
- Ergonomic Handle: A comfortable handle can make pumping easier and reduce hand fatigue.
Essential Steps to Using a Mini Hand Pump
Now that you’ve chosen the right mini hand pump, let’s go through the steps to use it effectively. Follow these instructions to inflate your tires quickly and efficiently.
Step 1: Prepare Your Bike and Pump
Before you start pumping, make sure your bike is in a stable position. If you’re on the road, move to a safe location away from traffic. Here’s what to do:
- Position Your Bike: Lean your bike against a wall, tree, or any stable object. If you have a kickstand, use it.
- Locate the Valve: Find the valve on the tire you need to inflate. Remove the valve cap and set it aside in a safe place.
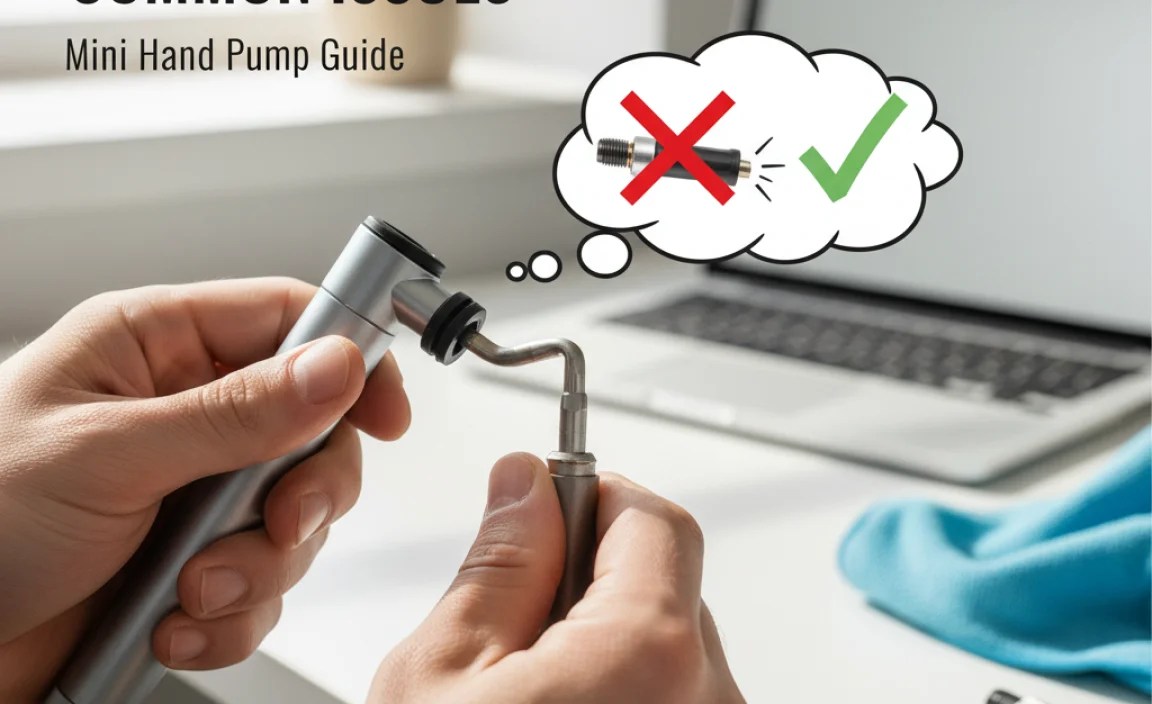
- Prepare the Pump: Check the pump head to ensure it’s set to the correct valve type (Presta or Schrader). Some pumps have a reversible head or an adapter that you need to adjust.
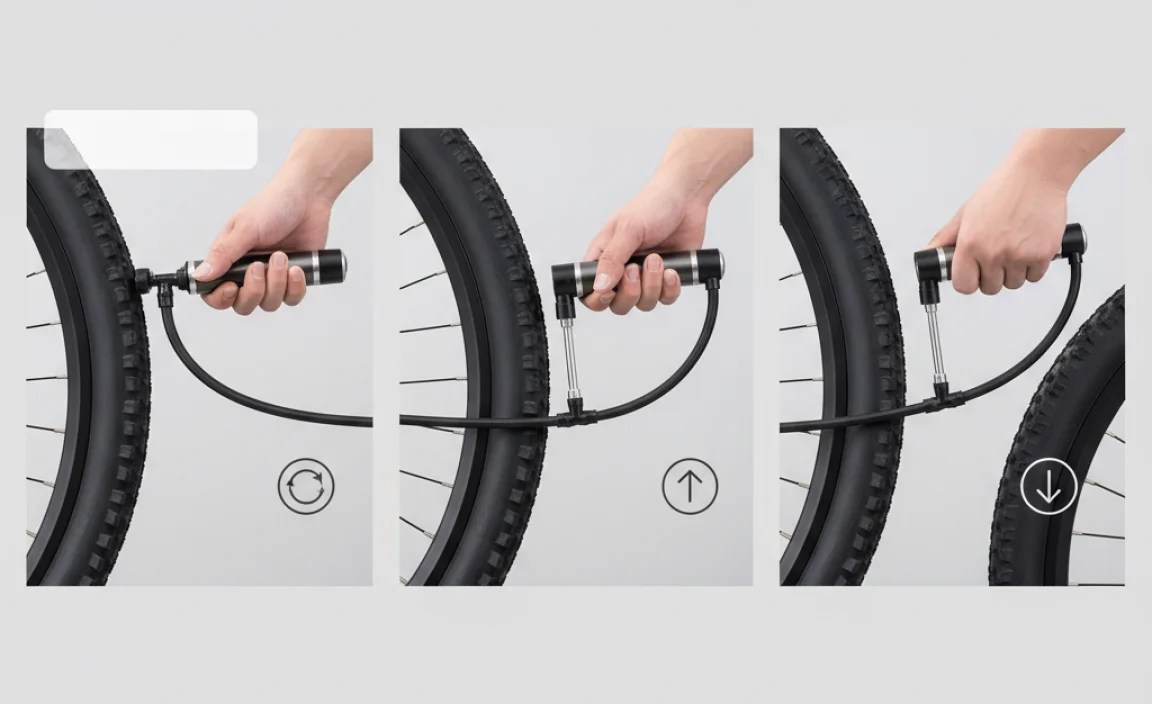
Step 2: Attach the Pump to the Valve
Attaching the pump correctly is crucial for getting a good seal and avoiding air leaks. Here’s how to do it:
- Presta Valve: Loosen the locking nut at the tip of the valve stem. Press the valve stem briefly to release a small amount of air. This helps to ensure the valve is open.
- Schrader Valve: No need to loosen anything. Just make sure the valve is clean and free of debris.
- Attach the Pump Head: Firmly press the pump head onto the valve stem. Make sure it’s fully seated to create a tight seal. Some pumps have a lever or locking mechanism that you need to engage to secure the connection.
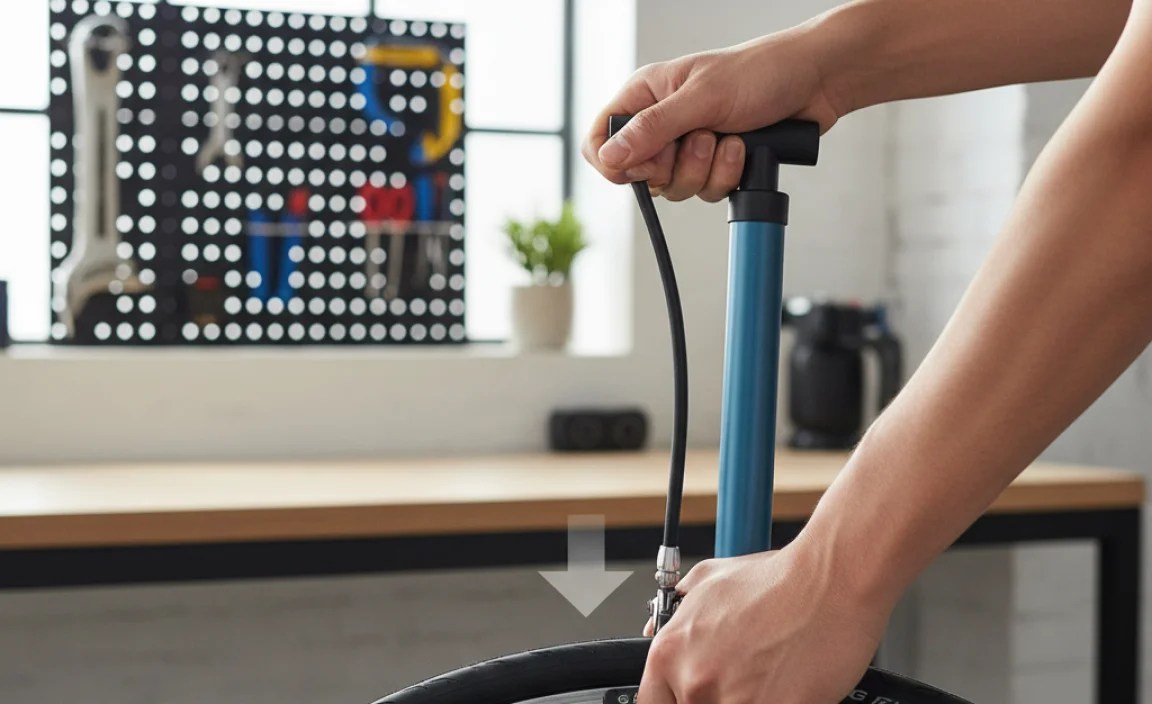
Step 3: Begin Pumping
Now comes the pumping action. Here’s how to do it efficiently:
- Stable Stance: Place one hand on the pump handle and the other hand on the tire or frame for stability.
- Pumping Motion: Use your body weight to push down on the pump handle. Use smooth, full strokes to maximize the amount of air delivered with each pump.
- Check for Leaks: Listen for air leaks around the valve stem. If you hear a hissing sound, stop pumping and re-seat the pump head to ensure a better seal.
Step 4: Monitor Tire Pressure
It’s important to inflate your tires to the correct pressure. Here’s how to monitor the pressure:
- Use a Pressure Gauge: If your pump has a built-in pressure gauge, monitor the pressure as you pump. Refer to the recommended pressure range printed on the sidewall of your tire.
- Check Manually: If your pump doesn’t have a gauge, you can check the pressure by squeezing the tire. It should feel firm but not rock hard. You can also use a separate pressure gauge to get an accurate reading.
- Recommended Pressure: As a general guideline, road bike tires typically require higher pressure (80-130 PSI), while mountain bike tires need lower pressure (25-40 PSI).
Step 5: Detach the Pump and Secure the Valve
Once you’ve reached the desired tire pressure, it’s time to detach the pump and secure the valve:
- Detach the Pump Head: Disengage the lever or locking mechanism (if applicable) and carefully remove the pump head from the valve stem.
- Presta Valve: Tighten the locking nut at the tip of the valve stem.
- Replace the Valve Cap: Screw the valve cap back onto the valve stem to protect it from dirt and debris.
Troubleshooting Common Issues
Even with the right technique, you might encounter some common issues when using a mini hand pump. Here’s how to troubleshoot them:
Air Leaks
If you’re experiencing air leaks, it could be due to a poor seal between the pump head and the valve stem. Try these solutions:
- Re-seat the Pump Head: Make sure the pump head is fully seated on the valve stem. Adjust the position and try again.
- Check the Valve: Inspect the valve for damage or debris. Clean it if necessary.
- Replace the Pump Head: If the pump head is worn or damaged, consider replacing it.
Difficulty Pumping
If you’re having trouble pumping, it could be due to a number of factors:
- Pump Condition: Make sure the pump is clean and well-lubricated. Apply a small amount of silicone-based lubricant to the pump’s moving parts.
- Tire Pressure: As the tire pressure increases, it will become more difficult to pump. Take breaks as needed and use your body weight to assist with the pumping motion.
- Valve Issues: Check the valve for obstructions or damage. A blocked valve can make it difficult to pump air into the tire.
Pump Overheating
Prolonged pumping can cause the pump to overheat, which can reduce its efficiency and potentially damage the pump. Here’s how to prevent overheating:
- Take Breaks: Allow the pump to cool down periodically during extended pumping sessions.
- Use Smooth Strokes: Avoid rapid, jerky pumping motions, which can generate more heat.
- Store Properly: When not in use, store the pump in a cool, dry place away from direct sunlight.
Tips for Efficient Pumping
Here are some additional tips to help you pump your tires more efficiently:
- Use Your Body Weight: Lean into the pump and use your body weight to assist with the pumping motion. This will reduce hand fatigue and make it easier to reach the desired tire pressure.
- Maintain a Steady Rhythm: Pump with a smooth, consistent rhythm. Avoid jerky or erratic motions.
- Keep the Pump Clean: Regularly clean the pump to remove dirt and debris. This will help to maintain its efficiency and prolong its lifespan.
- Lubricate the Pump: Apply a small amount of silicone-based lubricant to the pump’s moving parts to keep it working smoothly.
Mini Hand Pump vs. Other Inflation Methods

Mini hand pumps are a convenient option for on-the-go inflation, but they’re not the only choice. Here’s a comparison of mini hand pumps with other inflation methods:
| Inflation Method | Pros | Cons | Best For |
|---|---|---|---|
| Mini Hand Pump | Compact, lightweight, portable, no electricity required | Requires manual effort, can be slow, may not reach high pressures | Emergency repairs, on-the-go inflation |
| Floor Pump | Efficient, high-volume, easy to use, can reach high pressures | Not portable, requires a stable surface | Home use, pre-ride inflation |
| CO2 Inflator | Fast inflation, lightweight, compact | Requires CO2 cartridges, can be wasteful, potential for over-inflation | Race day, quick repairs |
| Electric Pump | Effortless inflation, can reach high pressures, portable options available | Requires electricity or battery, can be bulky, more expensive | Home use, travel |
Maintaining Your Mini Hand Pump
To keep your mini hand pump in good working condition, follow these maintenance tips:
- Clean Regularly: Wipe down the pump with a clean cloth after each use to remove dirt and debris.
- Lubricate Moving Parts: Apply a small amount of silicone-based lubricant to the pump’s moving parts every few months.
- Inspect for Damage: Check the pump for cracks, leaks, or other damage. Replace any worn or damaged parts.
- Store Properly: Store the pump in a cool, dry place away from direct sunlight and extreme temperatures.
Recommended Mini Hand Pumps
Here are a few highly-rated mini hand pumps that are worth considering:
- Lezyne Micro Floor Drive HP: This pump combines the portability of a mini pump with the efficiency of a floor pump. It features a foot peg and a flexible hose for easy inflation.
- Topeak RaceRocket HP: This lightweight pump is designed for high-pressure inflation. It has a compact design and a built-in pressure gauge.
- Blackburn Core Mini-Pump: This durable pump is made from high-quality materials and features a reversible head for Presta and Schrader valves.
Safety Precautions
When using a mini hand pump, it’s important to take certain safety precautions:
- Wear Gloves: Pumping can be tough on your hands, so consider wearing gloves to protect your skin and improve your grip.
- Stay Aware of Your Surroundings: If you’re inflating your tires on the road, be aware of traffic and other hazards.
- Avoid Over-Inflation: Never inflate your tires beyond the recommended pressure range. Over-inflation can cause the tire to explode, which can be dangerous.
- Inspect Tires Regularly: Check your tires for cuts, bulges, or other damage. Replace them if necessary.
FAQ: Using Mini Hand Pumps
1. Why is my mini hand pump so hard to use?
Mini hand pumps require more effort than floor pumps. Ensure your pump is well-maintained and use your body weight to assist with pumping. Check for leaks and make sure the pump head is securely attached to the valve.
2. How do I know if my tire is properly inflated with a mini hand pump?
If your pump has a built-in pressure gauge, use it to monitor the tire pressure. If not, squeeze the tire – it should feel firm. For accurate readings, use a separate tire pressure gauge.
3. Can I use a mini hand pump for both Presta and Schrader valves?
Yes, many mini hand pumps come with a dual-head design that can accommodate both Presta and Schrader valves. Make sure to adjust the pump head to the correct setting before attaching it to the valve.
4. What should I do if my mini hand pump gets too hot?
If your mini hand pump gets too hot, stop pumping and let it cool down. Avoid rapid, jerky pumping motions, which can generate more heat. Store the pump in a cool, dry place when not in use.
5. How often should I maintain my mini hand pump?
You should clean your mini hand pump after each use and lubricate the moving parts every few months. Inspect the pump regularly for damage and replace any worn or damaged parts.
6. What is the ideal pressure for my bicycle tires?
The ideal tire pressure is typically printed on the sidewall of your tire. Road bike tires generally require higher pressure (80-130 PSI), while mountain bike tires need lower pressure (25-40 PSI).
7. Why does air leak when I try to pump my tire?
Air leaks often occur due to a poor seal between the pump head and the valve stem. Try re-seating the pump head and ensure it’s firmly attached. Also, check the valve for any damage or debris.
Conclusion
Using a mini hand pump correctly can be a lifesaver when you’re out on a ride and get a flat tire. By choosing the right pump, following the proper techniques, and maintaining your equipment, you can inflate your tires quickly and efficiently. Remember to take your time, stay safe, and enjoy the ride! With a little practice, you’ll become a pro at using your mini hand pump and be able to handle any flat tire situation with confidence. So go out there, explore the open road, and ride worry-free!


