
How to Pump Fat Bike Tyres Manually: Easy Guide
Quick Summary: Pumping fat bike tires manually is simple! Attach your pump securely to the valve, ensuring a good seal. Use steady strokes, watching the pressure gauge to avoid over-inflation. Aim for the recommended PSI (usually between 5-10 PSI) printed on the tire’s sidewall. Check the pressure with a gauge after pumping. Now you’re ready to roll!
Fat bike tires are big and bouncy, perfect for snow, sand, and rough trails. But keeping them inflated can feel like a chore. Maybe you’re tired of relying on electric pumps or want to be self-sufficient on the trail. Pumping manually might seem daunting, but with the right technique, it’s totally doable. It’s easier than you think, and you’ll feel more connected to your ride.
In this guide, I’ll break down the process step-by-step. We’ll cover everything from choosing the right pump to mastering the pumping motion. You’ll learn how to get those fat tires inflated quickly and efficiently, so you can spend more time riding and less time struggling with your pump. Let’s get started!
Choosing the Right Pump for Your Fat Bike

Not all pumps are created equal. For fat bike tires, you’ll want a pump that can deliver a high volume of air. Here’s what to look for:
Floor Pumps vs. Hand Pumps
Floor Pumps: These are your best bet for home use. They’re more efficient and let you use your body weight to pump. Look for a pump with a large barrel for high volume.
Hand Pumps: These are great for on-the-go inflation. Choose a model specifically designed for high-volume tires. Some even have a built-in gauge.
Key Features to Consider
- Volume: A high-volume pump pushes more air per stroke, which is crucial for fat tires.
- Gauge: An accurate gauge helps you avoid over- or under-inflating your tires.
- Valve Compatibility: Most pumps work with both Presta and Schrader valves. Make sure yours does, or get an adapter.
- Durability: Look for a pump made from sturdy materials that can withstand regular use.
Recommended Pumps
Here are a few pumps that are popular among fat bike riders:
| Pump | Type | Features | Approximate Price |
|---|---|---|---|
| Lezyne Alloy Floor Drive | Floor Pump | High volume, accurate gauge, durable construction | $80-100 |
| Topeak Mountain DA G | Hand Pump | High volume, dual-action, built-in gauge | $40-50 |
| Serfas Thunderbolt | Floor Pump | Easy to use, high volume, stable base | $60-70 |
Understanding Tire Pressure for Fat Bikes

Tire pressure is super important for fat bikes. Too much pressure, and you’ll bounce around. Too little, and you’ll risk pinch flats and a sluggish ride. Finding the sweet spot makes all the difference.
Why Tire Pressure Matters
- Grip: Lower pressure increases the contact patch, giving you more grip on loose surfaces.
- Comfort: Lower pressure absorbs bumps, making for a smoother ride.
- Rolling Resistance: Higher pressure rolls faster on smooth surfaces, but can be harsh on rough terrain.
- Pinch Flats: Too little pressure increases the risk of pinch flats (snake bites), where the rim pinches the tube.
Finding the Right PSI
The ideal PSI for your fat bike tires depends on several factors:
- Rider Weight: Heavier riders need more pressure.
- Terrain: Softer surfaces like sand and snow require lower pressure.
- Tire Width: Wider tires can handle lower pressures.
- Personal Preference: Experiment to find what feels best for you.
Start with the manufacturer’s recommendation: Look on the sidewall of your tire for the recommended PSI range. This is usually a good starting point.
Use a tire pressure gauge: A good gauge is essential for accurate inflation. Digital gauges are more precise, but analog gauges are reliable and affordable.
Experiment and adjust: Don’t be afraid to experiment with different pressures. A difference of even 0.5 PSI can make a noticeable change in ride quality.
General Guidelines:
- Snow: 3-5 PSI
- Sand: 4-6 PSI
- Packed Trails: 6-8 PSI
- Pavement: 8-10 PSI
Step-by-Step Guide: Pumping Fat Bike Tires Manually

Alright, let’s get to the main event. Here’s how to pump your fat bike tires manually, step by step:
Step 1: Gather Your Tools
You’ll need:
- A high-volume floor pump or hand pump
- A tire pressure gauge
- A valve adapter (if needed)
Step 2: Prepare the Valve
For Presta valves:
- Remove the valve cap.
- Loosen the valve nut by turning it counterclockwise.
- Press the valve core briefly to release any trapped air.
For Schrader valves:
- Remove the valve cap.
- That’s it! Schrader valves are ready to go.
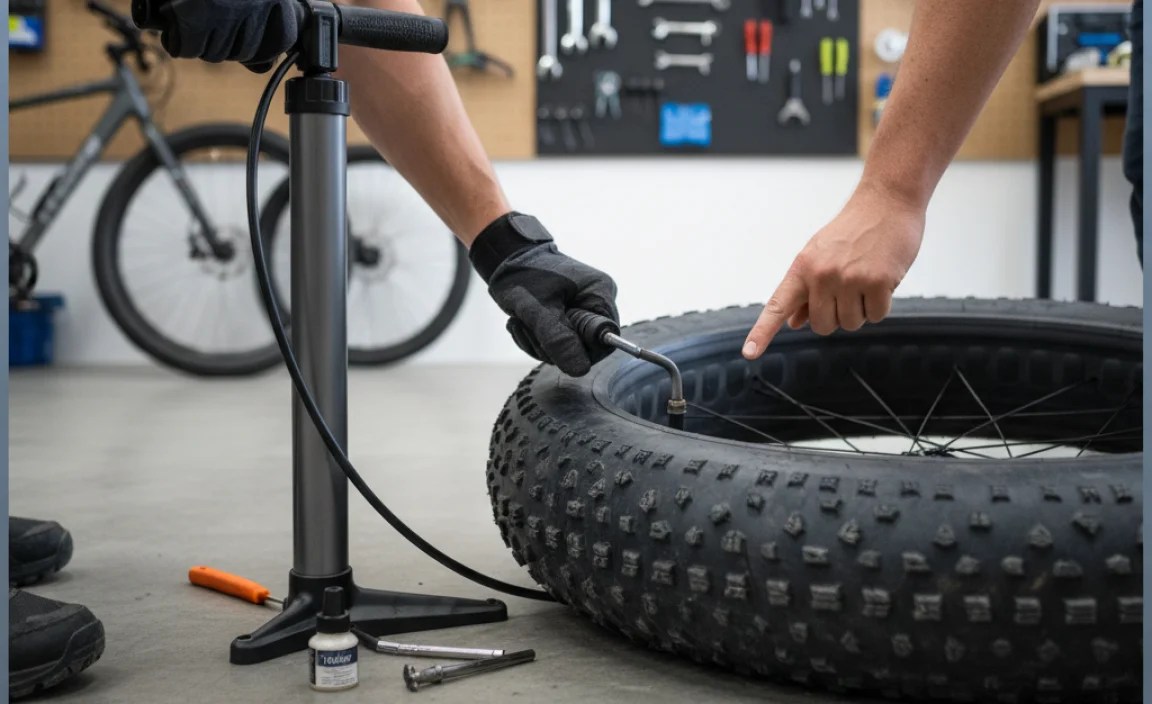
Step 3: Attach the Pump Head
For Floor Pumps:
- Open the pump head lever.
- Place the pump head firmly onto the valve.
- Close the lever to create a tight seal.
For Hand Pumps:
- Press the pump head firmly onto the valve. Some hand pumps have a lever to lock the head in place.
Ensure a good seal: A hissing sound means the pump head isn’t properly attached. Readjust until the seal is airtight.
Step 4: Start Pumping
For Floor Pumps:
- Stand with one foot on the base of the pump.
- Grip the handle firmly with both hands.
- Use your body weight to push the handle down in a smooth, steady motion.
- Let the handle return to the top, and repeat.
For Hand Pumps:
- Place the pump head on the valve with one hand while holding the tire or frame with the other for stability.
- Grip the pump handle firmly.
- Pump in a steady motion, using your arms and body weight.
Maintain a steady rhythm: Avoid jerky movements. Smooth, consistent strokes are more efficient.
Step 5: Monitor the Pressure
Check the gauge regularly: Keep an eye on the pressure gauge as you pump. Stop when you reach your desired PSI.
Avoid over-inflation: It’s better to under-inflate slightly than to over-inflate. Over-inflation can lead to a blowout.
Step 6: Remove the Pump Head
For Floor Pumps:
- Open the pump head lever.
- Carefully remove the pump head from the valve.
For Hand Pumps:
- Carefully remove the pump head from the valve.
Minimize air loss: Remove the pump head quickly to prevent air from escaping.
Step 7: Secure the Valve
For Presta valves:
- Tighten the valve nut by turning it clockwise.
- Replace the valve cap.
For Schrader valves:
- Replace the valve cap.
Step 8: Double-Check the Pressure
Use a tire pressure gauge: Double-check the pressure to ensure it’s accurate. Adjust as needed.
Troubleshooting Common Issues
Sometimes, things don’t go as planned. Here are some common issues you might encounter and how to fix them:
Problem: Pump Won’t Attach to Valve
Cause: Incorrect pump head or valve adapter.
Solution: Make sure you’re using the correct pump head for your valve type (Presta or Schrader). If needed, use a valve adapter.
Problem: Air Leaks When Pumping
Cause: Poor seal between pump head and valve.
Solution: Readjust the pump head to ensure a tight seal. Make sure the lever (if present) is fully closed.
Problem: Can’t Reach Desired Pressure
Cause: Pump not designed for high-volume tires or a leak in the system.
Solution: Use a high-volume pump specifically designed for fat bike tires. Check for leaks around the valve and pump head.
Problem: Gauge is Inaccurate
Cause: Faulty gauge.
Solution: Use a different gauge to verify the pressure. If the gauge is consistently inaccurate, replace it.
Tips for Easier Pumping
Here are a few extra tips to make pumping your fat bike tires easier:
- Use proper technique: Smooth, steady strokes are more efficient than jerky movements.
- Maintain your pump: Regularly clean and lubricate your pump to keep it working smoothly.
- Check your tires regularly: Inspect your tires for cuts, abrasions, and embedded objects.
- Store your bike properly: Store your bike in a cool, dry place away from direct sunlight.
FAQ About Pumping Fat Bike Tires
Here are some frequently asked questions about pumping fat bike tires manually:
Q: What PSI should I pump my fat bike tires to?
A: The ideal PSI depends on your weight, the terrain, and your tire width. Start with the manufacturer’s recommendation (usually printed on the tire sidewall) and adjust from there. A good starting point is usually between 5-10 PSI.
Q: Can I use a regular bike pump for fat bike tires?
A: While you *can* use a regular pump, it will take a lot longer. High-volume pumps designed for fat bike tires are much more efficient.
Q: How often should I check my tire pressure?
A: Check your tire pressure before every ride, especially if you’re riding on varied terrain.
Q: What’s the difference between Presta and Schrader valves?
A: Presta valves are narrower and have a valve nut that needs to be loosened before inflating. Schrader valves are wider and similar to those found on car tires.
Q: Can I over-inflate my fat bike tires?
A: Yes, over-inflating your tires can lead to a blowout. Always stay within the manufacturer’s recommended PSI range.
Q: What should I do if my tire keeps losing air?
A: Check for punctures, leaks around the valve, or damage to the tire. You may need to replace the tube or tire.
Q: Is it okay to use CO2 cartridges for fat bike tires?
A: Yes, CO2 cartridges can inflate fat bike tires quickly, but they’re best for emergencies. Always use a controlled inflator to prevent over-inflation. Be aware that CO2 can permeate tubes more quickly than air, so check your pressure soon after use. For everyday inflation, a hand or floor pump is more economical and sustainable.
Conclusion
Pumping fat bike tires manually might seem like a workout at first, but with the right pump and technique, it becomes second nature. Knowing your tire pressure and having the right tools empowers you to dial in your ride for optimal performance and comfort. Whether you’re hitting the snowy trails, cruising sandy beaches, or exploring rugged terrain, properly inflated tires are key to a great fat biking experience. So get out there, experiment with different pressures, and enjoy the ride!


