
How To Test Homemade Hose For Leaks: Easy Guide
Quick Summary: To test a homemade hose for leaks, start by visually inspecting the hose for any obvious cracks or damage. Then, connect one end to a water source and the other end to a nozzle or cap. Gradually increase the water pressure while carefully examining the hose and fittings for any signs of leaks, such as drips, sprays, or wet spots. Mark any leaks you find and make the necessary repairs or adjustments.
Building your own hose can be a rewarding DIY project, whether it’s for your garden, a custom bike pump setup, or another creative application. But the last thing you want is for your new hose to spring a leak the first time you use it! Leaks not only waste water and reduce pressure, but they can also cause damage to your equipment or property. Don’t worry; testing your homemade hose for leaks is a simple process that anyone can do. This guide will walk you through a step-by-step method to ensure your hose is watertight and ready to go. Let’s get started and make sure your DIY hose is a success!
Tools and Materials You’ll Need

Before you start testing, gather these essential tools and materials. Having everything on hand will make the process smooth and efficient.
- Water Source: A standard garden faucet or any water outlet with sufficient pressure.
- Hose Connectors: Fittings to connect your homemade hose to the water source and the end nozzle.
- End Nozzle or Cap: To seal the end of the hose and build pressure. A simple cap will work, or an adjustable spray nozzle.
- Adjustable Wrench: To tighten hose clamps and fittings.
- Teflon Tape (Plumber’s Tape): To seal threaded connections and prevent leaks.
- Bucket or Container: To catch any water during the testing process.
- Dry Cloth or Towel: To wipe down the hose and fittings, making leaks easier to spot.
- Safety Glasses: To protect your eyes from any unexpected sprays.
Step-by-Step Guide to Leak Testing
Follow these steps carefully to thoroughly test your homemade hose for leaks. Each step is designed to help you identify and address any potential issues.
Step 1: Visual Inspection
Start with a close visual inspection of the entire hose. Look for any:
- Cracks
- Cuts
- Weak spots
- Improper connections
Pay close attention to the areas where the hose is connected to fittings, as these are common points for leaks. Make sure the hose material looks consistent and undamaged along its entire length.
Step 2: Connect the Hose
Attach one end of your homemade hose to the water source using appropriate connectors. Ensure the connection is snug but not overly tight. Over-tightening can damage the fittings or the hose itself. Wrap Teflon tape around the threads of the connectors for a better seal.
Next, attach an end nozzle or cap to the opposite end of the hose. This will allow you to build pressure within the hose and make any leaks more apparent.
Step 3: Initial Pressure Test
Slowly turn on the water supply, allowing water to gradually fill the hose. Watch for any immediate leaks at the connections or along the hose’s length. If you spot any leaks, immediately turn off the water and address the issue before proceeding.
Step 4: Increase the Pressure
Once the hose is full of water and you’ve addressed any initial leaks, gradually increase the water pressure. Monitor the hose closely as the pressure increases. Most household water systems operate between 40 and 60 PSI (pounds per square inch), so aim to test within this range.
Caution: Do not exceed the recommended pressure limit of your hose material or fittings. Exceeding the pressure limit can cause the hose to burst, leading to injury or damage.
Step 5: Inspect for Leaks Under Pressure
With the hose under pressure, systematically inspect every inch of the hose and all connections. Use a dry cloth or towel to wipe down sections of the hose, making it easier to spot new leaks. Look for:
- Drips
- Sprays
- Wet spots
- A decrease in pressure (if you have a pressure gauge)
Pay special attention to areas where the hose is bent or flexed, as these areas are more prone to leaks.
Step 6: Address Any Leaks
If you find any leaks, turn off the water supply and relieve the pressure in the hose. Depending on the location and severity of the leak, you may need to:
- Tighten the hose clamps or fittings
- Apply more Teflon tape to threaded connections
- Replace a faulty fitting
- Repair the hose with a patch kit (if applicable)
- Replace the section of the hose if the damage is too severe
After making the necessary repairs, repeat steps 3-5 to ensure the leak is resolved.
Step 7: Final Inspection
Once you’ve addressed all the leaks and the hose is holding pressure without any issues, perform a final inspection. Check all connections and the entire length of the hose one last time to ensure everything is secure and leak-free.
Troubleshooting Common Leak Issues
Even with careful construction, leaks can sometimes occur. Here are some common problems and how to fix them.
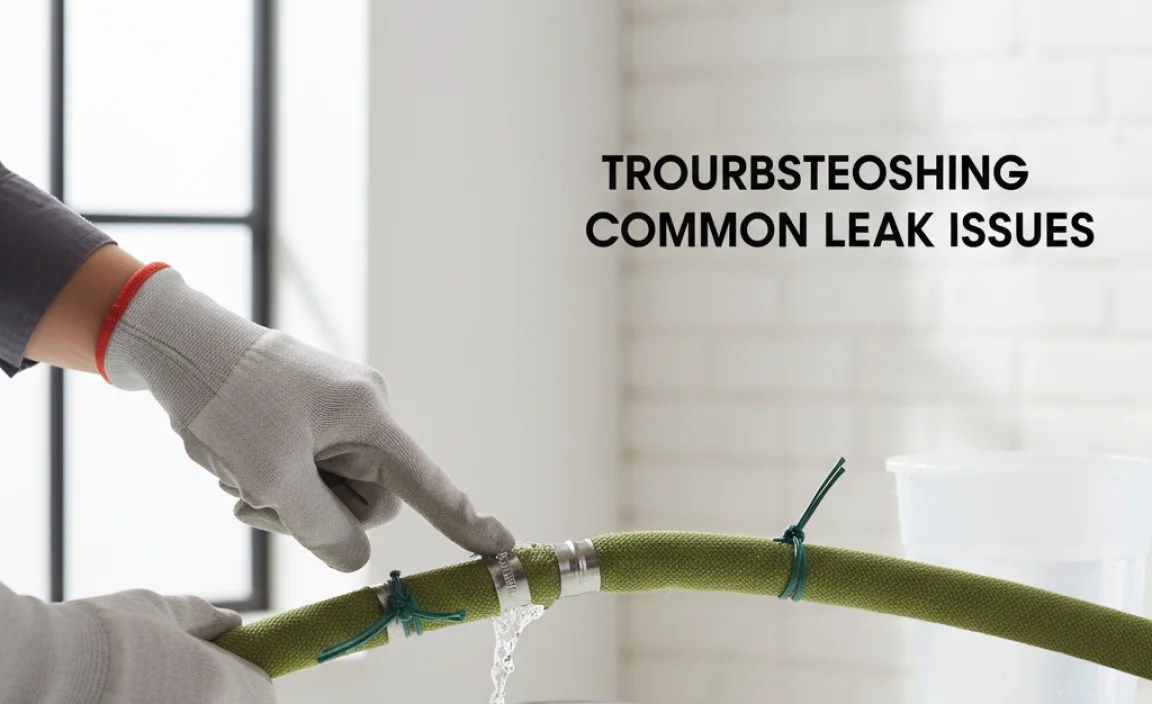
Leaky Connections
Problem: Water is dripping or spraying from the connections between the hose and the fittings.
Solution:
- Tighten the hose clamps or fittings using an adjustable wrench. Be careful not to over-tighten, as this can damage the components.
- Apply additional Teflon tape to the threads of the connectors. Make sure to wrap the tape in the correct direction (clockwise when looking at the open end of the thread).
- Inspect the fittings for any damage, such as cracks or stripped threads. Replace any faulty fittings.
- Ensure that the hose is properly seated within the fitting. Sometimes, the hose can slip out of position, causing a leak.
Hose Body Leaks
Problem: Water is leaking from the body of the hose, not at the connections.
Solution:
- If the leak is small, you may be able to repair it with a hose repair patch kit. Follow the instructions included with the kit.
- If the damage is more extensive, the best solution is usually to replace the damaged section of the hose. Cut out the damaged section and use hose connectors to join the remaining pieces.
- Check the hose material for compatibility with the intended use. Some materials are not suitable for high pressure or certain chemicals, which can cause premature failure.
Pinholes
Problem: Tiny holes are spraying water along the hose length.
Solution:
- Pinholes often indicate that the hose material is deteriorating. Unfortunately, there’s usually no reliable way to repair pinholes.
- The best solution is to replace the entire hose or the affected section.
- Consider using a higher-quality hose material that is more resistant to wear and tear for future projects.
Choosing the Right Materials
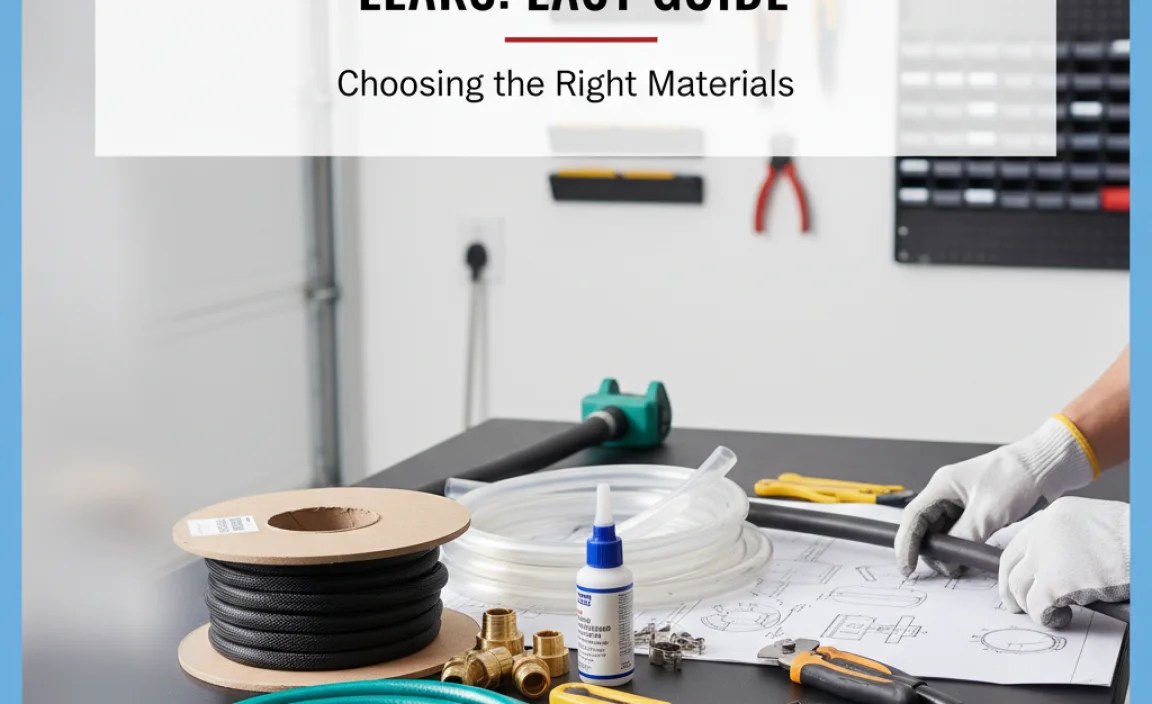
Selecting the right materials for your homemade hose is crucial for its durability and performance. Here’s a breakdown of common hose materials and their ideal applications:
| Material | Pros | Cons | Ideal Use |
|---|---|---|---|
| Rubber | Highly flexible, durable, resistant to cracking | Can be heavy, more expensive | Gardening, high-pressure applications |
| Vinyl | Lightweight, inexpensive | Less durable, prone to kinking and cracking | Light-duty watering, general use |
| Reinforced PVC | Good balance of flexibility and durability, resists bursting | Can become stiff in cold weather | Gardening, irrigation |
| Polyurethane | Lightweight, flexible, resistant to chemicals | Can be punctured more easily than rubber | Air lines, chemical transfer |
| Silicone | Highly flexible, resistant to temperature extremes | More expensive, lower pressure rating | High-temperature applications, food-grade uses |
Consider the pressure requirements, environmental conditions, and the type of fluid that will be running through the hose when selecting your materials. Using the right materials will significantly extend the life of your homemade hose.
Safety Precautions

When working with water pressure, it’s important to take certain safety precautions to prevent injuries and damage:
- Wear Safety Glasses: Protect your eyes from unexpected sprays or bursts.
- Avoid Over-Pressurizing: Do not exceed the recommended pressure limit of your hose material or fittings.
- Inspect Regularly: Check your hose and fittings for wear and tear before each use.
- Relieve Pressure: Always relieve the pressure in the hose before making any repairs or adjustments.
- Use Proper Fittings: Ensure that you are using the correct type and size of fittings for your hose material and application.
- Work in a Safe Area: Test your hose in an area where any leaks or bursts will not cause damage to property or injure anyone.
Alternative Testing Methods
While the pressure test described above is the most common method, here are a couple of alternative approaches you can use.
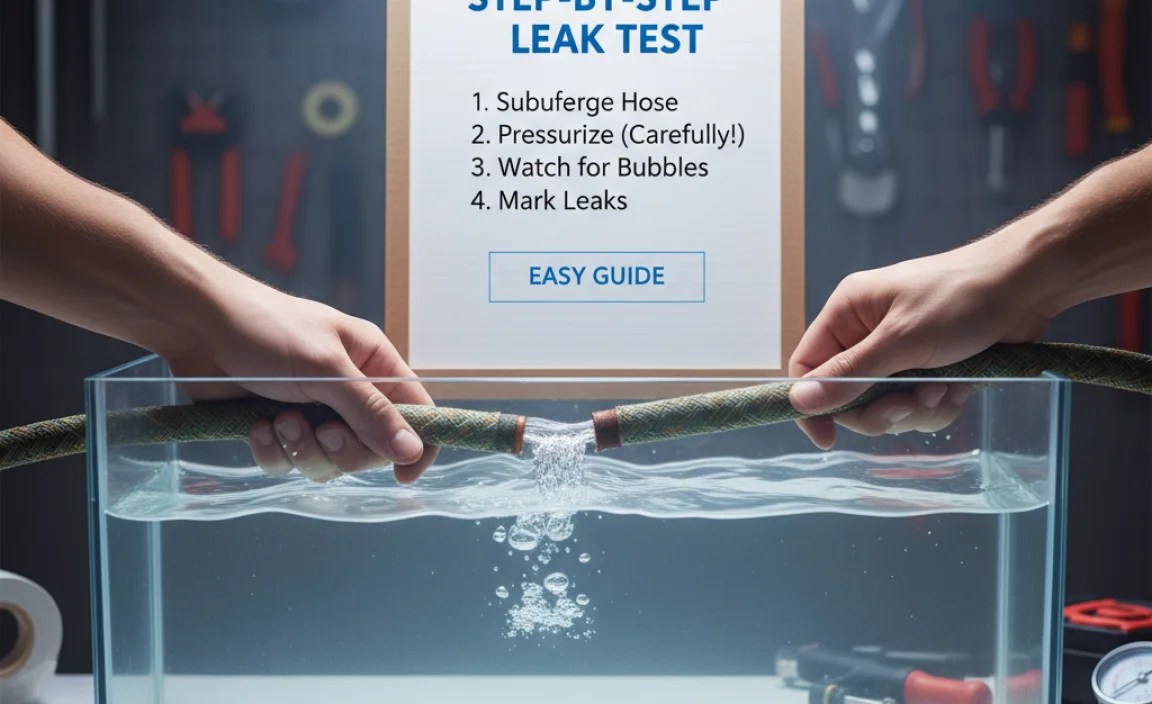
Submersion Test
For smaller hoses or sections of hose, you can try the submersion test:
- Cap one end of the hose.
- Submerge the hose in a tub or bucket of water.
- Introduce air pressure into the open end of the hose using an air compressor or even by blowing into it.
- Watch for bubbles rising from any leaks.
This method is particularly useful for finding very small leaks that might be difficult to spot otherwise.
Air Pressure Test
You can also test your hose using air pressure instead of water. This method is best suited for hoses that will be used for air or gas transfer.
- Connect one end of the hose to an air compressor.
- Cap the other end of the hose.
- Gradually increase the air pressure, monitoring the hose and connections for any leaks or signs of stress.
- Use a soapy water solution to spray on connections. Bubbles will form where there are leaks.
Be sure to use a pressure regulator to control the air pressure and avoid over-pressurizing the hose.
Cost Analysis: Homemade vs. Store-Bought
One of the main reasons people opt for homemade hoses is to save money or create a custom solution. Let’s compare the costs:
| Item | Homemade Hose Cost | Store-Bought Hose Cost |
|---|---|---|
| Hose Material (per foot) | $0.50 – $2.00 | $1.00 – $5.00 |
| Fittings (each) | $2.00 – $5.00 | $3.00 – $10.00 |
| Clamps (each) | $0.50 – $1.00 | Included in some store-bought hoses |
| Tools (if needed) | $0 – $20 (assuming you own some) | N/A |
| Total (for a 25-foot hose) | $17.50 – $75.00 | $35.00 – $150.00 |
As you can see, making your own hose can potentially save you money, especially if you need a custom length or have specific requirements. However, the cost savings may be offset by the time and effort involved, as well as the need to purchase additional tools.
FAQ: Testing Homemade Hoses for Leaks
What is the ideal water pressure for testing a homemade hose?
The ideal water pressure for testing is typically between 40 and 60 PSI, which is the standard range for most household water systems. Avoid exceeding the recommended pressure limit of your hose material to prevent damage.
Can I use air instead of water to test for leaks?
Yes, you can use air to test for leaks, especially for hoses intended for air or gas transfer. Use a pressure regulator to control the air pressure and apply soapy water to connections to identify leaks.
What kind of tape should I use for sealing threaded connections?
Use Teflon tape, also known as plumber’s tape, to seal threaded connections. Wrap the tape clockwise around the threads to ensure a tight, leak-free seal.
How do I fix a leak in the middle of the hose?
For small leaks, use a hose repair patch kit. For larger damage, replace the damaged section of the hose and use connectors to join the remaining pieces.
What if I can’t find the leak?
If you’re having trouble locating the leak, try the submersion test. Submerge the hose in water and introduce air pressure to identify bubbles rising from the leak.
Is it cheaper to make my own hose or buy one?
Making your own hose can be cheaper, especially for custom lengths or specific requirements. However, factor in the cost of materials, tools, and your time.
What are the best materials for a durable homemade hose?
Rubber and reinforced PVC offer a good balance of durability and flexibility for most applications. Choose materials based on the pressure requirements, environmental conditions, and the type of fluid being transferred.
Conclusion
Testing your homemade hose for leaks is a critical step in ensuring its reliability and preventing potential damage. By following these step-by-step instructions, you can confidently identify and address any issues, ensuring your DIY hose performs as expected. Remember to choose the right materials, take necessary safety precautions, and troubleshoot common problems effectively. With a little patience and attention to detail, you’ll have a leak-free hose ready for any task. So go ahead, put your DIY skills to the test, and enjoy the satisfaction of a job well done!


