
How to Remove Old Hose From Pump: Easy Fix!
Removing an old hose from a pump can be tricky, but it’s definitely doable! First, try warming the hose with a hairdryer to make it more flexible. Then, gently twist and pull the hose off the pump fitting. If it’s really stuck, use pliers or a hose removal tool for extra grip. Be patient and avoid damaging the pump!
Hey there, cycling friends! Raymond Ammons here, from BicyclePumper.com. Ever struggled with a stubborn, old hose stuck on your bike pump? You’re not alone! Over time, hoses can become brittle and fused to the pump, making removal a real pain. But don’t worry, I’m here to guide you through the process step-by-step. We’ll cover everything from simple tricks to using specialized tools, so you can get that old hose off without damaging your pump. Let’s get started and get you back to pumping those tires with ease!
Tools You’ll Need
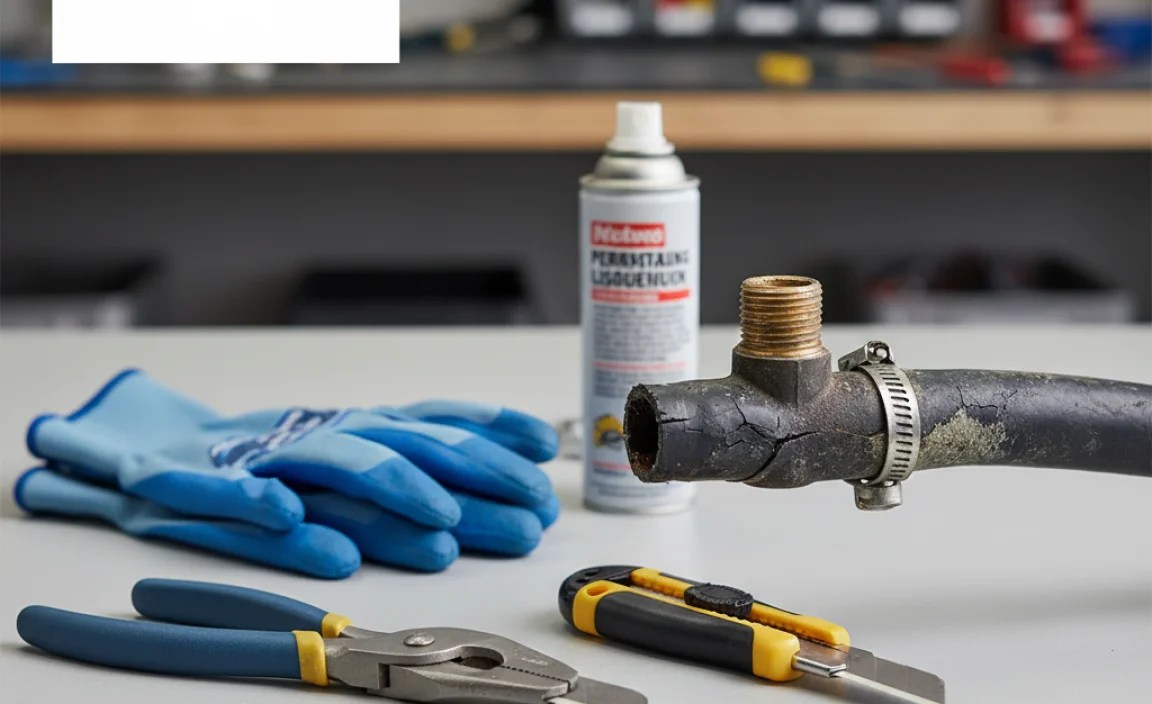
Before we dive in, let’s gather the necessary tools. Having the right equipment will make the job much smoother and prevent any accidental damage.
- Hairdryer or Heat Gun: To soften the hose and make it more pliable.
- Pliers (Slip-Joint or Hose Clamp Pliers): For gripping and twisting the hose.
- Screwdrivers (Flathead): Useful for prying if needed.
- Hose Removal Tool (Optional): A specialized tool for removing stubborn hoses.
- Utility Knife or Scissors: To carefully cut the hose if necessary.
- Lubricant (Silicone Spray or WD-40): To help loosen the hose.
- Gloves: To protect your hands and provide a better grip.
Step-by-Step Guide: Removing That Stubborn Hose

Alright, let’s get down to business. Follow these steps carefully to safely remove that old hose from your pump.
Step 1: Prepare the Area
First, make sure your pump is stable and won’t move around while you’re working on it. You might want to place it on a non-slip surface or secure it in a vise if you have one.
Step 2: Apply Heat
This is often the key to success. Use a hairdryer or heat gun to warm the hose where it connects to the pump. Keep the heat moving and don’t focus on one spot for too long to avoid melting or damaging the hose or pump. About 1-2 minutes of gentle heating should do the trick. The goal is to make the rubber more flexible.
Safety Note: If using a heat gun, be extra careful not to overheat the area. Keep the heat gun moving and maintain a safe distance.
Step 3: Apply Lubricant (Optional but Recommended)
A little lubricant can work wonders. Spray a small amount of silicone spray or WD-40 around the connection point between the hose and the pump. Let it sit for a minute or two to penetrate and loosen the bond.
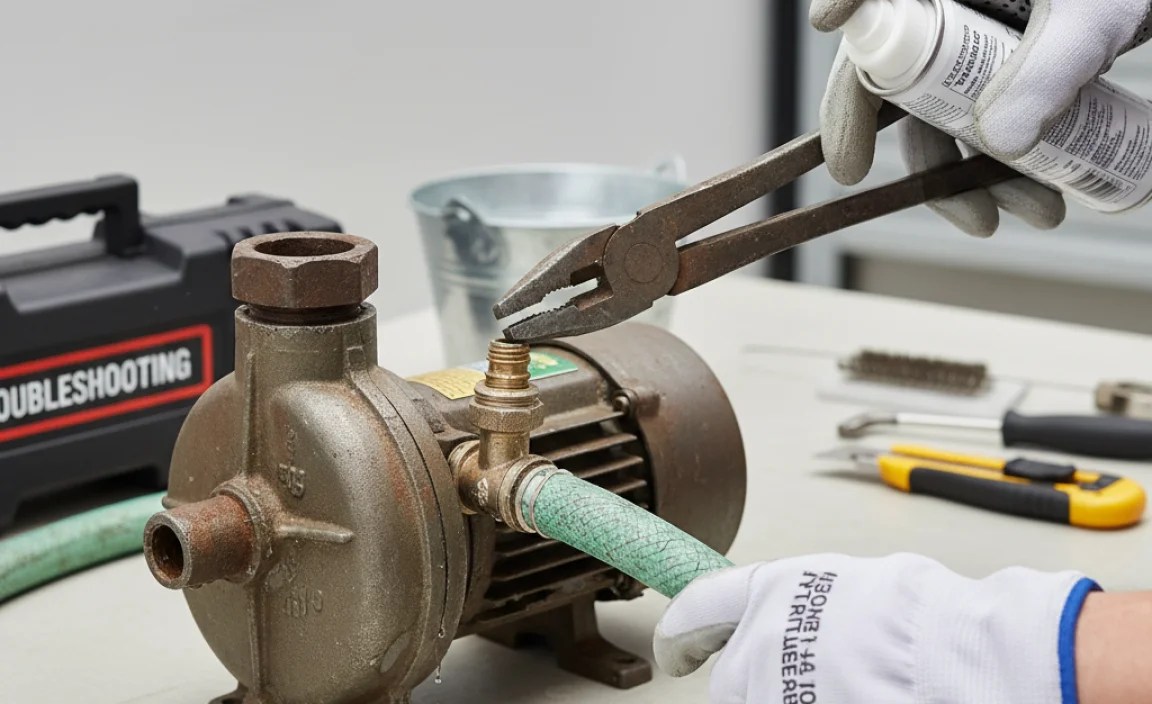
Step 4: Twist and Pull
Now, put on your gloves for a better grip. Gently twist the hose back and forth while pulling it away from the pump. Use a steady, even force. Avoid yanking or jerking, as this could damage the pump fitting.
Step 5: Use Pliers for Extra Grip
If the hose is still stuck, grab your pliers. Slip-joint pliers or hose clamp pliers work well for this. Grip the hose close to the pump fitting and gently twist and pull. Be careful not to squeeze too hard, as you don’t want to crush the hose or damage the pump.
Step 6: Try a Screwdriver for Prying (Use with Caution)
If twisting and pulling aren’t working, you can try using a flathead screwdriver to gently pry the hose away from the pump. Insert the screwdriver between the hose and the pump fitting and gently twist to create a small gap. Work your way around the hose, gradually loosening it. Be extremely careful not to scratch or damage the pump fitting.
Step 7: Consider a Hose Removal Tool
If you frequently deal with stubborn hoses, a hose removal tool can be a worthwhile investment. These tools are designed to grip the hose and provide leverage for easy removal. Simply insert the tool between the hose and the fitting, and then use the handle to push the hose off.
Step 8: Cut the Hose if Necessary (Last Resort)
If all else fails, you can carefully cut the hose off the pump. Use a utility knife or scissors to make a slit in the hose, being very careful not to cut into the pump fitting. Once you’ve made a slit, you should be able to peel the hose away from the pump.
Important: This method should only be used as a last resort, as it will obviously destroy the hose. Make sure you have a replacement hose ready before resorting to this step.
Step 9: Clean the Pump Fitting
Once you’ve removed the old hose, take a moment to clean the pump fitting. Use a clean cloth to wipe away any debris or residue. You can also use a small brush to remove any stubborn deposits.
Dealing with Different Types of Hoses

Not all hoses are created equal. Here’s how to approach different types of hoses you might encounter on your bike pump.
Rubber Hoses
These are the most common type of hose found on bike pumps. They tend to become brittle and stiff over time, making them difficult to remove. Heat and lubricant are your best friends when dealing with rubber hoses.
Plastic Hoses
Plastic hoses are more durable than rubber hoses, but they can still become stuck to the pump fitting. Heat can help soften the plastic, but be careful not to overheat it, as it can melt or deform. Lubricant can also be helpful.
Braided Hoses
Braided hoses are typically found on higher-end pumps. They’re more resistant to wear and tear, but they can still become stuck. Use the same techniques as with rubber or plastic hoses, but be extra careful not to damage the braiding.
Troubleshooting Common Problems
Sometimes, even with the best techniques, you might run into snags. Here are some common problems and how to tackle them.
Hose Won’t Budge
If the hose refuses to move, don’t force it. Apply more heat and lubricant, and let it sit for a longer period. You can also try tapping the hose lightly with a hammer to help break the bond.
Pump Fitting is Damaged
If you accidentally damage the pump fitting while removing the hose, don’t panic. In some cases, you can repair the fitting with epoxy or thread sealant. If the damage is severe, you may need to replace the entire pump head.
Hose Breaks During Removal
If the hose breaks while you’re trying to remove it, use a pick or small screwdriver to carefully remove the remaining pieces from the pump fitting. Be careful not to scratch or damage the fitting.
Preventative Maintenance
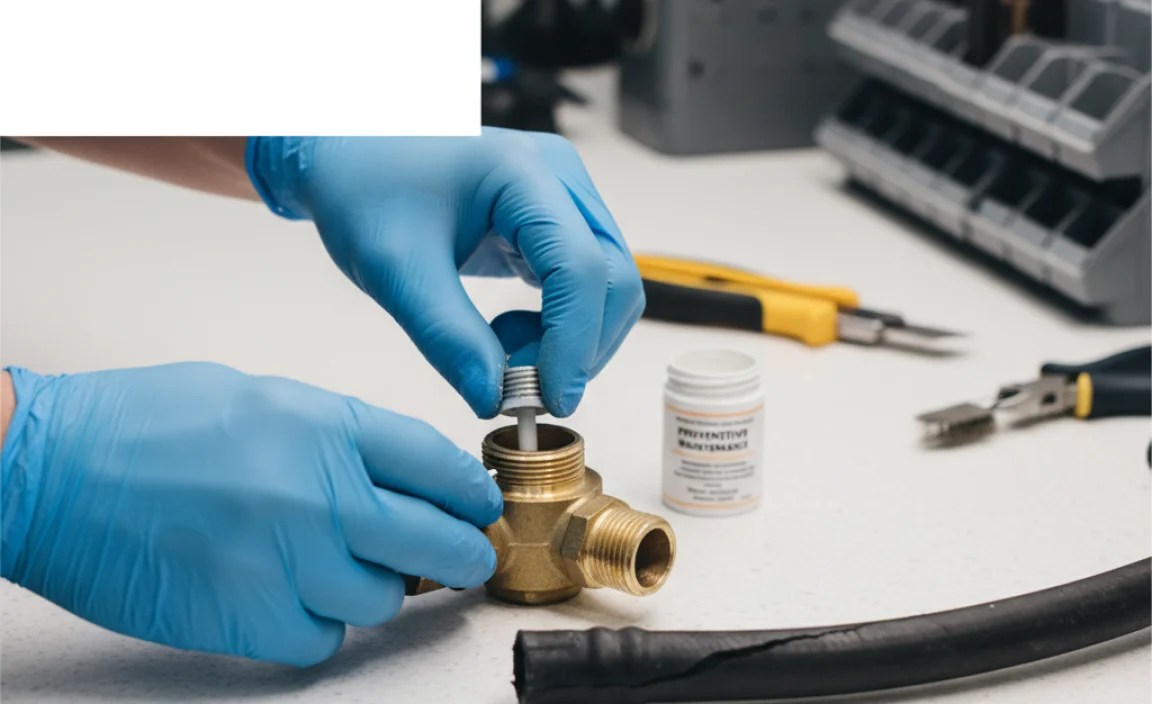
The best way to avoid struggling with stuck hoses is to practice preventative maintenance. Here are some tips to keep your hoses in good condition.
- Regularly Inspect Hoses: Check your hoses for cracks, kinks, and other signs of wear and tear. Replace them as needed.
- Lubricate Regularly: Apply a small amount of silicone spray to the hose connection points every few months to keep them from sticking.
- Store Pump Properly: Store your pump in a cool, dry place away from direct sunlight. This will help prevent the hoses from drying out and becoming brittle.
Choosing the Right Replacement Hose
When it’s time to replace your pump hose, it’s important to choose the right one. Here are some factors to consider.
- Hose Material: Choose a hose made from high-quality rubber or plastic that is resistant to wear and tear.
- Hose Length: Select a hose that is the appropriate length for your pump. A hose that is too short will be difficult to use, while a hose that is too long can get in the way.
- Hose Diameter: Make sure the hose diameter is compatible with your pump fitting.
- Hose Fittings: Choose a hose with fittings that are compatible with your pump and tire valves.
Hose Materials Comparison
| Hose Material | Pros | Cons | Typical Applications |
|---|---|---|---|
| Rubber | Flexible, inexpensive | Can dry out and crack over time | Most standard bike pumps |
| Plastic | More durable than rubber, resistant to chemicals | Can become stiff in cold weather | Some high-pressure pumps |
| Braided (Reinforced) | Very durable, resists expansion under pressure | More expensive | High-end and professional pumps |
Tools for Hose Removal: A Detailed Look
Here’s a breakdown of specialized tools that can make removing stubborn hoses easier and safer:
| Tool | Description | Pros | Cons | Best Use Case |
|---|---|---|---|---|
| Hose Removal Pliers | Pliers with specialized jaws designed to grip hoses without damaging them. | Provides a firm, even grip; reduces the risk of damage. | Can be bulky; may not fit in tight spaces. | Removing hoses from tight engine compartments or delicate fittings. |
| Hose Pick Set | A set of small, angled picks used to separate the hose from the fitting. | Precise; allows for careful separation; good for tight spaces. | Requires patience; can be easy to damage the hose if not careful. | Separating small vacuum hoses or fuel lines. |
| Hose Cutter | A specialized cutting tool designed to slice through hoses cleanly. | Provides a clean, straight cut; reduces fraying. | Only useful for cutting; not for removal. | Cutting hoses to length during installation or replacement. |
| Hose Removal Tool (Universal) | A tool with a forked end designed to slide between the hose and fitting to break the seal. | Easy to use; reduces the risk of damage to fittings. | May not work on very tightly stuck hoses; can be less effective on larger hoses. | General hose removal on various applications. |
The Importance of Regular Bike Pump Maintenance
Maintaining your bike pump isn’t just about dealing with stuck hoses; it’s about ensuring your pump works reliably whenever you need it. Regular maintenance can extend the life of your pump and save you from frustrating situations on the road or trail.
- Consistent Performance: A well-maintained pump delivers consistent pressure, making inflating tires easier and more accurate.
- Longevity: Regular cleaning and lubrication prevent wear and tear, extending the life of your pump.
- Prevents Failures: Addressing minor issues early can prevent major breakdowns, ensuring your pump is always ready when you need it.
- Saves Money: By maintaining your pump, you avoid the cost of frequent replacements.
FAQ: Removing Old Hoses From Pumps
Why is my hose so hard to remove?
Over time, the hose material can bond to the pump fitting due to heat, pressure, and environmental factors. The rubber or plastic can become less flexible, making it difficult to remove.
Can I use any lubricant to help remove the hose?
It’s best to use a silicone-based lubricant or WD-40, as these won’t damage the rubber or plastic. Avoid using petroleum-based lubricants, as they can degrade the hose material.
What if I damage the pump fitting while removing the hose?
If the damage is minor, you might be able to repair it with epoxy or thread sealant. However, if the damage is severe, you may need to replace the entire pump head or even the entire pump.
How often should I replace my pump hose?
It depends on how frequently you use your pump and the conditions it’s exposed to. As a general rule, inspect your hose regularly and replace it if you see any signs of wear and tear, such as cracks, kinks, or brittleness.
Is it worth buying a hose removal tool?
If you frequently deal with stubborn hoses, a hose removal tool can be a worthwhile investment. It will make the job easier and reduce the risk of damaging the hose or pump.
What’s the best way to store my bike pump to prevent hoses from sticking?
Store your pump in a cool, dry place away from direct sunlight. This will help prevent the hoses from drying out and becoming brittle. You can also apply a small amount of silicone spray to the hose connection points every few months to keep them from sticking.
Can I use boiling water instead of a heat gun?
Yes, you can use boiling water to soften the hose. Submerge the end of the hose in boiling water for a minute or two before attempting to remove it. Be careful not to burn yourself.
Conclusion
Removing an old hose from a pump doesn’t have to be a frustrating experience. With the right tools and techniques, you can safely and easily remove even the most stubborn hoses. Remember to be patient, use heat and lubricant, and avoid forcing anything. Regular maintenance and proper storage will also help prevent hoses from sticking in the first place. Now that you’re armed with this knowledge, go forth and conquer those stubborn hoses! And as always, happy pumping from your friend, Raymond Ammons at BicyclePumper.com!


