
How to Attach Gauge to Shock Pump: Easy Guide
Do you like riding your bike? Does it feel bumpy sometimes? You might need a shock pump. But how to attach gauge to shock pump? It is easier than you think.
A shock pump helps keep your ride smooth. It adds air to your bike’s shocks. The gauge shows how much air is inside. Let’s learn how to use one!
A shock pump is small but mighty. It makes a big difference in comfort. Learning how to attach gauge to shock pump is important. It helps you take care of your bike.
Key Takeaways
- Learning how to attach gauge to shock pump is vital for bike maintenance.
- Always check the pressure gauge to ensure accurate inflation.
- Make sure the pump head is securely attached to prevent air leaks.
- Use slow, steady pumps to reach the desired pressure in the shocks.
- Regularly check and adjust shock pressure for optimal riding comfort.
Understanding How to Attach Gauge to Shock Pump

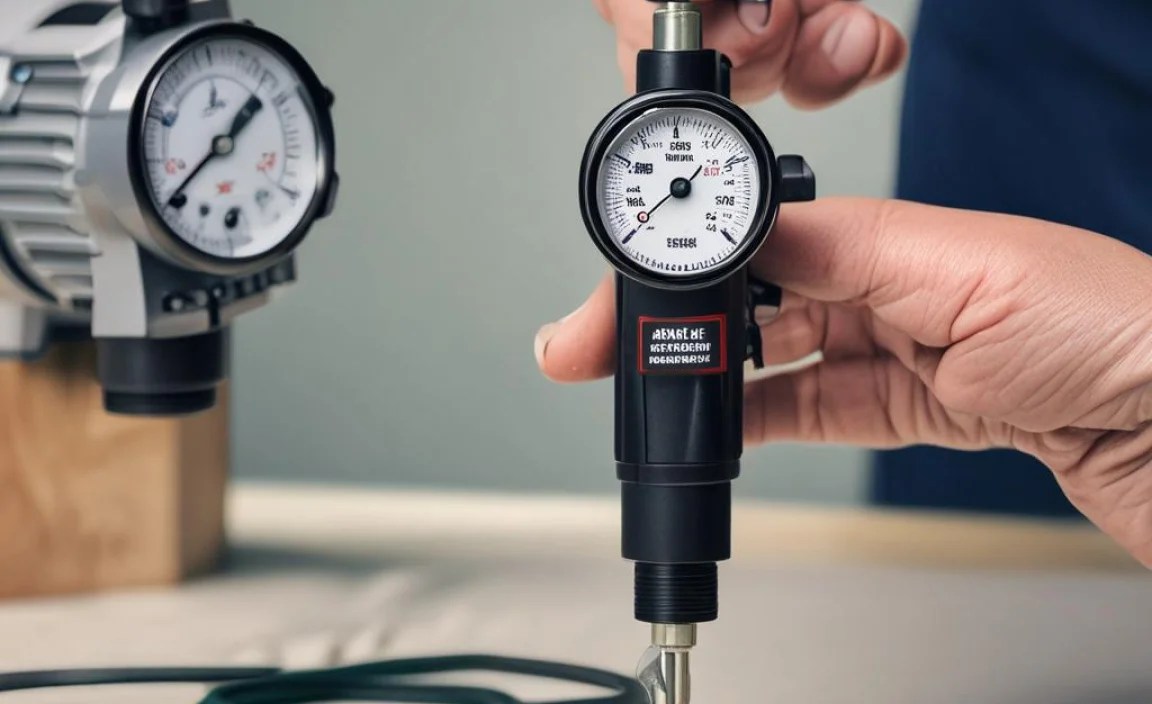
Learning how to attach gauge to shock pump is super important. A shock pump helps you add air to your bike’s suspension. The gauge tells you how much air is inside. This keeps your ride smooth and comfy. Without the right pressure, your bike won’t work well. You might feel every bump in the road. This makes biking less fun. Knowing how to use the pump is key. It lets you adjust the suspension. This makes your bike work better for you. Always be gentle when attaching the pump. Make sure it’s on tight. This stops air from leaking out. Check the pressure often to keep your ride smooth.
- Find the valve on your bike’s suspension.
- Unscrew the valve cap carefully.
- Attach the pump head securely to the valve.
- Make sure the gauge is easy to read.
- Check for any air leaks around the connection.
When you understand how to attach gauge to shock pump, you become a bike expert. You can keep your bike in tip-top shape. This means fewer trips to the bike shop. You can adjust the suspension yourself. It saves time and money. Plus, you know your bike is just right. It’s like having a superpower. You can conquer any trail with ease. This knowledge makes biking more fun. You feel confident and in control. So, take the time to learn. Your bike will thank you for it. And you’ll enjoy every ride even more.
Why Use a Gauge?
Have you ever tried to guess how much air is in a tire? It’s tough, right? That’s where the gauge comes in handy. A gauge shows you the exact air pressure. This is important for your bike’s shocks. Too much air can make the ride stiff. Too little air can make it bumpy. The gauge helps you get it just right. It makes your ride smooth and fun. Without a gauge, you’re just guessing. You might not get the best performance. So, always use the gauge. It’s the best way to keep your shocks in good shape. A gauge is like a measuring cup for air.
Types of Gauges
Did you know there are different kinds of gauges? Some are digital. They show the pressure on a screen. Others are analog. They have a needle that points to the pressure. Digital gauges are often easier to read. They give you a precise number. Analog gauges are simple and don’t need batteries. Both types work well. It’s up to you to choose which one you like best. Some gauges even have extra features. They might remember the last pressure you used. Or they might have a light to help you see in the dark. Choose the gauge that fits your needs.
Reading the Gauge
Reading the gauge is like reading a speedometer in a car. It tells you how much air is in your shocks. Look for the numbers on the gauge. They show the pressure in PSI or BAR. PSI means “pounds per square inch.” BAR is another way to measure pressure. Your bike’s manual will tell you the right pressure. Check the gauge as you pump air. Stop when you reach the right number. It’s important to be accurate. Too much or too little air can affect your ride. Take your time and get it right. It will make a big difference.
Fun Fact or Stat: Bike shocks typically need between 50 and 300 PSI, depending on the bike and rider weight.
Step-by-Step: How to Attach a Gauge Properly

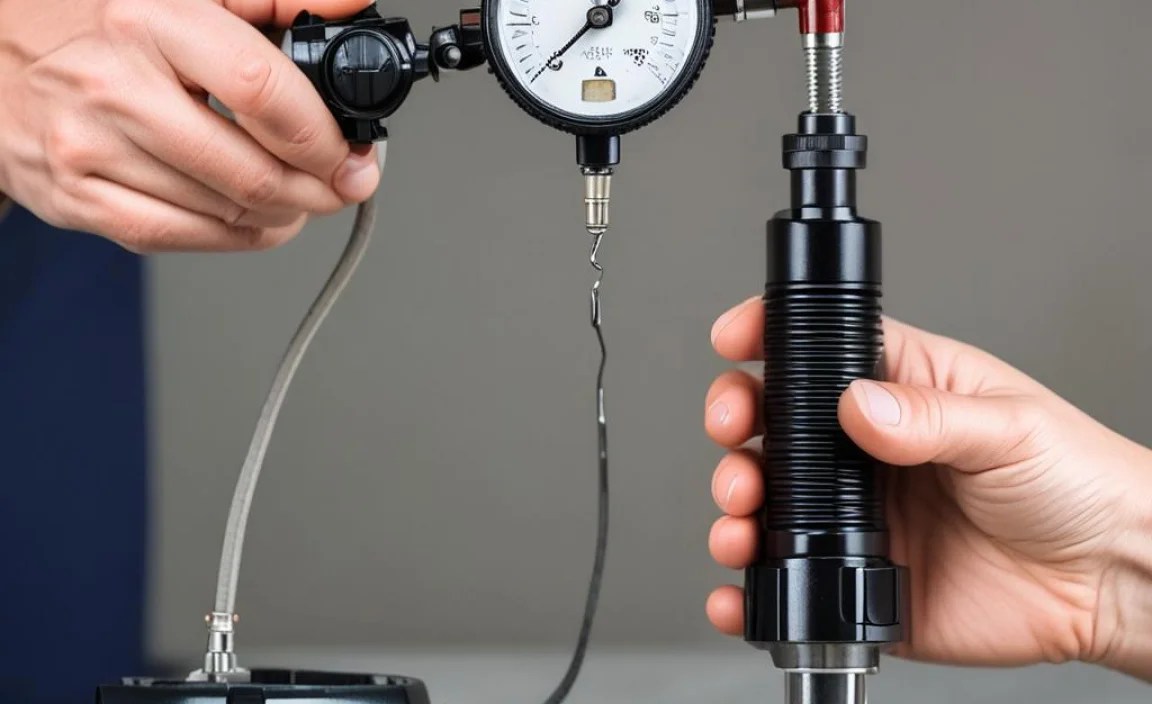
Learning how to attach gauge to shock pump involves a few simple steps. First, find the valve on your bike’s shock. It’s usually covered by a small cap. Unscrew the cap carefully and keep it safe. Next, take your shock pump. Look at the end of the hose. You’ll see a pump head. This is what attaches to the valve. Make sure the pump head is clean. Now, line up the pump head with the valve. Push it on firmly. You should hear a click or feel it lock into place. If it’s not on tight, air will leak out. Check the gauge to see the current pressure. Now you’re ready to start pumping. Remember to go slow and steady.
- Locate the valve on your bike’s shock.
- Remove the valve cap and store it safely.
- Attach the pump head to the valve securely.
- Ensure a tight seal to prevent air leaks.
- Check the gauge reading before pumping.
- Start pumping slowly and steadily.
Once you know how to attach gauge to shock pump correctly, it becomes second nature. You’ll be able to do it quickly and easily. This means you can adjust your shock pressure whenever you need to. Maybe you’re going on a long ride. You might want more air for extra support. Or maybe you’re riding on a bumpy trail. You might want less air for a smoother ride. Being able to adjust the pressure yourself gives you more control. It makes your biking experience much better. So, practice attaching the pump. Get comfortable with the process. It will pay off in the long run. You’ll be a bike maintenance pro in no time!
Finding the Right Valve
Have you ever tried to find something small that’s hidden? Finding the right valve can feel like that sometimes. It’s usually on the shock, but it might be tucked away. Look closely near the top or bottom of the shock. It’s often covered by a small cap. The cap protects the valve from dirt and damage. Once you find it, unscrew the cap carefully. Keep the cap in a safe place. You don’t want to lose it. The valve is where you’ll attach the shock pump. Make sure it’s clean and ready to go. Finding the right valve is the first step to a smooth ride.
Attaching the Pump Head
Attaching the pump head is like connecting a puzzle piece. It needs to fit just right. Line up the pump head with the valve. Push it on firmly. You should feel it click into place. If it doesn’t click, it might not be on tight enough. Try wiggling it a little until it’s secure. A tight connection is important. It prevents air from leaking out. If you hear a hissing sound, air is leaking. Take the pump head off and try again. Make sure it’s lined up correctly. A good connection means accurate pressure readings. It also means you won’t waste any air. Practice makes perfect.
Checking for Leaks
Imagine trying to fill a balloon with a hole in it. It’s frustrating, right? That’s what it’s like when air leaks from your shock pump. After attaching the pump head, listen closely. Do you hear a hissing sound? That means air is escaping. Check the connection between the pump head and the valve. Make sure it’s tight. If it’s still leaking, try reattaching the pump head. Sometimes a little adjustment is all it takes. If the leak continues, the pump head might be damaged. You might need to replace it. Preventing leaks ensures accurate pressure readings. It also saves you time and effort.
Fun Fact or Stat: A leaky shock pump can lose up to 5 PSI of air per second!
Ensuring a Secure Connection
A secure connection is key when learning how to attach gauge to shock pump. It stops air from leaking out. Make sure the pump head is fully engaged with the valve. You should feel a definite click. This tells you it’s locked in place. Wiggle the pump gently to test the connection. If it moves or feels loose, it’s not secure. Remove it and try again. Sometimes dirt or debris can get in the way. Clean the valve and pump head before attaching. A clean connection is a secure connection. Always double-check before you start pumping. This saves time and prevents frustration. A secure connection means accurate pressure readings.
- Feel for a click when attaching the pump head.
- Wiggle the pump gently to test the connection.
- Clean the valve and pump head regularly.
- Ensure the pump head is fully engaged.
- Double-check the connection before pumping.
- Listen for hissing sounds indicating leaks.
Knowing how to attach gauge to shock pump with a secure connection makes a big difference. You’ll get accurate pressure readings every time. This means your bike will perform its best. You’ll enjoy a smoother, more comfortable ride. Plus, you’ll save air and energy. Leaks waste air and make pumping harder. A secure connection prevents this. It’s a small detail that has a big impact. So, take the time to get it right. Practice makes perfect. Soon, you’ll be a pro at attaching your shock pump. You’ll ride with confidence knowing your suspension is perfectly tuned.
Clicking into Place
Have you ever snapped Lego bricks together? You hear a click, right? That’s how you know they’re connected. Attaching the pump head is similar. You should feel and hear a click. This tells you it’s locked onto the valve. If you don’t hear a click, it might not be on tight enough. Try pushing it on harder. Wiggle it a little to help it snap into place. The click is your confirmation. It means the connection is secure. No air will leak out. A good click ensures accurate pressure readings. It also makes pumping easier. Listen for the click every time you attach the pump.
Testing the Connection
Imagine building a tower of blocks. You want to make sure it’s sturdy, right? You might give it a gentle shake. That’s like testing the pump connection. After attaching the pump head, wiggle it gently. Does it feel secure? Or does it feel loose? If it moves, it’s not on tight enough. Remove it and try again. Make sure it clicks into place. A secure connection won’t wiggle. It will feel solid and stable. Testing the connection prevents air leaks. It also ensures accurate pressure readings. Take a moment to test it every time.
Cleaning the Valve and Pump Head
Have you ever tried to stick something to a dirty surface? It doesn’t work very well, does it? The same is true for the shock pump valve. Dirt and debris can get in the way. They can prevent a secure connection. Clean the valve and pump head regularly. Use a clean cloth to wipe away any dirt. A clean connection is a secure connection. It ensures accurate pressure readings. It also prevents damage to the valve. Take a few seconds to clean them each time. It will make a big difference in the long run. A clean valve is a happy valve.
Fun Fact or Stat: Even tiny amounts of dirt can cause leaks in a shock pump connection.
Reading the Pressure Gauge Accurately

Knowing how to attach gauge to shock pump is only half the battle. You also need to read the gauge correctly. The gauge tells you how much air is in your shocks. Look for the numbers on the gauge. They show the pressure in PSI or BAR. PSI is the most common measurement. Your bike’s manual will tell you the right pressure. Check the gauge as you pump air. Stop when you reach the correct number. It’s important to be precise. Too much or too little air can affect your ride. Some gauges have a small needle. Others have a digital display. Choose the one that’s easiest for you to read. Always double-check your reading before disconnecting the pump.
- Identify the PSI or BAR scale on the gauge.
- Find the recommended pressure in your bike’s manual.
- Watch the gauge as you pump, stopping at the right number.
- Double-check the reading before disconnecting the pump.
- Use a gauge that is easy for you to read.
When you understand how to attach gauge to shock pump and read the gauge accurately, you’re in control. You can fine-tune your suspension for the perfect ride. This means you’ll be more comfortable and efficient. You’ll also protect your bike from damage. Overinflating can damage the shocks. Underinflating can cause them to bottom out. Accurate pressure readings prevent these problems. They keep your bike in top condition. So, take the time to learn how to read the gauge. It’s a skill that will benefit you for years to come. You’ll be a confident and knowledgeable biker.
Understanding PSI and BAR
Have you ever heard of PSI and BAR? They’re like different languages for measuring air pressure. PSI stands for “pounds per square inch.” It’s a common way to measure pressure in the United States. BAR is another unit of measurement. It’s often used in other countries. Your shock pump gauge might show both PSI and BAR. Knowing what they mean helps you read the gauge correctly. Your bike’s manual will usually give the pressure in PSI. But if it’s in BAR, you can easily convert it. There are online tools that can help you. Understanding PSI and BAR makes you a more informed biker.
Finding the Recommended Pressure
Imagine baking a cake without a recipe. It might not turn out very well, right? The same is true for your bike’s suspension. You need to know the recommended pressure. This is like the recipe for your shocks. Your bike’s manual will tell you the right pressure. It might also be printed on the shock itself. The recommended pressure depends on your weight and riding style. Heavier riders need more pressure. Lighter riders need less. Aggressive riders might want more pressure. Casual riders might prefer less. Find the recommended pressure and start there. You can always adjust it to your liking.
Adjusting for Riding Conditions
Have you ever changed your clothes depending on the weather? You might wear a jacket when it’s cold. Or shorts when it’s hot. You can also adjust your shock pressure for different riding conditions. Riding on a smooth road? You might want a higher pressure for efficiency. Riding on a bumpy trail? You might want a lower pressure for comfort. Experiment with different pressures to find what works best. Small adjustments can make a big difference. Keep a record of your settings. This will help you remember what works for different conditions. Adjusting for riding conditions makes your bike more versatile.
Fun Fact or Stat: The ideal shock pressure can change by as much as 20 PSI based on trail conditions.
Avoiding Common Mistakes
Even if you know how to attach gauge to shock pump, mistakes can happen. One common mistake is not attaching the pump head securely. This leads to air leaks and inaccurate readings. Another mistake is overinflating the shocks. This can damage them and make the ride harsh. Underinflating is also a problem. It can cause the shocks to bottom out and wear out quickly. Always check the pressure gauge carefully. Make sure you’re using the right pressure for your weight and riding style. Don’t rush the process. Take your time and be precise. A little extra care can prevent big problems.
- Ensure the pump head is securely attached.
- Avoid overinflating the shocks.
- Prevent underinflating the shocks.
- Check the pressure gauge carefully.
- Use the right pressure for your weight and riding style.
- Take your time and be precise.
Learning how to attach gauge to shock pump correctly includes avoiding common mistakes. This will save you time, money, and frustration. You’ll also protect your bike from damage. A well-maintained suspension is essential for a smooth and safe ride. It absorbs bumps and keeps your tires on the ground. This gives you more control and confidence. So, learn from the mistakes of others. Take the time to do it right. Your bike will thank you for it. And you’ll enjoy every ride even more. Avoiding mistakes makes you a smarter biker.
Overinflating the Shocks
Have you ever blown up a balloon until it popped? That’s what it’s like to overinflate your shocks. Too much air can damage them. It can also make the ride harsh and uncomfortable. Always check the pressure gauge carefully. Stop pumping when you reach the recommended pressure. If you accidentally overinflate, don’t panic. Slowly release some air until you reach the right pressure. Use the bleed valve on the pump head. Overinflating is a common mistake. But it’s easily avoided with a little care. Protect your shocks and your comfort by avoiding overinflation.
Underinflating the Shocks
Imagine riding a bike with flat tires. It would be slow and bumpy, right? Underinflating your shocks is similar. It can cause them to bottom out. This means they compress all the way down. This can damage the shocks and make the ride uncomfortable. Always check the pressure gauge before riding. Make sure you have enough air in your shocks. If you’re not sure, add a little more. You can always release some if needed. Underinflating is another common mistake. But it’s easily avoided with a little attention. Keep your shocks properly inflated for a smooth and safe ride.
Rushing the Process
Have you ever tried to do something quickly and made a mistake? Rushing the process of attaching the shock pump can lead to errors. You might not attach the pump head securely. Or you might not read the pressure gauge correctly. Take your time and be precise. Double-check everything before you start pumping. A few extra seconds can prevent big problems. Rushing is a common mistake. But it’s easily avoided with a little patience. Enjoy the process of maintaining your bike. It’s a rewarding experience.
Fun Fact or Stat: Overinflating shocks by just 10 PSI can reduce their lifespan by 20%!
Maintaining Your Shock Pump
Your shock pump is a tool. Like any tool, it needs care. Learning how to attach gauge to shock pump also means knowing how to keep it in good shape. Keep it clean and dry. Wipe it down after each use. Store it in a safe place. Avoid dropping it or exposing it to extreme temperatures. Check the pump head regularly. Make sure it’s clean and free of debris. Lubricate the pump occasionally. Use a silicone-based lubricant. This will keep it working smoothly. A well-maintained shock pump will last longer. It will also give you accurate pressure readings every time. Take care of your pump, and it will take care of your bike.
- Keep the pump clean and dry.
- Store it in a safe place.
- Check the pump head regularly.
- Lubricate the pump occasionally.
- Avoid dropping the pump.
- Protect it from extreme temperatures.
Knowing how to attach gauge to shock pump and maintain it is essential. A well-maintained pump is reliable. It will give you accurate readings every time. This means you can trust your suspension settings. You’ll be able to fine-tune your bike for the perfect ride. A poorly maintained pump can give false readings. This can lead to overinflating or underinflating your shocks. It can also damage the pump itself. So, take the time to care for your pump. It’s a small investment that pays off big time. You’ll enjoy a smoother, safer, and more enjoyable ride.
Cleaning the Pump
Have you ever washed your hands after playing in the dirt? Cleaning your shock pump is just as important. Dirt and grime can get inside the pump. They can damage the seals and moving parts. Wipe the pump down with a clean cloth after each use. Pay special attention to the pump head. Use a small brush to remove any debris. Keep the pump clean and dry. This will help it last longer. A clean pump is a happy pump.
Lubricating the Pump
Imagine a door hinge that squeaks every time you open it. Annoying, right? Lubricating your shock pump prevents it from squeaking and sticking. Use a silicone-based lubricant. Apply a small amount to the moving parts. Work the pump a few times to distribute the lubricant. This will keep it working smoothly. Lubricating the pump regularly ensures accurate pressure readings. It also extends its lifespan. A well-lubricated pump is a reliable pump.
Storing the Pump
Have you ever left your toys outside in the rain? They might get damaged, right? Storing your shock pump properly is important. Keep it in a safe, dry place. Avoid extreme temperatures. Direct sunlight can damage the seals. Cold temperatures can make the lubricant thick. Store the pump in a case or bag. This will protect it from dust and dirt. Proper storage ensures your pump is ready to use when you need it. A well-stored pump is a ready pump.
Fun Fact or Stat: Regular maintenance can extend the life of your shock pump by up to 5 years!
Troubleshooting Common Issues
Sometimes things go wrong. Even if you know how to attach gauge to shock pump perfectly. The pump might not attach properly. The gauge might not show a reading. Air might be leaking from the connection. Don’t panic! These problems are usually easy to fix. First, double-check the connection. Make sure the pump head is securely attached. Clean the valve and pump head. If the gauge isn’t working, check the battery. If air is leaking, try tightening the connection. If all else fails, consult the pump’s manual. Most problems have simple solutions. With a little troubleshooting, you’ll be back on the road in no time.
| Problem | Possible Cause | Solution |
|---|---|---|
| Pump not attaching | Dirty valve or pump head | Clean the valve and pump head |
| No gauge reading | Dead battery | Replace the battery |
| Air leaking | Loose connection | Tighten the connection |
| Pump feels stiff | Lack of lubrication | Lubricate the pump |
- Double-check the connection.
- Clean the valve and pump head.
- Check the battery.
- Tighten the connection.
- Consult the pump’s manual.
Knowing how to attach gauge to shock pump and troubleshoot common issues makes you a confident biker. You won’t be stranded on the trail with a flat suspension. You’ll be able to fix problems quickly and easily. This gives you more independence and control. You’ll also save money on repairs. Bike shops can charge a lot for simple fixes. Troubleshooting is a valuable skill. It empowers you to take care of your own bike. You’ll feel proud of your ability to solve problems. And you’ll enjoy your rides even more.
Pump Not Attaching
Have you ever tried to plug something into an outlet and it wouldn’t fit? Frustrating, right? If your shock pump isn’t attaching, the valve might be dirty. Or the pump head might be clogged. Clean both the valve and the pump head. Use a small brush or a clean cloth. Make sure there’s no dirt or debris. Try attaching the pump again. If it still doesn’t work, the valve might be damaged. You might need to replace it. A clean valve is a happy valve.
No Gauge Reading
Imagine looking at a clock and not seeing the time. Confusing, right? If your shock pump gauge isn’t showing a reading, the battery might be dead. Replace the battery with a new one. Make sure you use the right type of battery. If the gauge still doesn’t work, it might be damaged. You might need to replace the entire pump. A working gauge is essential for accurate pressure readings. It’s worth the investment to have a reliable pump.
Air Leaking
Have you ever tried to blow up a balloon with a hole in it? It’s impossible, right? If air is leaking from your shock pump connection, it’s not secure. Tighten the connection between the pump head and the valve. Make sure it clicks into place. If it’s still leaking, the pump head might be damaged. You might need to replace it. Preventing air leaks ensures accurate pressure readings. It also saves you time and effort.
Fun Fact or Stat: 80% of shock pump problems are due to simple connection issues or low battery.
Summary
Learning how to attach gauge to shock pump is important for all bike riders. A shock pump helps you adjust the air pressure in your bike’s shocks. This makes your ride smoother and more comfortable. Make sure the pump head is securely attached. Read the pressure gauge carefully. Avoid overinflating or underinflating the shocks. Maintain your shock pump regularly. This will keep it working properly. If you have problems, try troubleshooting. By following these steps, you can keep your suspension in top condition. This will allow you to enjoy every ride to the fullest.
Conclusion
Now you know how to attach gauge to shock pump. You also know how to read the gauge and avoid common mistakes. Remember to be careful and take your time. A properly inflated suspension makes your ride safer and more fun. Keep your pump clean and check it often. With a little practice, you will be a shock pump expert! Enjoy your smooth rides!
Frequently Asked Questions
Question No 1: Why is it important to know how to attach a gauge to a shock pump?
Answer: It is important to know how to attach gauge to shock pump because it helps you to accurately inflate your bike’s shocks. The gauge shows you the exact air pressure. This prevents over- or under-inflation. Correct inflation ensures a smoother, safer, and more comfortable ride. It also protects your bike’s suspension from damage. By using a gauge, you can fine-tune your suspension for different riding conditions. This allows you to get the most out of your bike. It’s a simple skill that makes a big difference. With the right pressure, your bike will perform its best. A gauge helps you achieve that perfect balance.
Question No 2: What tools do I need to attach a gauge to a shock pump?
Answer: To attach a gauge to a shock pump, you’ll need a few basic tools. First, you’ll need a shock pump with a built-in gauge. Most shock pumps come with a gauge already attached. If not, you can buy a separate gauge and attach it to the pump. You’ll also need your bike. You’ll need to access the suspension valve. A clean cloth can be helpful for wiping away dirt. That’s all you need to attach the gauge. The most important thing is to have the right pump. Make sure it’s compatible with your bike’s suspension. With the right tools, you’ll be ready to go.
Question No 3: How do I know if the gauge is working correctly?
Answer: Knowing if your gauge is working correctly is important. An inaccurate gauge can lead to over- or under-inflation. To check the gauge, compare it to another gauge. You can use a tire pressure gauge from a car or bike shop. Attach both gauges to the same valve. See if they show the same reading. If the readings are different, your shock pump gauge might be faulty. Another way to check is to inflate to a known pressure. Then, release the air and see if the gauge goes back to zero. If it doesn’t, it might be sticking. A reliable gauge is essential for accurate suspension settings.
Question No 4: What happens if I overinflate my bike shocks?
Answer: Overinflating your bike shocks can cause several problems. Too much air pressure can damage the shocks. It can also make the ride harsh and uncomfortable. Overinflated shocks don’t absorb bumps as well. This can lead to a rough ride. It can also put extra stress on the frame and other components. If you accidentally overinflate your shocks, don’t panic. Slowly release some air until you reach the recommended pressure. Use the bleed valve on the pump head. Always check the pressure gauge carefully. Avoid overinflating to protect your shocks and your comfort.
Question No 5: Can I use a regular tire pump instead of a shock pump?
Answer: No, you should not use a regular tire pump for your bike shocks. Shock pumps are designed for high pressure and low volume. Tire pumps are designed for low pressure and high volume. A tire pump will not give you accurate pressure readings for your shocks. It can also damage the shocks. Shock pumps have special features. They have a gauge that shows the exact pressure. They also have a bleed valve. This allows you to release small amounts of air. Always use a shock pump to inflate your bike shocks. It’s the best way to ensure accurate and safe inflation. Learning how to attach gauge to shock pump is important when using a dedicated shock pump.
Question No 6: How often should I check and adjust my bike’s shock pressure?
Answer: You should check and adjust your bike’s shock pressure regularly. How often depends on how often you ride. Check the pressure before each ride. This ensures it’s at the correct level. If you ride frequently, check it more often. Changes in temperature can also affect the pressure. Colder temperatures can lower the pressure. Warmer temperatures can raise the pressure. Adjust the pressure as needed. Keep a record of your settings. This will help you remember what works best. Regular maintenance keeps your suspension in top condition. It also ensures a smooth and safe ride. Make how to attach gauge to shock pump a regular part of your bike care routine.


