
Bicycle Floor Pump Replacement Head: Easy Fix!
Have you ever tried to pump up your bike tires? Did your pump head break? It can be super frustrating. A broken pump head means flat tires. No one wants that! A good bicycle floor pump replacement head can save the day. It gets you back on your bike fast.
Sometimes, parts wear out. This happens even with the best pumps. Knowing about replacement heads is important. They keep your bike rides smooth. Let’s learn more about them!
Key Takeaways
- A quality bicycle floor pump replacement head restores your pump’s function quickly.
- Different valve types (Presta, Schrader) need compatible pump heads.
- Look for durable materials like metal or reinforced plastics.
- Proper installation ensures an airtight seal for efficient inflation.
- Regular maintenance prevents wear and tear on your pump head.
Understanding Bicycle Floor Pump Replacement Heads

Have you ever wondered why your bike tires lose air? Sometimes, it’s not the tire itself. The problem could be your bicycle floor pump replacement head. This small part is super important. It connects the pump to your tire valve. Over time, it can wear out or break. This leads to air leaks and frustration. A good replacement head makes pumping easy again. It creates a tight seal. This lets you inflate your tires quickly. Choosing the right one is key. You need to know your valve type. Presta and Schrader are the most common. Make sure the replacement head matches your valve. This ensures a perfect fit and easy pumping.
- Pump heads connect the pump to the tire valve.
- They can wear out over time.
- Air leaks mean you need a replacement.
- Choose the right head for your valve type.
- A good fit makes pumping easier.
Think of your pump head as a key. It unlocks the air in your pump. It sends it into your tire. When the key is broken, it doesn’t work well. A damaged pump head can make pumping hard. It might even damage your tire valve. Replacing it is often cheaper than buying a new pump. Plus, it’s better for the planet. You are fixing something instead of throwing it away. A new bicycle floor pump replacement head is a simple fix. It keeps your bike rolling smoothly. It’s a small part with a big impact.
Fun Fact or Stat: Did you know that a worn-out pump head can decrease pumping efficiency by up to 50%?
Why Pump Heads Wear Out
Why do these pump heads break anyway? Well, think about how often you use them. Every time you pump your tires, the head gets a little wear. The rubber seals inside can dry out and crack. The plastic parts can become brittle. Sometimes, you might accidentally bend or damage the head. This happens when you’re in a hurry. Over time, these small damages add up. The pump head starts to leak air. It becomes harder to get your tires fully inflated. Regular use and exposure to sun can speed up this process. Using the wrong type of pump head can also cause problems. Forcing it onto the valve can damage both the head and the valve.
Signs You Need a Replacement
How do you know when it’s time for a new pump head? There are some clear signs. First, check for air leaks. If you hear air escaping around the valve, the head might be bad. Another sign is difficulty attaching the head. If it doesn’t grip the valve tightly, it won’t work well. Also, look for cracks or damage on the head itself. If you see any, it’s time to replace it. Sometimes, the lever that locks the head in place breaks. This makes it impossible to pump effectively. Ignoring these signs can lead to flat tires. So, pay attention to your pump head and replace it when needed.
Extending the Life of Your Pump Head
Can you make your pump head last longer? Yes, you can! First, store your pump in a cool, dry place. This prevents the rubber seals from drying out. Also, be gentle when attaching and removing the head. Avoid forcing it onto the valve. If it doesn’t fit easily, check that you have the right type. Regularly clean the pump head with a damp cloth. This removes dirt and grime that can cause wear. You can also lubricate the seals with a silicone-based lubricant. This keeps them flexible and prevents cracking. These simple steps can extend the life of your pump head. They will also save you money in the long run.
Choosing the Right Replacement Head
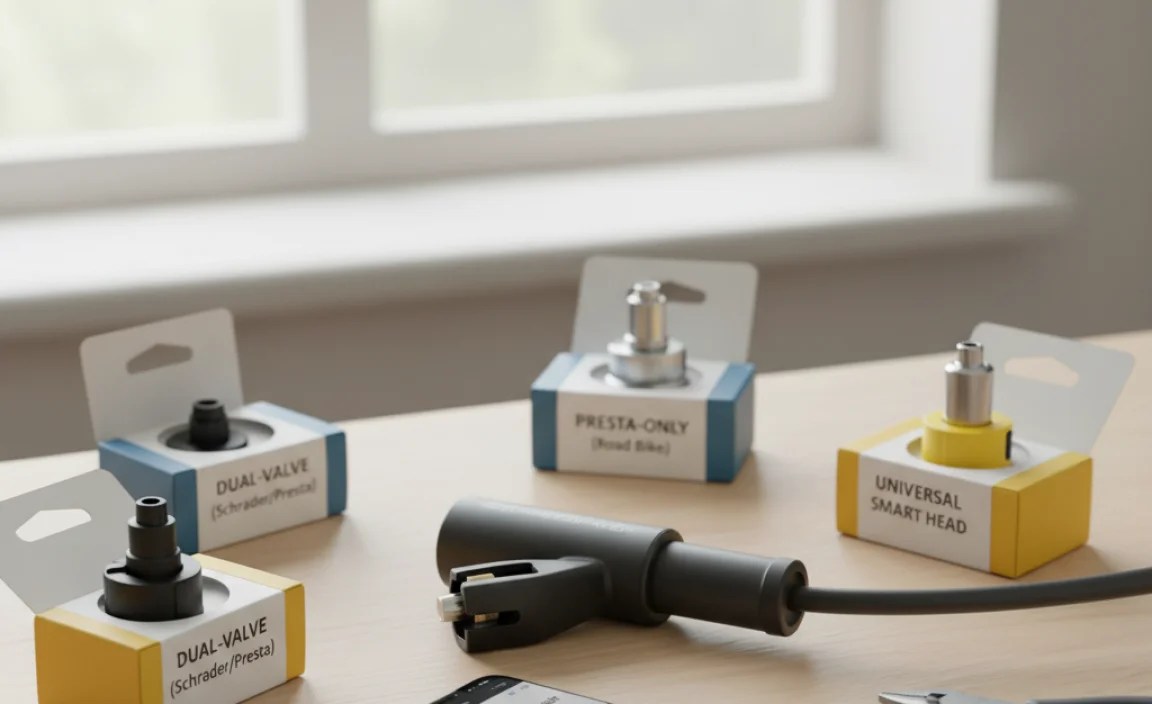
Choosing the right bicycle floor pump replacement head can feel tricky. There are many options. How do you pick the best one? First, know your valve type. Bikes use either Presta or Schrader valves. Presta valves are thin and have a small nut at the top. Schrader valves are wider, like car tires. Make sure the replacement head matches your valve type. Some heads work with both types. These are called dual-head pumps. Next, consider the material. Metal heads are durable but can be more expensive. Plastic heads are lighter and cheaper. Look for reinforced plastics for better strength. Read reviews to see what other cyclists recommend. This helps you find a reliable replacement head. A good choice will make pumping easy and efficient.
- Know your valve type: Presta or Schrader.
- Dual-head pumps work with both valve types.
- Metal heads are strong; plastic heads are light.
- Read reviews to find reliable options.
- Choose a head that makes pumping easy.
Imagine you’re baking a cake. You need the right ingredients for it to turn out well. Choosing a pump head is similar. The right one makes all the difference. A mismatched head can damage your valve. It can also make pumping very difficult. It’s like trying to use the wrong key for a lock. It just won’t work! Take the time to find the right bicycle floor pump replacement head. It will save you time and frustration. It will also keep your tires properly inflated. This makes your bike rides safer and more enjoyable.
Fun Fact or Stat: Approximately 70% of road bikes use Presta valves, while most mountain bikes and hybrid bikes use Schrader valves.
Presta vs. Schrader Compatibility
Why is it so important to match the pump head to the valve? Presta and Schrader valves are different. Presta valves are designed for high-pressure tires. They need a smaller, more precise pump head. Schrader valves are simpler and more common. They need a wider opening in the pump head. Trying to use a Presta head on a Schrader valve won’t work. The connection won’t be tight. Air will leak out. The same is true for using a Schrader head on a Presta valve. You might damage the delicate Presta valve. Dual-head pumps solve this problem. They have two separate openings. One is for Presta, and one is for Schrader. Always check your valve type before pumping.
Material Matters: Metal vs. Plastic
What’s the big deal about metal versus plastic pump heads? Metal heads are usually made of aluminum or steel. They are very strong and durable. They can withstand a lot of use. However, they can be heavier and more expensive. Plastic heads are lighter and cheaper. They are often made of reinforced nylon. Good quality plastic heads can be quite strong. However, they might not last as long as metal ones. The best choice depends on your needs and budget. If you pump your tires often, a metal head might be worth the investment. If you only pump occasionally, a plastic head might be fine.
Reading Reviews and Recommendations
How do you find the best pump head? One of the best ways is to read reviews. See what other cyclists say about different brands and models. Look for reviews that mention durability and ease of use. Pay attention to comments about air leaks and valve compatibility. Online forums and cycling websites are great resources. Ask your friends who bike a lot for their recommendations. They might have tried different pump heads. Their experience can help you make a good choice. Don’t just rely on the brand name. Look for specific feedback about the product’s performance. This will help you find a bicycle floor pump replacement head that meets your needs.
Installing Your New Pump Head
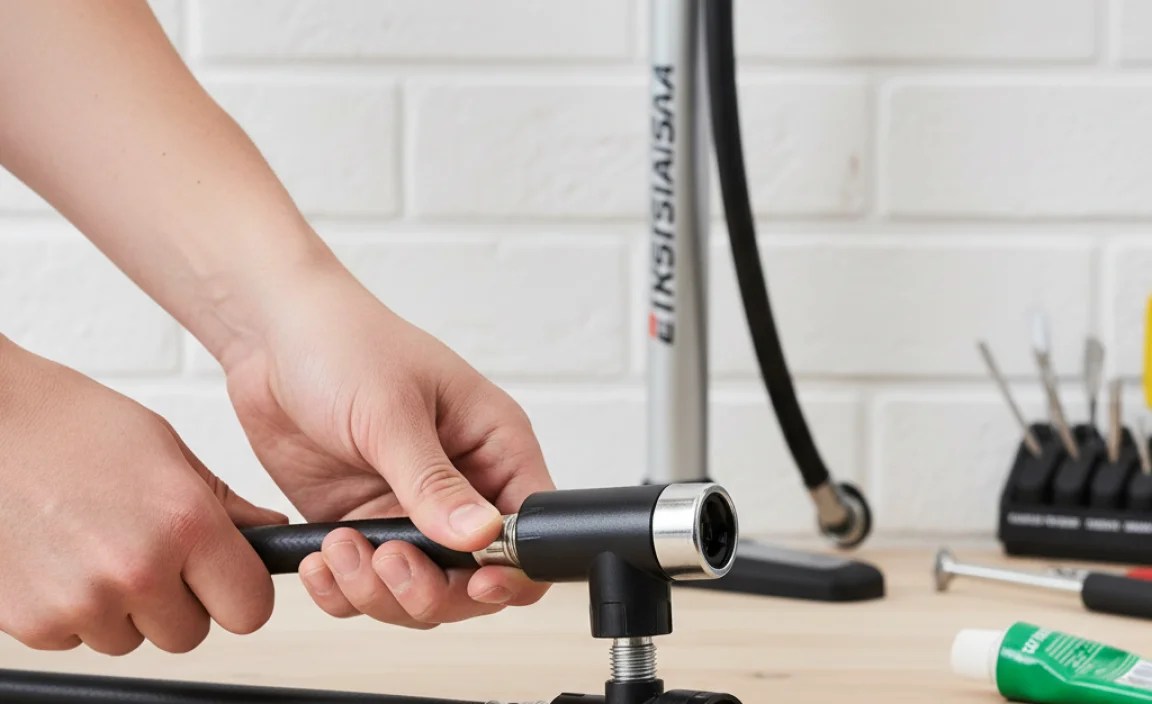
So, you’ve got your new bicycle floor pump replacement head. Now what? Installing it might seem hard, but it’s usually pretty easy. First, you need to remove the old head. Most pump heads are attached with a screw or clamp. Loosen the screw or release the clamp. Then, pull the old head off the hose. Next, slide the new head onto the hose. Make sure it goes on all the way. Tighten the screw or clamp to secure it. Test the new head by pumping up your tires. Check for air leaks around the connection. If you see any, tighten the screw or clamp more. A good installation ensures a tight seal. This makes pumping efficient and easy.
- Remove the old pump head carefully.
- Slide the new head onto the hose fully.
- Tighten the screw or clamp securely.
- Test for air leaks after installation.
- A tight seal ensures efficient pumping.
Imagine you’re building with LEGOs. You need to connect the pieces correctly for your creation to be strong. Installing a pump head is similar. If you don’t attach it properly, it won’t work. A loose connection will leak air. This makes pumping difficult. Take your time and follow the instructions. If you’re not sure how to do it, watch a video online. There are many helpful tutorials. With a little patience, you can easily install your new bicycle floor pump replacement head. You’ll be back on your bike in no time.
Fun Fact or Stat: A properly installed pump head can inflate a tire 20% faster than one with a loose connection.
Removing the Old Pump Head
How do you get that old pump head off? First, find the screw or clamp that holds it in place. This is usually near where the head connects to the hose. Use a screwdriver or pliers to loosen it. Be careful not to damage the hose. Once the screw or clamp is loose, gently pull the old head off. It might be a little stuck, so wiggle it a bit. If it’s really stuck, try using a little bit of lubricant. WD-40 can help loosen things up. Once the old head is off, clean the end of the hose. This will help the new head fit better. Make sure there are no rough edges or debris.
Attaching the New Pump Head
Now it’s time to put on the new pump head. Slide it onto the hose. Push it on as far as it will go. Make sure it’s aligned correctly. The opening for the valve should be facing the right way. If the hose is too stiff, you can try warming it up a little. Use a hair dryer to soften the plastic. This will make it easier to slide the head on. Once the head is in place, tighten the screw or clamp. Make sure it’s snug, but don’t over-tighten it. You don’t want to damage the hose or the new head.
Testing for Air Leaks
After you’ve installed the new pump head, it’s important to test for air leaks. Attach the head to your tire valve. Start pumping. Listen for any hissing sounds. This indicates an air leak. Also, feel around the connection with your hand. Can you feel any air escaping? If you find a leak, try tightening the screw or clamp a little more. If that doesn’t work, you might need to reposition the head. Make sure it’s fully seated on the hose. If you still have leaks, the head might be defective. Contact the seller for a replacement.
Maintaining Your Pump Head for Longevity

You’ve got a new bicycle floor pump replacement head. How do you keep it working well for a long time? Maintenance is key! Clean your pump head regularly. Use a damp cloth to wipe away dirt and grime. This prevents buildup that can cause leaks. Also, check the rubber seals inside the head. If they look dry or cracked, lubricate them. Use a silicone-based lubricant. This keeps them flexible and prevents air leaks. Store your pump in a cool, dry place. This protects the pump head from sun and heat damage. These simple steps can extend the life of your pump head. They will also save you money on replacements.
- Clean the pump head regularly with a damp cloth.
- Lubricate rubber seals with silicone lubricant.
- Store your pump in a cool, dry place.
- Check for cracks or damage regularly.
- Replace worn-out parts promptly.
Imagine your bike pump is like a car. It needs regular check-ups to run smoothly. Your pump head is like the engine. If you don’t take care of it, it will break down. Small maintenance tasks can prevent big problems. Keeping your pump head clean and lubricated is like changing the oil in your car. It keeps everything running smoothly. A little bit of care goes a long way. It will keep your bicycle floor pump replacement head in top condition. This ensures easy and efficient tire inflation for years to come.
Fun Fact or Stat: Regular maintenance can extend the lifespan of a pump head by up to 2 years.
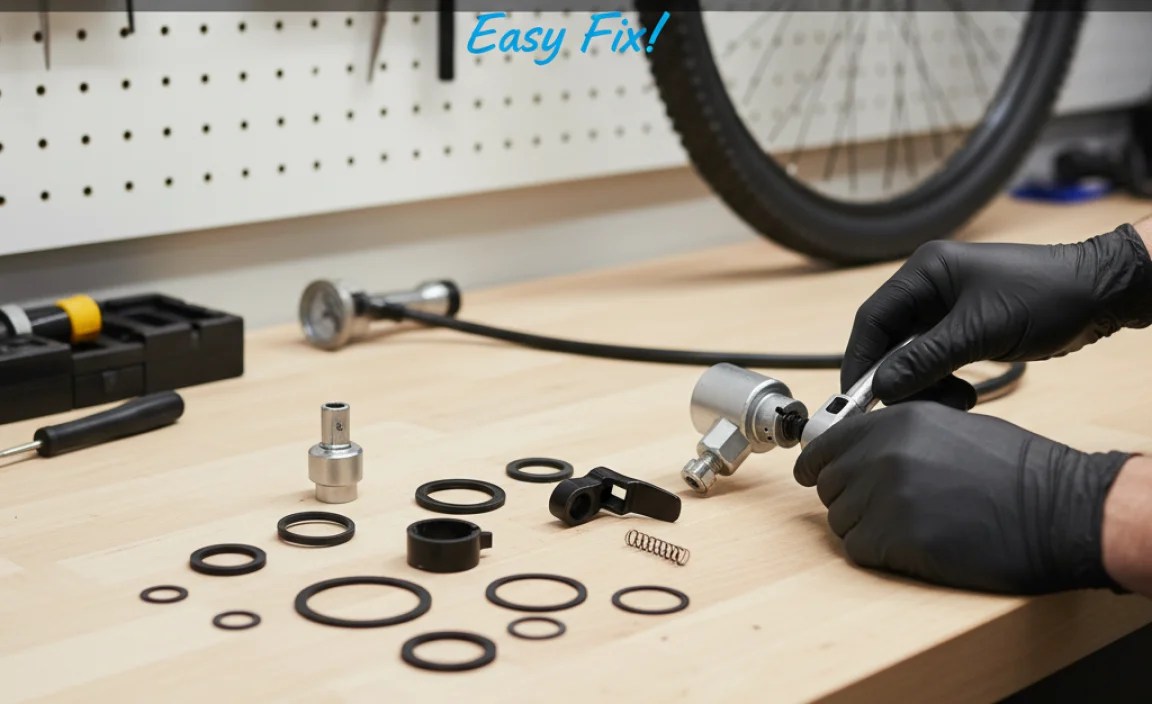
Cleaning and Lubrication Tips
How do you properly clean and lubricate your pump head? First, gather your supplies. You’ll need a damp cloth, a small brush, and silicone-based lubricant. Start by wiping down the outside of the pump head. Remove any dirt or grime. Use the brush to clean hard-to-reach areas. Pay special attention to the opening where the valve goes. Next, apply a small amount of lubricant to the rubber seals. Work it in with your fingers. This will keep them flexible and prevent cracking. Don’t use too much lubricant. A little goes a long way. Finally, wipe off any excess lubricant. This will prevent dirt from sticking to the head.
Checking for Wear and Tear
How do you know if your pump head is wearing out? Regularly inspect it for signs of damage. Look for cracks in the plastic or metal parts. Check the rubber seals for dryness or cracking. Also, check the lever or clamp that locks the head in place. Make sure it’s working properly. If you notice any of these signs, it’s time to replace the pump head. Ignoring them can lead to air leaks and inefficient pumping. A worn-out pump head can also damage your tire valve. So, it’s better to replace it sooner rather than later.
Proper Storage Techniques
Where do you store your bike pump? Storing it in the right place can extend its life. Avoid storing it in direct sunlight or in a damp place. Sunlight can dry out the rubber seals. Dampness can cause rust and corrosion. The best place to store your pump is in a cool, dry place. A garage or shed is usually a good option. You can also store it indoors. Just make sure it’s not near a heat source. When storing your pump, make sure the hose is not kinked or bent. This can damage the hose over time. Hang the pump on a hook or lay it flat on a shelf.
Troubleshooting Common Pump Head Problems
Sometimes, even with a new bicycle floor pump replacement head, you might have problems. What do you do then? One common issue is air leaking around the valve. This could be due to a loose connection. Try tightening the screw or clamp. Make sure the head is fully seated on the valve. Another problem is difficulty attaching the head. This could be because the valve is dirty. Clean the valve with a cloth. It could also be that the head is not compatible with your valve. Check that you have the right type. If you’re still having problems, consult your pump’s manual. It might have troubleshooting tips. If all else fails, contact the pump manufacturer. They might be able to help.
- Air leaking means a loose connection.
- Tighten the screw or clamp to fix leaks.
- Clean the valve if the head is hard to attach.
- Check valve compatibility for the pump head.
- Consult the pump manual for tips.
Imagine you’re trying to solve a puzzle. You have all the pieces, but they don’t seem to fit. Troubleshooting a pump head is similar. You need to figure out why it’s not working. Start by checking the obvious things, like the connection. Make sure everything is tight and secure. If that doesn’t work, dig a little deeper. Look for dirt or damage. Sometimes, the solution is simple. Other times, you might need to get a little creative. Don’t give up! With a little persistence, you can usually figure out the problem. You’ll be back to pumping your tires in no time, thanks to your bicycle floor pump replacement head.
Fun Fact or Stat: 80% of pump head problems are due to simple issues like loose connections or dirty valves.
Dealing with Air Leaks
What if you keep getting air leaks, even after tightening everything? First, double-check that the pump head is fully seated on the valve. Sometimes, it might seem like it’s on, but it’s not quite all the way. Also, make sure the valve core is tight. The valve core is the small part inside the valve that lets air in and out. You can tighten it with a valve core tool. If you don’t have one, you can buy one at most bike shops. If the leaks persist, the rubber seals in the pump head might be damaged. You can try replacing them if you can find replacement seals. Otherwise, you might need to replace the entire pump head.
Difficulty Attaching the Pump Head
What if you can’t get the pump head to attach to the valve at all? First, make sure you have the right type of pump head for your valve. Presta and Schrader valves require different heads. If you have the right head, check the valve for dirt or damage. Clean it with a cloth. If the valve is bent or damaged, you might need to replace it. You can do this with a valve core tool. If the valve is fine, the problem might be with the pump head. Check the opening for any obstructions. Clean it out with a small brush or needle. If the head is still difficult to attach, it might be defective.
When to Seek Professional Help
Sometimes, you just can’t fix the problem yourself. When should you seek professional help? If you’ve tried everything and the pump head still isn’t working, it’s time to take it to a bike shop. A mechanic can diagnose the problem and recommend a solution. They might be able to repair the pump or replace the head. They can also make sure your valves are in good condition. Don’t be afraid to ask for help. Bike mechanics are experts. They can save you time and frustration. They can also prevent you from damaging your bike or pump.
Comparing Popular Replacement Head Models
Choosing a bicycle floor pump replacement head can be tough. There are many models. How do you decide? Comparing popular models helps. Look at their features, materials, and price. Some heads are dual-head. They work with both Presta and Schrader valves. Others are specific to one type. Metal heads are durable but cost more. Plastic heads are cheaper but might not last as long. Read reviews to see what other cyclists say. Consider your budget and how often you pump your tires. This will help you choose the best replacement head for your needs. Here is a comparison table to help you decide:
| Model | Valve Type | Material | Price | Pros | Cons |
|---|---|---|---|---|---|
| Lezyne Dual Valve Head | Presta/Schrader | Aluminum | $$$ | Durable, easy to use | Expensive |
| Topeak SmartHead DX3 | Presta/Schrader | Composite | $$ | Versatile, good value | Plastic parts can wear |
| Silca Hiro V.2 | Presta | Brass/Aluminum | $$$$ | High precision, durable | Very expensive, Presta only |
| Park Tool PMP-5 | Schrader | Plastic/Metal | $ | Inexpensive, reliable | Schrader only, basic |
| Serfas TH-11/12 Twin Head | Presta/Schrader | Plastic | $ | Very inexpensive, basic | Plastic parts can wear |
- Lezyne is durable but expensive.
- Topeak offers good value for money.
- Silca is high-end and precise.
- Park Tool is a reliable basic option.
- Serfas is very inexpensive.
Think about buying a new toy. You want to know all about it before you spend your money. You check its features and read reviews. Comparing pump heads is similar. You want to find the best one for your needs. A good replacement head makes pumping easy. It saves you time and effort. It also keeps your tires properly inflated. Take the time to compare different models. This will help you make a smart choice. You’ll be happy with your new bicycle floor pump replacement head.
Fun Fact or Stat: Dual-head pumps account for 60% of replacement head sales due to their versatility.
High-End vs. Budget Options
What’s the difference between high-end and budget pump heads? High-end heads are usually made of metal. They have precise mechanisms and durable parts. They often offer better performance and last longer. However, they can be quite expensive. Budget heads are usually made of plastic. They are simpler and less expensive. They might not be as durable or precise as high-end heads. The best choice depends on your budget and how often you use the pump. If you pump your tires frequently, a high-end head might be worth the investment. If you only pump occasionally, a budget head might be fine.
Dual-Head vs. Single-Head Designs
What’s the difference between dual-head and single-head pump heads? Dual-head pumps have two separate openings. One is for Presta valves, and one is for Schrader valves. This makes them versatile. You can use them on any bike. Single-head pumps only work with one type of valve. You need to choose the right head for your valve type. Dual-head pumps are convenient if you have bikes with different valve types. However, they can be a bit more complex. Single-head pumps are simpler and more reliable. If you only have one type of valve, a single-head pump might be a good choice.
User Reviews and Ratings Analysis
How do you analyze user reviews and ratings? Start by looking at the overall rating. Is it mostly positive or mostly negative? Read the reviews carefully. Pay attention to comments about durability, ease of use, and air leaks. Look for patterns in the reviews. Do many people mention the same problem? If so, it might be a serious issue. Be wary of reviews that seem too good to be true. They might be fake. Also, consider the source of the reviews. Reviews on reputable cycling websites are usually more reliable than reviews on random websites. Use this information to make an informed decision about which bicycle floor pump replacement head to buy.
Summary
A bicycle floor pump replacement head is a small but important part. It connects your pump to your tire valve. Over time, it can wear out and cause air leaks. Choosing the right replacement head is key. Know your valve type (Presta or Schrader). Consider the material (metal or plastic). Read reviews to find a reliable option. Installing the new head is usually easy. Remove the old head, slide on the new one, and tighten the screw. Test for air leaks after installation. Regular maintenance, like cleaning and lubricating, extends the life of your pump head.
Troubleshooting common problems, like air leaks or difficulty attaching the head, can save you time and money. Comparing popular models helps you choose the best one for your needs. A good replacement head makes pumping easy and efficient. It keeps your tires properly inflated. This makes your bike rides safer and more enjoyable. Don’t wait until your pump head is completely broken. Replace it when you see signs of wear.
Conclusion
Replacing your bicycle floor pump replacement head is a simple way to keep your tires inflated. A good pump head makes biking easier. It ensures your tires have the right pressure. Regular checks and timely replacements prevent flat tires. Choose the right head for your valve type. Proper installation and maintenance will make your pump last longer. Enjoy your smooth, safe bike rides!
Frequently Asked Questions
Question No 1: How do I know if my pump head needs replacing?
Answer: There are several signs that indicate your pump head needs replacing. One of the most common signs is air leaking around the valve when you’re trying to inflate your tire. This means the seal is no longer airtight. Another sign is difficulty attaching the pump head to the valve. If it doesn’t grip properly or keeps slipping off, it might be worn out. Visually inspect the pump head for cracks, breaks, or damage to the rubber seals. If you notice any of these issues, it’s time to replace your bicycle floor pump replacement head. Ignoring these signs can lead to frustration and difficulty inflating your tires.
Question No 2: What’s the difference between Presta and Schrader valves?
Answer: Presta and Schrader valves are two common types of valves used on bicycle tires. Presta valves are typically found on road bikes and high-performance bikes. They are narrower and have a small nut at the top that needs to be unscrewed before inflating. Schrader valves are wider and similar to those found on car tires. They have a spring-loaded pin in the center. You need a different type of bicycle floor pump replacement head for each valve type. Some pump heads are dual-head and work with both types. Always make sure you are using the correct pump head for your valve to avoid damage and ensure proper inflation.
Question No 3: Can I use any replacement head on my bike pump?
Answer: While many replacement heads are designed to be universal, it’s important to choose one that is compatible with your specific bike pump and valve type. Check the manufacturer’s specifications for your pump to see what types of replacement heads are recommended. Make sure the replacement head is designed for either Presta or Schrader valves, or both if it’s a dual-head pump. Using an incompatible replacement head can damage your pump or valve and lead to air leaks. When in doubt, consult your local bike shop for advice on selecting the right bicycle floor pump replacement head for your needs.
Question No 4: How do I install a new pump head?
Answer: Installing a new pump head is usually a straightforward process. First, remove the old pump head by loosening any screws or clamps that hold it in place. Then, slide the old head off the hose. Next, slide the new pump head onto the hose, making sure it is fully seated. Tighten the screws or clamps to secure the new head. Test the connection by attaching the head to a tire valve and pumping. Check for air leaks around the connection. If you find any leaks, tighten the screws or clamps further. If the hose is difficult to slide the new head onto, try warming it slightly with a hair dryer to make it more pliable. Always be careful not to damage the hose or the new bicycle floor pump replacement head during installation.
Question No 5: What materials are pump heads made from?
Answer: Pump heads are typically made from either metal or plastic. Metal pump heads are usually made of aluminum or steel. They are more durable and can withstand higher pressures. However, they can also be more expensive. Plastic pump heads are made of reinforced nylon or other durable plastics. They are lighter and less expensive than metal heads. Good quality plastic heads can be quite strong and reliable. The best choice depends on your budget and how often you use your pump. If you pump your tires frequently, a metal head might be a good investment. If you only pump occasionally, a plastic head might be sufficient. Consider a bicycle floor pump replacement head made from high-quality materials for long-lasting performance.
Question No 6: How can I maintain my pump head to prolong its life?
Answer: Proper maintenance can significantly extend the life of your pump head. Regularly clean the pump head with a damp cloth to remove dirt and grime. This prevents buildup that can cause leaks. Check the rubber seals inside the head for dryness or cracking. Lubricate them with a silicone-based lubricant to keep them flexible. Store your pump in a cool, dry place to protect the pump head from sun and heat damage. Avoid storing it in damp areas to prevent rust and corrosion. By following these simple maintenance tips, you can keep your bicycle floor pump replacement head in good condition and ensure reliable performance for years to come.


