
How to Mount Water Bottle Cage on Carbon Seat Tube? Easy!
Have you ever been on a long bike ride? Did you get thirsty? Water is important when you bike. You need a water bottle. But where do you put it? Many bikes have a place for a water bottle cage. But what if you have a cool carbon fiber bike? Can you figure out how to mount water bottle cage on carbon seat tube? It might seem tricky, but it is not.
Key Takeaways
- Learning how to mount water bottle cage on carbon seat tube keeps you hydrated while biking.
- Always check the bike frame for damage before you start installing anything new.
- Use the correct tools and torque settings to avoid damaging your carbon frame.
- Protect your carbon frame with special tape where the cage will sit.
- Take your time and ask for help if you are unsure about any step.
Mounting Cages on Carbon: What You Need

Mounting a water bottle cage on a carbon seat tube might seem hard. Carbon fiber is strong, but you need to be careful. You do not want to break your bike! The right tools and some patience can make it easy. First, you need to gather some things. Get a set of Allen wrenches. These will help you tighten the bolts. You also need a torque wrench. This tool helps you tighten bolts just right. If you tighten them too much, you could crack the carbon. Next, get some protective tape. This tape goes between the cage and the frame. It stops the cage from rubbing and scratching the carbon. Finally, find the right bolts. Most cages come with bolts, but make sure they are the right size for your bike.
- Gather your tools before you start.
- Get Allen wrenches that fit your bolts.
- Use a torque wrench to tighten bolts correctly.
- Apply protective tape to the frame.
- Make sure the bolts are the right size.
Before you start, look at your carbon seat tube. Check for any cracks or damage. If you see something, do not put the cage on. Take your bike to a professional. They can help you fix it. If the frame looks good, you are ready to go. Remember to take your time. Do not rush. This will help you avoid mistakes. Mounting a cage on carbon is not hard if you are careful. It is all about using the right tools and being gentle. That way, you can enjoy your bike rides with water.
Fun Fact or Stat: Carbon fiber is five times stronger than steel but much lighter, making it a popular choice for bike frames!
Why Use a Torque Wrench?
Have you ever tried to open a jar that was too tight? It is frustrating! But if you use too much force, you might break the jar. The same thing can happen with your bike. A torque wrench helps you tighten bolts just right. It measures how much force you are using. This is important for carbon fiber. Carbon can crack if you tighten bolts too much. The torque wrench tells you when to stop. It prevents you from over-tightening. This keeps your frame safe. Using a torque wrench might seem hard, but it is easy once you get the hang of it. It is like using a measuring cup when you bake. You need the right amount to make it perfect.
Choosing the Right Protective Tape
Imagine you are putting a sticker on your favorite toy. You want to protect the toy from scratches. Protective tape does the same thing for your bike. It goes between the water bottle cage and the carbon frame. This stops the cage from rubbing and causing damage. There are different kinds of tape you can use. Some are clear, so you cannot even see them. Others are thicker and offer more protection. Choose a tape that is made for bikes. It should be strong and easy to apply. Clean the frame before you put the tape on. This helps the tape stick better. Putting on protective tape is like putting on a superhero shield for your bike.
What Size Bolts Do I Need?
Bolts are like the screws that hold things together. They come in different sizes. If you use the wrong size, they will not work. For your water bottle cage, you need bolts that fit the holes in your frame. Most bikes use M5 bolts. This is a common size. But it is always good to check. Look in your bike’s manual or ask a bike shop. Using the right size bolts is like using the right key for a lock. If the key is too big or too small, it will not open the lock. The same thing happens with bolts. If they are too long, they might hit something inside the frame. If they are too short, they will not hold the cage tightly.
Finding The Best Cage Position on Carbon

Finding the best spot for your water bottle cage is important. You want it to be easy to reach when you are riding. But you also want it to be out of the way. Look at your carbon seat tube. Most bikes have two places to put a cage. One is on the seat tube. The other is on the down tube. The seat tube is the one that goes up to your seat. The down tube is the one that goes down to the pedals. Think about which one is easier for you to reach. Some people like the seat tube because it is closer. Others like the down tube because it is out of the way. Try holding a water bottle in different spots. See what feels best.
- Check for existing mounting points on your frame.
- Consider how easy it is to reach the bottle.
- Make sure the cage does not interfere with your legs.
- Think about the weight balance on your bike.
- Test different positions before you tighten everything.
- Consider using an offset mount if needed.
If you have a small frame, it might be harder to find a good spot. The tubes might be shorter. This means there is less room for the cage. You might need to use a special cage that is smaller. Or you might need to use an adapter. An adapter is a piece that lets you move the cage around. It gives you more options for where to put it. No matter what, take your time. Try different spots. See what works best for you. Finding the perfect spot will make your rides more fun. You will be able to grab your water bottle without stopping.
Fun Fact or Stat: Professional cyclists often have their water bottle cages positioned for the fastest and easiest access during races!
Seat Tube Placement Tips
The seat tube is a popular place to put a water bottle cage. It is close to you, so it is easy to reach. But there are some things to think about. Make sure the cage does not hit your legs when you pedal. This can be annoying. Also, make sure the cage does not get in the way when you get on and off your bike. If you have a small frame, the seat tube might not have much room. You might need to use a smaller cage. Or you can try putting the cage on the down tube instead. Remember to test the position before you tighten everything. Sit on your bike and pretend to grab the water bottle. See if it feels comfortable.
Down Tube Mounting Options
The down tube is another place you can put your water bottle cage. It is further away than the seat tube. But some people like it better. It keeps the water bottle out of the way. This can be good if you have long legs. Or if you do not want the bottle to rub against your knees. When you put the cage on the down tube, think about how easy it is to reach. You might need to lean down more to grab the bottle. This can be tricky when you are riding. Make sure you can do it safely. Also, check to see if the cage gets in the way of your front wheel. You do not want it to hit the wheel when you turn.
Using Adapters for Difficult Fits
Sometimes, it is hard to find a good spot for your water bottle cage. Maybe your frame is too small. Or maybe the tubes are in the way. In these cases, you can use an adapter. An adapter is a piece that lets you move the cage around. It gives you more options. There are different kinds of adapters. Some move the cage up or down. Others move it to the side. You can even get adapters that let you put two cages on one tube. Adapters are helpful if you have a funny-shaped frame. Or if you just want to put the cage in a different spot. They can make it easier to reach your water bottle. They can also make your bike look cooler.
Protecting Your Carbon Seat Tube

Carbon fiber is strong, but it can be damaged. You need to protect it when you put on a water bottle cage. The cage can rub against the frame. This can scratch the carbon. Over time, it can even weaken the frame. That is why you need to use protective tape. The tape goes between the cage and the frame. It stops the cage from rubbing. There are different kinds of tape you can use. Some are clear, so you cannot see them. Others are thicker and offer more protection. You can also use a special carbon paste. This paste helps the cage grip the frame. It stops it from slipping. But be careful not to use too much. It can make a mess.
- Apply protective tape to prevent scratches.
- Use carbon paste to increase friction.
- Check the frame regularly for wear.
- Avoid over-tightening the bolts.
- Clean the area before applying tape.
- Replace the tape when it wears out.
Before you put on the tape, clean the frame. Use a clean cloth and some rubbing alcohol. This will remove any dirt or grease. It will help the tape stick better. When you put on the tape, make sure it covers the whole area where the cage will sit. You can use more than one layer of tape if you want. Just make sure it is smooth. You do not want any bumps. After you put on the cage, check it regularly. Look for any signs of wear. If the tape is starting to peel, replace it. Protecting your carbon frame is important. It will help it last longer.
Fun Fact or Stat: Some professional bike mechanics use clear nail polish to protect small areas of carbon frames from scratches!
Applying Protective Film Correctly
Protective film is like a clear sticker that protects your bike frame. It stops scratches and damage. To put it on right, start by cleaning the frame. Use soap and water to remove dirt. Then, dry the frame with a clean cloth. Cut the film to the right size. Make it a little bigger than the area you want to protect. Peel off the backing and carefully stick the film on the frame. Start at one edge and smooth it out as you go. Use your finger or a soft cloth to get rid of any bubbles. If there are still bubbles, you can use a needle to poke a tiny hole and smooth them out.
Using Carbon Paste for Extra Grip
Carbon paste is a special kind of grease that helps things stick to carbon fiber. It has tiny bits of grit in it. These bits create friction. This stops things from slipping. When you put on your water bottle cage, put a little carbon paste on the frame where the cage will touch. Also, put some on the bolts. Do not use too much. A little bit goes a long way. Tighten the bolts to the right torque. The carbon paste will help the cage stay in place. It will also protect the carbon frame from damage. Carbon paste is like a superhero’s grip for your bike parts.
Regular Frame Inspections
It is important to check your bike frame regularly. Look for any cracks, scratches, or damage. Pay special attention to the areas around the water bottle cage. These areas can get stressed from the cage rubbing. If you see any damage, take your bike to a professional. They can help you fix it. Regular inspections are like giving your bike a checkup. They help you catch problems early. This can save you money and keep you safe. A healthy frame means a happy ride. So, take a few minutes to check your bike frame often.
Torque Settings Matter for Carbon Seat Tubes

Torque settings are super important when working with carbon fiber. Torque is how tight you screw in a bolt. Too tight, and you can break the carbon. Too loose, and the water bottle cage will wobble. A torque wrench helps you get it just right. This tool measures how much force you are using. It tells you when to stop tightening. Look up the right torque setting for your bike. It is usually written on the frame or in the manual. Use the torque wrench to tighten the bolts to that setting. This will keep your carbon frame safe and your water bottle secure.
- Always use a torque wrench on carbon fiber.
- Find the correct torque specification for your bike.
- Tighten bolts in a star pattern.
- Check the torque after the first few rides.
- Do not over-tighten the bolts.
- Use a calibrated torque wrench.
Imagine you are building a tower out of blocks. If you put too much weight on one block, the tower will fall. The same thing can happen with your bike. Over-tightening a bolt puts too much stress on the carbon. This can cause it to crack. Under-tightening a bolt is also bad. The cage might come loose. This could be dangerous when you are riding. Using a torque wrench is like having a magic tool that makes everything perfect. It takes the guesswork out of tightening bolts. This keeps your bike safe and fun to ride.
Fun Fact or Stat: The unit of measurement for torque is usually Newton-meters (Nm) or inch-pounds (in-lbs).
Understanding Torque Specifications
Torque specifications tell you how tight to tighten a bolt. They are like instructions for building something. They tell you exactly how much force to use. Torque is measured in Newton-meters (Nm) or inch-pounds (in-lbs). Your bike’s manual will tell you the right torque for each bolt. It is important to follow these instructions. If you do not have a manual, you can ask a bike shop. They can help you find the right torque settings. Using the right torque is like following a recipe. If you use the right ingredients and the right amounts, the dish will turn out great. If you do not, it might not taste very good.
Using a Torque Wrench Correctly
A torque wrench is a special tool that helps you tighten bolts to the right torque. It has a handle and a gauge. The gauge tells you how much force you are using. To use a torque wrench, first set it to the right torque setting. Then, put the wrench on the bolt. Slowly tighten the bolt until the wrench clicks. The click means you have reached the right torque. Do not tighten it anymore after the click. If you keep tightening, you could damage the bolt or the frame. Using a torque wrench is like using a ruler to measure something. It helps you be precise and accurate.
What Happens If You Overtighten?
Overtightening a bolt on a carbon frame is a bad idea. Carbon fiber is strong, but it can crack if you put too much stress on it. Overtightening a bolt puts too much stress on the carbon. This can cause it to crack or break. If you overtighten a bolt, you might not see the damage right away. But over time, the crack can get bigger. This can make the frame weak and unsafe. If you think you have overtightened a bolt, stop. Take your bike to a professional. They can check the frame for damage. It is better to be safe than sorry.
Step-by-Step: Mounting Your Cage
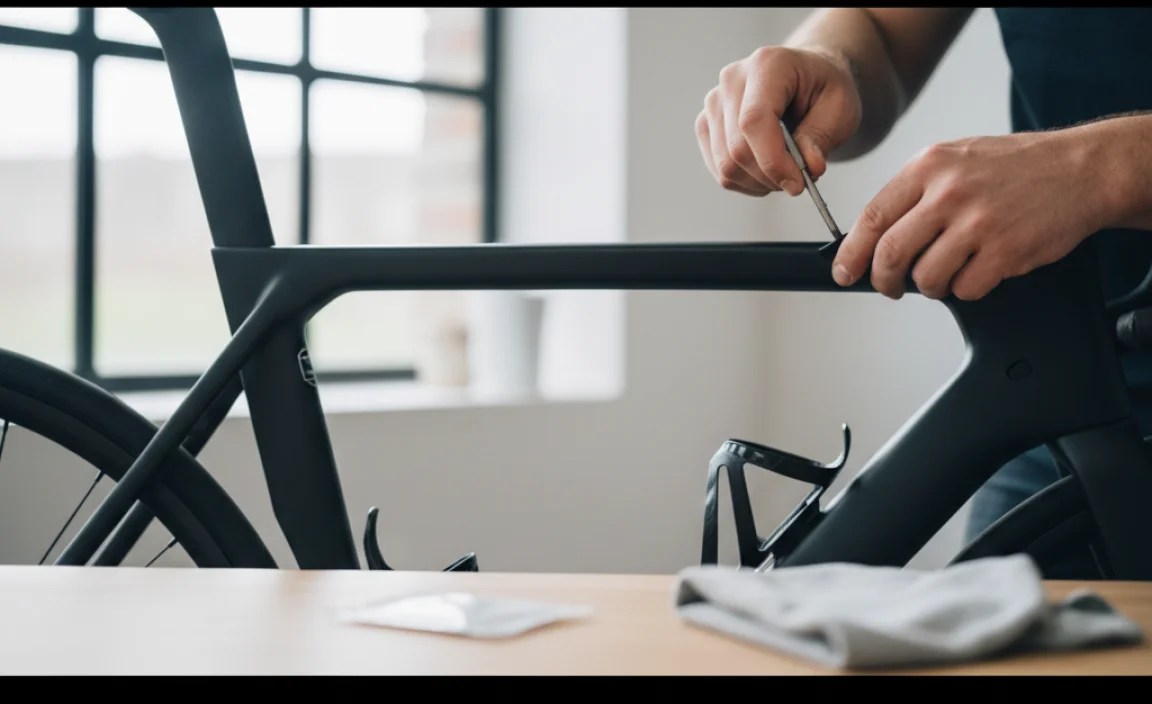
Now, let’s talk about the steps. You want to know how to mount water bottle cage on carbon seat tube. It is not too hard. First, gather all your tools. You need Allen wrenches, a torque wrench, protective tape, and the right bolts. Next, clean the area on the frame where you will put the cage. Use rubbing alcohol and a clean cloth. Then, put on the protective tape. Make sure it covers the whole area. Now, line up the cage with the holes in the frame. Put in the bolts. Use your fingers to tighten them a little bit. Then, use the torque wrench to tighten them to the right setting. Do not over-tighten! Finally, check to make sure the cage is secure.
- Gather your tools and materials.
- Clean the frame thoroughly.
- Apply protective tape or film.
- Align the cage and insert bolts.
- Torque bolts to the correct specification.
- Double-check the cage’s stability.
Before you start, read the instructions that came with your water bottle cage. Some cages have special instructions. Follow them carefully. Also, take your time. Do not rush. This will help you avoid mistakes. If you are not sure about something, ask a bike shop for help. They can show you how to do it right. Mounting a water bottle cage is a small job. But it is important to do it correctly. It will keep you hydrated on your rides. It will also protect your carbon frame.
Fun Fact or Stat: Many professional cyclists practice reaching for their water bottles while riding to improve their efficiency!
Preparing the Frame Surface
Before you stick anything to your bike frame, you need to clean it. Dirt and grease can stop the tape from sticking. Use soap and water to wash the area. Then, dry it with a clean cloth. After that, use rubbing alcohol to clean it again. Rubbing alcohol removes any leftover grease. It also helps the tape stick better. Let the alcohol dry completely before you put on the tape. A clean surface is like a blank canvas. It lets the tape do its job properly. If you skip this step, the tape might peel off.
Aligning the Cage Properly
Putting the cage on straight is important. If it is crooked, it will look funny. It might also be harder to reach your water bottle. Line up the cage with the holes in the frame. Make sure the holes in the cage match the holes in the frame. If they do not match, you might need to use an adapter. Once the cage is lined up, hold it in place with one hand. Use your other hand to put in the bolts. Do not tighten the bolts all the way yet. Just get them started. This will let you adjust the cage if you need to.
Final Checks and Adjustments
After you tighten the bolts, check to make sure the cage is secure. Grab the cage and try to wiggle it. It should not move. If it moves, the bolts might not be tight enough. Use the torque wrench to tighten them a little more. But be careful not to over-tighten. Also, check to make sure the cage does not rub against anything. It should not rub against your legs or your frame. If it rubs, you might need to adjust the position of the cage. You can use an adapter to move it around. Final checks are like the last touches on a painting. They make sure everything looks perfect.
Alternatives to Seat Tube Mounting
What if you cannot put a water bottle cage on your seat tube? Maybe you have a small frame. Or maybe there are no mounting holes. Do not worry! There are other options. You can use a saddle-mounted cage. This cage attaches to your seat post. It sits behind your seat. You can also use a handlebar-mounted cage. This cage attaches to your handlebars. It sits in front of you. Another option is to use a hydration pack. This is a backpack that holds water. It has a tube that you can drink from. These options are great if you cannot use a seat tube cage.
| Mounting Option | Pros | Cons | Best For |
|---|---|---|---|
| Seat Tube | Easy to reach, common placement | Can interfere with legs, limited space | Most bikes with standard frames |
| Saddle-Mounted | Good for small frames, multiple bottle options | Can affect balance, harder to reach | Small frames or riders needing extra water |
| Handlebar-Mounted | Easy access, good for long rides | Can affect steering, bulky | Touring or long-distance cycling |
| Hydration Pack | Large water capacity, hands-free drinking | Can be hot, adds weight to your back | Long rides or off-road cycling |
Each option has its own pros and cons. Saddle-mounted cages are good for small frames. They let you carry extra water. But they can affect your balance. Handlebar-mounted cages are easy to reach. But they can make steering harder. Hydration packs are great for long rides. But they can be hot and heavy. Think about what is important to you. Choose the option that works best for your needs. No matter what, make sure you stay hydrated. Water is important when you are biking.
Fun Fact or Stat: Some cyclists use aero water bottles that are shaped to reduce wind resistance and improve speed!
Saddle-Mounted Cage Options
Saddle-mounted cages attach to the back of your seat. They are a good option if you do not have room on your frame. They let you carry one or two water bottles. Some saddle-mounted cages also have a place for tools. This is handy if you need to fix your bike on the road. Saddle-mounted cages can affect your balance. They put weight behind you. This can make it harder to steer. But if you get used to it, it is not a big deal. They are a good way to carry extra water.
Handlebar-Mounted Cage Solutions
Handlebar-mounted cages attach to your handlebars. They are easy to reach. You do not have to lean down to grab your water bottle. This can be helpful if you have back problems. Handlebar-mounted cages can make steering harder. They add weight to the front of your bike. They can also get in the way of your hands. But if you find the right cage, it will not be a problem. There are many different kinds of handlebar-mounted cages. Some are small and lightweight. Others are bigger and can hold more water.
Hydration Packs for Long Rides
Hydration packs are backpacks that hold water. They have a tube that you can drink from. You do not have to take your hands off the handlebars. This is great for long rides. Hydration packs can hold a lot of water. Some can hold up to three liters. This is enough water for several hours of riding. Hydration packs can be hot. They sit on your back. This can make you sweat. But if you choose a pack with good ventilation, it will not be too bad. They are a good way to stay hydrated on long rides.
Regular Maintenance: Keeping It Secure
After you mount water bottle cage on carbon seat tube, you are not done. You need to check it regularly. Make sure the bolts are still tight. They can loosen over time. This is especially true if you ride on bumpy roads. Use your torque wrench to check the bolts. Make sure they are still at the right setting. Also, check the protective tape. Make sure it is still in good condition. If it is torn or worn, replace it. Regular maintenance will keep your water bottle cage secure. It will also protect your carbon frame.
- Check bolt tightness regularly.
- Inspect protective tape for wear.
- Clean the cage and frame.
- Replace worn bolts or tape.
- Listen for any unusual noises.
- Ensure the cage is still aligned properly.
Imagine you have a pet. You need to feed it and take care of it. Your bike is the same way. It needs regular maintenance to stay in good shape. Checking your water bottle cage is just one small part of that. But it is important. A loose water bottle cage can be dangerous. It can fall off while you are riding. This could cause an accident. So, take a few minutes to check your cage regularly. It will keep you safe and hydrated.
Fun Fact or Stat: Some cyclists use a small dab of threadlocker on the bolts to prevent them from loosening over time!
Checking Bolt Tightness
Checking the bolt tightness is easy. Use your torque wrench to check each bolt. Put the wrench on the bolt and gently tighten it. If the wrench clicks right away, the bolt is tight enough. If the wrench does not click, tighten the bolt until it does. Be careful not to over-tighten. Over-tightening can damage the carbon frame. Check the bolts every few weeks. Or more often if you ride on bumpy roads. Loose bolts can cause the cage to wobble. This can be annoying. It can also damage the frame.
Inspecting Protective Tape
The protective tape stops the cage from rubbing against the frame. Over time, the tape can wear out. It can get torn or peeled. If the tape is damaged, it will not protect the frame. Check the tape regularly. Look for any signs of wear. If you see any, replace the tape. Replacing the tape is easy. Just peel off the old tape and put on new tape. Make sure the new tape covers the whole area where the cage touches the frame. Protective tape is like a shield for your bike. It keeps it safe from scratches and damage.
Cleaning the Cage and Frame
Dirt and grime can build up on the cage and frame. This can make the cage look dirty. It can also damage the frame. Clean the cage and frame regularly. Use soap and water to wash them. Then, dry them with a clean cloth. You can also use rubbing alcohol to clean the frame. Rubbing alcohol removes any grease or dirt. Cleaning the cage and frame is like taking a shower. It keeps them looking good and working well. A clean bike is a happy bike.
Summary
Mounting a water bottle cage on a carbon seat tube is not as hard as it looks. You just need the right tools and a little patience. Remember to use a torque wrench to avoid over-tightening the bolts. Protective tape will keep your carbon frame safe from scratches. If you cannot mount a cage on your seat tube, there are other options. Saddle-mounted cages, handlebar-mounted cages, and hydration packs are all good alternatives. Always check your work and make sure everything is secure before you hit the road. Knowing how to mount water bottle cage on carbon seat tube will help you stay hydrated.
Conclusion
Learning how to mount water bottle cage on carbon seat tube lets you carry water on your bike. This is important for staying hydrated. Carbon fiber is strong but needs care. Use the right tools and torque settings. Protective tape helps prevent scratches. Check the cage regularly to make sure it is secure. Now you can enjoy your rides knowing you have water with you. Safe riding!
Frequently Asked Questions
Question No 1: Can I use any type of water bottle cage on a carbon seat tube?
Answer: Not all water bottle cages are suitable for carbon fiber frames. It’s best to use cages made from lightweight materials like plastic or carbon fiber to avoid adding unnecessary weight. Metal cages can sometimes cause damage to the carbon if they are not properly installed or if they vibrate against the frame. Also, make sure the cage has smooth edges and a good contact area to distribute pressure evenly. This will help protect the carbon from stress and potential cracks. When in doubt, check with your local bike shop for recommendations on the best cages for your specific carbon frame.
Question No 2: What is the correct torque setting for mounting a water bottle cage on a carbon seat tube?
Answer: The correct torque setting is very important when mounting anything on a carbon fiber frame. Overtightening can cause cracks and damage, while undertightening can lead to the cage coming loose. Generally, the torque setting for water bottle cage bolts on a carbon frame is between 2 to 4 Newton-meters (Nm). Always check the manufacturer’s specifications for your specific bike frame and water bottle cage. Use a torque wrench to ensure you are tightening the bolts to the correct level. It is better to start with a lower torque setting and gradually increase it until the cage is secure, to prevent any damage to the frame. This is a key step when learning how to mount water bottle cage on carbon seat tube.
Question No 3: Do I really need to use protective tape when mounting a water bottle cage on a carbon seat tube?
Answer: Yes, using protective tape is highly recommended when mounting a water bottle cage on a carbon seat tube. Protective tape acts as a barrier between the cage and the frame, preventing scratches and rubbing that can damage the carbon fiber. Over time, vibrations and movement can cause the cage to wear away the clear coat and even the carbon layers. Protective tape is inexpensive and easy to apply. It’s a simple way to add an extra layer of protection and keep your carbon frame looking its best. There are special frame protection kits available, or you can use clear vinyl tape. Just make sure the tape is durable and won’t leave residue when removed.
Question No 4: What should I do if the water bottle cage bolts are too short?
Answer: If the water bottle cage bolts are too short, do not try to force them. Using bolts that are too short can strip the threads in the frame or not provide enough clamping force to hold the cage securely. The best solution is to purchase longer bolts. Most bike shops sell water bottle cage bolts in various lengths. Make sure to get bolts that are the correct diameter and thread pitch for your frame. Typically, water bottle cage bolts are M5 size. When installing the longer bolts, be careful not to overtighten them. Use a torque wrench to ensure you are tightening them to the correct specification. This will help protect your carbon frame from damage. Knowing this helps in understanding how to mount water bottle cage on carbon seat tube safely.
Question No 5: How often should I check the water bottle cage bolts after mounting it on a carbon seat tube?
Answer: After mounting a water bottle cage on a carbon seat tube, it’s a good idea to check the bolts after the first few rides. Carbon fiber can settle slightly, and the bolts may loosen. After the initial check, you should inspect the bolts every few weeks or before any long rides. Use a torque wrench to ensure the bolts are still tightened to the correct specification. Also, check the cage itself for any signs of wear or damage. If you notice any issues, address them promptly to prevent further problems. Regular maintenance will help keep your water bottle cage secure and protect your carbon frame. This is an important part of learning how to mount water bottle cage on carbon seat tube for the long term.
Question No 6: Can I use threadlocker on water bottle cage bolts when mounting on a carbon seat tube?
Answer: Using threadlocker on water bottle cage bolts when mounting on a carbon seat tube is generally not recommended. While threadlocker can help prevent bolts from loosening, it can also make them more difficult to remove and potentially damage the carbon fiber. If you are concerned about the bolts loosening, a better option is to use a small amount of carbon paste. Carbon paste increases friction between the bolt and the frame, which helps keep the bolt in place. Always use a torque wrench to tighten the bolts to the correct specification. Regular checks of the bolt tightness are also important to ensure the cage remains secure. Knowing how to properly secure these bolts is vital when figuring out how to mount water bottle cage on carbon seat tube.


