
Easy: How to Mount Radar/Rear Detection on Bike Post
Have you ever wondered how to mount radar or rear detection on your bike seatpost? It is important to be safe when you are riding your bike. Using radar or rear lights helps cars see you. This makes your ride safer and more fun.
Why should you add these devices to your bike? They help you see what is behind you. Cars can also see you better. Let’s learn how to attach them the right way! This will keep you safe on all your bike rides.
Do you want to make sure cars see you when you ride? Do you want to know what’s coming up behind you? Keep reading to learn more. We will show you how to easily and safely add these tools to your bike. Let’s get started!
Key Takeaways
- Mounting radar or rear detection improves your bike safety a lot.
- Use the right tools to attach devices to your bike seatpost.
- Make sure the radar or light is secure before riding.
- Regularly check the mount to keep everything working well.
- Knowing how to mount radar or rear detection on bike seatpost boosts your confidence.
Understanding Bike Seatpost Mounts

A bike seatpost mount is what holds your radar or light. It connects to the seatpost, the part that holds your seat. Different bikes need different mounts. Some seatposts are round. Others are shaped like an oval or aero. You need to pick the right mount for your seatpost. This will make sure your radar or light stays in place. A good mount keeps your device from shaking. It also keeps it pointed the right way. If it is loose, the light might point down. Then cars might not see you. Make sure your mount fits tightly. This keeps you safe on the road. Check your bike’s seatpost shape. Then find a mount that fits just right. This will help you ride safely and happily.
- Know your seatpost shape before you start.
- Pick a mount that fits your seatpost well.
- Make sure the mount is strong and secure.
- Check the mount often to keep it tight.
- A good mount keeps your device pointed right.
Think of your seatpost mount like a superhero’s belt. It needs to hold tight and never fail. Your radar or rear light is like the superhero’s power. It keeps you safe from danger. If the belt breaks, the superhero is in trouble. If your mount is loose, your light won’t work right. So, take care when you choose your mount. Read reviews and ask for help. A good mount makes your rides safer and more fun. It gives you peace of mind knowing you are visible. It is a small part, but it plays a big role in your safety. Always double-check that it is secure before you ride.
Why a Good Mount Matters
Have you ever seen a wobbly bike light? It can be distracting and unsafe. A good mount stops this from happening. It keeps your light steady, even on bumpy roads. This means drivers can see you clearly. A strong mount also lasts longer. Cheap mounts can break easily. This means you have to buy new ones often. Investing in a good mount saves you money in the long run. It also keeps you safer. Think of it like building a house. You need a strong base to keep it from falling. Your mount is the base for your light. It keeps it safe and secure. So, choose wisely and ride safely!
Types of Seatpost Mounts
Did you know there are many kinds of seatpost mounts? Some use straps that wrap around the seatpost. Others use screws to tighten onto the seatpost. Aero seatposts need special mounts that fit their shape. Some mounts even let you adjust the angle of the light. This is helpful if your seatpost is tilted. The best mount is one that fits your seatpost and your needs. Read the descriptions carefully before you buy one. Ask a bike shop worker for help if you are not sure. They can show you the right mount for your bike. This will make sure your light is safe and secure.
Checking for Compatibility
Imagine trying to fit a square peg into a round hole. It just doesn’t work! The same is true for seatpost mounts. You need to make sure the mount fits your seatpost. Some seatposts are wider than others. Some are shaped differently. Check the size and shape of your seatpost before you buy a mount. Most mounts will say what kind of seatposts they fit. If you are not sure, ask a bike shop worker. They can help you find the right mount. Using the wrong mount can damage your seatpost. It can also make your light fall off. So, take the time to check for compatibility. This will keep you safe and happy on your rides.
Fun Fact or Stat: Studies show that using bike lights can reduce accidents by up to 60%!
Choosing the Right Radar or Light

Choosing the right radar or light is very important. It helps keep you safe when you ride your bike. Think about where you ride most often. Do you ride in the city or on country roads? If you ride in the city, you need a bright light. City streets have lots of lights already. Your light needs to be strong enough to stand out. If you ride on country roads, you also need a bright light. Country roads can be very dark. A radar can warn you about cars coming from behind. Some lights have both radar and a light. These are great for extra safety. Make sure the light is easy to turn on and off. You do not want to be fiddling with it while you ride. Pick a light that is right for you and your rides.
- Choose a light that is bright enough for your rides.
- Consider a radar to warn you about cars.
- Make sure the light is easy to use.
- Check how long the battery lasts.
- Pick a light that fits your seatpost mount.
- Think about where you ride most often.
Imagine you are a detective on a dark night. You need a good flashlight to see what is around you. Your bike light is like that flashlight. It helps you see and be seen. A dim light is like a weak flashlight. It does not help much. A bright light is like a powerful flashlight. It lights up everything! When you choose a light, think about the brightness. Look for lights with high lumens. Lumens measure how bright a light is. The higher the lumens, the brighter the light. Also, think about the battery life. You want a light that lasts for your whole ride. Read reviews to see what other riders say about the light. Choose a light that will keep you safe on all your adventures.
Understanding Lumens and Brightness
Have you ever wondered what lumens are? Lumens measure how much light a bulb gives off. The more lumens, the brighter the light. For bike lights, more lumens mean you are more visible. A light with 200 lumens is good for city riding. A light with 400 lumens or more is better for dark roads. Think of it like this: a candle has low lumens. A flashlight has high lumens. You want your bike light to be like a flashlight. It should be bright enough for drivers to see you. Check the lumen rating when you buy a light. This will help you choose the right one for your needs.
Features to Look For in a Radar
Radars are like having eyes in the back of your head. They use sensors to detect cars coming from behind. Some radars can even show you how far away the cars are. Look for a radar that has a long range. This gives you more time to react to cars. Some radars connect to your bike computer. They show you alerts on the screen. Others have lights that change color when a car is near. These features help you stay safe on the road. Read reviews to see what other riders think of the radar. Choose one that is reliable and easy to use.
Battery Life and Charging Options
Imagine your phone running out of battery in the middle of a call. It’s frustrating! The same can happen with your bike light. That’s why battery life is so important. Look for a light with a long battery life. Some lights last for 6 hours or more on a single charge. Also, check how the light charges. Some use USB cables. Others use batteries. USB charging is easy because you can plug it into your computer. Make sure you charge your light before every ride. This will keep you safe and visible on the road. A dead light is no good in the dark!
Fun Fact or Stat: Rear bike lights are most effective when they flash because it catches drivers’ attention better!
Gathering the Necessary Tools

Before you start, you need to gather the right tools. This will make the job easier and safer. You will need a few simple things. First, get the right size screwdriver. Some mounts use Phillips head screws. Others use flat head screws. Make sure you have the right one. Next, you might need an Allen wrench. These wrenches are used for tightening bolts. Check your mount to see what size Allen wrench you need. A small towel can be useful too. You can use it to wipe off any dirt or grime. This will help the mount stick better. Having all your tools ready will make the job go smoothly. It will also help you do it right the first time.
- Phillips head screwdriver for some screws.
- Allen wrench for tightening bolts.
- Small towel to clean the seatpost.
- Measuring tape to center the mount.
- Bike repair stand for easier access.
- Work gloves to protect your hands.
Think of gathering tools like preparing for a treasure hunt. You need a map, a shovel, and a bag to carry your treasure. Your tools are like the map and shovel. They help you find and secure your light. Without the right tools, you might struggle. You could even damage your bike. A screwdriver that is too small can strip the screw. An Allen wrench that is too big won’t fit. So, take the time to gather the right tools. This will make the job easier and more fun. It will also help you keep your bike safe and sound. Always double-check that you have everything before you start.
Essential Screwdrivers and Wrenches
Screwdrivers and wrenches are like the keys to your bike. They help you unlock and tighten bolts. A Phillips head screwdriver has a cross-shaped tip. A flat head screwdriver has a straight tip. Allen wrenches are L-shaped and fit into hexagonal bolts. Most bike mounts use Allen bolts. Buy a set of Allen wrenches in different sizes. This will make sure you have the right one. Use the right size screwdriver or wrench. Using the wrong size can damage the bolt. This can make it hard to remove later. Keep your tools organized and easy to find. This will save you time and frustration.
Cleaning Supplies for the Seatpost
Imagine trying to stick tape to a dirty surface. It doesn’t work very well! The same is true for your seatpost mount. Dirt and grime can keep it from sticking properly. Clean your seatpost before you attach the mount. Use a clean towel and some rubbing alcohol. Rubbing alcohol removes grease and dirt. Make sure the seatpost is dry before you attach the mount. This will help it stick better. A clean seatpost also prevents rust. Rust can damage your bike over time. So, take a few minutes to clean your seatpost. It will help your mount stay secure and your bike stay healthy.
Measuring Tools for Centering
Have you ever hung a picture that was crooked? It looks a little funny! The same can happen with your bike light. If it is not centered, it might not point straight back. Use a measuring tape to center the mount. Measure the distance from the mount to the edges of the seatpost. Adjust the mount until it is centered. This will make sure your light shines straight back. It will also make your bike look better. A centered light shows that you care about the details. It also makes you more visible to drivers. So, take the time to center your mount. It’s worth the effort!
Fun Fact or Stat: The average cyclist tightens bolts 20% more than needed, which often damages the threads. Be careful!
Step-by-Step Mounting Guide
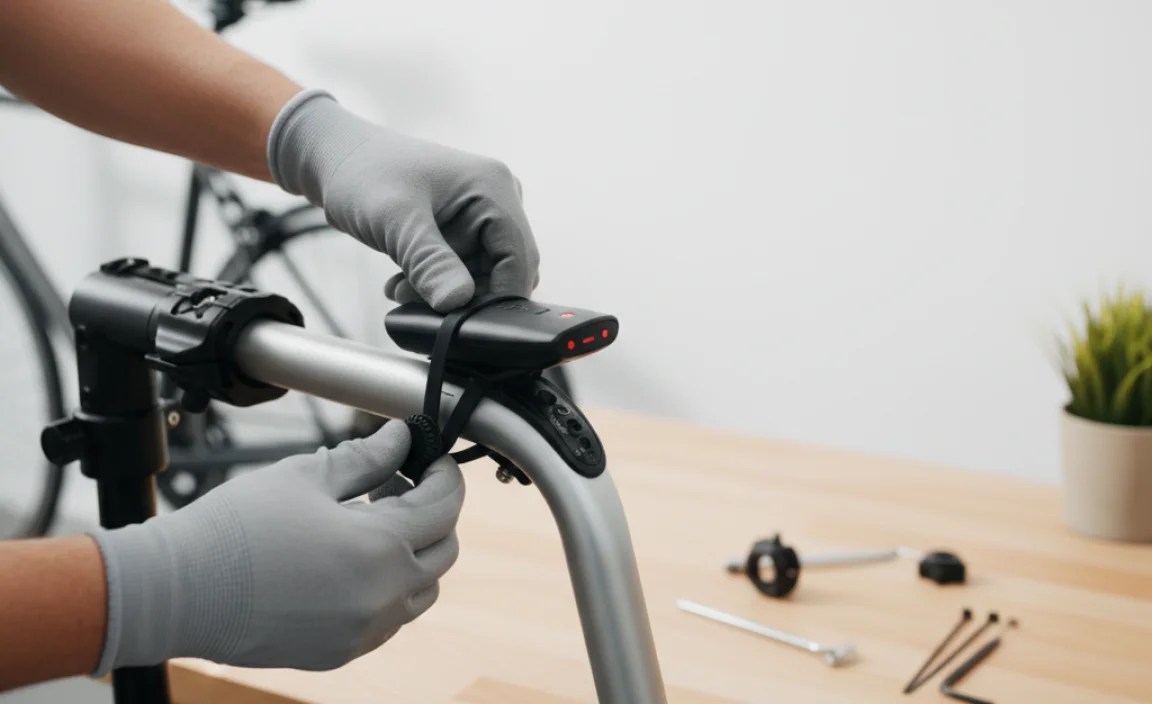
Now, let’s learn how to mount your radar or rear light. First, clean your bike’s seatpost. Use a towel to wipe off any dirt. Next, take your mount and place it on the seatpost. Make sure it is facing the right way. The light should point towards the back. Tighten the screws or bolts on the mount. Do not tighten them too much at first. Just make them snug. Adjust the angle of the mount if needed. You want the light to point straight back. Once you are happy with the position, tighten the screws all the way. Make sure the mount is secure and does not move. Now, attach your radar or light to the mount. Follow the instructions that came with your device. Test the light to make sure it works. You are now ready to ride safely!
- Clean the seatpost before you start.
- Place the mount on the seatpost.
- Tighten the screws or bolts snugly.
- Adjust the angle of the mount.
- Tighten the screws all the way.
- Attach the radar or light to the mount.
- Test the light to make sure it works.
Imagine you are building a Lego set. Each step is important to get it right. Mounting your radar or light is like that. You need to follow each step carefully. Start with a clean seatpost. This helps the mount stick better. Next, place the mount in the right spot. Make sure it is facing the back. Tighten the screws slowly. Do not over-tighten them. This can damage the mount or your bike. Adjust the angle so the light points straight back. Then, tighten the screws all the way. Check that the mount is secure. Attach your light and test it. If you follow these steps, you will have a safe and secure light. Happy riding!
Preparing the Seatpost Surface
Have you ever tried to paint a wall without cleaning it first? The paint doesn’t stick very well. The same is true for your seatpost. You need to clean it before you attach the mount. Use a clean towel and some rubbing alcohol. Rubbing alcohol removes grease and dirt. Make sure the seatpost is dry before you attach the mount. This will help it stick better. A clean seatpost also prevents rust. Rust can damage your bike over time. So, take a few minutes to clean your seatpost. It will help your mount stay secure and your bike stay healthy.
Attaching the Mount Securely
Imagine you are building a tower of blocks. You need to make sure each block is secure. Otherwise, the tower will fall over! Attaching the mount is like that. You need to make sure it is secure. Place the mount on the seatpost. Tighten the screws or bolts snugly. Do not over-tighten them. This can damage the mount or your bike. Check that the mount does not move. If it does, tighten the screws a little more. Use the right size screwdriver or Allen wrench. This will help you tighten the screws properly. A secure mount keeps your light safe and visible.
Connecting the Radar or Light
Now that the mount is secure, it’s time to connect the radar or light. Follow the instructions that came with your device. Some lights slide onto the mount. Others clip in. Make sure the light is firmly attached. You should hear a click or feel it snap into place. Test the light to make sure it works. Turn it on and off. Check that it shines brightly. If you have a radar, test that too. Make sure it detects cars coming from behind. A working light and radar keep you safe on the road. So, take the time to connect them properly.
Fun Fact or Stat: Some bike radars can detect cars from up to 140 meters (460 feet) away!
Ensuring Proper Alignment
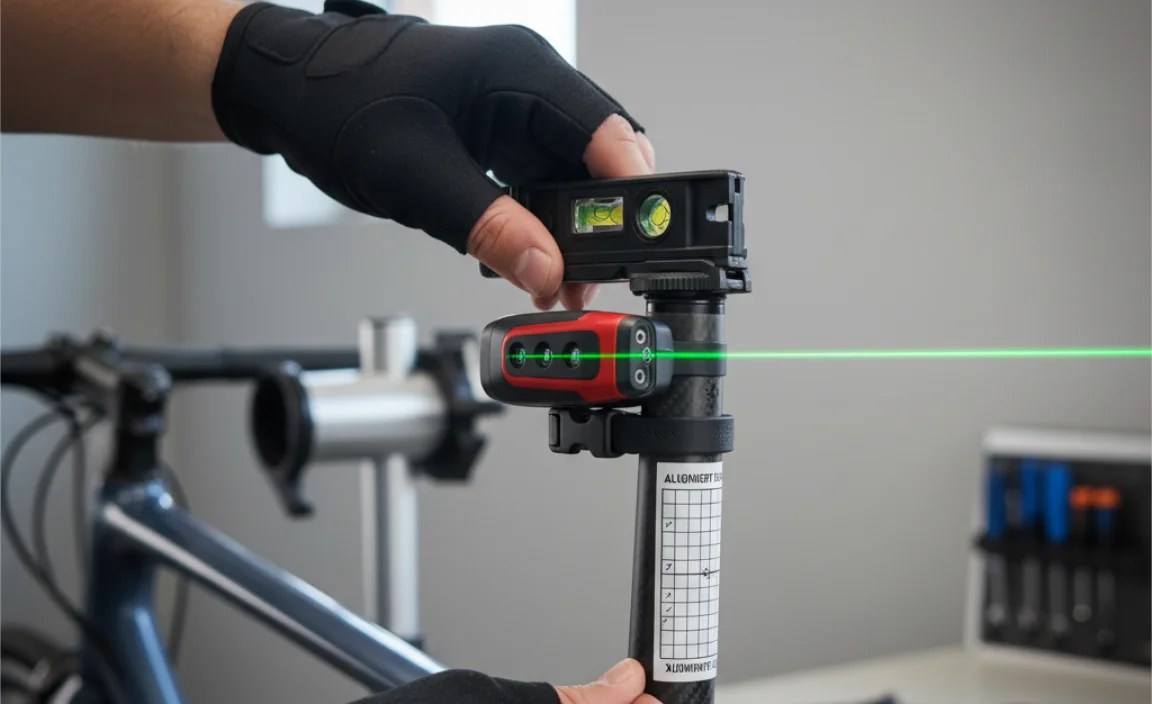
Making sure your light is aligned correctly is very important. It ensures that drivers can see you from far away. If your light is pointing up or down, it won’t be as effective. The goal is to have the light shine straight back. This makes you visible to cars behind you. Check the angle of your seatpost. Some seatposts are tilted. This can affect the angle of your light. Adjust the mount so that the light is level. Use a level or your eye to check the alignment. Ask a friend to stand behind your bike and tell you if the light looks straight. Proper alignment keeps you safe on the road. It also helps you ride with confidence.
- Check the angle of your seatpost.
- Adjust the mount to level the light.
- Use a level to check the alignment.
- Ask a friend to help you check.
- Make sure the light shines straight back.
Imagine you are aiming a water hose. You want the water to go where you are pointing. If the hose is pointed up, the water will go too high. If it is pointed down, the water will go too low. Your bike light is like that water hose. You want it to point straight back. This way, drivers can see you. If the light is tilted, it won’t be as effective. Take the time to adjust the mount. Use a level to make sure the light is straight. Ask a friend to help you. They can tell you if the light looks right. Proper alignment makes you more visible and safer.
Using a Level for Accuracy
A level is a tool that helps you make sure things are straight. It has a bubble inside a tube. When the bubble is in the middle, the surface is level. You can use a level to check the alignment of your bike light. Place the level on top of the light. Adjust the mount until the bubble is in the middle. This means your light is level and pointing straight back. A level is a simple tool, but it can make a big difference. It helps you make sure your light is aligned correctly. This keeps you safe on the road.
Adjusting for Seatpost Angle
Did you know that seatposts come in different angles? Some are straight up and down. Others are tilted back. If your seatpost is tilted, it can affect the angle of your light. You need to adjust the mount to compensate. Some mounts have adjustable angles. You can loosen a screw and tilt the mount. Adjust the mount until the light is level. Use a level to check the alignment. Ask a friend to help you. They can tell you if the light looks right. Adjusting for seatpost angle ensures your light shines straight back.
Checking Visibility from a Distance
Imagine you are driving a car at night. You see a bike light in the distance. You want to make sure you can see it clearly. Ask a friend to stand about 100 feet away from your bike. Turn on the light and have them tell you how visible it is. Can they see it clearly? Is it bright enough? Does it shine straight back? If the light is not visible enough, adjust the angle. You might need to raise or lower the light. Check the visibility from different angles. This will help you make sure drivers can see you from all directions.
Fun Fact or Stat: Lights mounted higher on the body or bike are more visible because they are less likely to be blocked by other objects!
Testing and Securing the Setup
After you mount your radar or light, you need to test it. Make sure it works correctly. Turn the light on and off. Check that it is bright enough. If you have a radar, test that too. Walk behind your bike and see if the radar detects you. Some radars connect to your bike computer. Make sure the radar is sending signals to the computer. Check the mount to make sure it is secure. Try to wiggle it with your hand. If it moves, tighten the screws some more. Go for a short bike ride and see if the light stays in place. Testing your setup helps you make sure everything is working right. It also gives you peace of mind knowing you are safe.
- Turn the light on and off to check brightness.
- Test the radar to see if it detects movement.
- Check the connection to your bike computer.
- Wiggle the mount to test for looseness.
- Go for a short ride to check stability.
Imagine you are a pilot checking your plane before takeoff. You need to make sure everything is working. Your bike light is like that. You need to test it before you ride. Turn the light on and make sure it is bright. Check that the radar is working. Wiggle the mount to make sure it is secure. Go for a short ride and see if the light stays in place. If you find any problems, fix them before you go on a long ride. Testing your setup helps you stay safe. It also makes your ride more enjoyable. You can ride with confidence knowing everything is working right.
Checking Light Functionality
The first thing you should do is check that your light works. Turn it on and off. Make sure it is bright enough. Check the different light modes. Some lights have a steady mode and a flashing mode. The flashing mode is often more visible. Make sure all the modes work. If your light has a low battery indicator, check that too. The indicator should light up when the battery is low. If your light is not working correctly, check the batteries. Replace them if needed. A working light is essential for your safety. So, take the time to check it before every ride.
Testing Radar Detection Range
Radars are like having a sixth sense. They help you see what is behind you. You need to test the radar to make sure it is working correctly. Walk behind your bike and see if the radar detects you. Some radars have a display that shows how far away you are. Check that the display is accurate. If you have a bike computer, make sure the radar is sending signals to it. The computer should show you alerts when a car is approaching. Test the radar in different conditions. See how well it works in daylight and at night. A working radar helps you stay aware of your surroundings.
Securing the Mount Against Vibration
Bike rides can be bumpy. Vibration can loosen the mount over time. You need to make sure the mount is secure against vibration. Tighten the screws or bolts firmly. Use the right size screwdriver or Allen wrench. Check the mount after every few rides. If it is loose, tighten the screws again. Some people use threadlocker on the screws. Threadlocker is a special glue that keeps screws from loosening. You can buy threadlocker at most hardware stores. A secure mount keeps your light safe and visible. It also prevents damage to your bike.
Fun Fact or Stat: Using threadlocker on screws can reduce the chance of them loosening by up to 80%!
Maintenance and Long-Term Care
Taking care of your radar or light is important. It helps them last longer. Check the mount regularly. Make sure the screws are tight. Clean the light with a soft cloth. Do not use harsh chemicals. Store the light in a dry place. This prevents rust and corrosion. Replace the batteries when they get weak. Some lights have rechargeable batteries. Charge them regularly. Check the wires and connections. Make sure they are not damaged. If you take good care of your light, it will keep you safe for many years. Regular maintenance is key to keeping your equipment in top shape.
| Maintenance Task | Frequency | Tools Needed | Notes |
|---|---|---|---|
| Check Mount Security | Weekly | Screwdriver or Allen Wrench | Tighten any loose screws. |
| Clean Light and Radar | Monthly | Soft Cloth, Mild Soap | Remove dirt and grime. |
| Inspect Wires and Connections | Every 3 Months | None | Look for damage. |
| Replace Batteries | As Needed | New Batteries | Use the correct type of batteries. |
- Check the mount for tightness weekly.
- Clean the light monthly with a soft cloth.
- Store the light in a dry place to prevent rust.
- Replace batteries when they get weak.
- Inspect wires and connections every few months.
Imagine you have a pet. You need to feed it, give it water, and take it for walks. Your bike light is like that pet. You need to take care of it. Check the mount to make sure it is secure. Clean the light to keep it bright. Store it in a dry place to prevent damage. Replace the batteries when they get weak. If you take good care of your light, it will take care of you. It will keep you safe and visible on the road. Regular maintenance is easy. It just takes a few minutes. But it can make a big difference in the life of your light.
Regular Cleaning Tips
Dirt and grime can make your light less bright. Clean your light regularly to keep it shining. Use a soft cloth and some mild soap. Do not use harsh chemicals or abrasive cleaners. These can damage the light. Wipe the light gently. Remove any dirt or grime. Rinse the light with clean water. Dry it with a soft cloth. Cleaning your light is easy. It just takes a few minutes. But it can make a big difference in its brightness. A clean light is a bright light. And a bright light keeps you safe.
Battery Management for Longevity
Batteries are the heart of your bike light. Taking care of them helps your light last longer. If your light uses replaceable batteries, use high-quality batteries. Store extra batteries in a dry place. If your light has rechargeable batteries, charge them regularly. Do not let the batteries run down completely. This can damage them. Do not overcharge the batteries. This can also damage them. Follow the manufacturer’s instructions for charging. Battery management is important. It helps your light stay bright and reliable.
Storage Solutions to Prevent Damage
Where do you store your bike light when you are not using it? Storing it in the right place can prevent damage. Do not leave it in direct sunlight. The sun can damage the batteries. Do not leave it in a damp place. Moisture can cause rust and corrosion. Store your light in a dry, cool place. A toolbox or a drawer is a good place. You can also store it in a bag. This protects it from scratches. Proper storage keeps your light safe and sound. It also helps it last longer. Treat your light with care. It will keep you safe on the road.
Fun Fact or Stat: Proper storage can extend the life of your bike light by up to 30%!
Summary
Adding a radar or rear detection system to your bike seatpost is a smart move. It boosts your safety while riding. This article showed you how to mount radar or rear detection on bike seatpost. First, understand the seatpost mount. Choose the right radar or light. Gather the needed tools. Follow the step-by-step guide. Ensure proper alignment. Test and secure the setup. Maintain it for long-term use. A well-mounted and maintained system helps you see and be seen. Remember to choose the right light and mount. Always test your setup before riding.
Taking these steps ensures a safer ride. Being visible to drivers is crucial. Radar systems warn you of approaching vehicles. This extra layer of safety gives you peace of mind. By following this guide, you can confidently enhance your bike’s safety features. Now you know exactly how to mount radar or rear detection on bike seatpost. Stay safe and enjoy your rides!
Conclusion
Adding a radar or rear light to your bike makes you safer. You learned how to pick the right gear. You know the tools you need. You also know how to put it all together. Remember to keep your gear clean and check it often. Now you know how to mount radar or rear detection on bike seatpost. Have fun and stay safe on your bike rides!
Frequently Asked Questions
Question No 1: What tools do I need to mount a radar or rear light on my bike seatpost?
Answer: To mount a radar or rear light, you’ll need a few simple tools. A Phillips head screwdriver is often used for tightening screws. An Allen wrench set is helpful for bolts of different sizes. A clean towel helps wipe dirt off the seatpost. A measuring tape can ensure the mount is centered. Having these tools makes the job easier and ensures a secure fit. You can find these tools at most hardware stores or bike shops. Always use the right size tools to avoid damaging your bike or the mount. Knowing which tools to use is the first step in how to mount radar or rear detection on bike seatpost.
Question No 2: How do I choose the right size mount for my bike’s seatpost?
Answer: Choosing the right size mount is very important. Bike seatposts come in different shapes and sizes. Some are round, while others are aero-shaped. Measure the diameter of your seatpost to find the right size. Check the product description of the mount to see if it fits your seatpost type. If you are unsure, ask a bike shop worker for help. They can help you find the right mount for your bike. Using the wrong size mount can damage your seatpost or cause the light to fall off. Take the time to find a mount that fits perfectly. This is key to learning how to mount radar or rear detection on bike seatpost safely.
Question No 3: How high should I mount the radar or rear light on my seatpost?
Answer: The height of your radar or rear light affects how visible you are. Mount the light as high as possible on the seatpost. This makes it easier for drivers to see you from a distance. Make sure the light is not blocked by anything, like your saddlebag. The higher the light, the better the visibility. However, make sure the light is still secure and does not interfere with your pedaling. Experiment with different heights to find the best spot. A well-placed light can significantly increase your safety on the road, which is a key part of knowing how to mount radar or rear detection on bike seatpost.
Question No 4: How do I make sure the mount is secure and won’t slip during a ride?
Answer: Ensuring the mount is secure is crucial for safety. Before each ride, check the screws or bolts on the mount. Tighten them if they are loose. Use the correct size screwdriver or Allen wrench to avoid stripping the screws. Some people use threadlocker to keep the screws from loosening. If you ride on bumpy roads, check the mount more often. A slipping mount can cause the light to point in the wrong direction. This reduces your visibility. A secure mount keeps your light in place and keeps you safe. Regular checks are vital for learning how to mount radar or rear detection on bike seatpost and keeping it reliable.
Question No 5: What if my seatpost is an unusual shape? Are there special mounts available?
Answer: Yes, many seatposts have unusual shapes. Aero seatposts, for example, are not round. Special mounts are available for these types of seatposts. Look for mounts that are designed for aero or D-shaped seatposts. These mounts often have adjustable straps or shims to fit the seatpost properly. Check the product description to make sure the mount is compatible with your seatpost shape. If you cannot find a suitable mount, ask a bike shop worker for advice. They can help you find a solution that works for your bike. Understanding your seatpost shape is a crucial part of how to mount radar or rear detection on bike seatpost correctly.
Question No 6: Can I use the same mount for both a radar and a rear light, or do I need separate mounts?
Answer: Some mounts are designed to hold both a radar and a rear light. These combination mounts can save space on your seatpost. They also make it easier to install both devices at once. However, make sure the mount is strong enough to hold the weight of both devices. If you use separate mounts, you have more flexibility in positioning the radar and light. This can help you optimize their visibility. Choose the option that works best for your needs and your bike. Remember that correct mounting is important to achieve the best result for how to mount radar or rear detection on bike seatpost.


