
How to Inflate Balls Using Bike Hose Adapter: Easy Guide
Quick Summary
Want to inflate sports balls with your bike pump? You can! You’ll need a bike pump, a ball inflation needle, and a bike pump adapter. Simply attach the adapter to your pump, insert the needle into the ball, and start pumping. Make sure to inflate to the correct pressure. Now you’re ready to play!
Ever tried to pump up a basketball or soccer ball with your bike pump and realized the nozzle just doesn’t fit? It’s a common problem that many cyclists and sports enthusiasts face. Don’t worry, you don’t need to buy a separate pump just for your sports balls. With a simple adapter, you can easily use your trusty bike pump to inflate all sorts of balls. This guide will walk you through each step, making the process easy and frustration-free. Let’s get started and get that ball game ready!
What You’ll Need
Before we begin, gather these essential items. Having everything ready will make the process smooth and quick.
- Bike Pump: Any standard bike pump will work. Floor pumps are generally easier to use than hand pumps.
- Ball Inflation Needle: These are inexpensive and widely available at sporting goods stores.
- Bike Pump Adapter: This adapter connects the inflation needle to your bike pump hose.
- Ball: The ball you want to inflate (e.g., basketball, soccer ball, volleyball).
Step-by-Step Guide to Inflating Balls Using a Bike Hose Adapter

Follow these simple steps to inflate your sports balls quickly and efficiently using your bike pump.
Step 1: Gather Your Equipment
Make sure you have all the necessary items: your bike pump, the ball inflation needle, and the bike pump adapter. Lay them out so they are easily accessible.
Step 2: Attach the Adapter to Your Bike Pump
Most bike pumps have a universal valve head that can be adjusted to fit different valve types (Presta or Schrader). For inflating balls, you’ll typically use the Schrader valve setting.
- Identify the Valve Head: Look at the end of your bike pump hose. It should have a lever or a rotating head.
- Adjust to Schrader Setting: If your pump has a switch, make sure it’s set to the Schrader valve setting. This is the wider of the two valve types.
- Attach the Adapter: Screw or push the bike pump adapter onto the valve head of your bike pump. Ensure it is securely attached.
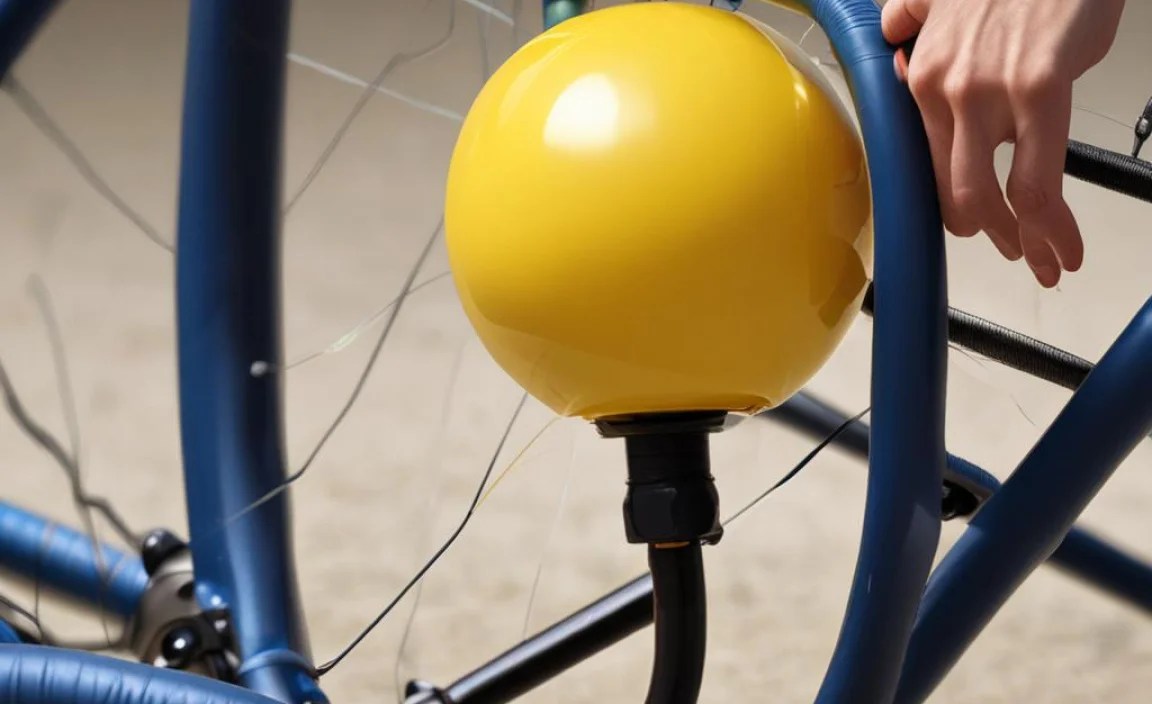
Step 3: Insert the Inflation Needle into the Ball
Carefully insert the inflation needle into the valve of the ball. Be gentle to avoid damaging the valve.
- Locate the Ball Valve: Find the small opening on the ball where you insert the needle.
- Moisten the Needle: Lightly moisten the inflation needle with water or saliva. This helps it slide in smoothly and prevents damage to the ball’s valve.
- Insert Gently: Gently push the needle straight into the valve until it is fully inserted.
Step 4: Connect the Adapter to the Inflation Needle
Now, connect the bike pump adapter to the end of the inflation needle. This creates a secure connection for inflating the ball.
- Align the Adapter: Line up the opening of the bike pump adapter with the end of the inflation needle.
- Attach Securely: Push or screw the adapter onto the needle, ensuring a tight seal.
Step 5: Begin Pumping
With everything connected, start pumping air into the ball. Use smooth, steady strokes to inflate the ball evenly.
- Position the Ball: Hold the ball firmly with one hand and the pump handle with the other.
- Start Pumping: Begin pumping the handle up and down in a smooth, consistent motion.
- Monitor Inflation: Periodically check the firmness of the ball to avoid over-inflation.
Step 6: Check the Pressure
It’s important to inflate the ball to the correct pressure. Over-inflation can damage the ball, while under-inflation affects its performance. Look for the recommended PSI (pounds per square inch) printed on the ball near the valve. If you don’t have a pressure gauge on your pump, you can purchase a separate ball pressure gauge.
- Locate Recommended PSI: Check the ball for the recommended pressure, usually printed near the valve.
- Use a Pressure Gauge: If your pump doesn’t have a gauge, use a separate ball pressure gauge to check the pressure.
- Adjust Accordingly: Add or release air as needed to reach the recommended pressure.
Step 7: Remove the Needle and Adapter
Once the ball is properly inflated, carefully remove the inflation needle and adapter.
- Detach the Adapter: Gently disconnect the bike pump adapter from the inflation needle.
- Remove the Needle: Slowly and carefully pull the inflation needle straight out of the ball valve.
- Check for Leaks: Listen for any hissing sounds, which could indicate a leak. If you hear a leak, re-insert the needle and try again.
Troubleshooting Tips

Sometimes, things don’t go as planned. Here are a few troubleshooting tips to help you overcome common issues.
- Air Leaks: If you hear air leaking while pumping, make sure the adapter and needle are securely connected. Also, check the ball valve for damage.
- Difficulty Inserting the Needle: If the needle is hard to insert, try moistening it with water or saliva. Be gentle to avoid damaging the valve.
- Pump Not Pumping: Ensure your bike pump is functioning correctly. Check the valve head and make sure it is properly attached to the adapter.
Choosing the Right Adapter and Needle
Selecting the right adapter and needle can make the inflation process much easier. Here’s what to look for:
- Adapter Material: Look for adapters made from durable materials like brass or aluminum. These will last longer than plastic adapters.
- Needle Material: Stainless steel needles are less likely to bend or break compared to cheaper alternatives.
- Compatibility: Ensure the adapter is compatible with your bike pump’s valve head (Schrader or Presta).
Maintaining Your Bike Pump and Accessories
Proper maintenance will keep your bike pump and accessories in good working condition for years to come.
- Clean Regularly: Wipe down your bike pump and adapter with a clean cloth after each use to remove dirt and grime.
- Store Properly: Store your bike pump in a dry place to prevent rust and corrosion.
- Check for Wear: Periodically inspect the pump hose, valve head, and adapter for signs of wear and tear. Replace parts as needed.
Benefits of Using a Bike Pump for Ball Inflation
Using a bike pump to inflate your sports balls offers several advantages:
- Cost-Effective: You don’t need to buy a separate pump just for balls.
- Versatile: Bike pumps are designed to provide high pressure, making them suitable for inflating various types of balls.
- Convenient: If you already own a bike pump, it’s easy to use it for inflating balls with the right adapter.
Comparing Different Types of Bike Pumps
There are several types of bike pumps available, each with its own pros and cons. Here’s a quick comparison:
| Type of Pump | Pros | Cons | Best For |
|---|---|---|---|
| Floor Pump | Easy to use, high pressure, stable | Larger, not portable | Home use, inflating multiple balls |
| Hand Pump | Portable, lightweight | Requires more effort, lower pressure | On-the-go inflation, emergency use |
| Mini Pump | Very compact, easy to carry | Lower pressure, can be difficult to use | Backpacking, minimalist cycling |
| CO2 Inflator | Fast inflation, very portable | Requires cartridges, can be expensive | Racing, quick inflation needs |
Understanding Ball Pressure: PSI and Bar
Understanding pressure measurements like PSI (pounds per square inch) and bar is crucial for proper ball inflation. Here’s a simple breakdown:
- PSI: Pounds per square inch, a common unit of pressure measurement.
- Bar: Another unit of pressure measurement, often used in Europe and other parts of the world. 1 bar is approximately equal to 14.5 PSI.
Always refer to the recommended pressure printed on the ball and use a pressure gauge to ensure accurate inflation.
Best Practices for Ball Maintenance
Maintaining your sports balls properly will extend their lifespan and ensure optimal performance.
- Store Properly: Store balls in a cool, dry place away from direct sunlight and extreme temperatures.
- Clean Regularly: Wipe down your balls with a damp cloth after each use to remove dirt and grime.
- Avoid Over-Inflation: Always inflate to the recommended pressure to prevent damage.
- Check for Leaks: Periodically check your balls for leaks and repair them as needed.
Alternatives to Bike Pump Adapters
If you don’t have a bike pump adapter, there are a few alternatives you can try:
- Dedicated Ball Pump: These pumps are specifically designed for inflating sports balls and typically come with the necessary needles.
- Air Compressor: If you have an air compressor, you can use it to inflate balls with the appropriate adapter.
Safety Tips for Using Bike Pumps
Follow these safety tips to ensure a safe and enjoyable experience when using your bike pump:
- Wear Safety Glasses: Protect your eyes from potential debris or air blasts.
- Avoid Over-Pressurizing: Never exceed the recommended pressure for the ball.
- Inspect Equipment: Regularly inspect your bike pump and accessories for damage.
Common Mistakes to Avoid
Here are some common mistakes to avoid when inflating balls with a bike pump:
- Over-Inflating the Ball: This can cause the ball to burst or become damaged.
- Using the Wrong Needle: Using the wrong size or type of needle can damage the ball valve.
- Forcing the Needle: Forcing the needle can bend or break it, or damage the ball valve.
Recommended Tools and Accessories
Here are some recommended tools and accessories to enhance your ball inflation experience:
- Digital Pressure Gauge: Provides accurate pressure readings.
- Ball Inflation Kit: Includes a variety of needles and adapters for different types of balls.
- Pump Repair Kit: Contains replacement parts for your bike pump.
Advanced Techniques for Ball Inflation
For those looking to take their ball inflation skills to the next level, here are some advanced techniques:
- Using a Dual-Action Pump: These pumps inflate on both the up and down strokes, making the process faster and more efficient.
- Pre-Inflating Balls: Inflate balls slightly before use to allow them to stretch and break in.
FAQ: Inflating Balls with Bike Hose Adapter
1. Can I use any bike pump to inflate a ball?
Yes, most standard bike pumps can be used to inflate balls, but you’ll need a special adapter and inflation needle. The adapter connects the needle to the pump hose.
2. What if I don’t have a bike pump adapter?
If you don’t have an adapter, you can purchase one at most sporting goods stores or online. Alternatively, you can use a dedicated ball pump, which comes with the necessary attachments.
3. How do I know how much to inflate the ball?
Check the ball for the recommended PSI (pounds per square inch). It’s usually printed near the valve. Use a pressure gauge to ensure you’re inflating it to the correct level.
4. What if the needle is hard to insert into the ball?
Moisten the needle with water or saliva before inserting it. This helps it slide in smoothly and prevents damage to the ball’s valve.
5. Can over-inflating a ball damage it?
Yes, over-inflating a ball can cause it to burst or become damaged. Always inflate to the recommended pressure to avoid this.
6. What type of bike pump is best for inflating balls?
A floor pump is generally the easiest to use for inflating balls because it provides more stability and higher pressure compared to hand pumps.
7. How often should I check the pressure in my sports balls?
Check the pressure before each use to ensure optimal performance. Balls can lose air over time, especially if they are stored in fluctuating temperatures.
Conclusion
Inflating sports balls with a bike pump adapter is a simple and cost-effective solution. By following these steps and tips, you can easily maintain your balls and keep them in top playing condition. Remember to always use the right tools, check the pressure, and maintain your equipment for long-lasting performance. Now you’re all set to enjoy your favorite sports with perfectly inflated balls!


