
How Cycle Pump Works: A Beginner’s Guide
Quick Summary: A cycle pump works by using a piston to force air into your tire. When you push down on the handle, the piston compresses the air inside the pump’s cylinder. This compressed air then flows through a valve and into your tire, increasing the tire pressure. Releasing the handle allows more air to be drawn into the cylinder, ready for the next push.
Ever struggled with a flat tire and a confusing cycle pump? You’re not alone! Many cyclists find bike pumps a bit mysterious at first. But don’t worry, understanding how your cycle pump works is easier than you think. This guide breaks down the mechanics of a cycle pump, step by step. We’ll cover the different types of pumps, their components, and how they inflate your tires effortlessly. Get ready to pump like a pro!
Understanding the Basic Components of a Cycle Pump
Every cycle pump, regardless of its type, shares a few key components that make the magic happen. Let’s break them down:
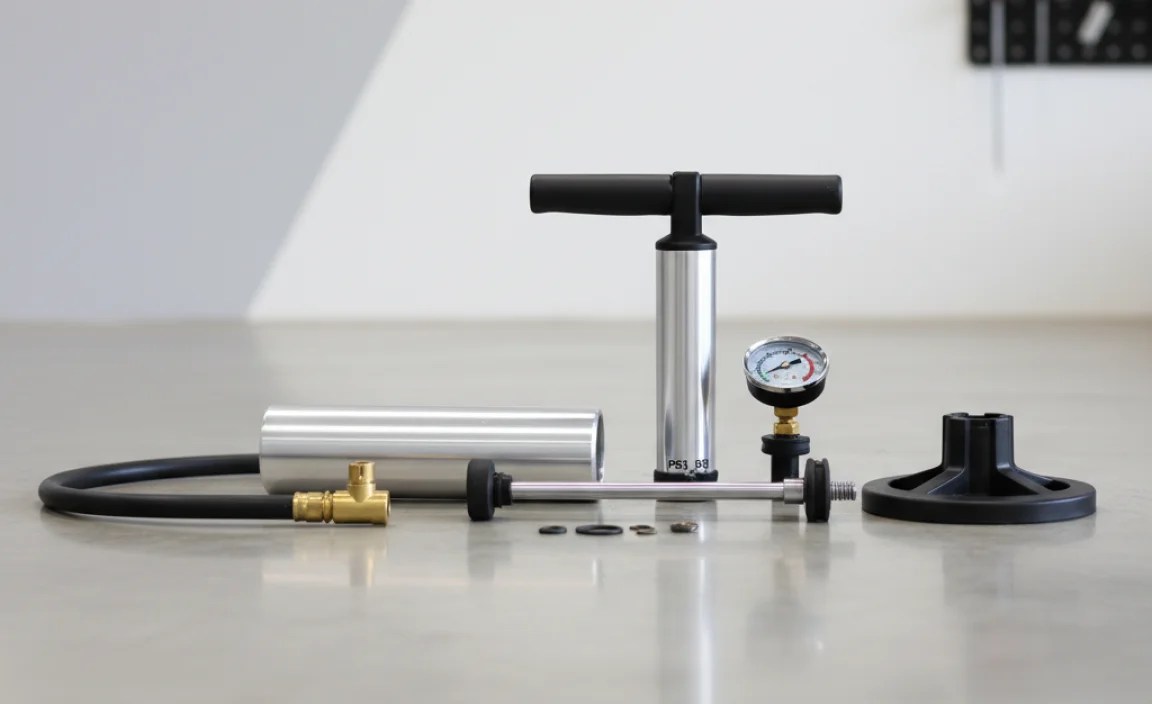
- Cylinder: This is the main body of the pump, a hollow tube where air is compressed.
- Piston: A movable component inside the cylinder that compresses the air.
- Handle: The part you push or pull to move the piston.
- Valve: A one-way gateway that allows air to flow into the tire but prevents it from escaping back into the pump.
- Hose: Connects the pump to the tire valve.
- Pump Head: The part that attaches to the tire valve, ensuring a secure connection.
The Mechanics: How Air Gets Into Your Tire

Now that we know the parts, let’s see how they work together to inflate your tire:
- Intake Stroke: When you pull up on the handle, the piston moves upwards inside the cylinder. This creates a vacuum, drawing air into the cylinder through an intake valve.
- Compression Stroke: When you push down on the handle, the piston moves downwards, compressing the air inside the cylinder. The intake valve closes to prevent air from escaping.
- Delivery Stroke: As the air compresses, it forces open the delivery valve, allowing the pressurized air to flow through the hose and into your tire.
- Repeat: You repeat these steps until your tire reaches the desired pressure.
Types of Cycle Pumps: A Quick Overview

Cycle pumps come in various shapes and sizes, each designed for specific needs. Here’s a rundown of the most common types:
- Floor Pumps (Track Pumps): These are larger pumps designed for home use. They offer high volume and pressure, making them ideal for quickly inflating tires.
- Hand Pumps: Compact and portable, hand pumps are perfect for on-the-go inflation during rides. They require more effort than floor pumps but are essential for emergency repairs.
- Mini Pumps: A smaller version of hand pumps, even more portable but generally require more strokes to inflate a tire.
- CO2 Inflators: These use cartridges of compressed carbon dioxide to rapidly inflate tires. They’re lightweight and fast but require purchasing replacement cartridges.
Floor Pumps: The Powerhouse of Inflation

Floor pumps, also known as track pumps, are the workhorses of tire inflation. They provide a stable platform and efficient pumping action. Let’s delve deeper into how they work:
- Stance and Stability: The wide base provides stability, allowing you to use both hands for pumping.
- Large Cylinder: Floor pumps have a larger cylinder than hand pumps, allowing them to move more air with each stroke.
- Leverage: The long handle provides leverage, making it easier to compress the air.
- Gauge: Most floor pumps have a built-in pressure gauge, allowing you to accurately inflate your tires to the desired PSI (pounds per square inch) or BAR.
Here’s a table comparing the pros and cons of floor pumps:
| Pros | Cons |
|---|---|
| High volume and pressure | Less portable |
| Easy to use | More expensive than hand pumps |
| Built-in pressure gauge | Requires storage space |
Hand Pumps: Portable Inflation on the Go

Hand pumps are your trusty companions for roadside repairs. They are lightweight and compact, fitting easily into a backpack or frame mount. Here’s how they work:
- Compact Design: Hand pumps are designed to be as small and lightweight as possible.
- Manual Operation: You manually move the piston back and forth to compress the air.
- Effort Required: Inflating a tire with a hand pump requires more effort than with a floor pump, as the cylinder is smaller.
- Attachment: They attach directly to the tire valve using a pump head.
Here’s a table comparing the pros and cons of hand pumps:
| Pros | Cons |
|---|---|
| Highly portable | Requires more effort |
| Affordable | Smaller air volume per stroke |
| No power required | Can be tiring for high-pressure tires |
Mini Pumps: The Ultra-Portable Option
Mini pumps take portability to the extreme. They are incredibly small and lightweight, making them ideal for cyclists who prioritize minimal weight and space. However, this comes at a cost:
- Extremely Compact: Mini pumps are designed to be as small as possible.
- High Stroke Count: Due to their small size, they require a significantly higher number of strokes to inflate a tire.
- Lower Efficiency: They are generally less efficient than standard hand pumps.
CO2 Inflators: Speed and Convenience
CO2 inflators offer a rapid inflation solution. They use cartridges of compressed carbon dioxide to quickly fill your tires. Here’s how they work:
- Cartridge Connection: The inflator head screws onto a CO2 cartridge.
- Valve Activation: When you press the inflator head onto the tire valve, the CO2 is released into the tire.
- Rapid Inflation: The tire inflates almost instantly.
- One-Time Use: Each cartridge can only be used once.
CO2 inflators are popular among racers and cyclists who prioritize speed and convenience. However, they also have some drawbacks:
- Cost: You need to purchase replacement CO2 cartridges.
- Environmental Impact: CO2 cartridges contribute to greenhouse gas emissions.
- Limited Control: It can be difficult to control the exact pressure when using a CO2 inflator.
Valve Types: Presta vs. Schrader
Understanding valve types is crucial for using your cycle pump effectively. The two main types are Presta and Schrader.
- Presta Valves: These are commonly found on road bikes and high-performance bicycles. They are narrower than Schrader valves and have a locking nut at the tip.
- Schrader Valves: These are the same type of valves used on car tires. They are wider and more robust than Presta valves and are commonly found on mountain bikes and hybrid bikes.
Here’s a comparison table:
| Feature | Presta Valve | Schrader Valve |
|---|---|---|
| Width | Narrower | Wider |
| Typical Bikes | Road bikes, high-performance bikes | Mountain bikes, hybrid bikes |
| Pressure Retention | Better pressure retention | Slightly less pressure retention |
| Ease of Use | Requires unlocking nut before inflation | More straightforward inflation process |
Using Your Cycle Pump: A Step-by-Step Guide
Now that you understand the different types of pumps and valves, let’s go through the process of inflating your tires:
- Prepare the Valve: For Presta valves, unscrew the locking nut at the tip. For Schrader valves, remove the valve cap.
- Attach the Pump Head: Securely attach the pump head to the valve. Make sure it’s a tight fit to prevent air leakage. Some pump heads have a lever that you need to flip to lock the head onto the valve.
- Inflate the Tire: Begin pumping, using smooth, consistent strokes. Watch the pressure gauge (if your pump has one) to monitor the pressure.
- Reach the Desired Pressure: Inflate the tire to the recommended pressure, which is usually printed on the sidewall of the tire.
- Detach the Pump Head: Carefully detach the pump head from the valve. For Presta valves, tighten the locking nut. For Schrader valves, replace the valve cap.
Troubleshooting Common Pump Problems
Sometimes, things don’t go as planned. Here are some common problems you might encounter and how to fix them:
- Air Leakage: Make sure the pump head is securely attached to the valve. Check the pump head for wear and tear.
- Difficulty Pumping: Ensure the pump is properly lubricated. Check the valve for obstructions.
- Incorrect Pressure Reading: Calibrate the pressure gauge. If the gauge is faulty, replace the pump.
Maintaining Your Cycle Pump
Proper maintenance will keep your cycle pump working smoothly for years to come. Here are some tips:
- Lubrication: Regularly lubricate the piston and other moving parts with silicone grease.
- Cleaning: Keep the pump clean and free of dirt and debris.
- Storage: Store the pump in a dry place to prevent rust and corrosion.
Choosing the Right Cycle Pump
Selecting the right cycle pump depends on your needs and riding style. Consider the following factors:
- Type of Bike: Road bikes typically require high-pressure pumps, while mountain bikes may benefit from high-volume pumps.
- Portability: If you need a pump for on-the-go repairs, choose a hand pump or CO2 inflator.
- Budget: Cycle pumps range in price from affordable hand pumps to high-end floor pumps.
- Features: Look for features like a pressure gauge, dual pump head (compatible with both Presta and Schrader valves), and ergonomic handles.
Reputable brands like Topeak, Lezyne, and Park Tool offer a wide range of high-quality cycle pumps. Before purchasing, read online reviews and compare different models to find the best pump for your needs.
Understanding PSI and BAR
PSI (pounds per square inch) and BAR are units of pressure used to measure tire inflation. Most pumps display both units on their pressure gauges. Knowing the correct pressure for your tires is crucial for optimal performance and safety. Refer to the tire sidewall for the recommended pressure range.
For example, a road bike tire might require 100-120 PSI, while a mountain bike tire might need 30-50 PSI. Always stay within the recommended range to avoid flats or blowouts.
Essential Accessories for Your Cycle Pump
To enhance your pumping experience, consider these accessories:
- Valve Adapters: These allow you to use your pump with different valve types.
- Pressure Gauges: Separate pressure gauges provide accurate readings, especially for pumps with unreliable built-in gauges.
- Pump Mounts: These attach your hand pump to your bike frame for easy access during rides.
External Resources for Further Learning
For more in-depth information on cycle pumps and tire maintenance, check out these resources:
- Park Tool’s Guide to Tire and Tube Service: Comprehensive guide on tire and tube maintenance.
- BikeRadar’s Best Bike Pumps: Reviews and comparisons of various cycle pumps.
- REI’s Guide to Bike Tire Pressure: Expert advice on choosing the right tire pressure.
FAQ About Cycle Pumps
1. Why is my bike tire going flat even after I pump it up?
There could be several reasons. Check for punctures in the tire or tube. Also, ensure the valve is properly sealed and the valve core is tight. Temperature changes can also affect tire pressure.
2. How often should I pump up my bike tires?
It depends on the type of tire and how often you ride. Generally, check and inflate your tires before each ride or at least once a week to maintain optimal pressure.
3. Can I use a car tire pump on my bike?
Yes, if your bike has Schrader valves. However, car tire pumps often deliver too much air too quickly, so be careful not to overinflate your tires. Using a dedicated bike pump is generally recommended for better control.
4. What does PSI mean for bike tires?
PSI stands for pounds per square inch. It’s the unit of measurement for tire pressure. The recommended PSI for your tires is usually printed on the tire sidewall.
5. How do I know what PSI to inflate my tires to?
Look for the recommended pressure range printed on the sidewall of your tire. This range will give you a good idea of the optimal pressure for your tires. Consider your weight and riding conditions when choosing a specific pressure within that range.
6. My pump head won’t fit on my valve. What should I do?
Make sure you have the correct type of pump head for your valve (Presta or Schrader). Some pump heads are dual-compatible and can be switched between valve types. If the head still doesn’t fit, you may need a valve adapter.
7. Why is my pump getting harder to use over time?
The pump may need lubrication. Apply a small amount of silicone grease to the piston and other moving parts to keep it working smoothly. Also, check for any dirt or debris that may be causing friction.
Conclusion
Understanding how your cycle pump works empowers you to maintain your bike’s tires confidently. Whether you choose a floor pump for home use, a hand pump for on-the-go repairs, or a CO2 inflator for speed, knowing the mechanics behind inflation ensures you’re always ready for a smooth ride. Remember to maintain your pump, choose the right type for your needs, and always inflate your tires to the recommended pressure. Happy cycling!
“`


