What Makes My Well Pump Short Cycle? A Simple Guide
Quick Summary: Well pump short cycling happens when your pump turns on and off too frequently. Common causes include a waterlogged pressure tank, incorrect pressure switch settings, a leak in the system, or a faulty check valve. Fixing these issues can save energy, extend your pump’s life, and ensure a steady water supply.
Is your well pump making a racket, turning on and off more often than it should? This annoying problem, called short cycling, is more than just a nuisance. It puts extra wear and tear on your pump, wastes electricity, and can even lead to premature failure. Don’t worry, though – identifying and fixing the causes of short cycling is often something you can handle yourself with a bit of know-how. In this guide, we’ll walk you through the most common culprits and provide simple steps to get your water system running smoothly again.
Understanding Well Pump Short Cycling

Short cycling refers to the rapid and repeated on-off cycles of your well pump within a short period. Normally, a well pump should run for a reasonable amount of time to fill the pressure tank and then shut off until the water pressure drops to a certain level. When short cycling occurs, the pump may only run for a few seconds or minutes before shutting off, only to start up again almost immediately.
Why is Short Cycling Bad?
- Reduced Pump Lifespan: Frequent starts and stops cause excessive wear on the pump motor and components.
- Increased Energy Consumption: Each start-up requires a surge of electricity, wasting energy.
- Water Pressure Fluctuations: Short cycling can lead to inconsistent water pressure in your home.
- Potential for Overheating: The pump motor can overheat due to the rapid cycling.
Common Causes of Well Pump Short Cycling and How to Fix Them

Let’s dive into the most frequent causes of short cycling and explore how to address them. We’ll break down each problem and offer step-by-step solutions you can try.
1. Waterlogged Pressure Tank
The pressure tank stores water under pressure, allowing your pump to run less frequently. It has an air bladder that compresses as water fills the tank. Over time, this air bladder can lose its air charge, causing the tank to become waterlogged. When this happens, the pump has to work harder and cycles more often.
How to Identify a Waterlogged Tank:
- Check the Tank’s Air Charge: Turn off the pump, drain the tank completely, and check the air pressure using a tire pressure gauge. It should be 2 PSI below the pump’s cut-in pressure (usually around 28 PSI for a 30/50 switch).
- Listen for Water Sounds: Tap on the side of the tank. A waterlogged tank will sound full or solid, while a healthy tank will sound hollow near the top.
How to Fix a Waterlogged Tank:
- Turn off the power to the well pump at the circuit breaker.
- Drain the Tank: Open a faucet in the house and let the water run until the tank is empty. You may need to open a drain valve at the bottom of the tank if one is installed.
- Check the Air Pressure: Use a tire pressure gauge on the Schrader valve (like on a car tire) located at the top of the tank.
- Add Air: If the pressure is low, use an air compressor to add air until it reaches 2 PSI below the cut-in pressure of your pressure switch.
- Monitor: Turn the pump back on and observe its cycling behavior. If the problem persists, the tank may need replacement.
If your pressure tank is old or severely waterlogged, consider replacing it. You can find replacement tanks at most hardware stores or online retailers like Home Depot.
2. Incorrect Pressure Switch Settings
The pressure switch controls when your pump turns on and off based on the water pressure in the tank. If the settings are incorrect, it can cause short cycling. Common pressure switch settings are 30/50 (pump turns on at 30 PSI and off at 50 PSI) or 40/60.
How to Identify Incorrect Pressure Switch Settings:
- Check the Pressure Gauge: Observe the pressure gauge on the water line near the pressure tank. Note the pressures at which the pump turns on and off.
- Compare to Switch Settings: Remove the cover of the pressure switch (after turning off the power!) and check the settings. They are usually indicated on the switch itself.
How to Adjust Pressure Switch Settings:
- Turn off the power to the well pump at the circuit breaker.
- Remove the Cover: Carefully remove the cover of the pressure switch.
- Locate Adjustment Nuts: You’ll see two nuts – one large and one small. The larger nut adjusts the overall pressure range (cut-in and cut-out), while the smaller nut adjusts the differential (the difference between cut-in and cut-out).
- Adjust the Range: To increase the overall pressure, turn the larger nut clockwise. To decrease it, turn it counterclockwise. Make small adjustments and check the pressure gauge after each adjustment.
- Adjust the Differential: If you want to change the difference between the cut-in and cut-out pressures, adjust the smaller nut. Turning it clockwise increases the differential, and counterclockwise decreases it.
- Replace the Cover: Once you’ve made the adjustments, replace the cover and turn the power back on. Monitor the pump’s cycling behavior.
3. Leaks in the System
Even a small leak in your plumbing system can cause a drop in water pressure, triggering the pump to turn on frequently. This is a common cause of short cycling that’s often overlooked.
How to Identify Leaks:
- Check Faucets and Fixtures: Look for drips or signs of moisture around faucets, showerheads, and toilets.
- Inspect Pipes: Examine exposed pipes in your basement or crawl space for leaks or corrosion.
- Check the Well Casing: Look around the well casing for signs of water leakage.
- Monitor Water Meter: Turn off all water-using appliances and check the water meter. If it’s still moving, you likely have a leak.
How to Fix Leaks:
- Repair Leaky Faucets and Fixtures: Replace worn washers, O-rings, or the entire fixture if necessary.
- Patch or Replace Leaky Pipes: Use pipe clamps, epoxy, or replace sections of pipe as needed.
- Seal Leaks in the Well Casing: This may require professional help, especially if the leak is underground.
For more information on finding and fixing leaks, the EPA’s WaterSense program offers valuable resources.
4. Faulty Check Valve
The check valve is a one-way valve that prevents water from flowing back into the well when the pump shuts off. If the check valve is faulty, water can flow back, causing the pressure to drop quickly and triggering the pump to short cycle.
How to Identify a Faulty Check Valve:
- Listen for Backflow: When the pump shuts off, listen for the sound of water flowing back into the well.
- Check Pressure Drop: Observe how quickly the pressure drops after the pump shuts off. A rapid drop suggests a faulty check valve.
How to Fix a Faulty Check Valve:
- Locate the Check Valve: Check valves are usually located either above the well pump or within the pump itself.
- Replace the Check Valve: Turn off the power to the pump and drain the system. Remove the old check valve and install a new one. Ensure it’s installed in the correct direction (usually indicated by an arrow on the valve).
5. Low Well Water Level
If your well’s water level is too low, the pump may struggle to draw enough water, causing it to cycle on and off rapidly. This is more common during periods of drought or high water usage.
How to Identify a Low Well Water Level:
- Monitor Water Production: Notice if your water pressure drops significantly during periods of high water usage.
- Check Well Records: Review your well’s construction records to determine the static water level and pump depth.
How to Fix a Low Well Water Level:
- Conserve Water: Reduce your water usage, especially during peak demand times.
- Lower the Pump: If possible, lower the pump deeper into the well. This may require professional assistance.
- Consider Well Deepening: In severe cases, you may need to deepen the well to access more water.
6. Clogged or Damaged Well Screen
The well screen filters out sediment and debris from the water entering the pump. Over time, it can become clogged or damaged, restricting water flow and causing the pump to short cycle.
How to Identify a Clogged or Damaged Well Screen:
- Reduced Water Flow: Notice a decrease in water pressure or flow from your faucets.
- Sediment in Water: Observe sediment or debris in your water supply.
How to Fix a Clogged or Damaged Well Screen:
- Shock the Well: Shocking the well with chlorine can help to disinfect it and loosen sediment buildup. Follow the instructions provided by your local health department or a well service professional.
- Clean or Replace the Well Screen: This usually requires professional assistance. A well service company can pull the pump and inspect the screen.
Troubleshooting Table
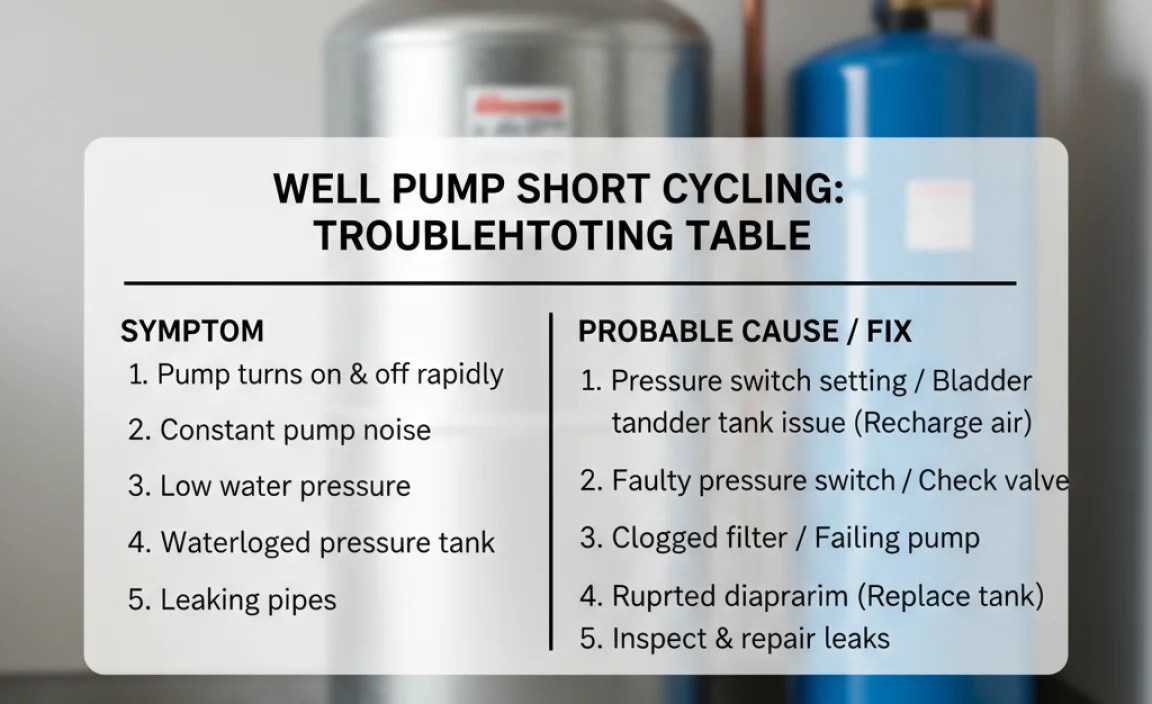
Here’s a quick reference table to help you diagnose and address the causes of short cycling:
| Problem | Symptoms | Possible Solutions |
|---|---|---|
| Waterlogged Pressure Tank | Pump cycles frequently, tank feels heavy, low air pressure | Drain tank, check/add air pressure, replace tank if necessary |
| Incorrect Pressure Switch Settings | Pump cycles at incorrect pressures, pressure gauge readings are off | Adjust pressure switch settings |
| Leaks in the System | Pump cycles frequently, water meter moves when water is off, visible leaks | Repair leaky faucets, pipes, or well casing |
| Faulty Check Valve | Water flows back into well when pump shuts off, rapid pressure drop | Replace check valve |
| Low Well Water Level | Pump cycles frequently during high water usage, reduced water pressure | Conserve water, lower pump, deepen well |
| Clogged or Damaged Well Screen | Reduced water flow, sediment in water | Shock well, clean or replace well screen |
When to Call a Professional
While many short cycling issues can be resolved with DIY troubleshooting, there are times when it’s best to call a professional well service company. Consider seeking professional help if:
- You are uncomfortable working with electrical components or plumbing.
- You are unable to identify the cause of the short cycling.
- The problem persists after attempting DIY solutions.
- You suspect a major issue with the well itself, such as a collapsed casing or a severely depleted water supply.
Preventing Short Cycling in the Future

Here are some tips to help prevent short cycling and keep your well pump running smoothly:
- Regularly Check the Pressure Tank: Check the air charge in your pressure tank at least once a year.
- Monitor Water Usage: Be mindful of your water usage, especially during peak demand times.
- Address Leaks Promptly: Fix any leaks as soon as you detect them.
- Schedule Routine Well Maintenance: Have your well inspected and serviced by a professional every few years.
FAQ: Troubleshooting Well Pump Short Cycling
Here are some frequently asked questions to help you further understand and address well pump short cycling:
What exactly does it mean when my well pump is “short cycling”?
Short cycling means your well pump is turning on and off too frequently in a short period. Instead of running for a longer period to fill the pressure tank and then shutting off for a while, it’s starting and stopping rapidly.
How can a waterlogged pressure tank cause short cycling?
A waterlogged pressure tank has lost its air charge, so it can’t store water under pressure effectively. This makes the pump turn on more often because the water pressure drops quickly.
Can a small leak really cause my well pump to short cycle?
Yes, even a small leak can cause the pressure in your water system to drop, triggering the pump to turn on more frequently to compensate for the lost water.
Is it safe to adjust the pressure switch myself?
Yes, but always turn off the power to the pump first. Make small adjustments and monitor the pressure gauge to ensure you don’t exceed the recommended pressure range.
How often should I check my pressure tank’s air charge?
It’s a good idea to check the air charge at least once a year, or more often if you suspect a problem.
What are the signs of a failing check valve?
Signs of a failing check valve include hearing water flowing back into the well when the pump shuts off and a rapid drop in water pressure after the pump stops running.
When should I call a professional for well pump issues?
Call a pro if you’re uncomfortable working with electrical or plumbing, can’t identify the problem, or if DIY fixes don’t solve the short cycling issue.
Conclusion
Dealing with a short cycling well pump can be frustrating, but understanding the common causes and knowing how to troubleshoot them can save you time, money, and extend the life of your well system. By systematically checking the pressure tank, pressure switch, plumbing for leaks, and the check valve, you can often pinpoint the problem and implement a solution. Remember, regular maintenance and prompt attention to any issues are key to keeping your well pump running efficiently and reliably for years to come. If you’re ever unsure or uncomfortable, don’t hesitate to call a qualified well service professional for assistance.
“`