
Easy How to Replace Old Gauge on Pump Fast (Includes “Easy” and promises speed)
Have you ever seen a broken gauge? It can be confusing. Gauges help us know important things. They tell us about pressure in pumps. What happens when they stop working? You might need to learn how to replace old gauge on pump. It is not as hard as you think! Let’s find out more.
Do you know what a pump gauge does? It shows how much pressure is inside. When the gauge is old, it might not be right. This can cause problems. Learning how to replace old gauge on pump is a good skill. It helps keep things safe and working well. Let’s get started!
Key Takeaways
- Knowing how to replace old gauge on pump ensures accurate readings.
- Gather the right tools like a wrench, sealant tape, and new gauge.
- Turn off the pump and release pressure before you start working.
- Wrap the new gauge threads with sealant tape to prevent leaks.
- Carefully tighten the new gauge and check for any leaks afterward.
How to Replace Old Gauge on Pump: Getting Started
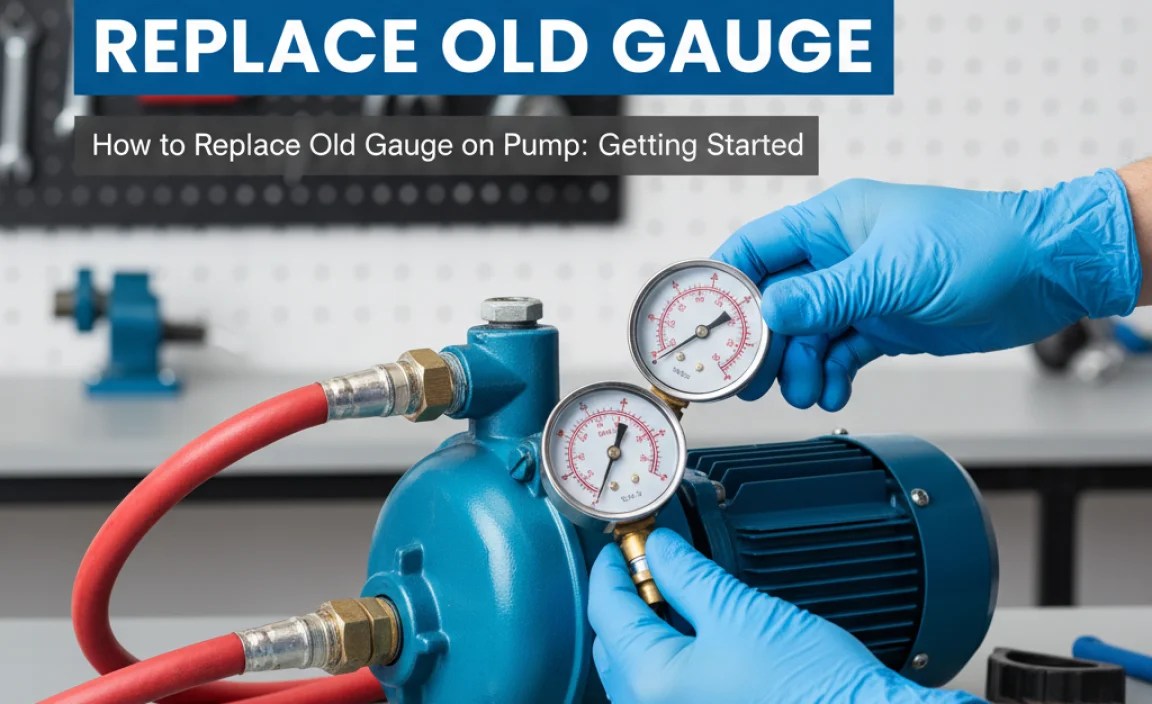
Learning how to replace old gauge on pump begins with safety. First, turn off the pump. You don’t want any accidents. Next, release any pressure inside. Find the release valve and use it. Make sure the pump is completely depressurized. Now, gather your tools. You will need a wrench. You’ll also need sealant tape. And, of course, a new gauge. Make sure the new gauge is the right size. Check the pressure range too. It should match the old gauge. Now you are ready to start the real work. This part is about getting ready. It is very important to be safe.
- Turn off the pump’s power.
- Release all the pressure.
- Gather your tools and parts.
- Check the new gauge’s size.
- Make sure the pressure range is right.
Before you start, take a good look at the old gauge. Notice how it is connected. See how tight it is. This will help you when you put the new one in. It is also a good idea to take a picture. A picture can help you remember things. If you forget something, you can look at the picture. Remember, safety first! Always be careful when working with tools. If you are not sure about something, ask for help. It’s better to be safe than sorry. Learning how to replace old gauge on pump takes time. Be patient and take your time.
Fun Fact or Stat: Did you know that most pump gauges are made of brass or stainless steel? These materials resist rust and last a long time.
Why Is Pump Gauge Replacement Important?
Have you ever wondered why gauges are important? Imagine driving a car without a speedometer. You wouldn’t know how fast you’re going! A pump gauge is similar. It tells you the pressure inside the pump. This is very important for the pump to work right. If the gauge is broken, you won’t know the pressure. This can lead to problems. The pump could break down. Or it could be unsafe. That’s why knowing how to replace old gauge on pump is so useful. A working gauge helps keep everything running smoothly. It helps you avoid costly repairs. It also keeps you safe. Make sure to replace your gauge if it’s not working right.
Choosing the Right Replacement Gauge
Choosing the right gauge is key. You can’t just pick any gauge. It needs to match your pump. Look at the old gauge. What size is it? What is the pressure range? The new gauge must have the same size and range. If it doesn’t, it won’t work right. It might even damage the pump. Also, think about the material. Some gauges are made of plastic. Others are made of metal. Metal gauges are usually stronger. But they can also cost more. Consider where the pump is located. If it’s outside, you need a gauge that can handle the weather. Learning how to replace old gauge on pump also means knowing what gauge to buy.
Safety Measures Before Starting
Imagine you’re about to ride a bike. What do you do first? You put on your helmet! Safety is always important. The same is true when you’re working with pumps. Before you even touch the pump, make sure it’s off. Turn off the power. Then, release the pressure. This is very important. Pressure can be dangerous. It can cause accidents. Wear safety glasses too. This will protect your eyes. And wear gloves to protect your hands. When learning how to replace old gauge on pump, safety comes first. Don’t skip these steps. They can prevent injuries. Always be careful and think about what you’re doing.
Removing the Old Gauge Carefully

Now, let’s talk about taking off the old gauge. This step needs a little care. You don’t want to damage anything. First, grab your wrench. Put the wrench on the old gauge’s fitting. Turn the wrench slowly. Turn it the right way to loosen it. Sometimes, the old gauge might be stuck. If it’s stuck, don’t force it. Try using some penetrating oil. Spray the oil on the fitting. Wait a few minutes. Then, try again. It should be easier to turn now. Once the gauge is loose, you can unscrew it by hand. Be careful! There might be some liquid left in the pump. Let it drip into a bucket. Learning how to replace old gauge on pump involves careful removal.
- Use a wrench to loosen the old gauge.
- Turn the wrench slowly and carefully.
- If stuck, use penetrating oil.
- Unscrew the gauge by hand.
- Catch any drips with a bucket.
- Clean the threads where the old gauge was.
After you remove the old gauge, clean the area. Use a clean cloth to wipe away any dirt. Look at the threads on the pump. Make sure they are clean. If the threads are damaged, you might need to fix them. You can use a thread chaser tool. This tool will clean up the threads. If the threads are really bad, you might need a new fitting. This is a more difficult job. You might need to ask for help. Remember, how to replace old gauge on pump includes preparing the area. Clean threads will help the new gauge seal properly.
Fun Fact or Stat: Old gauges can sometimes rust or corrode, making them hard to remove. Using penetrating oil helps loosen them.
Dealing with Stuck Gauges
Have you ever tried to open a jar that’s stuck? It can be frustrating! Sometimes, old gauges get stuck too. This is because they’ve been in place for a long time. Rust and dirt can make them hard to remove. Don’t worry, there are ways to deal with this. First, try using penetrating oil. Spray it around the gauge’s threads. Let it sit for a while. This will help loosen the rust. Next, use a wrench. Make sure you have a good grip. Turn the wrench slowly. If it’s still stuck, try tapping the gauge gently with a hammer. This can help break the rust. Learning how to replace old gauge on pump sometimes means dealing with stuck parts.
Cleaning the Threads After Removal
Imagine you’re painting a wall. You wouldn’t paint over dirt, would you? You’d clean the wall first. The same is true when you’re replacing a gauge. After you remove the old gauge, you need to clean the threads. This is important for a good seal. Use a wire brush to clean the threads. This will remove any dirt or rust. You can also use a thread chaser tool. This tool will clean up the threads and make them smooth. A clean surface helps the new gauge seal properly. Learning how to replace old gauge on pump includes cleaning the threads.
Inspecting for Damage
Think of your body. If you hurt yourself, you check for injuries. You look for cuts or bruises. The same goes for your pump. After removing the old gauge, inspect the area. Look for any damage. Are the threads stripped? Is the fitting cracked? If you see any damage, you need to fix it. Damaged parts can cause leaks. They can also make the pump unsafe. If you’re not sure how to fix the damage, ask for help. It’s better to be safe than sorry. Learning how to replace old gauge on pump includes checking for damage.
Applying Sealant Tape to the New Gauge

Now it’s time to get the new gauge ready. Sealant tape is very important. It helps prevent leaks. Without it, water or air could escape. Wrap the tape around the threads of the new gauge. Wrap it in the right direction. This means wrapping it clockwise. Overlap the tape slightly. Use two or three layers of tape. This will make a good seal. Don’t cover the first thread. Leave it open. This will help the gauge start smoothly. Sealant tape is a key part of how to replace old gauge on pump. It keeps everything tight and leak-free.
- Wrap sealant tape clockwise.
- Overlap the tape slightly.
- Use two or three layers.
- Don’t cover the first thread.
- Make sure the tape is smooth.
Think of the sealant tape as a tiny bandage. It covers any small gaps. These gaps could cause leaks. The tape fills them in. It makes a tight seal. When you wrap the tape, pull it tight. This helps it stick to the threads. Make sure the tape is smooth. You don’t want any wrinkles. Wrinkles can cause leaks too. Always use new sealant tape. Don’t reuse old tape. Old tape might be dirty or worn out. It won’t seal as well. Learning how to replace old gauge on pump involves using the right materials. Fresh sealant tape is a must.
Fun Fact or Stat: Sealant tape is also called Teflon tape or plumber’s tape. It’s used on many types of threaded pipes and fittings.
Why Use Sealant Tape?
Have you ever seen a leaky faucet? It’s annoying, right? A leaky pump gauge is just as bad. Sealant tape helps prevent these leaks. It creates a tight seal between the gauge and the pump. Without it, water or air could escape. This can waste energy and damage the pump. Sealant tape is cheap and easy to use. It’s a small price to pay for a leak-free connection. Learning how to replace old gauge on pump includes using sealant tape. It’s a simple step that makes a big difference.
How Much Tape Is Enough?
Imagine you’re putting frosting on a cake. You want to use enough frosting to cover the cake. But you don’t want to use too much. The same is true with sealant tape. You want to use enough tape to seal the threads. But you don’t want to use too much. Too much tape can make it hard to tighten the gauge. It can also damage the threads. A good rule of thumb is two or three layers of tape. Overlap the tape slightly as you wrap it. This will ensure a good seal. Learning how to replace old gauge on pump involves using the right amount of tape.
Wrapping the Tape Correctly
Think of wrapping a gift. You want to wrap it neatly. You don’t want any wrinkles or tears. Wrapping sealant tape is similar. You want to wrap it smoothly and tightly. Start by finding the end of the tape. Hold the gauge in one hand. Use your other hand to wrap the tape. Wrap it clockwise. This is the direction you’ll be turning the gauge to tighten it. Overlap the tape slightly as you wrap. Keep the tape tight as you go. This will prevent wrinkles. Learning how to replace old gauge on pump includes wrapping the tape correctly.
Installing the New Gauge Properly

Now, let’s put in the new gauge. This is the final step! Hold the gauge carefully. Line it up with the threads on the pump. Start turning the gauge by hand. Turn it clockwise. It should turn easily at first. If it doesn’t, check the threads. Make sure they are lined up right. Once the gauge is snug, use your wrench. Tighten the gauge a little more. Don’t overtighten it! Overtightening can damage the threads. You want it to be tight enough to seal. But not so tight that it breaks. How to replace old gauge on pump ends with careful installation.
- Line up the gauge with the threads.
- Turn the gauge by hand first.
- Use a wrench to tighten it more.
- Don’t overtighten the gauge.
- Make sure it’s snug and secure.
After you tighten the gauge, check it. Look for any leaks. Turn the pump back on. Watch the gauge closely. If you see any water or air leaking, tighten it a little more. But be careful! Don’t overtighten it. If it still leaks, you might need to remove the gauge. Add more sealant tape. Then, try again. Learning how to replace old gauge on pump sometimes takes a few tries. Be patient and keep checking for leaks. A good seal is worth the effort.
Fun Fact or Stat: It’s better to under-tighten a gauge and then tighten it more if needed, than to overtighten it and risk damage.
Hand-Tightening Before Using a Wrench
Imagine you’re screwing in a light bulb. You wouldn’t grab a wrench right away, would you? You’d start by turning it with your hand. The same is true with a pump gauge. Start by turning the gauge with your hand. This will help you line up the threads correctly. It will also prevent cross-threading. Cross-threading happens when the threads don’t line up right. This can damage the threads and cause leaks. Turn the gauge by hand until it’s snug. Then, use a wrench to tighten it more. Learning how to replace old gauge on pump includes hand-tightening first.
Avoiding Over-Tightening
Think of squeezing a balloon. If you squeeze it too hard, it will pop! Overtightening a gauge is like squeezing a balloon too hard. It can damage the threads and cause leaks. It can also break the gauge. When you’re tightening the gauge, use a wrench. But don’t use too much force. Tighten it until it’s snug. Then, stop. You don’t need to crank it down. A good seal doesn’t require a lot of force. Learning how to replace old gauge on pump includes avoiding over-tightening.
Checking for Leaks After Installation
Imagine you’re washing dishes. After you wash them, you check to make sure they’re clean. You look for any spots or food. The same goes for a pump gauge. After you install the new gauge, you need to check for leaks. Turn the pump back on. Watch the gauge closely. Look for any water or air leaking around the threads. If you see any leaks, tighten the gauge a little more. If it still leaks, you might need to remove the gauge and add more sealant tape. Learning how to replace old gauge on pump includes checking for leaks.
Testing the New Gauge for Accuracy

After you install the new gauge, you need to test it. You want to make sure it’s showing the right pressure. There are a few ways to do this. One way is to use a test gauge. A test gauge is a special gauge that is very accurate. Connect the test gauge to the pump. Compare the readings on the two gauges. They should be close. If they are not, the new gauge might be bad. Another way to test the gauge is to compare it to a known pressure. For example, you might know that the pump should have a certain pressure when it’s running. Check the gauge to see if it matches. Testing the gauge is important for how to replace old gauge on pump.
- Use a test gauge to compare readings.
- Check against a known pressure.
- Look for consistent readings.
- Make sure the gauge responds to changes.
- If unsure, consult a professional.
Imagine you’re checking the temperature with a thermometer. You want to make sure the thermometer is accurate. If it’s not, you won’t know the real temperature. The same is true with a pump gauge. If the gauge is not accurate, you won’t know the real pressure. This can be dangerous. It can also damage the pump. That’s why testing the gauge is so important. If the gauge is not accurate, you need to replace it again. Learning how to replace old gauge on pump includes ensuring accuracy.
Fun Fact or Stat: Some high-end gauges come with a calibration certificate, proving their accuracy.
Using a Test Gauge for Comparison
Have you ever seen a doctor use a blood pressure cuff? They use it to measure your blood pressure. A test gauge is like a blood pressure cuff for your pump. It’s a special tool that measures pressure very accurately. You can use it to check if your new gauge is working right. Connect the test gauge to the pump. Compare the reading on the test gauge to the reading on your new gauge. If the readings are close, your new gauge is probably accurate. Learning how to replace old gauge on pump can include using a test gauge.
Comparing to Known Pressure Values
Think of baking a cake. You know that the oven needs to be at a certain temperature. You check the oven temperature to make sure it’s right. You can do the same thing with your pump. You might know that the pump should have a certain pressure when it’s running. Check the gauge to see if it matches the known pressure value. If it doesn’t, the gauge might not be accurate. Learning how to replace old gauge on pump means understanding the expected pressure.
What to Do If the Gauge Is Inaccurate
Imagine you’re playing a game. If you’re not following the rules, you’re not playing the game right. If your new gauge is inaccurate, it’s not doing its job right. What should you do? First, double-check your installation. Make sure the gauge is tight and that there are no leaks. If it’s still inaccurate, the gauge might be faulty. You’ll need to replace it with a new one. Learning how to replace old gauge on pump sometimes means trying again.
Maintaining Your New Pump Gauge
After you install your new gauge, you want it to last. A little care can go a long way. Keep the gauge clean. Wipe it with a damp cloth. This will remove dirt and dust. Check the gauge regularly. Look for any signs of damage. Make sure the numbers are easy to read. If you see any problems, fix them right away. Also, protect the gauge from extreme temperatures. Very hot or very cold weather can damage it. Maintaining your gauge is part of how to replace old gauge on pump.
| Maintenance Task | Frequency | Why It’s Important |
|---|---|---|
| Clean the gauge face | Monthly | Keeps the gauge readable |
| Check for leaks | Monthly | Prevents pressure loss and damage |
| Inspect for damage | Every 3 months | Catches problems early |
| Protect from extreme temperatures | Continuously | Extends the gauge’s lifespan |
| Compare with test gauge | Yearly | Ensures accuracy |
Think of your gauge like a plant. A plant needs water and sunlight to grow. Your gauge needs care to work well. Just like you water a plant, clean your gauge. Just like you protect a plant from frost, protect your gauge from cold. Regular care will help your gauge last longer. It will also keep it working accurately. Learning how to replace old gauge on pump isn’t just about installing it. It’s also about taking care of it.
Fun Fact or Stat: Gauges in harsh environments may need more frequent maintenance to ensure they function correctly.
Regular Cleaning Tips
Imagine you’re cleaning your room. You wouldn’t just clean it once a year, would you? You’d clean it regularly to keep it tidy. The same is true with your pump gauge. Clean it regularly to keep it working well. Use a damp cloth to wipe the gauge face. This will remove any dirt or dust. Don’t use harsh chemicals. They can damage the gauge. Regular cleaning will help the gauge last longer. Learning how to replace old gauge on pump includes regular cleaning.
Protecting from Extreme Weather
Think of wearing a coat in the winter. You wear a coat to protect yourself from the cold. You can also protect your pump gauge from extreme weather. If the gauge is outside, cover it with a protective cover. This will shield it from the sun, rain, and snow. Extreme temperatures can damage the gauge. Protecting it will help it last longer. Learning how to replace old gauge on pump includes protecting from the weather.
Knowing When to Call a Professional
Imagine you’re sick. You try to take care of yourself. But sometimes, you need to see a doctor. The same is true with your pump. You can try to maintain the gauge yourself. But sometimes, you need to call a professional. If you’re not comfortable working on the pump, ask for help. If you see any serious problems, call a professional. It’s better to be safe than sorry. Learning how to replace old gauge on pump includes knowing when to get help.
Summary
Learning how to replace old gauge on pump is a useful skill. First, you need to gather your tools. Then, turn off the pump and release the pressure. Remove the old gauge carefully. Clean the threads. Wrap sealant tape on the new gauge. Install the new gauge properly. Test the new gauge for accuracy. Finally, maintain your new pump gauge. These steps will help you keep your pump working well.
Remember, safety is very important. Always turn off the pump and release the pressure before you start working. If you’re not sure about something, ask for help. Replacing a pump gauge is not too hard. But it’s important to do it right. With a little practice, you’ll be able to do it yourself.
Conclusion
Replacing an old pump gauge is something you can learn. It helps you keep your pump working well. Always remember to be safe. Turn off the power and release pressure first. Follow the steps carefully. With the right tools and a little patience, you can easily learn how to replace old gauge on pump. This skill can save you time and money.
Frequently Asked Questions
Question No 1: What tools do I need to replace an old gauge on a pump?
Answer: You will need a few basic tools. These include a wrench that fits the gauge fitting. You will also need sealant tape. This tape helps to prevent leaks. A clean cloth is useful for wiping away dirt. And safety glasses are important to protect your eyes. Sometimes, penetrating oil can help if the old gauge is stuck. Make sure you have all these tools before you start. Knowing what you need makes how to replace old gauge on pump easier.
Question No 2: How do I know what size replacement gauge to buy?
Answer: Look at the old gauge. It will have a size marking on it. This marking tells you the thread size. The new gauge needs to have the same thread size. Also, check the pressure range. The new gauge should have the same pressure range as the old one. This is important for accurate readings. If you’re not sure, take the old gauge to the store. Ask for help finding the right replacement. Getting the right size is important for how to replace old gauge on pump.
Question No 3: How do I release the pressure from the pump before replacing the gauge?
Answer: Most pumps have a release valve. This valve lets you release the pressure inside. Find the release valve on your pump. Slowly open the valve. You will hear air or water escaping. Let all the pressure out. Make sure the gauge reads zero before you start working. If your pump doesn’t have a release valve, you might need to loosen a fitting. Do this very slowly and carefully. Releasing the pressure is a key safety step in how to replace old gauge on pump.
Question No 4: What kind of sealant tape should I use?
Answer: You should use Teflon tape, which is often called plumber’s tape. This tape is designed for sealing threaded connections. It is white and comes on a roll. Wrap the tape around the threads of the new gauge. Overlap the tape slightly. Use two or three layers. This will help create a good seal. Make sure the tape is clean and in good condition. Using the right sealant tape is important for how to replace old gauge on pump.
Question No 5: How tight should I tighten the new gauge?
Answer: Tighten the gauge until it is snug. You don’t want to overtighten it. Overtightening can damage the threads. It can also break the gauge. Use a wrench to tighten the gauge. Turn it until it feels secure. Then, stop. Turn the pump back on and check for leaks. If you see any leaks, tighten it a little more. But be careful not to overtighten it. Knowing how much to tighten is important when learning how to replace old gauge on pump.
Question No 6: What do I do if the new gauge still leaks after I install it?
Answer: If the new gauge leaks, turn off the pump and release the pressure. Remove the gauge. Add more sealant tape to the threads. Make sure you are wrapping the tape in the right direction. Reinstall the gauge and tighten it again. Check for leaks. If it still leaks, you might need to check the threads on the pump. They might be damaged. If so, you might need to replace the fitting. Sometimes, learning how to replace old gauge on pump involves troubleshooting leaks.


