
Cycle Pump All Parts Name: Easy ID Guide
Quick Summary: A cycle pump has several key parts: a barrel (cylinder), a piston with a seal, a handle for pushing the piston, a base for stability, a hose to connect to the tire valve, and a valve connector (like Presta or Schrader). Knowing these parts helps you understand how your pump works and fix it if needed.
Ever struggled with a bike pump that just won’t inflate your tires? It’s frustrating when your ride is delayed because of a faulty pump. Understanding the different parts of your cycle pump can help you troubleshoot common issues and keep your tires properly inflated. This guide will break down each component, explaining what it does and how it contributes to the pump’s overall function. By the end, you’ll be able to identify and potentially fix problems, ensuring your pump is always ready to get you back on the road. Let’s dive in and get you acquainted with your trusty cycle pump!
Understanding Your Cycle Pump: A Complete Parts Breakdown

A cycle pump, whether it’s a floor pump or a hand pump, relies on a simple mechanism to inflate your tires. Knowing each part and its function will make you a more informed cyclist and better equipped to handle minor repairs. Let’s explore the main components:
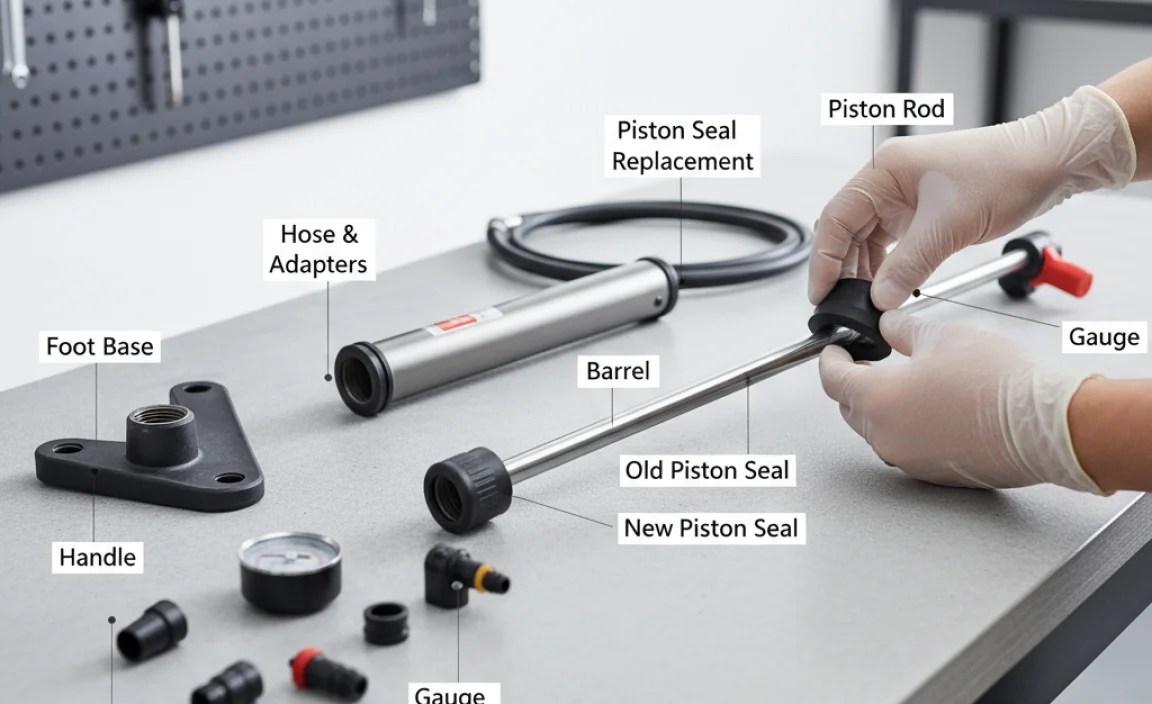
The Barrel (Cylinder)
The barrel, or cylinder, is the main body of the pump. It’s a hollow tube, usually made of steel or aluminum, where the piston moves to compress air.
- Function: The barrel contains the air that is compressed and forced into the tire.
- Material: Typically steel or aluminum. Steel is more durable but heavier; aluminum is lighter but can be more prone to dents.
- Maintenance: Keep the barrel clean and free from debris to ensure smooth piston movement.
The Piston
The piston is a crucial moving part inside the barrel. It has a seal that creates an airtight barrier, allowing it to compress air effectively.
- Function: The piston moves up and down inside the barrel, creating pressure to pump air.
- Material: Often made of plastic, rubber, or metal with rubber seals.
- Maintenance: The seal on the piston needs regular maintenance. If it dries out or cracks, the pump will lose efficiency. Lubricating the seal with silicone grease can extend its life.
The Handle
The handle is what you grip to operate the pump. It’s connected to the piston and allows you to push and pull, creating the pumping action.
- Function: Provides the leverage needed to move the piston and compress air.
- Material: Usually made of plastic, wood, or metal with a comfortable grip.
- Ergonomics: A comfortable handle can make a big difference, especially when inflating tires to high pressures.
The Base
The base provides stability for the pump, especially floor pumps. It keeps the pump steady while you’re using it.
- Function: Keeps the pump stable, allowing you to use both hands to pump.
- Material: Typically made of steel, plastic, or aluminum.
- Design: Wider bases generally provide better stability.
The Hose
The hose connects the pump to the tire valve. It needs to be flexible and durable to withstand repeated use.
- Function: Carries the compressed air from the pump to the tire valve.
- Material: Usually made of rubber or reinforced plastic.
- Length: The length of the hose affects ease of use. A longer hose provides more flexibility but can reduce pumping efficiency slightly.
The Valve Connector (Head)
The valve connector, or pump head, attaches to the tire valve. Different connectors are designed for Presta, Schrader, or Dunlop valves.
- Function: Creates an airtight seal with the tire valve, allowing air to flow into the tire.
- Types:
- Presta: Common on road bikes and some mountain bikes.
- Schrader: Similar to car tire valves, found on many mountain bikes, hybrid bikes, and kids’ bikes.
- Dual Head: Can accommodate both Presta and Schrader valves.
- Maintenance: Check the connector regularly for wear and tear. Replace it if it’s damaged or doesn’t seal properly.
Pressure Gauge (for Floor Pumps)
Many floor pumps include a pressure gauge to show the current tire pressure in PSI or bar.
- Function: Displays the tire pressure, helping you avoid over- or under-inflating your tires.
- Types: Analog or digital. Digital gauges are generally more accurate.
- Accuracy: Ensure the gauge is accurate by comparing it to another gauge periodically.
Seals and O-Rings
Small rubber or plastic rings that create airtight seals between different parts of the pump.
- Function: Prevent air leakage, ensuring efficient pumping.
- Location: Found in the piston, valve connector, and other joints.
- Maintenance: These can dry out and crack over time. Replacing them can often restore a pump to like-new condition.
Internal Check Valve
A one-way valve inside the pump that prevents air from flowing back into the pump from the tire.
- Function: Ensures air only flows in one direction – into the tire.
- Location: Usually located near the base of the barrel.
- Maintenance: Can sometimes get stuck or clogged. Cleaning or replacing it can fix pumping issues.
Types of Cycle Pumps

Knowing the different types of cycle pumps can help you choose the best one for your needs. Here’s a quick overview:
Floor Pumps (Track Pumps)
Floor pumps are designed for home use and offer high volume and pressure, making them ideal for quickly inflating tires.
- Pros:
- Efficient and fast inflation
- Built-in pressure gauge
- Stable base
- Cons:
- Larger and less portable
- Requires more storage space
Hand Pumps
Hand pumps are compact and portable, perfect for carrying on rides for emergency inflation.
- Pros:
- Lightweight and portable
- Easy to carry on rides
- Cons:
- Requires more effort to inflate tires
- May not have a pressure gauge
- Lower volume compared to floor pumps
CO2 Inflators
CO2 inflators use compressed carbon dioxide cartridges to quickly inflate tires. They are very fast but require purchasing cartridges.
- Pros:
- Extremely fast inflation
- Very compact and lightweight
- Cons:
- Requires purchasing CO2 cartridges
- Can be wasteful
- No pressure feedback
Mini Pumps
Mini pumps are smaller versions of hand pumps, designed to be as compact as possible while still providing decent inflation power.
- Pros:
- Very portable and lightweight
- Better than CO2 inflators for controlled inflation
- Cons:
- Can still require significant effort
- Inflation speed slower than floor pumps or CO2
Essential Cycle Pump Parts: A Detailed Table

Here’s a detailed table summarizing the key parts of a cycle pump, their functions, and maintenance tips:
| Part Name | Function | Material | Maintenance Tips |
|---|---|---|---|
| Barrel (Cylinder) | Contains air for compression | Steel or Aluminum | Keep clean, free from debris |
| Piston | Compresses air | Plastic, Rubber, or Metal with Rubber Seals | Lubricate seal with silicone grease |
| Handle | Provides leverage for pumping | Plastic, Wood, or Metal | Ensure comfortable grip |
| Base | Provides stability | Steel, Plastic, or Aluminum | Check for stability, tighten if needed |
| Hose | Connects pump to tire valve | Rubber or Reinforced Plastic | Inspect for cracks or leaks |
| Valve Connector (Head) | Creates airtight seal with tire valve | Plastic or Metal with Rubber Inserts | Clean and replace if worn |
| Pressure Gauge | Displays tire pressure | Analog or Digital | Calibrate periodically |
| Seals and O-Rings | Prevent air leakage | Rubber or Plastic | Replace when cracked or worn |
| Internal Check Valve | Ensures one-way air flow | Metal or Plastic | Clean or replace if stuck |
Troubleshooting Common Pump Problems
Knowing the parts of your pump can help you diagnose and fix common issues. Here are a few problems and how to address them:
- Problem: Pump isn’t building pressure.
- Possible Cause: Worn piston seal.
- Solution: Replace the piston seal or lubricate it with silicone grease.
- Problem: Air leaking from the hose connection.
- Possible Cause: Loose connection or damaged hose.
- Solution: Tighten the connection or replace the hose.
- Problem: Valve connector not sealing properly.
- Possible Cause: Worn or damaged rubber insert in the connector.
- Solution: Replace the valve connector.
- Problem: Pressure gauge is inaccurate.
- Possible Cause: Faulty gauge mechanism.
- Solution: Replace the pressure gauge or use a separate gauge to verify pressure.
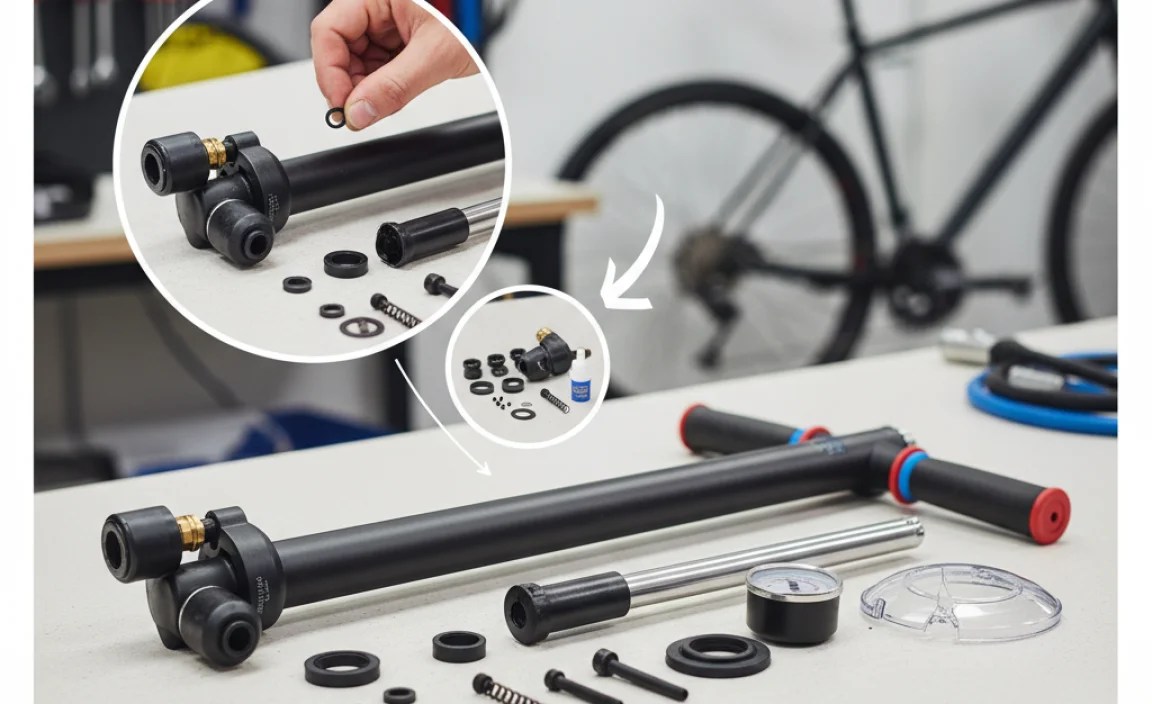
Step-by-Step Guide: Replacing a Piston Seal
Replacing a piston seal is a common repair that can significantly improve your pump’s performance. Here’s how to do it:
- Gather Your Tools: You’ll need a new piston seal, a wrench or pliers, and silicone grease.
- Disassemble the Pump:
- Remove the handle from the pump. This usually involves unscrewing a nut or bolt.
- Carefully slide the barrel off the base.
- Locate the piston at the end of the piston rod.
- Remove the Old Seal:
- Use a small tool to carefully pry off the old piston seal. Be careful not to scratch the piston.
- Clean the piston to remove any residue.
- Install the New Seal:
- Apply a small amount of silicone grease to the new piston seal.
- Carefully slide the new seal onto the piston. Ensure it sits properly in the groove.
- Reassemble the Pump:
- Slide the barrel back onto the base.
- Reattach the handle, tightening the nut or bolt securely.
- Test the Pump:
- Inflate a tire to check if the pump is working correctly.
- Listen for any air leaks and ensure the pressure gauge (if present) is accurate.
Choosing the Right Pump for Your Needs
Selecting the right pump depends on your cycling style and needs. Here’s a breakdown to help you decide:
- Road Cycling:
- Pump Type: Floor pump for home use, mini pump or CO2 inflator for on-the-road repairs.
- Why: Road bikes require higher pressures (80-120 PSI), so a floor pump with an accurate gauge is essential. Mini pumps or CO2 inflators are lightweight and easy to carry during rides.
- Mountain Biking:
- Pump Type: Floor pump with a large volume, hand pump for trails.
- Why: Mountain bike tires use lower pressures (25-40 PSI) but higher volume. A floor pump with a large barrel can quickly inflate tires. A durable hand pump is crucial for trailside repairs.
- Commuting/Hybrid Bikes:
- Pump Type: Floor pump for home, versatile hand pump for on-the-go.
- Why: Hybrid bikes typically use moderate pressures (40-70 PSI). A floor pump makes home inflation easy, while a versatile hand pump can handle various valve types.
- E-Bikes:
- Pump Type: Robust floor pump, reliable hand pump.
- Why: E-bike tires vary, but a sturdy floor pump ensures accurate pressure. A reliable hand pump is important for longer rides.
Maintaining Your Cycle Pump for Longevity
Regular maintenance can significantly extend the life of your cycle pump. Here are some tips:
- Clean Regularly: Wipe down the pump with a damp cloth to remove dirt and grime.
- Lubricate Moving Parts: Use silicone grease on the piston seal and other moving parts to keep them smooth.
- Inspect the Hose: Check the hose for cracks or leaks and replace it if necessary.
- Store Properly: Store the pump in a dry place to prevent rust and corrosion.
- Check Valve Connector: Ensure the valve connector is clean and free from debris. Replace it if it’s worn or damaged.
- Calibrate Gauge: If your pump has a pressure gauge, calibrate it periodically to ensure accuracy.
Cycle Pump Parts: Advanced Insights
For those who want to delve deeper, here are some advanced insights into cycle pump technology:
Two-Stage Pumps
Some high-end floor pumps feature a two-stage design. In the first stage, the pump delivers a high volume of air at low pressure, quickly filling the tire. In the second stage, it switches to a lower volume at high pressure, making it easier to reach higher PSI levels.
Digital Pressure Gauges
Digital pressure gauges offer greater accuracy and precision compared to analog gauges. They often display pressure in multiple units (PSI, bar, kPa) and can be easier to read.
Threaded Valve Connectors
Some premium pumps use threaded valve connectors that screw onto the tire valve. This provides a more secure and airtight seal, reducing the risk of air leakage during inflation.
Ergonomic Design
High-quality pumps often feature ergonomic handles and bases, designed to reduce fatigue and improve comfort during use. Look for features like padded handles and wide, stable bases.
FAQ: Cycle Pump Parts and Maintenance
What is the difference between a Presta and Schrader valve?
A Presta valve is narrow with a small locking nut at the tip, commonly found on road bikes. A Schrader valve is wider, like those on car tires, and used on many mountain and hybrid bikes.
How often should I lubricate my cycle pump?
Lubricate your pump every 3-6 months, or more frequently if you notice it’s becoming harder to pump. Use silicone grease on the piston seal and other moving parts.
What do I do if my pump hose has a leak?
If the hose has a small leak, you might try patching it with rubber sealant. For larger leaks or cracks, it’s best to replace the entire hose.
Can I use a car tire pump on my bicycle?
Yes, if you have a Schrader valve on your bike. However, car tire pumps often deliver air at a higher volume and pressure, so be careful not to overinflate your tires. It’s harder to use a car pump on a Presta valve without an adapter.
How do I know if my pressure gauge is accurate?
Compare your pump’s pressure reading with another gauge, such as a digital tire pressure gauge. If there’s a significant difference, your pump’s gauge may need calibration or replacement.
What type of grease should I use on my pump?
Use silicone grease, as it’s safe for rubber and plastic parts. Avoid petroleum-based greases, which can damage seals and hoses.
Why is my pump head popping off the valve when I try to inflate?
This could be due to a worn or loose pump head. Ensure the pump head is securely attached to the valve and that the rubber seal inside the head is in good condition. If it’s worn, replace the pump head.
Conclusion
Understanding the parts of your cycle pump empowers you to maintain it properly and troubleshoot common issues. By knowing each component’s function, you can diagnose problems, perform simple repairs, and ensure your pump is always ready to inflate your tires. Whether you’re a casual rider or a seasoned cyclist, taking the time to learn about your pump will enhance your cycling experience and keep you rolling smoothly. Regular maintenance, like lubricating seals and checking for leaks, will extend the life of your pump and save you money in the long run. So next time your pump isn’t working as it should, don’t panic – you now have the knowledge to tackle the problem head-on and get back on your bike with confidence.


