
What Makes a Well Pump Rapid Cycle? A Simple Guide
Rapid cycling in a well pump means it’s turning on and off too frequently. This is usually caused by low water pressure, a faulty pressure tank, or a leak in your water lines. Fixing it quickly can save you from bigger problems like pump failure or costly repairs.
Is your well pump acting like it’s got a bad case of the hiccups, turning on and off way too often? It’s a common issue that many homeowners face, and it can be super frustrating. But don’t worry! Understanding why your well pump is rapid cycling is the first step to solving the problem. When a well pump cycles too rapidly, it puts extra strain on the system, wastes energy, and can even lead to premature pump failure.
In this guide, we’ll break down the common causes of rapid cycling and walk you through simple steps to diagnose and fix the issue. By the end of this article, you’ll have a clear understanding of what’s going on and how to keep your well pump running smoothly. Let’s get started!
Understanding Well Pump Cycling

Before diving into the causes of rapid cycling, it’s important to understand how a well pump normally operates. A well pump is designed to maintain water pressure within a specific range, usually between 40 and 60 PSI (pounds per square inch). When the pressure drops below the cut-in pressure (e.g., 40 PSI), the pump turns on to refill the pressure tank. Once the pressure reaches the cut-out pressure (e.g., 60 PSI), the pump shuts off. This cycle repeats as you use water in your home.
Normal cycling is gradual and doesn’t happen too frequently. Rapid cycling, on the other hand, is when the pump turns on and off several times in a short period, often with only small amounts of water being used. This can indicate underlying issues that need to be addressed.
Common Causes of Rapid Cycling

Several factors can contribute to rapid cycling in a well pump. Here are some of the most common:
- Low Water Level in the Well: If the water level in your well drops too low, the pump may struggle to maintain pressure, causing it to cycle rapidly.
- Faulty Pressure Tank: The pressure tank stores water under pressure, providing a buffer that reduces the frequency of pump cycles. If the tank is waterlogged or has a broken bladder, it can cause rapid cycling.
- Leaks in the Plumbing: Even small leaks in your plumbing system can cause a drop in pressure, triggering the pump to turn on more frequently.
- Clogged or Faulty Check Valve: The check valve prevents water from flowing back into the well. If it’s clogged or faulty, it can cause pressure fluctuations and rapid cycling.
- Incorrect Pressure Switch Settings: The pressure switch controls the pump’s on and off points. If the settings are incorrect, it can lead to rapid cycling.
- Sediment Buildup: Sediment in the well or plumbing can clog components and reduce efficiency, leading to pressure issues and rapid cycling.
Diagnosing the Cause of Rapid Cycling

Identifying the specific cause of rapid cycling can save you time and money on repairs. Here’s a step-by-step guide to diagnosing the issue:
Step 1: Check the Water Level in the Well
The first thing to do is ensure that your well has an adequate water level. If the water level is too low, the pump will struggle to maintain pressure. This is more common during droughts or periods of high water usage.
- Locate Your Well: Find the well cap, usually a large, round cover on the ground.
- Remove the Well Cap: Carefully remove the cap, taking precautions to avoid contamination.
- Check the Water Level: Use a flashlight to look down the well. You should see water well above the pump intake. If the water level is very low or near the pump, this could be the issue.
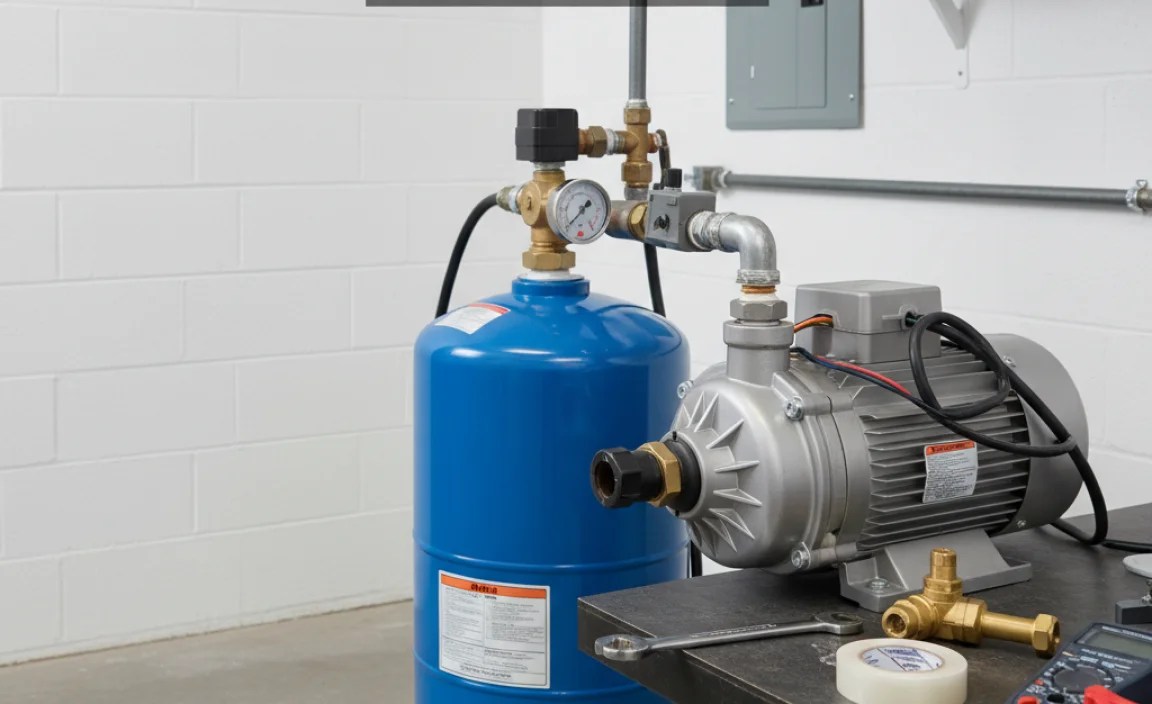
Step 2: Inspect the Pressure Tank
The pressure tank is a crucial component of your well system. It stores water under pressure and helps maintain consistent water flow. A faulty pressure tank is a common cause of rapid cycling.
- Locate the Pressure Tank: Find the pressure tank, usually located near the well pump.
- Check for Waterlogging: Tap on the side of the tank. If it sounds full of water from top to bottom, it may be waterlogged. A properly functioning tank should sound hollow at the top.
- Test the Air Pressure:
- Turn off the pump and disconnect the power.
- Open a faucet to relieve any water pressure in the system.
- Locate the Schrader valve (like a tire valve) on top of the tank.
- Use a tire pressure gauge to check the air pressure. It should be 2 PSI below the pump’s cut-in pressure (e.g., 38 PSI if the cut-in pressure is 40 PSI).
- If there’s no air pressure or water comes out of the valve, the bladder is likely broken, and the tank needs to be replaced.
Here’s a table summarizing the key indicators of a faulty pressure tank:
| Symptom | Possible Cause | Action |
|---|---|---|
| Tank sounds full of water | Waterlogged tank | Replace the tank |
| No air pressure at Schrader valve | Broken bladder | Replace the tank |
| Water comes out of Schrader valve | Broken bladder | Replace the tank |
Step 3: Check for Leaks
Even small leaks can cause a significant drop in water pressure, leading to rapid cycling. Inspect your plumbing system for any signs of leaks.
- Inspect Faucets and Toilets: Check all faucets and toilets for drips or running water. Even a slow drip can waste a lot of water over time.
- Check Plumbing Connections: Look for leaks around pipe joints, fittings, and valves. Pay close attention to areas near the well pump and pressure tank.
- Check for Underground Leaks: If you notice unusually high water bills or wet spots in your yard, you may have an underground leak. This can be harder to detect and may require professional help.
Step 4: Inspect the Check Valve
The check valve prevents water from flowing back into the well when the pump is off. A faulty check valve can cause pressure fluctuations and rapid cycling.
- Locate the Check Valve: The check valve is usually located near the well pump or inside the well.
- Inspect for Clogs or Damage: Remove the check valve and inspect it for any signs of clogs or damage. Clean or replace the valve as needed.
- Test the Check Valve: Ensure the valve allows water to flow in one direction only. If it allows backflow, it needs to be replaced.
Step 5: Check the Pressure Switch Settings
The pressure switch controls the pump’s on and off points. Incorrect settings can cause the pump to cycle rapidly.
- Locate the Pressure Switch: The pressure switch is usually mounted on the pressure tank or nearby.
- Check the Settings: Most pressure switches have adjustable settings for the cut-in and cut-out pressure. Refer to the manufacturer’s instructions for the correct settings.
- Adjust the Settings: If the settings are incorrect, carefully adjust them according to the manufacturer’s instructions. Be sure to turn off the power to the pump before making any adjustments.
Step 6: Check for Sediment Buildup
Sediment buildup in the well or plumbing can clog components and reduce efficiency, leading to pressure issues and rapid cycling.
- Inspect Faucets and Showerheads: Check for sediment in faucet aerators and showerheads. This can indicate sediment buildup in the plumbing.
- Flush the Well: Consider flushing the well to remove sediment. This may require professional help, especially for deeper wells.
- Install a Sediment Filter: Install a sediment filter in your water line to prevent sediment from entering your plumbing system.
Fixing Rapid Cycling Issues
Once you’ve identified the cause of rapid cycling, you can take steps to fix the problem. Here are some common solutions:
Adjusting or Replacing the Pressure Tank
If the pressure tank is waterlogged or has a broken bladder, it needs to be replaced. Here’s how to do it:
- Turn Off the Power: Turn off the power to the well pump at the circuit breaker.
- Drain the System: Open a faucet to relieve any water pressure in the system.
- Disconnect the Old Tank: Disconnect the old pressure tank from the plumbing.
- Install the New Tank: Connect the new pressure tank to the plumbing, ensuring all connections are tight.
- Pressurize the Tank: Add air to the tank to the correct pre-charge pressure (2 PSI below the cut-in pressure).
- Turn On the Power: Turn the power back on to the well pump and monitor the system for proper cycling.
Repairing Leaks
Repairing leaks is essential to maintaining water pressure and preventing rapid cycling.
- Locate the Leak: Identify the source of the leak.
- Turn Off the Water: Turn off the water supply to the affected area.
- Repair the Leak: Depending on the type of leak, you may need to tighten fittings, replace pipes, or use plumbing sealant.
- Turn On the Water: Turn the water supply back on and check for any remaining leaks.
Replacing the Check Valve
If the check valve is faulty, it needs to be replaced.
- Turn Off the Power: Turn off the power to the well pump at the circuit breaker.
- Drain the System: Open a faucet to relieve any water pressure in the system.
- Disconnect the Old Valve: Disconnect the old check valve from the plumbing.
- Install the New Valve: Connect the new check valve to the plumbing, ensuring it’s installed in the correct direction (allowing water to flow only towards the house).
- Turn On the Power: Turn the power back on to the well pump and monitor the system for proper cycling.
Adjusting the Pressure Switch
If the pressure switch settings are incorrect, adjust them according to the manufacturer’s instructions. Here’s a general guideline:
- Turn Off the Power: Turn off the power to the well pump at the circuit breaker.
- Locate the Adjustment Screws: Find the adjustment screws on the pressure switch.
- Adjust the Cut-In and Cut-Out Pressure: Use a screwdriver to adjust the screws. Turning the screw clockwise increases the pressure, while turning it counterclockwise decreases the pressure.
- Monitor the Pressure: Use a pressure gauge to monitor the pressure as you make adjustments.
- Turn On the Power: Turn the power back on to the well pump and monitor the system for proper cycling.
Important Note: Always follow the manufacturer’s instructions when adjusting the pressure switch. Incorrect settings can damage the pump or cause other issues.
Preventing Rapid Cycling

Preventing rapid cycling is better than dealing with the problem after it occurs. Here are some tips to keep your well pump running smoothly:
- Regular Maintenance: Schedule regular maintenance checks for your well system, including inspecting the pressure tank, check valve, and plumbing.
- Monitor Water Usage: Be mindful of your water usage, especially during peak times. Avoid running multiple water-intensive appliances at the same time.
- Install a Sediment Filter: Install a sediment filter to prevent sediment from entering your plumbing system.
- Protect the Well: Keep the area around your well clean and free of debris. Ensure the well cap is securely in place to prevent contamination.
- Address Leaks Promptly: Fix any leaks as soon as you detect them to prevent pressure drops and rapid cycling.
When to Call a Professional
While many rapid cycling issues can be resolved with DIY troubleshooting, some situations require professional help. Consider calling a well pump technician if:
- You’re not comfortable working with electrical components or plumbing.
- You suspect a major issue, such as a collapsed well or a damaged pump.
- You’ve tried troubleshooting and fixing the problem yourself, but the rapid cycling persists.
- You notice signs of contamination in your water, such as unusual odors or discoloration.
A professional technician can diagnose the problem accurately and provide the necessary repairs or replacements to ensure your well system is functioning properly.
FAQ About Well Pump Rapid Cycling
What is rapid cycling in a well pump?
Rapid cycling is when your well pump turns on and off too frequently, often with only small amounts of water being used. This can strain the pump and indicate underlying issues.
Why is my well pump turning on and off every few minutes?
This is likely due to low water pressure, a faulty pressure tank, leaks in your plumbing, or a malfunctioning check valve. Each of these can cause the pump to cycle more often than it should.
How do I check my pressure tank?
First, turn off the pump and relieve water pressure. Then, tap the side of the tank to check for waterlogging. Use a tire pressure gauge to check the air pressure at the Schrader valve; it should be 2 PSI below the pump’s cut-in pressure.
Can a small leak cause rapid cycling?
Yes, even small leaks can lead to a significant drop in water pressure, causing the pump to turn on more frequently to compensate.
What should the pressure be on my well pump pressure switch?
The typical pressure range for a well pump pressure switch is between 40 and 60 PSI. The cut-in pressure (when the pump turns on) is usually set at 40 PSI, and the cut-out pressure (when the pump turns off) is set at 60 PSI.
How often should a well pump cycle on and off?
A well pump should cycle on and off only a few times per hour under normal water usage. Frequent cycling, such as every few minutes, indicates a problem.
Is it safe to drink water when my well pump is rapid cycling?
While rapid cycling itself doesn’t necessarily make the water unsafe, it can indicate underlying issues that could affect water quality. If you notice any changes in the taste, odor, or appearance of your water, it’s best to have it tested.
Conclusion
Dealing with a rapid cycling well pump can be a headache, but with a little knowledge and some simple troubleshooting steps, you can often diagnose and fix the problem yourself. Remember to check the water level, inspect the pressure tank, look for leaks, and verify the pressure switch settings. Regular maintenance and prompt repairs are key to keeping your well system running smoothly for years to come.
If you’re not comfortable tackling these tasks yourself, don’t hesitate to call a professional. A qualified technician can quickly identify and resolve the issue, ensuring your water supply remains reliable and safe. By taking proactive steps, you can avoid costly repairs and enjoy a consistent water supply without the annoying hiccups of rapid cycling.
“`


