
How to Mount Front Light & Dash Camera on Bicycle: Easy!
Have you ever ridden your bike at night? It can be super fun. But it can also be dangerous. You need to see where you are going. Other people need to see you too. That is why lights are so important. A dash camera can also help keep you safe. It can record what happens on your ride. Do you know how to mount a front light and dash camera on your bicycle? Let’s find out.
It is important to stay safe while riding. Lights and cameras can help. They make you more visible. They can also record accidents. This article will show you how to mount a front light and dash camera on your bicycle.
Key Takeaways
- Mounting a front light and dash camera on your bicycle enhances safety.
- Choose the right mounts and ensure they are compatible with your bike.
- Proper positioning of lights and cameras improves visibility and recording.
- Regularly check and adjust your equipment for optimal performance.
- Consider battery life and charging options for lights and cameras.
Choosing the Right Front Light for Your Bike


Picking the right front light is important. The light keeps you safe. It helps you see at night. Think about how often you ride. Do you ride on dark roads? A bright light is best for dark roads. A dimmer light might be okay for city streets. Look for a light that is easy to mount. Make sure it fits your handlebars. Some lights have different modes. A flashing mode can help you be seen. Consider how long the battery lasts. You don’t want your light to die mid-ride. Think about how easy it is to charge. Some lights use USB. Others need batteries. Choose what works best for you. A good light makes riding safer and more fun.
- Check the light’s brightness (lumens).
- Consider the battery life and charging method.
- Look for different light modes (steady, flashing).
- Make sure the mount fits your handlebars.
- Choose a light that is waterproof or water-resistant.
Imagine you are riding home from a friend’s house. It is getting dark. Your front light is your best friend. It lights up the road. It helps you see potholes and other dangers. Other cars and bikes can see you too. Without a light, you might not be seen. This could cause an accident. A good front light can prevent accidents. It gives you peace of mind. Choose a light that you can trust. It will keep you safe on your rides. Always check your light before you ride.
What are Lumens and Why Do They Matter?
Have you ever heard of lumens? Lumens measure how bright a light is. More lumens mean a brighter light. For biking, lumens are very important. A brighter light helps you see better. It also helps others see you. If you ride in the city, you might not need many lumens. Streetlights help you see. But if you ride on dark trails, you need more lumens. A light with 600-800 lumens is good for dark trails. Think about where you ride. Choose a light with the right amount of lumens. This will keep you safe. Always test your light before a ride. Make sure it is bright enough for the conditions. A good light can make a big difference.
Steady Beam vs. Flashing Mode: Which Is Better?
Lights have different modes. The two main modes are steady and flashing. A steady beam shines constantly. It helps you see the road. A flashing mode blinks on and off. It helps others see you. Which mode is better? It depends on the situation. A steady beam is good for dark roads. It lights up the path ahead. A flashing mode is good for being seen. It catches people’s attention. Some lights have both modes. You can switch between them. Use a steady beam when you need to see. Use a flashing mode when you want to be seen. Using both modes can be the safest option. Always think about your surroundings.
How to Choose a Waterproof Front Light?
Riding in the rain can be fun. But it can also damage your light. That is why you need a waterproof light. Waterproof lights are designed to keep water out. They can handle rain and splashes. Look for a light with an IP rating. This rating tells you how waterproof it is. IPX4 means the light can handle splashes. IPX7 means the light can be submerged in water. Choose a light with a high IP rating. This will protect it from the rain. Always check the light’s description. Make sure it says it is waterproof. A waterproof light will last longer. It will keep you safe in all weather.
Fun Fact or Stat: Did you know that bike lights can have up to 2000 lumens? That’s brighter than some car headlights!
Selecting a Dash Camera for Bicycle Safety

A dash camera can be a great addition to your bike. It records your rides. This can be helpful if there is an accident. It can also capture cool moments. When choosing a dash camera, think about video quality. You want clear footage. Look for a camera that records in 1080p or higher. Consider the camera’s battery life. Make sure it lasts for your typical ride. Think about how easy it is to mount. The camera should be secure. It should not move around while you ride. Some cameras have extra features. They might have GPS. This tracks your location. They might have loop recording. This records over old footage. Choose a camera that fits your needs. It can help keep you safe and capture memories.
- Check the video resolution (1080p or higher).
- Consider the battery life and storage capacity.
- Look for features like GPS and loop recording.
- Make sure the camera is waterproof or water-resistant.
- Choose a camera with a stable and secure mount.
- Read reviews to learn from other riders’ experiences.
Imagine you are riding in a busy city. Cars are everywhere. Suddenly, a car cuts you off. You have to brake hard to avoid a crash. Luckily, your dash camera recorded everything. The video shows the car’s license plate. You can use this video to report the incident. Without the camera, it would be hard to prove what happened. A dash camera can protect you in these situations. It provides evidence. It can also deter bad drivers. Knowing you have a camera can make you feel safer. It is a small investment for peace of mind. Always review your footage after a ride.
What Video Resolution Is Best for a Bike Dash Cam?
Video resolution is important for a dash cam. It determines how clear the video is. Higher resolution means clearer video. 1080p is a good starting point. It provides clear footage. But 4K resolution is even better. It offers more detail. This can be helpful for reading license plates. Consider your budget. 4K cameras are more expensive. Think about storage space. Higher resolution videos take up more space. Choose a resolution that balances quality and storage. Always test the camera before a ride. Make sure the video is clear enough. A good resolution can make a big difference.
GPS and Loop Recording: Are They Necessary?
GPS and loop recording are extra features. GPS tracks your location. It adds this information to the video. This can be helpful for accident reports. Loop recording automatically records over old footage. This saves storage space. Are these features necessary? It depends on your needs. GPS can be useful for tracking your rides. Loop recording can be helpful if you don’t want to manage storage. Some riders find these features essential. Others don’t need them. Consider how you will use the camera. This will help you decide if these features are important. Always think about your priorities.
How to Ensure Your Dash Cam Is Weatherproof?
Weather can be unpredictable. Rain, snow, and sun can damage your dash cam. That is why you need a weatherproof camera. Weatherproof cameras are designed to withstand the elements. Look for a camera with an IP rating. This tells you how protected it is. IP65 means the camera is protected from dust and water. IP67 means it can be submerged in water. Choose a camera with a high IP rating. This will protect it from the weather. Always check the camera’s description. Make sure it says it is weatherproof. A weatherproof camera will last longer. It will keep recording in all conditions.
Fun Fact or Stat: Some bike dash cameras can record for up to 8 hours on a single charge!
Finding the Best Mounting Spots on Your Bicycle

Finding the right spot to mount your light and camera is key. You want them to be secure. You also want them to be in a good position. For the front light, the handlebars are a common choice. This puts the light in front. It shines the light where you are going. For the dash camera, the handlebars are also a good option. You can also mount it on your helmet. This gives you a different view. Make sure the mount is sturdy. It should not move around. Test the position before you ride. Make sure the light shines where you need it. Make sure the camera has a clear view. A good mounting spot will improve your safety and recording.
- Consider the handlebars, stem, or helmet for mounting.
- Ensure the mount is secure and stable.
- Position the light for optimal visibility.
- Position the camera for a clear and unobstructed view.
- Test the mounting position before your ride.
Imagine you have a wobbly mount. Your light keeps shaking. Your camera keeps pointing down. This is not safe. You need a secure mount. A good mount will keep your light and camera in place. It will prevent them from moving around. This will give you a clear view. It will also help you see better. A secure mount is an investment in your safety. It will give you peace of mind. Always check your mount before you ride. Make sure it is tight and secure. A little effort can prevent accidents.
Handlebar Mount vs. Stem Mount: Which Is Better?
Handlebar mounts and stem mounts are common choices. Handlebar mounts attach to the handlebars. They are easy to adjust. Stem mounts attach to the stem. They are more secure. Which is better? It depends on your preferences. Handlebar mounts are good if you want to adjust the position often. Stem mounts are good if you want a stable mount. Consider the size of your handlebars and stem. Make sure the mount fits properly. Some mounts are universal. They fit different sizes. Choose a mount that works for your bike. Always test the mount before a ride.
How to Choose a Secure Helmet Mount?
Helmet mounts offer a different perspective. They attach the camera to your helmet. This records what you see. A secure helmet mount is essential. You don’t want the camera to fall off. Look for a mount with strong adhesive. Or choose one with straps. Make sure the mount is lightweight. You don’t want it to weigh down your helmet. Test the mount before a ride. Shake your head to see if it moves. A secure helmet mount will keep your camera in place. It will give you a unique view of your ride. Always prioritize safety.
Adjusting the Angle for Optimal Recording and Visibility
The angle of your light and camera is important. The light should point down the road. It should illuminate your path. The camera should capture a wide view. It should record everything in front of you. Adjust the angle until you are happy. Use a test ride to fine-tune the position. A good angle will improve your safety. It will also improve the quality of your recordings. Always check the angle before a ride. Make sure everything is pointing in the right direction. A small adjustment can make a big difference.
Fun Fact or Stat: Some cyclists use multiple cameras to record different angles of their rides!
Step-by-Step Guide to Mounting Your Front Light

Mounting your front light is easy. First, gather your tools. You might need a screwdriver or Allen wrench. Next, attach the mount to your handlebars. Make sure it is tight. Then, slide the light into the mount. Secure it in place. Test the light. Turn it on and off. Adjust the angle. Make sure it shines where you need it. If the light uses batteries, install them. If it uses USB, charge it before your ride. Always check the light before you ride. Make sure it is working properly. A properly mounted light will keep you safe.
- Gather necessary tools (screwdriver, Allen wrench).
- Attach the mount to your handlebars securely.
- Slide the light into the mount and tighten.
- Test the light to ensure it is working.
- Adjust the angle for optimal visibility.
Imagine you are rushing to get to school. You quickly attach your light. You don’t tighten the screws. Halfway to school, the light falls off. This is dangerous. Take your time when mounting your light. Make sure everything is secure. A little extra time can prevent accidents. Always double-check your work. A secure light is a safe light. It will keep you visible on the road. It will help you arrive safely at your destination. Remember to always prioritize safety.
Preparing Your Handlebars for the Mount
Before you mount your light, prepare your handlebars. Clean them with a cloth. This will remove dirt and grime. Check for any damage. Make sure the handlebars are in good condition. If you have handlebar tape, make sure it is secure. Loose tape can interfere with the mount. Choose a spot on the handlebars that is flat and smooth. This will provide a stable surface. Use a rubber shim if needed. This will protect your handlebars. It will also provide a better grip. A little preparation can make a big difference.
Attaching the Mount Securely
Attaching the mount securely is crucial. Use the right size screws or bolts. Don’t overtighten them. This can damage the mount or handlebars. Tighten them until they are snug. Check the mount for movement. It should not wiggle or slide. If it does, tighten the screws a little more. Use a torque wrench if you have one. This will help you tighten the screws to the correct level. A secure mount will keep your light in place. It will prevent it from falling off during your ride. Always prioritize safety.
Adjusting the Light Angle for Best Visibility
The angle of your light is important. It determines how well you can see. It also determines how well others can see you. Adjust the angle so the light shines down the road. It should illuminate your path. Avoid pointing the light too high. This can blind oncoming traffic. Point the light slightly downward. This will help you see potholes and other hazards. Test the light on a dark road. Make sure it provides enough visibility. Adjust the angle as needed. A properly adjusted light will keep you safe.
Fun Fact or Stat: The best angle for a bike light is usually between 5 and 10 degrees below the horizontal.
Mounting Your Dash Camera: A Simple Guide
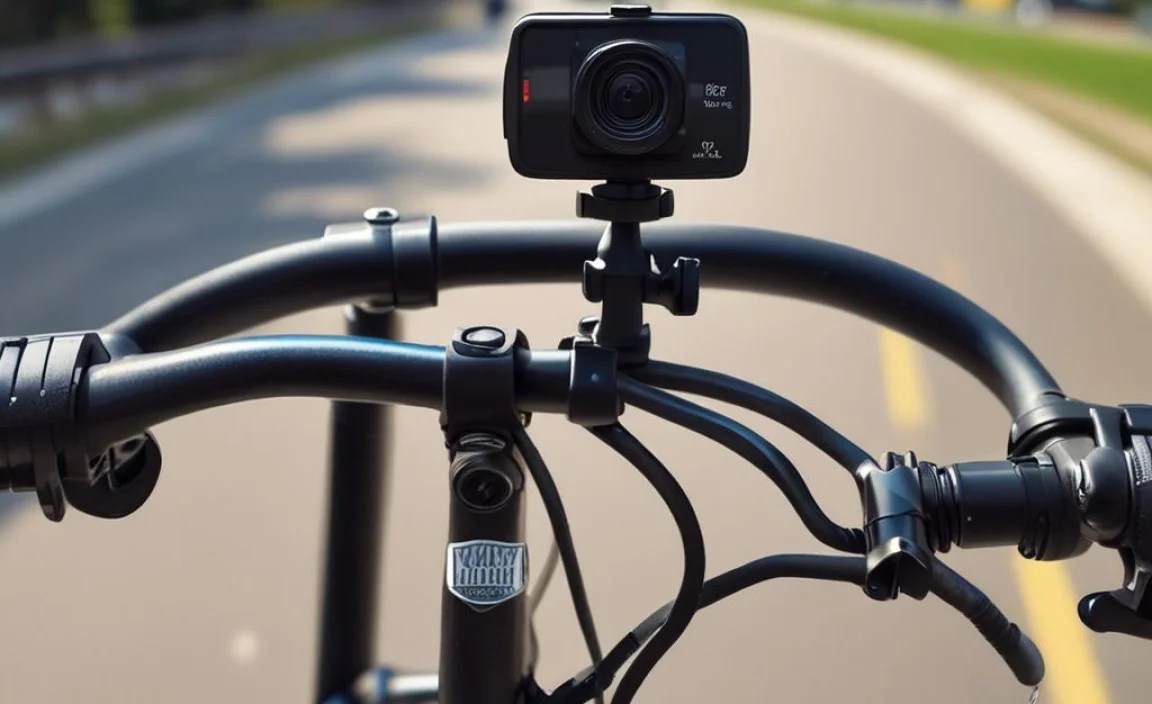
Mounting your dash camera is similar to mounting your light. First, choose a mounting spot. The handlebars or helmet are good options. Next, attach the mount to your chosen spot. Make sure it is secure. Then, slide the camera into the mount. Tighten the screws. Adjust the angle. Make sure the camera has a clear view. Test the camera. Record a short video. Play it back to check the quality. If the camera uses batteries, install them. If it uses USB, charge it before your ride. Always check the camera before you ride. Make sure it is working properly. A properly mounted camera will capture your rides safely.
- Choose a mounting spot (handlebars or helmet).
- Attach the mount securely.
- Slide the camera into the mount and tighten.
- Adjust the angle for a clear view.
- Test the camera to ensure it is recording properly.
Imagine you are on a long bike ride. You are enjoying the scenery. Suddenly, you hit a bump. Your camera falls off. This is frustrating. You lose the footage. You also risk damaging the camera. A secure mount is essential. It will keep your camera in place. It will protect it from bumps and vibrations. A little extra effort can prevent these problems. Always double-check your mount. Make sure it is tight and secure. A secure camera is a happy camera.
Choosing the Right Mount for Your Camera Type
Different cameras need different mounts. Some cameras use adhesive mounts. These stick to your helmet or handlebars. Other cameras use clamp mounts. These clamp onto your handlebars. Choose a mount that is compatible with your camera. Consider the size and weight of your camera. Make sure the mount can support it. Read reviews to see what other riders recommend. A good mount will keep your camera secure. It will also be easy to use. Always choose a mount that fits your needs.
Securing the Camera to the Mount
Securing the camera to the mount is important. Use the screws or bolts that came with the mount. Don’t overtighten them. This can damage the camera or mount. Tighten them until they are snug. Check the camera for movement. It should not wiggle or slide. If it does, tighten the screws a little more. Use a safety tether if you have one. This will prevent the camera from falling if the mount fails. A secure camera will capture your rides safely.
Testing the Camera Angle and Recording Quality
Testing the camera angle and recording quality is essential. Record a short video. Play it back on your computer. Check the video for clarity. Make sure the angle is correct. You should be able to see everything in front of you. Adjust the angle as needed. Test the camera in different lighting conditions. Make sure it records well in bright sunlight and low light. A properly tested camera will capture high-quality footage. It will provide valuable evidence in case of an accident. Always prioritize safety and quality.
Fun Fact or Stat: Some high-end dash cameras can even record in 360 degrees!
Maintaining Your Lights and Camera for Longevity
Taking care of your lights and camera is important. It will help them last longer. Clean them regularly with a soft cloth. Remove any dirt or grime. Check the batteries. Replace them when they are low. Store your lights and camera in a dry place. Avoid extreme temperatures. Check the mounts regularly. Make sure they are still secure. Tighten the screws if needed. Replace any damaged parts. Regular maintenance will keep your lights and camera working properly. It will also save you money in the long run.
- Clean lights and cameras regularly.
- Check and replace batteries as needed.
- Store equipment in a dry place.
- Inspect mounts for damage or looseness.
- Update camera firmware when available.
Imagine you neglect your lights and camera. You never clean them. You leave them in the rain. The batteries die. The mounts become loose. Eventually, they stop working. This is a waste of money. Taking care of your equipment is easy. A little effort can go a long way. Regular maintenance will keep your lights and camera in good condition. It will ensure they are ready when you need them. Always prioritize maintenance. It is an investment in your safety and enjoyment.
Cleaning Tips for Lights and Cameras
Cleaning your lights and cameras is simple. Use a soft, dry cloth. Wipe away any dirt or grime. Avoid using harsh chemicals. These can damage the lenses or housings. For stubborn dirt, use a slightly damp cloth. Make sure to dry the equipment thoroughly. Clean the lenses carefully. Use a lens cleaning solution if needed. Avoid touching the lenses with your fingers. This can leave smudges. Regular cleaning will keep your lights and cameras working properly. It will also improve the quality of your recordings.
Battery Care and Charging Best Practices
Proper battery care is essential. Use the correct type of batteries. Follow the manufacturer’s instructions. Avoid overcharging the batteries. This can shorten their lifespan. Store the batteries in a cool, dry place. Remove the batteries when not in use. This will prevent corrosion. Charge the batteries fully before each ride. Carry spare batteries with you. This will ensure you always have power. Proper battery care will extend the life of your lights and cameras.
Checking and Tightening Mounts Regularly
Checking your mounts regularly is important. Make sure they are still secure. Tighten the screws if needed. Use the correct size screwdriver or Allen wrench. Don’t overtighten the screws. This can damage the mount or handlebars. Check the mounts for wear and tear. Replace them if they are damaged. Loose mounts can cause your lights and cameras to fall off. This is dangerous. Regular maintenance will keep your mounts secure. It will also keep your lights and cameras in place. Always prioritize safety.
Fun Fact or Stat: Some bike shops offer maintenance services for lights and cameras!
Understanding Local Laws and Regulations
Before you ride with lights and cameras, check your local laws. Some areas require front lights at night. Some areas have rules about camera use. Make sure you are following the rules. This will help you avoid fines. It will also keep you safe. Check with your local police department. Or check your city’s website. They will have information about bike laws. Always be aware of the rules. This will ensure you are riding legally and safely.
- Research local laws regarding bike lights and cameras.
- Ensure your equipment meets legal requirements.
- Be aware of privacy laws regarding camera usage.
- Check for any restrictions on mounting locations.
- Stay informed about changes in local regulations.
Imagine you are riding at night without a front light. A police officer stops you. You get a ticket. This is frustrating. It is also avoidable. Knowing the local laws can prevent this. A little research can save you money and trouble. Always check the laws before you ride. This will ensure you are following the rules. It will also help you stay safe. Remember, ignorance of the law is no excuse.
Bike Light Requirements in Your Area
Bike light requirements vary by location. Some areas require a white front light. Others require a red rear light. Some areas require both. Check your local laws to see what is required. The laws might also specify the brightness of the light. Make sure your light meets these requirements. This will help you avoid fines. It will also make you more visible to others. Always prioritize safety and legality.
Camera Usage and Privacy Laws
Camera usage is also subject to laws. Some areas have privacy laws. These laws restrict where you can record. Be aware of these laws. Avoid recording people without their permission. Respect their privacy. Post signs if you are recording in a public place. This will inform people that they are being recorded. Always be mindful of privacy laws. This will help you avoid legal trouble.
Where to Find Information on Local Bike Laws
Finding information on local bike laws is easy. Check your city’s website. Look for the transportation department. They will have information on bike laws. You can also check with your local police department. They can answer your questions. Bike shops are another good resource. They often have information on local laws. Always verify the information you find. Make sure it is accurate and up-to-date. Staying informed will help you ride legally and safely.
Fun Fact or Stat: Some cities offer free bike safety classes that cover local laws!
| Feature | Front Light | Dash Camera |
|---|---|---|
| Brightness/Resolution | Lumens (at least 400 for city, 600+ for dark areas) | 1080p or higher for clear video |
| Battery Life | At least 2 hours on steady mode | At least 1.5 hours of recording time |
| Mounting | Secure handlebar or stem mount | Stable handlebar, stem, or helmet mount |
| Weather Resistance | Waterproof or water-resistant (IPX4 or higher) | Weatherproof (IP65 or higher) |
| Extra Features | Flashing mode, USB charging | GPS, loop recording |
Summary
Mounting a front light and dash camera on your bicycle can greatly improve your safety. Choosing the right equipment is the first step. Consider brightness, battery life, and mounting options. Proper installation is also important. Make sure the mounts are secure. Adjust the angles for optimal visibility and recording. Regular maintenance will keep your equipment working well. Check local laws to ensure you are following the rules. By taking these steps, you can enjoy safer and more enjoyable bike rides. Lights and cameras are valuable tools for protecting yourself on the road.
Conclusion
Riding a bike can be a lot of fun. But it is important to stay safe. Using a front light and a dash camera can really help. They make you more visible to others. They can also record any accidents. Knowing how to mount a front light and dash camera on your bicycle is a great way to protect yourself. So, follow these steps and enjoy your rides with more confidence!
Frequently Asked Questions
Question No 1: Why should I mount a front light and dash camera on my bicycle?
Answer: Mounting a front light and dash camera on your bicycle is a great way to enhance your safety. A front light helps you see the road and makes you visible to others, especially at night or in low-light conditions. A dash camera can record your rides, providing valuable evidence in case of an accident or incident. Together, these tools can significantly improve your safety and peace of mind while cycling. They help you stay aware and protected on the road.
Question No 2: What type of front light is best for my bicycle?
Answer: The best type of front light for your bicycle depends on your riding conditions. If you primarily ride in urban areas with streetlights, a light with 400-600 lumens should be sufficient. However, if you ride on dark roads or trails, you’ll want a brighter light with 600-800 lumens or more. Look for a light with different modes, such as steady and flashing, and consider the battery life and charging method. A waterproof or water-resistant light is also a good choice to protect against rain and splashes. Choose a light that meets your needs and budget to ensure safe riding.
Question No 3: What features should I look for in a bicycle dash camera?
Answer: When choosing a bicycle dash camera, consider several important features. Video resolution is key; look for a camera that records in 1080p or higher for clear footage. Battery life is also important, so choose a camera that can record for at least 1.5 hours on a single charge. Additional features like GPS, which tracks your location, and loop recording, which automatically records over old footage, can be very useful. Make sure the camera is waterproof or water-resistant to protect it from the elements. A stable and secure mount is also essential for capturing clear and steady video.
Question No 4: Where is the best place to mount my front light and dash camera on my bicycle?
Answer: The best place to mount your front light and dash camera on your bicycle depends on your preferences and the design of your bike. Common mounting locations include the handlebars, stem, and helmet. Handlebar mounts are easy to adjust and provide a good view of the road. Stem mounts are more secure and can save space on your handlebars. Helmet mounts offer a unique perspective and record what you see. Choose a location that provides a stable and secure mount, optimal visibility for the light, and a clear and unobstructed view for the camera. Test the mounting position before your ride to ensure everything is working properly.
Question No 5: How do I ensure my front light and dash camera are securely mounted?
Answer: Ensuring your front light and dash camera are securely mounted is crucial for safety and optimal performance. Use the correct size screws or bolts to attach the mounts. Tighten them until they are snug, but avoid overtightening, which can damage the mount or handlebars. Check the mounts for movement; they should not wiggle or slide. Use a torque wrench if you have one to tighten the screws to the correct level. For helmet mounts, make sure the adhesive is strong or the straps are secure. Regularly check and tighten the mounts to prevent them from loosening during your rides. A secure mount will keep your equipment in place and prevent accidents.
Question No 6: What are some tips for maintaining my front light and dash camera?
Answer: Maintaining your front light and dash camera will help them last longer and perform better. Clean them regularly with a soft cloth to remove dirt and grime. Check the batteries and replace them as needed. Store your equipment in a dry place to prevent damage. Inspect the mounts for wear and tear and tighten the screws regularly. Update the camera’s firmware when available to ensure optimal performance. By following these simple tips, you can keep your lights and cameras in good condition and enjoy safer and more enjoyable bike rides. Knowing how to maintain your equipment is just as important as knowing how to mount it.


