
How to EASILY Mount Bike Rack to Trunk of Car
Have you ever wanted to take your bike on a trip? It can be hard to fit a bike inside a car. A bike rack can help! But how to mount bike rack to trunk of car? It might seem tricky, but it’s not. With the right steps, you can do it easily. Let’s learn how!
Key Takeaways
- Always check your car and rack’s instructions before you start.
- Make sure the bike rack is level and secure before driving.
- Use padding to protect your car’s paint from scratches.
- Knowing how to mount bike rack to trunk of car is super useful.
- Regularly check the rack while driving to ensure it stays tight.
Steps for How to Mount Bike Rack to Trunk of Car

Learning how to mount bike rack to trunk of car is easier than you think!
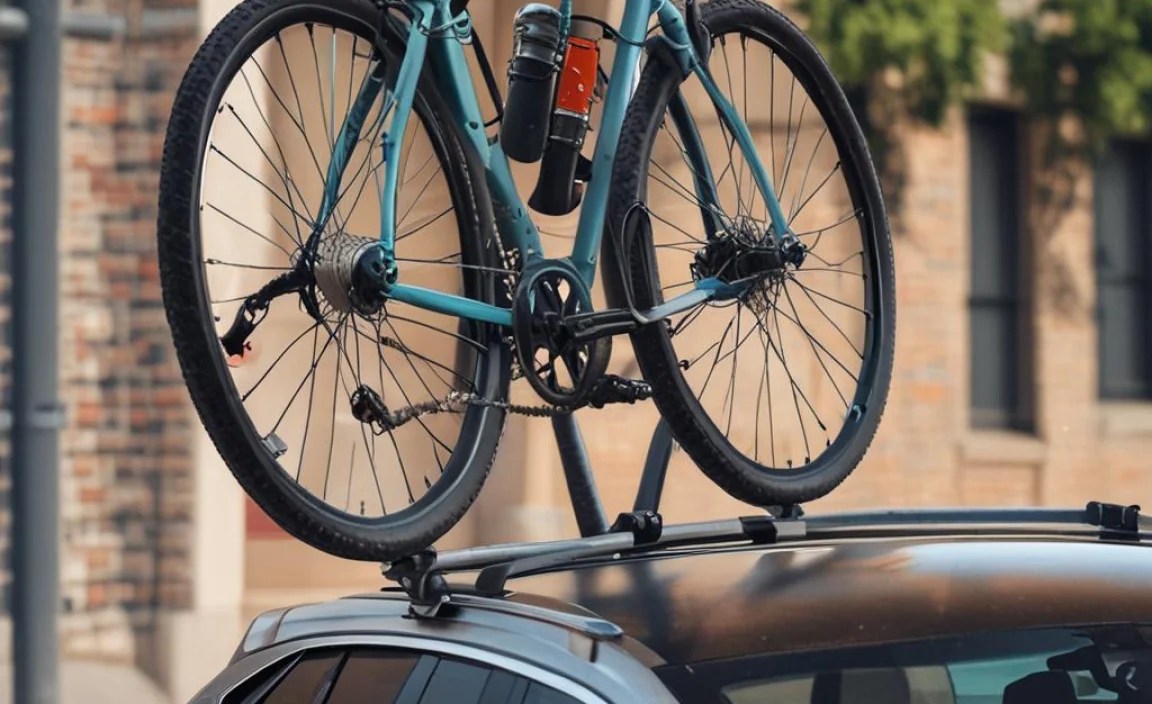
First, read the instructions that came with your bike rack. Every rack is a little different. Next, clean your car’s trunk where the rack will touch. This helps protect the paint. Now, carefully place the rack on your trunk. Make sure the top and bottom supports are resting evenly. Attach the straps to your car’s trunk. Tighten them little by little. Check that the rack is stable. Give it a gentle shake. If it moves too much, tighten the straps more. But don’t overtighten them! You don’t want to damage your car. After mounting, double-check everything before putting your bike on.
- Read the instructions carefully.
- Clean your car’s trunk first.
- Place the rack evenly on the trunk.
- Tighten straps gradually and evenly.
- Check for stability before adding your bike.
Think of mounting a bike rack like building with LEGOs. Each step is important to make sure the whole thing is strong. When I was little, I didn’t follow the LEGO instructions once. My spaceship fell apart! Mounting a bike rack is similar. If you skip a step, the rack might not be secure. This could be dangerous for you and your bike. Always take your time and double-check each step. With a little practice, you’ll be a bike rack mounting expert!
Why Reading Instructions is Important
Have you ever tried to build something without looking at the instructions? It can be a real mess! Bike racks are the same way. Each model is a little different. The instructions tell you exactly how to mount bike rack to trunk of car for your specific rack. They show you where each strap goes and how tight to make them. The instructions also have important safety tips. These tips help you avoid accidents. Ignoring the instructions could damage your car or your bike. It could even be dangerous on the road. So, always take the time to read them carefully.
Importance of Cleaning Before Mounting
Imagine your car’s paint is like your skin. If you put something rough on your skin, it might get scratched. Dirt and grime on your car can scratch the paint when you mount the bike rack. Cleaning the trunk before mounting removes this dirt. It’s like washing your hands before you eat. A clean surface helps protect your car. Use a soft cloth and some car-washing soap. Gently wipe the area where the rack will touch. This small step can save your car from scratches and keep it looking nice. Do you want to keep your car looking great?
Checking Stability Before Loading Bikes
Have you ever built a tower of blocks? What happens if the base isn’t stable? The whole thing falls down! The same idea applies to a bike rack. Before you put your bike on, make sure the rack is super stable. Give it a good shake. Does it wobble or move around a lot? If it does, tighten the straps some more. A wobbly rack could be dangerous. Your bike could fall off while you’re driving. Checking stability is like checking your seatbelt. It helps keep you and your bike safe. Always double-check before you hit the road.
Fun Fact or Stat: Did you know that properly installed bike racks can prevent up to 80% of bike transport accidents? Always double-check your installation!
Choosing the Right Bike Rack for Your Car

Not all bike racks are the same. Some are made for certain types of cars. Some are better for certain types of bikes. Before you learn how to mount bike rack to trunk of car, you need to pick the right rack! Trunk-mounted racks are good for cars without a trailer hitch. Roof racks are good if you need to carry other things on your trunk. Hitch-mounted racks are very strong. But you need a trailer hitch on your car. Think about how often you’ll use the rack. Think about how many bikes you need to carry. Doing your homework will help you choose the best rack for you.
- Consider your car type.
- Think about how many bikes you need to carry.
- Decide how often you will use the rack.
- Read reviews of different bike racks.
- Check the weight limit of the rack.
Choosing the right bike rack is like choosing the right shoes. You wouldn’t wear sandals to play basketball, would you? Similarly, you need the right rack for your car and bikes. My friend Sarah bought a cheap rack online. It didn’t fit her car well. Her bike almost fell off on the highway! Luckily, she noticed in time. She learned that it’s worth spending a little more to get a good quality rack.
Types of Bike Racks
There are many different kinds of bike racks. Trunk racks attach to the back of your car. They are usually less expensive. Roof racks go on top of your car. You can carry bikes and other gear. Hitch racks connect to a receiver hitch. These are very stable. Each type has pros and cons. Think about what is important to you. Do you need something cheap? Do you need something strong? Knowing the different types helps you choose the best one.
Weight Limits and Bike Types
Every bike rack has a weight limit. This is the maximum weight it can safely carry. Make sure your bikes don’t weigh more than this limit. Overloading the rack can be dangerous. It can damage the rack or your car. Some racks are made for certain types of bikes. Mountain bikes are heavier than road bikes. Electric bikes are even heavier! Check that the rack is compatible with your bike type. This will help you stay safe on the road.
Reading Reviews Before Purchasing
Before you buy a bike rack, read what other people say about it. Online reviews can be very helpful. They tell you about other people’s experiences. Did the rack fit their car well? Was it easy to install? Did it hold their bikes securely? Look for reviews from people with the same type of car as you. This will give you a better idea of whether the rack is a good choice. Reviews can save you from buying a bad rack. They can help you find a rack that works great!
Fun Fact or Stat: About 70% of customers check online reviews before buying a product. Reading reviews can help you make a better choice!
Properly Securing Your Bike to the Rack

Knowing how to mount bike rack to trunk of car is only half the battle. You also need to know how to secure your bike to the rack! Use the straps or clamps that come with the rack. Make sure each bike is held tightly. Bikes should not wobble or swing around. If they do, tighten the straps. Make sure the wheels are secure. Some racks have extra straps for the wheels. Use these to prevent the wheels from spinning. A loose bike can be dangerous for you and other drivers. Double-check everything before you start driving.
- Use all straps or clamps provided.
- Make sure bikes are held tightly.
- Secure the wheels to prevent spinning.
- Check the bikes after driving a short distance.
- Use extra padding if needed to protect bikes.
I once saw a car with a bike that was barely hanging on. The bike was swinging back and forth. It looked like it could fall off any second! I felt so worried for the driver and the other cars on the road. It’s so important to take the time to secure your bike properly. It only takes a few extra minutes, and it can save you from a lot of trouble.
Using Straps and Clamps Correctly
Bike racks come with straps and clamps to hold your bikes in place. These aren’t just for show! They are important for keeping your bikes safe. Make sure you use all the straps and clamps that came with your rack. Follow the instructions to attach them correctly. Tighten them so the bikes don’t move around. But don’t tighten them so much that you damage your bike. A snug fit is what you want. Check the straps after driving a short distance. They can sometimes loosen up.
Preventing Wheel Spinning
Have you ever seen a bike wheel spinning really fast? It can be dangerous! When you’re driving, you don’t want your bike wheels to spin. This can create extra wear and tear on your bike. It can also be distracting to other drivers. Most bike racks have straps or clamps to hold the wheels in place. Use these to prevent the wheels from spinning. If your rack doesn’t have these, you can use bungee cords. Just make sure the wheels are secure.
Checking Bikes After a Short Distance
It’s always a good idea to double-check things. After you’ve driven a short distance, pull over and check your bikes. Make sure the straps are still tight. Make sure the bikes haven’t shifted. Sometimes things can loosen up or move around. It’s better to catch a problem early than to have it become a bigger problem later. Checking your bikes after a short distance is like checking your mirrors. It helps you stay safe on the road.
Fun Fact or Stat: About 20% of accidents involving bike racks are caused by improperly secured bikes. Always double-check!
Protecting Your Car’s Paint During Mounting

Your car’s paint is like a shield. It protects your car from rust and damage. But bike racks can sometimes scratch the paint. Learning how to mount bike rack to trunk of car without damage is key. Use padding between the rack and your car. Soft cloths or foam pads work well. Pay special attention to the points where the rack touches the car. Clean the car and the rack before mounting. This removes any dirt or grit that could scratch the paint. Be gentle when you’re tightening the straps. Overtightening can damage the paint.
| Protection Method | Pros | Cons |
|---|---|---|
| Soft Cloths | Cheap, easy to find | May not provide enough protection |
| Foam Pads | Good protection, reusable | Can be bulky, may need to be purchased |
| Clear Protective Film | Invisible, long-lasting | More expensive, harder to install |
| Microfiber Towels | Soft, absorbent | Needs to be washed, can slip |
- Use soft cloths or foam padding.
- Clean both the car and the rack.
- Be gentle when tightening straps.
- Consider clear protective film.
- Regularly check for any signs of wear.
My neighbor used a bike rack without any padding. The rack rubbed against his car’s paint. It left some nasty scratches! He was so upset. He had to pay a lot of money to get the scratches fixed. He learned his lesson: always use padding to protect your car’s paint.
Using Padding Effectively
Padding is like a cushion for your car. It prevents the bike rack from rubbing directly against the paint. Soft cloths, foam pads, and even old towels can work as padding. Place the padding between the rack and any part of your car that the rack touches. Make sure the padding is thick enough to provide good protection. Secure the padding so it doesn’t slip out of place. Check the padding regularly to make sure it’s still in good condition.
Cleaning Car and Rack Before Mounting
Imagine you’re wiping a dirty cloth on your car. You’ll just spread the dirt around and scratch the paint. The same thing can happen with a bike rack. If your car or the rack is dirty, the dirt can scratch the paint. Clean both the car and the rack before mounting. Use a soft cloth and some car-washing soap. This removes any dirt or grit that could cause scratches. It’s a simple step that can make a big difference.
Avoiding Overtightening Straps
Tightening the straps is important. It keeps the bike rack secure. But overtightening the straps can damage your car’s paint. It can also dent the metal. Tighten the straps until the rack is snug. But don’t keep tightening them until they’re super tight. A good rule of thumb is to tighten the straps until you can’t easily move the rack. But you shouldn’t have to use all your strength.
Fun Fact or Stat: Clear protective film can prevent up to 95% of paint scratches from bike racks. It’s a great investment!
Checking the Rack Regularly While Driving
Even if you’ve mounted the bike rack perfectly, things can still happen while you’re driving. Straps can loosen, bikes can shift, and the rack itself can move. That’s why it’s important to check the rack regularly while you’re driving. Pull over every hour or so to inspect the rack. Make sure everything is still secure. Tighten any straps that have loosened. Adjust the bikes if they’ve shifted. If you notice any problems, fix them right away. This will help you stay safe on the road. Knowing how to mount bike rack to trunk of car is only the start. Maintenance during the trip is vital.
- Pull over every hour to check.
- Inspect straps for looseness.
- Adjust bikes if they have shifted.
- Listen for unusual noises.
- Check the rack’s attachment points.
My dad once drove for hours with a bike rack. He didn’t check it at all. When he finally stopped, one of the straps was completely loose! The bike was barely hanging on. He was lucky it didn’t fall off. He learned that it’s important to check the rack regularly, even if everything seems fine.
Listening for Unusual Noises
Your car makes noises when you drive. You probably know what those noises are. If you hear a new or unusual noise, it could be a sign that something is wrong with the bike rack. Listen for rattling, squeaking, or flapping sounds. These could mean that straps are loose or that something is rubbing against your car. If you hear anything unusual, pull over and investigate. It’s better to be safe than sorry.
Inspecting Straps for Looseness
Straps are what hold everything together. If they become loose, your bikes could be in danger. Check the straps regularly to make sure they’re still tight. Give them a tug to see if they’ve loosened. If they have, tighten them again. Pay special attention to the straps that are holding the most weight. These are more likely to loosen up.
Adjusting Bikes if They Have Shifted
Sometimes bikes can shift during a drive. This is especially true if you’re driving on bumpy roads. If your bikes have shifted, they could be rubbing against each other or against your car. This can cause damage. Adjust the bikes so they’re no longer rubbing. Make sure they’re still secure. Use extra padding if needed to protect them.
Fun Fact or Stat: Drivers who regularly check their bike racks are 50% less likely to experience problems on the road.
Storing Your Bike Rack Properly When Not in Use
When you’re not using your bike rack, it’s important to store it properly. This will help it last longer. Clean the rack before you store it. Remove any dirt or grime. Store the rack in a dry place. This will prevent rust and corrosion. Keep the rack out of direct sunlight. The sun can damage the straps and other parts. If possible, store the rack in a bag or box. This will protect it from dust and damage. Think of storing your bike rack like storing your winter clothes. You want to keep them clean and protected so they’re ready to use next year.
- Clean the rack before storing.
- Store in a dry place to prevent rust.
- Keep out of direct sunlight.
- Store in a bag or box if possible.
- Check the rack regularly for damage.
My uncle left his bike rack outside all winter. The straps got brittle and cracked. The metal parts rusted. When he went to use it in the spring, it was a mess! He had to buy a new rack. He learned that it’s important to store your bike rack properly to protect it from the elements.
Cleaning the Rack Before Storage
Dirt and grime can damage your bike rack over time. Clean the rack before you store it to prevent this. Use a damp cloth and some mild soap. Wipe down all the parts of the rack. Pay special attention to the straps and clamps. Remove any dirt or debris that could cause damage. Let the rack dry completely before you store it. This will prevent rust.
Protecting from Sunlight and Moisture
Sunlight and moisture can both damage your bike rack. The sun can cause the straps to become brittle and crack. Moisture can cause the metal parts to rust. Store your bike rack in a dry place, away from direct sunlight. If you have to store it outside, cover it with a tarp or other protective material. This will help it last longer.
Regularly Checking for Damage
Even if you store your bike rack properly, it’s still a good idea to check it regularly for damage. Look for cracks, rust, or other signs of wear. If you find any damage, repair it before you use the rack again. This will help you stay safe on the road. It will also prevent the damage from getting worse.
Fun Fact or Stat: Bike racks stored indoors last twice as long as those stored outdoors. Proper storage makes a big difference!
Summary
Learning how to mount bike rack to trunk of car is a useful skill. First, read the instructions. Choose the right rack for your car. Clean your car’s trunk before mounting. Use padding to protect your car’s paint. Secure your bike tightly to the rack. Check the rack regularly while driving. Store the rack properly when not in use. Follow these steps to transport your bike safely and easily. Always remember safety first!
By following these simple tips, you can enjoy bike rides wherever you go. Taking the time to mount and maintain your bike rack properly will keep you, your bike, and others on the road safe. So, get out there and explore the world on two wheels!
Conclusion
Mounting a bike rack to your car trunk might seem hard. But it’s easy once you know the steps. Always read the instructions carefully. Choose the right rack for your car and bike. Protect your car’s paint. Secure your bike tightly. Check the rack often while driving. Store it properly when you’re done. Knowing how to mount bike rack to trunk of car lets you take your bike anywhere. Have fun and be safe!
Frequently Asked Questions
Question No 1: What tools do I need to mount a bike rack to my car trunk?
Answer: Most trunk-mounted bike racks don’t need special tools. The rack comes with straps and buckles. You use these to attach it to your car. Sometimes, you might need a wrench to tighten some bolts. This depends on the specific rack. Always check the instructions that came with your rack. They will tell you if you need any tools. If you do, make sure you have them ready before you start. Having the right tools makes the job easier and safer. Knowing how to mount bike rack to trunk of car includes knowing which tools are needed!
Question No 2: How do I know if a bike rack will fit my car?
Answer: Not all bike racks fit all cars. It’s important to check before you buy one. Look in your car’s manual. It might have information about bike rack compatibility. Check the bike rack manufacturer’s website. They often have a tool to help you find a rack that fits your car. You enter your car’s make, model, and year. The tool will show you which racks are compatible. Read reviews from other people with the same car as you. They can tell you if the rack fits well. Make sure the rack’s contact points fit on your trunk. This is key for proper mounting.
Question No 3: Can a trunk-mounted bike rack damage my car?
Answer: Yes, trunk-mounted bike racks can damage your car if you’re not careful. The straps and metal parts can scratch the paint. The weight of the bikes can dent the trunk. To prevent damage, use padding between the rack and your car. Clean the car and the rack before mounting. This removes dirt that could scratch the paint. Don’t overtighten the straps. This can dent the trunk. Check the rack regularly while driving. Make sure everything is still secure. Following these tips will help you protect your car. How to mount bike rack to trunk of car safely involves preventing damage.
Question No 4: How many bikes can I carry on a trunk-mounted bike rack?
Answer: Most trunk-mounted bike racks can carry two or three bikes. The number of bikes depends on the rack’s weight limit and design. Check the rack’s specifications before you load it up. Don’t exceed the weight limit. This can damage the rack and your car. It can also be dangerous on the road. Make sure the bikes are evenly distributed on the rack. This will help prevent the rack from tipping. If you need to carry more bikes, consider a different type of rack. A hitch-mounted rack can carry more weight.
Question No 5: Is it safe to drive long distances with a trunk-mounted bike rack?
Answer: Yes, it is safe to drive long distances with a trunk-mounted bike rack. But you need to take some precautions. Make sure the rack is properly installed and secured. Check it regularly while driving. Stop every hour or so to inspect the rack. Tighten any loose straps. Adjust the bikes if they have shifted. Drive carefully and avoid sudden stops or turns. Be aware that the rack adds extra length to your car. This can make it harder to park and maneuver. By following these tips, you can travel safely. Knowing how to mount bike rack to trunk of car is important for long trips.
Question No 6: What should I do if my bike rack is stolen?
Answer: It’s awful when your bike rack gets stolen! First, report the theft to the police. They might be able to recover it. Contact your insurance company. Your car insurance or homeowner’s insurance might cover the loss. Check your bike rack’s warranty. Some manufacturers offer theft replacement programs. Take photos of where the rack was attached to your car. This can help with the insurance claim. Consider buying a locking cable for your next bike rack. This can deter thieves. How to mount bike rack to trunk of car securely also means preventing theft of the rack itself.


