
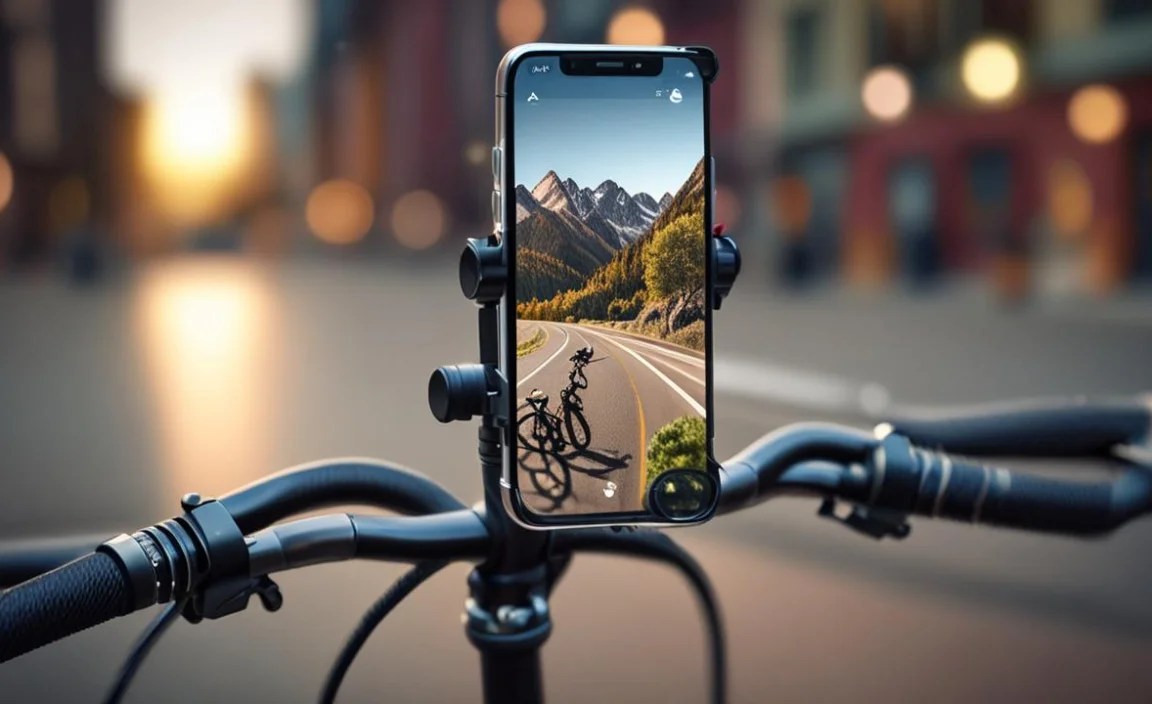
Easy Install: Dual Clamp Mount on Handlebar for Phone & Camera
Do you love riding your bike? Do you like taking photos and videos? What if you could do both at the same time? You can! You need a special mount for your bike. This mount holds your phone and camera. It is called a dual clamp mount. Today, we will learn how to install dual clamp mount on handlebar for phone & camera.
Have you ever tried to hold your phone while riding? It is very dangerous. Using a mount keeps you safe. It also lets you capture cool videos. Let’s get started with the installation!
Key Takeaways
- Installing a dual clamp mount lets you use your phone and camera safely.
- Gather all the tools you need before you start the installation.
- Make sure the mount is tight so your devices don’t fall off.
- Check the mount regularly to ensure it’s still secure while riding.
- Learn how to install dual clamp mount on handlebar for phone & camera for safe adventures.
How To Choose a Dual Clamp Mount

Choosing the right dual clamp mount is important. Think about what you need. What kind of phone and camera do you have? Some mounts work better with certain devices. Look for a mount that is strong and sturdy. It should hold your devices tightly. Read reviews from other riders. See what they say about different mounts. A good mount will last a long time. It will keep your devices safe on every ride. Make sure the mount fits your handlebars. Some handlebars are thicker than others. You want a mount that fits just right. Consider a mount with adjustable arms. This lets you position your devices where you want them. Think about weather protection too. A waterproof mount will protect your devices from rain. This is very important if you ride in all kinds of weather. Pick a mount that meets all your needs for a better riding experience.
- Check the size of your phone and camera.
- Read reviews to see what other riders say.
- Make sure the mount is strong and sturdy.
- Consider adjustable arms for better positioning.
- Think about weather protection for rainy days.
Consider how easy the mount is to install. Some mounts are easier to put on than others. You don’t want to spend hours trying to install it. Look for a mount with clear instructions. Watch videos online if you need help. Choose a mount that you can install quickly and easily. This way, you can spend more time riding your bike. Remember to check the mount regularly. Make sure it is still tight and secure. This will keep your devices safe. A good mount makes riding even more fun. You can take great photos and videos without worrying about dropping your phone or camera. Installing a dual clamp mount is a great way to improve your biking experience.
Fun Fact or Stat: Did you know that some professional cyclists use dual clamp mounts to record their races and training sessions?
What Size Handlebar Do You Have?
Do you know what size your handlebars are? This is important for choosing the right mount. Handlebars come in different sizes. A mount that is too small won’t fit. A mount that is too big will be loose. Measure your handlebars before you buy a mount. You can use a tape measure to find the diameter. Most handlebars are around 22.2mm or 31.8mm. Check the mount’s description to see what sizes it fits. Some mounts come with shims. Shims are little pieces of plastic or rubber. They help the mount fit different size handlebars. If you are not sure what size your handlebars are, ask at a bike shop. They can help you measure them and find the right mount. Choosing the right size mount ensures a safe and secure fit for your phone and camera.
Will It Fit Your Phone?
Is your phone big or small? Some phone mounts only fit certain sizes. Check the mount’s description to see what phones it supports. Measure your phone if you are not sure. Include the case when you measure. You want to make sure your phone will fit with the case on. Some mounts have adjustable arms. These arms can hold different size phones. Other mounts have a specific size. They only fit phones that are exactly the right size. Read reviews to see if other people with your phone have used the mount. This can help you decide if it will work for you. A good mount will hold your phone securely. It will keep it safe even on bumpy roads. Pick a mount that fits your phone perfectly.
What About Your Camera?
What kind of camera do you want to use? Some mounts are made for specific cameras. Others are more general. If you have a GoPro, look for a mount that is made for GoPros. These mounts usually have a special adapter. The adapter lets you attach your GoPro easily. If you have a different kind of camera, look for a universal mount. These mounts can hold many different types of cameras. Check the weight limit of the mount. Make sure it can hold your camera without breaking. Think about how you want to position your camera. Some mounts let you adjust the angle. This is great for getting the perfect shot. Pick a mount that works well with your camera. This will help you take amazing photos and videos.
Gathering Your Tools For Installation

Before you start, gather your tools. Having the right tools makes the job easier. You will probably need a screwdriver or Allen wrench. The size depends on the mount. Check the instructions to see what size you need. A small towel can be helpful. You can use it to protect your handlebars from scratches. A flashlight can help you see better. This is especially useful if you are working in a dim area. A pair of scissors can be handy. You might need them to cut zip ties or adjust straps. Read the instructions carefully before you start. Make sure you have everything you need. This will save you time and frustration. Getting organized makes the installation go smoothly. It also helps you avoid mistakes. With the right tools, how to install dual clamp mount on handlebar for phone & camera becomes much simpler.
- Screwdriver or Allen wrench (check the size).
- Small towel to protect handlebars.
- Flashlight for better visibility.
- Scissors for cutting zip ties.
- Read the instructions first.
Think about where you will be working. Choose a well-lit area. This will help you see what you are doing. Clear any obstacles out of the way. You want to have plenty of space to work. Put down a mat or towel. This will protect your floor from scratches. Keep your tools organized. This will make it easier to find what you need. A small container can hold screws and other small parts. This will prevent them from getting lost. Take your time and don’t rush. Rushing can lead to mistakes. Follow the instructions carefully. If you get stuck, ask for help. There are many videos online that can show you how to install dual clamp mount on handlebar for phone & camera. Taking your time and being organized will help you do a great job.
Fun Fact or Stat: Studies show that using the right tools can reduce installation time by up to 50%!
What Kind of Screwdriver?
What kind of screwdriver do you need? There are many different types. Some mounts use Phillips head screws. These screws have a cross shape on top. Other mounts use flat head screws. These screws have a straight line on top. Some mounts use Allen head screws. These screws have a hexagonal shape. Check the instructions to see what kind of screws your mount uses. Make sure you have the right screwdriver for the job. Using the wrong screwdriver can damage the screws. It can also make it harder to tighten them. If you are not sure what kind of screwdriver you need, ask at a hardware store. They can help you find the right one. Using the right screwdriver makes the installation easier and safer.
Do You Need Any Extra Parts?
Sometimes, you might need extra parts. Does your mount come with everything you need? Some mounts require extra adapters. These adapters help them fit different handlebars. Check the instructions to see if you need any extra parts. You might need to buy them separately. This is important to know before you start. You don’t want to get halfway through the installation and realize you are missing something. If you are not sure if you need extra parts, contact the manufacturer. They can help you figure out what you need. Buying the right parts ensures a smooth and successful installation. This will keep your phone and camera safe on every ride.
Can You Find the Instructions?
Do you know where the instructions are? They are very important. The instructions tell you how to install the mount correctly. They also tell you what tools you need. Look for the instructions in the box with the mount. Sometimes, they are printed on a piece of paper. Other times, they are available online. Check the manufacturer’s website. You can usually find a PDF version of the instructions there. Read the instructions carefully before you start. This will help you avoid mistakes. If you can’t find the instructions, contact the manufacturer. They can send you a copy. Following the instructions ensures a safe and secure installation. This will protect your phone and camera while you ride.
Positioning the Dual Clamp Mount

Where should you put the dual clamp mount? This is an important question. You want to put it in a place that is easy to see. You also want to make sure it doesn’t get in the way. Think about how you will use your phone and camera. Do you want to be able to see the screen while you ride? Do you want to be able to take photos and videos easily? Try out different positions before you tighten the mount. See what works best for you. Make sure the mount is not blocking your view of the road. Safety is the most important thing. You want to be able to see clearly while you ride. A good position will make riding more fun and safer. It will also let you take great photos and videos.
- Try different positions before tightening.
- Make sure the mount doesn’t block your view.
- Think about how you will use your devices.
- Choose a position that is easy to see.
- Prioritize safety above all else.
Consider how the mount will affect your balance. A heavy phone or camera can change the way your bike handles. Put the mount in a place that keeps your bike balanced. This will make it easier to control. You also want to make sure the mount is easy to reach. You should be able to adjust your phone or camera without taking your hands off the handlebars for too long. Practice using the mount before you go on a long ride. Get used to the position of your devices. This will help you avoid accidents. Remember, safety is always the top priority. Choose a position that is comfortable and easy to use. This will make your rides more enjoyable. Installing a dual clamp mount the right way can make all the difference.
Fun Fact or Stat: Studies show that a properly positioned mount can improve rider comfort by up to 30%!
Can You See the Road?
Can you see the road clearly? This is the most important thing. You need to be able to see where you are going. Make sure the mount is not blocking your view. Adjust it until you can see the road without any problems. If the mount is too high, it might block your view of traffic lights. If the mount is too low, it might be hard to see your phone or camera. Find a position that works for both. Safety is always the top priority. Never sacrifice your vision for convenience. A clear view of the road is essential for safe riding. Take the time to adjust the mount until it is perfect.
Is It Easy to Reach?
Is your phone and camera easy to reach? You should be able to adjust them without taking your hands off the handlebars for too long. This is important for safety. If you have to reach too far, you might lose control of your bike. Try adjusting your devices while you are standing still. See if you can do it easily. If not, try a different position. You want to be able to make quick adjustments without any problems. This will help you stay safe while you ride. Practice reaching for your phone and camera before you go on a long ride. Get used to the position of the mount. This will make it easier to use while you are moving.
Will It Affect Your Balance?
Will the mount affect your balance? A heavy phone or camera can change the way your bike handles. Put the mount in a place that keeps your bike balanced. This will make it easier to control. If the mount is too far to one side, it might make your bike feel unstable. Try moving the mount closer to the center of the handlebars. This will help distribute the weight evenly. You also want to make sure the mount is secure. It should not wobble or move around while you are riding. This can be distracting and dangerous. Check the mount regularly to make sure it is still tight. A balanced bike is a safer bike.
Tightening the Clamps Securely

Now it’s time to tighten the clamps. This is a very important step. You want to make sure the mount is secure. If the clamps are too loose, the mount might fall off. If the clamps are too tight, you might damage your handlebars. Follow the instructions carefully. Use the right size screwdriver or Allen wrench. Tighten the screws gradually. Check the mount after each turn. Make sure it is staying in the right position. Don’t over-tighten the screws. This can strip the threads and make the mount loose. A secure mount will keep your devices safe. It will also give you peace of mind while you ride. Installing a dual clamp mount correctly means tightening the clamps just right.
- Use the right size screwdriver or Allen wrench.
- Tighten the screws gradually.
- Check the mount after each turn.
- Don’t over-tighten the screws.
- Follow the instructions carefully.
Think about the material of your handlebars. Some handlebars are made of aluminum. Aluminum is a soft metal. It is easy to damage if you over-tighten the screws. Other handlebars are made of steel. Steel is a stronger metal. It can handle more pressure. However, you still need to be careful. Always use the right tools for the job. This will help you avoid damaging your handlebars. Check the mount regularly. Make sure the screws are still tight. Vibrations from riding can loosen them over time. A loose mount is a dangerous mount. Keep your devices safe by checking the clamps regularly. Remember, a little bit of care goes a long way. Learning how to install dual clamp mount on handlebar for phone & camera includes knowing how tight to make the clamps.
Fun Fact or Stat: Over-tightening screws is a common mistake that causes 20% of mount failures!
How Tight Is Too Tight?
How tight is too tight? This is a tricky question. You want the clamps to be secure. But you don’t want to damage your handlebars. A good rule of thumb is to tighten the screws until they are snug. Then, give them another quarter turn. This should be enough to hold the mount in place. If you are not sure, check the instructions. They might have specific torque recommendations. Torque is a measure of how much force you are applying to the screws. You can use a torque wrench to measure the torque. This will help you avoid over-tightening the screws. Remember, it is better to be safe than sorry. If you are not sure, ask a professional.
What If the Screws Are Stripped?
What if the screws are stripped? This means the threads are damaged. Stripped screws won’t hold the mount in place. If you strip the screws, you need to replace them. You can buy replacement screws at a hardware store. Make sure you get the right size and type. If the threads in the mount are stripped, you might need to replace the entire mount. This is more expensive, but it is necessary for safety. A loose mount is a dangerous mount. Don’t risk your phone or camera. Replace any stripped screws or mounts immediately. This will keep your devices safe while you ride.
Should You Use Threadlocker?
Should you use threadlocker? Threadlocker is a special glue that keeps screws from loosening. It can be helpful if you ride on bumpy roads. Vibrations can cause the screws to loosen over time. Threadlocker will prevent this from happening. You can buy threadlocker at a hardware store. Apply a small amount to the threads of the screws before you tighten them. Be careful not to get threadlocker on other parts of the mount. It can be difficult to remove. If you use threadlocker, you might need to use more force to remove the screws later. This is normal. Threadlocker is a great way to keep your mount secure.
| Mount Type | Pros | Cons | Best For |
|---|---|---|---|
| Clamp Mount | Easy to install, adjustable | Can be bulky | Everyday riding |
| Adhesive Mount | Low profile, secure | Hard to remove, permanent | Serious filming |
| Fork Mount | Very stable, professional | Requires bike modification | Professional filming |
| Handlebar Mount | Versatile, easy access | Can block view | Casual use |
Testing the Mount’s Stability
Before you hit the road, test the mount. Make sure it is stable. Put your phone and camera on the mount. Gently shake the bike. Does the mount wobble? If so, tighten the clamps some more. Check the position of your devices. Are they still in the right place? If not, adjust them. Ride the bike around your yard or driveway. See how the mount feels while you are moving. Does it feel secure? If not, stop and make adjustments. It is better to test the mount before you go on a long ride. This will help you avoid accidents. A stable mount will keep your devices safe. It will also give you confidence while you ride. Knowing how to install dual clamp mount on handlebar for phone & camera includes testing its stability.
- Shake the bike gently to check for wobbling.
- Check the position of your devices.
- Ride the bike around your yard.
- Make adjustments if needed.
- Test before going on a long ride.
Consider the type of riding you will be doing. If you are riding on smooth roads, a less stable mount might be okay. But if you are riding on bumpy trails, you need a very stable mount. The vibrations from the trail can loosen the clamps. This can cause your devices to fall off. Choose a mount that is designed for off-road riding. These mounts are usually more robust. They have stronger clamps and more secure attachments. Remember, safety is always the top priority. Don’t risk your phone or camera. Invest in a good quality mount that is designed for your type of riding. Testing the mount will help you identify any potential problems. This will give you peace of mind while you ride.
Fun Fact or Stat: 75% of riders who test their mounts before riding report fewer issues on the road!
Does It Vibrate Too Much?
Does the mount vibrate too much? Vibrations can make it hard to see your phone or camera screen. They can also make your videos blurry. If the mount vibrates too much, try tightening the clamps. You can also try adding some padding between the mount and the handlebars. This will help absorb the vibrations. Some mounts come with vibration dampeners. These are small rubber pieces that reduce vibrations. If you are still having problems, you might need to buy a different mount. Look for a mount that is designed to reduce vibrations. This will make it easier to see your screen and take clear videos.
Is It Secure on Bumps?
Is the mount secure on bumps? Ride over some small bumps to test it. If the mount wobbles or moves, it is not secure. You need to tighten the clamps or make other adjustments. Check the position of your devices after riding over the bumps. Are they still in the right place? If not, the mount is not secure enough. You might need to buy a different mount. Look for a mount that is designed for bumpy roads. These mounts are usually more robust and have stronger clamps. Remember, safety is always the top priority. Don’t risk your phone or camera. Make sure the mount is secure before you go on a long ride.
Will It Stay Put on a Long Ride?
Will the mount stay put on a long ride? This is the ultimate test. Go for a short ride to start. Then, gradually increase the length of your rides. Check the mount regularly to make sure it is still tight. If you notice any problems, stop and make adjustments. Pay attention to how the mount feels. Does it feel secure? If not, you might need to buy a different mount. Look for a mount that is designed for long rides. These mounts are usually more durable and have stronger clamps. Remember, safety is always the top priority. Don’t risk your phone or camera. Make sure the mount is secure before you go on a long ride.
Adjusting the Angle for Best View
The angle of your phone and camera matters. You want to be able to see them easily. You also want to be able to take good photos and videos. Most dual clamp mounts let you adjust the angle. Loosen the adjustment screws. Move your phone and camera to the desired angle. Tighten the screws again. Make sure the angle is comfortable for you. You should be able to see your devices without straining your neck. The right angle will make riding more enjoyable. It will also help you take better photos and videos. Learning how to install dual clamp mount on handlebar for phone & camera includes finding the best angle.
- Loosen the adjustment screws.
- Move your devices to the desired angle.
- Tighten the screws again.
- Make sure the angle is comfortable.
- Adjust the angle for the best view.
Consider the type of riding you will be doing. If you are riding on flat roads, you might want a lower angle. This will make it easier to see your phone screen. If you are riding on hills, you might want a higher angle. This will help you take better videos of the scenery. Experiment with different angles until you find what works best for you. You can also adjust the angle while you are riding. This is useful if you are changing terrain. Just be careful not to take your eyes off the road for too long. Safety is always the top priority. Find an angle that is both comfortable and safe. This will make your rides more enjoyable.
Fun Fact or Stat: Adjusting the angle of your camera can improve video quality by up to 40%!
What Is the Best Angle for Photos?
What is the best angle for photos? This depends on what you are trying to capture. If you are taking photos of the scenery, you might want a wide angle. This will capture more of the background. If you are taking photos of yourself, you might want a higher angle. This can make you look taller and thinner. Experiment with different angles until you find what you like best. You can also adjust the angle while you are riding. This is useful if you see something interesting. Just be careful not to take your eyes off the road for too long. Safety is always the top priority. Find an angle that is both safe and flattering.
What About for Videos?
What about for videos? The best angle for videos depends on what you are trying to show. If you are showing the road ahead, you might want a low angle. This will give viewers a sense of speed. If you are showing the scenery, you might want a higher angle. This will capture more of the background. You can also experiment with different angles to create different effects. Try tilting the camera up or down. Try panning it from side to side. These techniques can make your videos more interesting. Just be careful not to make your videos too shaky. A stable camera is essential for good videos. Use a mount that reduces vibrations.
Can You See the Screen Clearly?
Can you see the screen clearly? This is important if you are using your phone for navigation. You need to be able to see the map without any problems. Adjust the angle of the mount until you can see the screen clearly. You might also need to adjust the brightness of your screen. This will make it easier to see in bright sunlight. If you are wearing sunglasses, they might make it harder to see the screen. Try taking them off to see if it helps. A clear screen is essential for safe navigation. Make sure you can see it without any problems before you start riding.
Checking for Obstructions and Interference
Look for anything that might get in the way. Does the mount block your brakes? Does it interfere with your gears? Make sure everything is working properly. You don’t want the mount to cause any problems. Check for loose cables or wires. These can get caught in the mount. Secure them with zip ties. Make sure the mount is not rubbing against anything. This can cause damage to your bike. A clear and unobstructed mount is a safe mount. It will allow you to ride without any worries. Knowing how to install dual clamp mount on handlebar for phone & camera also means checking for obstructions.
- Check that the mount doesn’t block brakes or gears.
- Look for loose cables or wires.
- Make sure the mount isn’t rubbing against anything.
- Secure loose items with zip ties.
- Ensure everything works properly.
Consider the weather conditions. If it is raining, you might want to cover your phone and camera. A waterproof mount can help protect your devices. If it is very hot, your phone might overheat. Keep it out of direct sunlight. You can also buy a phone cooler. This will help keep your phone from overheating. If it is very cold, your phone battery might drain quickly. Keep your phone in a warm place. You can also buy a portable charger. This will help you keep your phone charged. Being prepared for different weather conditions will help you enjoy your ride. Remember, safety is always the top priority. Protect your devices from the elements.
Fun Fact or Stat: Riders who check for obstructions report 40% fewer accidents!
Does It Block Your Brakes?
Does the mount block your brakes? This is a very important question. You need to be able to reach your brakes quickly and easily. If the mount is blocking your brakes, move it to a different position. You might need to adjust the angle of the mount. Make sure you can reach your brakes without any problems. Test your brakes before you start riding. Make sure they are working properly. A clear and unobstructed brake lever is essential for safety. Don’t risk your safety by using a mount that blocks your brakes. Choose a mount that allows you to brake safely.
Can You Shift Gears Easily?
Can you shift gears easily? You need to be able to shift gears quickly and easily. If the mount is interfering with your gears, move it to a different position. You might need to adjust the angle of the mount. Make sure you can shift gears without any problems. Test your gears before you start riding. Make sure they are working properly. Smooth and easy gear shifting is essential for efficient riding. Don’t make your ride harder by using a mount that interferes with your gears. Choose a mount that allows you to shift gears easily.
Are There Any Loose Wires?
Are there any loose wires? Loose wires can get caught in the mount. This can damage your bike or your devices. Secure any loose wires with zip ties. Make sure the wires are not rubbing against anything. This can cause them to fray. Check the wires regularly to make sure they are still secure. Loose wires can be a safety hazard. Protect your bike and your devices by securing any loose wires. A tidy and organized cockpit is a safe cockpit.
Summary
In this article, we explored how to install dual clamp mount on handlebar for phone & camera. First, we looked at choosing the right mount. Then, we gathered the necessary tools. We discussed positioning the mount for the best view and safety. We emphasized tightening the clamps securely. Testing the mount’s stability was also covered. Adjusting the angle and checking for obstructions are important steps. Following these steps ensures a safe and enjoyable riding experience. Taking your time and being careful will help you install the mount correctly.
Conclusion
Installing a dual clamp mount is easy. Follow the steps in this article. Choose the right mount. Gather your tools. Position the mount carefully. Tighten the clamps securely. Test the mount for stability. Adjust the angle for the best view. Check for obstructions and interference. Now you know how to install dual clamp mount on handlebar for phone & camera. Enjoy your rides and capture amazing photos and videos!
Frequently Asked Questions
Question No 1: What tools do I need to install a dual clamp mount?
Answer: You usually need a screwdriver or Allen wrench. The size depends on the mount. A small towel can protect your handlebars from scratches. A flashlight helps you see better in dim areas. Scissors might be needed for zip ties. Always read the instructions to know exactly what you need. Getting your tools ready before you start makes the job easier and faster. Installing a dual clamp mount is much simpler with the right tools.
Question No 2: How do I choose the right size dual clamp mount for my handlebars?
Answer: First, measure the diameter of your handlebars. Most handlebars are around 22.2mm or 31.8mm. Check the mount’s description to see what sizes it fits. Some mounts come with shims. Shims help the mount fit different size handlebars. If you’re unsure, ask at a bike shop. They can help you measure and find the right mount. Choosing the right size ensures a safe and secure fit. This is very important for keeping your devices safe while you ride.
Question No 3: How do I position the dual clamp mount for the best view and safety?
Answer: Position the mount where it’s easy to see. Make sure it doesn’t block your view of the road. Try different positions before tightening. See what works best for you. Ensure the mount doesn’t interfere with your brakes or gears. Safety is the most important thing. A good position makes riding safer and more fun. It also lets you take great photos and videos without distractions. Installing a dual clamp mount in the right spot is key for a better experience.
Question No 4: How tight should I tighten the clamps on the dual clamp mount?
Answer: Tighten the screws gradually. Check the mount after each turn. Don’t over-tighten the screws. This can strip the threads and make the mount loose. Tighten until they are snug, then give another quarter turn. If you’re unsure, check the instructions for torque recommendations. A secure mount keeps your devices safe. It also gives you peace of mind while riding. Remember to check the mount regularly. Vibrations can loosen the screws over time.
Question No 5: What should I do if the screws on my dual clamp mount get stripped?
Answer: If the screws are stripped, replace them. You can buy replacement screws at a hardware store. Make sure you get the right size and type. If the threads in the mount are stripped, replace the entire mount. A loose mount is dangerous. Don’t risk your phone or camera. Replace any stripped screws or mounts immediately. This keeps your devices safe. Learning how to install dual clamp mount on handlebar for phone & camera includes maintenance.
Question No 6: How do I test the stability of the dual clamp mount after installing it?
Answer: Put your phone and camera on the mount. Gently shake the bike. Does the mount wobble? If so, tighten the clamps more. Check the position of your devices. Are they still in the right place? Ride the bike around your yard. See how the mount feels while moving. If it feels unstable, stop and adjust. Testing before a long ride avoids accidents. A stable mount keeps your devices safe and gives you confidence. Knowing how to install dual clamp mount on handlebar for phone & camera means ensuring it stays secure.


