
Easy: How to Install Aftermarket Gauge on Mini Pump
Have you ever pumped up a bike tire and wondered about the pressure? Do you wish you knew exactly how much air was inside? Learning how to install aftermarket gauge on mini pump can help! It’s easier than you think. Let’s find out how to do it.
Knowing the air pressure helps your bike ride smoothly. It also keeps your tires from popping. Adding a gauge to your pump makes it super easy to check. Are you ready to get started? Let’s learn how to install aftermarket gauge on mini pump.
Key Takeaways
- Installing an aftermarket gauge improves accuracy when inflating your tires.
- You’ll need simple tools like a wrench and maybe some Teflon tape.
- Proper installation prevents air leaks and ensures correct pressure readings.
- Knowing how to install aftermarket gauge on mini pump saves time and effort.
- Always double-check the gauge’s connection for a secure fit.
How to Choose the Right Gauge for Your Pump

Picking the right gauge is super important. You want one that fits your pump. Think about what kind of bike you have. Road bikes need higher pressure than mountain bikes. So, get a gauge that measures the right amount. Look at the size of the gauge too. A bigger gauge is easier to read. Make sure the gauge is made well. It should last a long time. Some gauges light up. This is great for pumping tires in the dark! Consider these points when choosing your gauge. This will help you know how to install aftermarket gauge on mini pump.
- Check the pressure range of the gauge.
- Make sure the gauge fits your pump’s connector.
- Read reviews to find a reliable brand.
- Consider a digital gauge for easy reading.
- Think about the size of the gauge face.
Imagine you bought a new gauge. It looks great, but it doesn’t fit your pump! That would be a bummer. Always measure the connector on your pump first. Then, find a gauge that matches. Some gauges use different units. PSI is common, but some use BAR. Make sure you understand what the gauge is showing. This will help you pump your tires to the right pressure. Knowing how to install aftermarket gauge on mini pump starts with picking the right parts. Get the right gauge, and you’re halfway there.
Fun Fact or Stat: Did you know that tire pressure affects how fast you can ride your bike? Correct pressure can increase your speed by up to 10%!
What Size Gauge Do You Need?
Do you know what size gauge to get? It depends on your bike tires. Road bikes often need high pressure. Mountain bikes use lower pressure. Check your tire’s sidewall. It tells you the right pressure range. Get a gauge that matches this range. A gauge that goes too high won’t be useful. A gauge that doesn’t go high enough is also bad. Pick a gauge with a range that fits your needs. This makes knowing how to install aftermarket gauge on mini pump much easier.
Analog vs. Digital: Which Is Better?
Have you ever seen an analog clock? It has hands. A digital clock shows numbers. Bike gauges are the same. Analog gauges have a needle. Digital gauges show numbers. Analog gauges are simple. They don’t need batteries. Digital gauges are very exact. They can show tiny changes in pressure. Some people like analog. Others like digital. It’s all about what you like best. Both types can help you learn how to install aftermarket gauge on mini pump. Which one do you prefer?
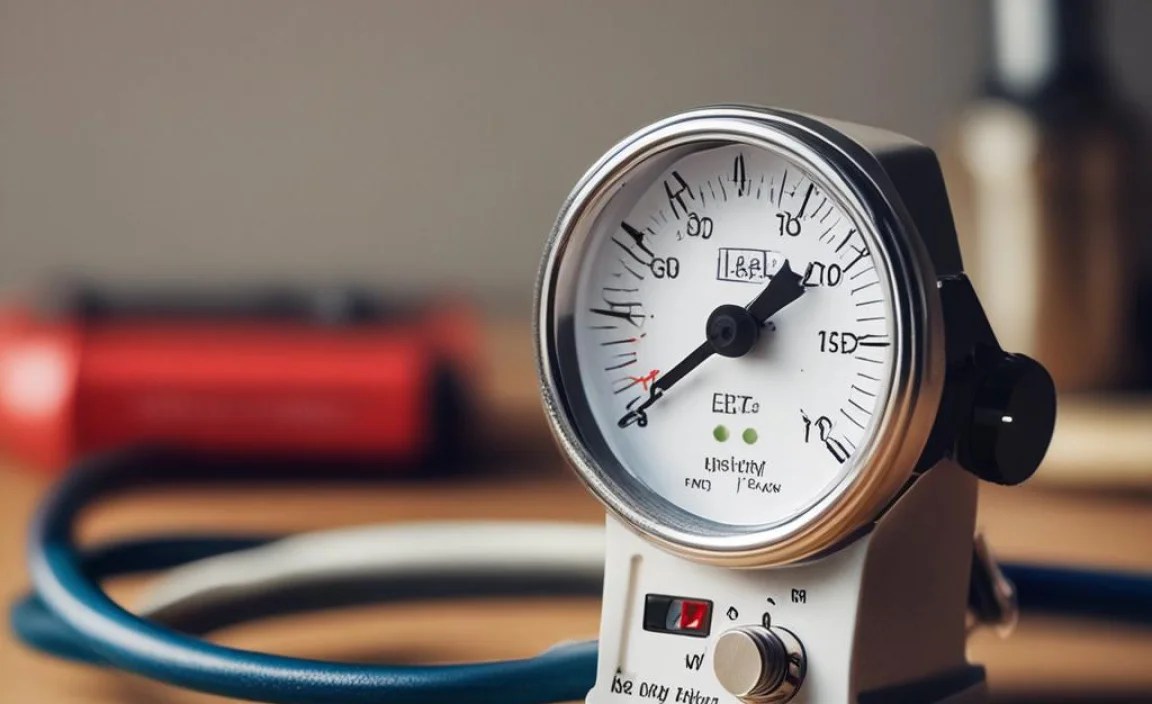
How to Read a Bike Tire Pressure Gauge
Reading a gauge is easy. Look at the numbers. Find the needle on an analog gauge. See where it points. That’s your pressure. Digital gauges show the number right away. The unit is usually PSI. Make sure you know what unit your gauge uses. Pump your tire until it reaches the right number. Don’t overfill it! Too much pressure can cause a flat. Learning to read the gauge is key. It helps you know how to install aftermarket gauge on mini pump and use it correctly.
Gathering the Tools Needed for Installation

Before you start, get your tools ready. You’ll need a wrench. Maybe two. This helps tighten the gauge. You might need Teflon tape. This stops air leaks. A small screwdriver can be useful too. Have a clean cloth handy. This helps wipe away dirt. Make sure you have the right gauge. And, of course, your mini pump! Having everything ready makes the job easier. It also makes learning how to install aftermarket gauge on mini pump smoother. Being prepared is always a good idea. It saves time and frustration.
- Gather wrenches that fit the gauge fittings.
- Get Teflon tape to seal threads.
- Have a small screwdriver for adjustments.
- Keep a clean cloth to wipe surfaces.
- Make sure you have your mini pump.
Imagine you’re halfway through the job. You realize you don’t have Teflon tape! Now you have to stop and go to the store. That’s no fun. Always check your toolbox before you begin. Make a list of what you need. This helps you stay organized. It also makes sure you don’t forget anything. Knowing how to install aftermarket gauge on mini pump is just part of the battle. Having the right tools is just as important. So, get your tools ready. You’ll be glad you did.
Fun Fact or Stat: Teflon tape was invented in 1938. It’s used to seal pipes and fittings to prevent leaks. It’s also great for bike pumps!
Why Is Teflon Tape Important?
Teflon tape is like a superhero for your pump. It stops air from leaking. It fills in tiny gaps between the gauge and the pump. Without it, air can escape. This makes it hard to get the right pressure. Teflon tape is cheap and easy to use. Just wrap it around the threads of the gauge. Then, screw the gauge into the pump. The tape creates a tight seal. This keeps the air where it belongs. Using Teflon tape is a key step in how to install aftermarket gauge on mini pump.
What Kind of Wrench Should You Use?
Wrenches come in all shapes and sizes. You need one that fits the gauge’s fittings. An adjustable wrench is a good choice. It can fit different sizes. Open-end wrenches are also useful. Make sure the wrench isn’t too big. It can damage the fittings. Don’t overtighten the gauge. This can also cause damage. Use the right size wrench. Tighten the gauge gently. This helps you learn how to install aftermarket gauge on mini pump without breaking anything.
How to Prepare the Pump for Installation
Before you start, clean the pump. Wipe off any dirt or grime. This helps the gauge fit better. Check the threads where the gauge will go. Make sure they are clean and smooth. If they’re rough, use a small file to smooth them. This helps the Teflon tape seal properly. A clean pump is a happy pump. Preparing the pump is a small step. But, it makes a big difference in how to install aftermarket gauge on mini pump. Take the time to do it right.
Step-by-Step Guide: Installing the Gauge

Okay, let’s get to the fun part! First, wrap Teflon tape around the gauge’s threads. Wrap it a few times. Make sure it’s snug. Next, screw the gauge into the pump. Turn it by hand at first. Then, use a wrench to tighten it. Don’t overtighten! Just make it snug. Check for air leaks. Pump up a tire a little bit. Listen for hissing sounds. If you hear a leak, tighten the gauge a bit more. That’s it! You now know how to install aftermarket gauge on mini pump. Wasn’t that easy?
- Wrap Teflon tape clockwise around the threads.
- Screw the gauge onto the pump by hand.
- Use a wrench to tighten the gauge snugly.
- Test for leaks by pumping air and listening.
- Adjust tightness if you hear air escaping.
Imagine you skip the Teflon tape. You screw the gauge in. You pump up a tire. Hiss! Air is leaking everywhere. You have to start all over. That’s why Teflon tape is so important. It saves you time and trouble. When you learn how to install aftermarket gauge on mini pump, remember the tape! It’s a small step, but it makes a big difference. Take your time. Do it right. You’ll have a working gauge in no time.
Fun Fact or Stat: The first bike tire pressure gauges were invented in the late 1800s. They were big and bulky, not like the small ones we use today!
Wrapping Teflon Tape Correctly
Wrapping Teflon tape seems easy. But, there’s a right way to do it. Wrap the tape clockwise. As you face the threads, turn the tape to the right. Overlap the tape slightly as you go. This makes a good seal. Don’t use too much tape. Too much tape can make it hard to screw in the gauge. A few wraps are enough. Learning how to wrap Teflon tape is a small part of how to install aftermarket gauge on mini pump. But, it’s an important detail.
Tightening the Gauge Without Damage
Tightening the gauge is tricky. You want it snug. But, you don’t want to break it. Use a wrench that fits well. Don’t use too much force. Tighten the gauge a little bit at a time. Check for leaks after each small turn. If you hear air escaping, tighten it a bit more. If it feels too tight, stop. You might need to loosen it and try again. Knowing how much to tighten is key to how to install aftermarket gauge on mini pump safely.
Testing for Leaks After Installation
Testing for leaks is the final step. Pump up a tire a little bit. Then, listen. Do you hear any hissing sounds? If so, air is escaping. Check the connection between the gauge and the pump. Tighten it a bit more. If you still hear a leak, try adding more Teflon tape. Sometimes, you need to start over. Keep testing until you don’t hear any leaks. This ensures your gauge is working right. It’s the last part of learning how to install aftermarket gauge on mini pump.
Ensuring Accurate Pressure Readings

A new gauge is great! But, is it accurate? Sometimes, gauges are wrong. You can check your gauge against another one. A tire shop might have a good gauge to compare with. Make sure your tire is cool. Heat can change the pressure. Pump the tire to a known pressure. See if your gauge shows the same number. If it’s off, you might need to adjust it. Or, you might need to get a different gauge. Accurate readings are important. It’s part of knowing how to install aftermarket gauge on mini pump and use it well.
- Compare your gauge with a known accurate gauge.
- Check readings when the tire is cool.
- Adjust the gauge if possible.
- Consider the gauge’s accuracy rating.
- Calibrate the gauge if needed.
Imagine you think your tire has the right pressure. But, your gauge is wrong. You ride your bike. Suddenly, your tire pops! That’s because it was overfilled. An inaccurate gauge can cause problems. Always check your gauge. Make sure it’s giving you the right information. Learning how to install aftermarket gauge on mini pump includes checking its accuracy. Don’t just assume it’s right. Take the time to be sure.
Fun Fact or Stat: Some high-end bike shops use digital pressure gauges that are accurate to within 0.1 PSI. That’s super precise!
How to Calibrate Your New Gauge
Some gauges can be calibrated. This means you can adjust them to be more accurate. Look for a small screw on the back of the gauge. This is often the calibration screw. Use a small screwdriver to turn it. Compare your gauge with a known accurate gauge. Adjust the screw until your gauge matches the accurate gauge. Calibration can make a big difference. It helps you ensure your gauge is giving you the right readings. It’s an important step in how to install aftermarket gauge on mini pump.
Understanding PSI vs. BAR
PSI and BAR are units of pressure. PSI stands for pounds per square inch. BAR is another unit used in Europe. Most bike gauges use PSI. But, some use BAR. Make sure you know which unit your gauge uses. Your tire will have a recommended pressure range. It will be in PSI or BAR. Use the right unit when you pump your tire. Mixing them up can lead to over or under inflation. Understanding PSI and BAR is key to using your gauge correctly. It’s part of how to install aftermarket gauge on mini pump and get the most out of it.
When to Replace Your Gauge
Gauges don’t last forever. Over time, they can become less accurate. If your gauge is old, it might be time to replace it. If it’s damaged, replace it right away. Look for cracks or leaks. If the needle is stuck, it’s time for a new one. A good gauge is important for safe riding. Don’t wait until it’s too late. Replace your gauge when needed. This helps you keep your tires at the right pressure. It’s an important part of bike safety and knowing how to install aftermarket gauge on mini pump properly.
Troubleshooting Common Installation Issues
Sometimes, things go wrong. Don’t worry! It happens to everyone. If you have a leak, check the Teflon tape. Make sure it’s wrapped tightly. If the gauge is hard to screw in, don’t force it. The threads might be crossed. Try again carefully. If the gauge shows the wrong pressure, check its calibration. Or, compare it with another gauge. Don’t give up! Most problems are easy to fix. Learning how to install aftermarket gauge on mini pump includes knowing how to fix problems. With a little patience, you can get it right.
- Check Teflon tape for leaks.
- Avoid forcing the gauge to prevent cross-threading.
- Calibrate the gauge if pressure readings are off.
- Inspect for damage if the gauge doesn’t work.
- Ensure correct gauge size for your pump.
Imagine you’re trying to install the gauge. It just won’t screw in. You force it. Snap! The threads are broken. Now you need a new pump and a new gauge. That’s why it’s important to be careful. Don’t force anything. If something doesn’t feel right, stop. Check everything. Make sure you’re doing it correctly. Knowing how to install aftermarket gauge on mini pump also means knowing when to stop and ask for help. A little patience can save you a lot of trouble.
Fun Fact or Stat: Cross-threading is a common problem when installing threaded parts. It can damage the threads and make it hard to tighten the part.
What to Do If the Gauge Leaks Air
A leaking gauge is frustrating. But, it’s usually easy to fix. First, tighten the gauge a bit more. Use a wrench, but don’t overtighten. If it still leaks, add more Teflon tape. Remove the gauge. Wrap more tape around the threads. Then, screw it back in. Make sure the tape is snug. If it still leaks, the gauge might be damaged. You might need to get a new one. Fixing a leak is a key part of how to install aftermarket gauge on mini pump.
How to Fix Cross-Threading
Cross-threading happens when the threads don’t line up. Don’t force the gauge. This can damage the threads. Back the gauge out. Look at the threads carefully. Make sure they are clean and straight. Start again. Turn the gauge slowly and carefully. If it still doesn’t work, the threads might be damaged. You might need to use a thread repair tool. Or, you might need to replace the pump or the gauge. Avoiding cross-threading is important in how to install aftermarket gauge on mini pump.
When to Seek Professional Help
Sometimes, you can’t fix the problem yourself. That’s okay! If you’ve tried everything and the gauge still doesn’t work, seek help. A bike shop can install the gauge for you. They have the right tools and experience. They can also help you choose the right gauge. Don’t be afraid to ask for help. It’s better to get it done right than to break something. Knowing when to seek help is a smart part of how to install aftermarket gauge on mini pump.
Maintaining Your Pump and Gauge
Taking care of your pump and gauge is important. It helps them last longer. Keep your pump clean. Wipe it off with a cloth after each use. Store it in a dry place. This prevents rust. Check the gauge regularly. Make sure it’s accurate. If it’s not, calibrate it or replace it. A little care goes a long way. Maintaining your pump and gauge helps you keep your tires at the right pressure. It’s part of knowing how to install aftermarket gauge on mini pump and use it for years to come.
- Clean the pump after each use.
- Store the pump in a dry place.
- Check gauge accuracy regularly.
- Replace the gauge if damaged.
- Lubricate pump parts as needed.
Imagine you leave your pump outside in the rain. It gets rusty and stops working. You try to pump your tire. But, the pump is stuck. Now you need a new pump. That’s why it’s important to take care of your tools. A little bit of care can prevent big problems. Learning how to install aftermarket gauge on mini pump is just the first step. Taking care of it is just as important. Keep your pump clean and dry. It will last a long time.
Fun Fact or Stat: Properly maintained bike pumps can last for many years. Some people still use pumps that are over 20 years old!
How to Clean Your Bike Pump
Cleaning your bike pump is easy. Use a damp cloth to wipe off dirt and grime. Pay attention to the nozzle. This is where the air comes out. Make sure it’s clean and clear. You can use a small brush to clean it. Don’t use soap or harsh chemicals. These can damage the pump. Just water is enough. Cleaning your pump regularly helps it work better. It’s a simple way to extend its life. This is a great part of how to install aftermarket gauge on mini pump and maintain it.
Storing Your Pump Properly
Where you store your pump matters. Keep it in a dry place. Avoid storing it outside. Rain and sun can damage the pump. A garage or shed is a good place to store it. You can also store it inside your house. Make sure it’s out of the way. You don’t want to trip over it! Storing your pump properly helps it last longer. It’s a simple way to protect your investment. This is a key point in how to install aftermarket gauge on mini pump and care for it.
Knowing When to Replace Your Pump
Pumps don’t last forever. Over time, they can wear out. If your pump is hard to use, it might be time to replace it. If it doesn’t pump air well, replace it. If it’s damaged, replace it right away. A good pump is important for safe riding. Don’t wait until it’s too late. Replace your pump when needed. This helps you keep your tires at the right pressure. This is an essential tip on how to install aftermarket gauge on mini pump and ensure your safety.
| Feature | Benefits | Maintenance Tip | Lifespan |
|---|---|---|---|
| Gauge Accuracy | Ensures correct pressure readings | Compare with known accurate gauge | 3-5 years |
| Pump Material | Durability and resistance to rust | Store in a dry place | 5-10 years |
| Teflon Tape | Prevents air leaks | Replace tape every installation | Single use |
| Calibration Screw | Allows adjustment for accuracy | Calibrate yearly | N/A |
The Benefits of Having an Accurate Gauge
Why bother with a gauge? An accurate gauge helps you keep your tires at the right pressure. This makes your bike ride smoother. It also helps prevent flats. Underinflated tires can get pinch flats. Overinflated tires can blow out. The right pressure makes your bike faster. It also makes it easier to pedal. An accurate gauge is a small investment. But, it makes a big difference. Knowing how to install aftermarket gauge on mini pump and having an accurate gauge is very important for bike safety and performance.
- Smoother bike rides due to correct pressure.
- Prevention of flat tires from over or under inflation.
- Improved bike speed and easier pedaling.
- Enhanced safety by avoiding tire blowouts.
- Better control and handling of the bike.
Imagine you’re riding your bike up a hill. Your tires are underinflated. It’s hard to pedal. You feel like you’re riding through mud. With the right pressure, it would be much easier. You’d glide up the hill. An accurate gauge helps you achieve that. Learning how to install aftermarket gauge on mini pump is worth the effort. It makes your bike rides more enjoyable. It also makes them safer. So, get a gauge and keep your tires properly inflated.
Fun Fact or Stat: Proper tire pressure can improve your fuel efficiency by up to 3%. That’s like getting free gas!
Improved Bike Handling
The right tire pressure makes your bike handle better. Underinflated tires feel squishy. They can make it hard to turn. Overinflated tires feel hard and bumpy. They can make it easy to lose control. The right pressure gives you the best of both worlds. Your bike will feel stable and responsive. You’ll be able to turn easily. You’ll feel confident on the road. Good bike handling is important for safety. Knowing how to install aftermarket gauge on mini pump helps you achieve that.
Increased Tire Lifespan
Proper tire pressure can make your tires last longer. Underinflated tires wear out quickly on the sides. Overinflated tires wear out quickly in the middle. The right pressure distributes the wear evenly. This helps your tires last longer. Replacing tires can be expensive. Keeping them properly inflated saves you money. It’s a simple way to protect your investment. Learning how to install aftermarket gauge on mini pump helps you do that.
Enhanced Riding Comfort
Riding with the right tire pressure is more comfortable. Underinflated tires feel sluggish. Overinflated tires feel harsh. The right pressure gives you a smooth, comfortable ride. You’ll feel less vibration. You’ll be able to ride longer without getting tired. Comfort is important for enjoying your bike. Knowing how to install aftermarket gauge on mini pump helps you achieve that. It makes your bike rides more enjoyable.
Summary
Learning how to install aftermarket gauge on mini pump is a simple project. It can greatly improve your biking experience. Choosing the right gauge for your pump is the first step. Gather the necessary tools. This includes a wrench and Teflon tape. Follow the step-by-step guide. Wrap the Teflon tape, screw in the gauge, and test for leaks. Ensure accurate pressure readings by comparing your gauge with another one. Maintain your pump and gauge to keep them in good condition. An accurate gauge helps you keep your tires at the right pressure. This makes your bike ride smoother, safer, and more enjoyable.
Conclusion
Adding an aftermarket gauge to your mini pump is a worthwhile upgrade. It provides accurate pressure readings. This helps you maintain your tires properly. It enhances your riding experience. Following the steps outlined makes the installation process simple. You can now enjoy safer, smoother, and more efficient bike rides. Learning how to install aftermarket gauge on mini pump empowers you to take better care of your bike.
Frequently Asked Questions
Question No 1: Why should I install an aftermarket gauge on my mini pump?
Answer: An aftermarket gauge gives you a more accurate reading of your tire pressure. Mini pumps often have built-in gauges that are not very precise. Knowing the exact pressure helps you avoid over or under inflating your tires. This improves your bike’s performance and safety. It also prevents flats. Installing an accurate gauge is a simple way to enhance your biking experience. It ensures your tires are always at the optimal pressure for a smooth and efficient ride. This makes learning how to install aftermarket gauge on mini pump a great idea.
Question No 2: What tools do I need to install a gauge on my mini pump?
Answer: You will need a few basic tools. These include a wrench that fits the gauge fittings, Teflon tape to seal the threads, and a small screwdriver if your gauge has a calibration screw. A clean cloth is also helpful to wipe away any dirt or grime. Having these tools on hand before you start makes the installation process smoother and more efficient. It also ensures you can complete the job without having to stop and search for missing items. Being prepared is key to successfully learning how to install aftermarket gauge on mini pump.
Question No 3: How do I wrap Teflon tape correctly to prevent leaks?
Answer: Wrap the Teflon tape clockwise around the threads of the gauge. As you face the threads, turn the tape to the right. Overlap the tape slightly as you go. This creates a tight seal. Use a few wraps. Too much tape can make it hard to screw in the gauge. Make sure the tape is snug and covers all the threads. Wrapping the tape correctly is crucial for preventing air leaks. It ensures your gauge works properly. It’s an important step in how to install aftermarket gauge on mini pump.
Question No 4: How do I know if my new gauge is accurate?
Answer: You can check your gauge against another one that you know is accurate. A tire shop might have a good gauge to compare with. Pump your tire to a known pressure using the other gauge. See if your new gauge shows the same number. If it’s off, you might need to adjust it. Some gauges have a calibration screw that you can use to fine-tune the reading. If your gauge is consistently inaccurate, you might need to get a different one. Accuracy is key for knowing how to install aftermarket gauge on mini pump and use it effectively.
Question No 5: What should I do if the gauge leaks air after installation?
Answer: If the gauge leaks air after installation, first tighten the gauge a bit more using a wrench. Be careful not to overtighten it. If it still leaks, remove the gauge and add more Teflon tape to the threads. Make sure the tape is wrapped snugly and covers all the threads. Screw the gauge back in and test again. If the leak persists, the gauge might be damaged or the threads on the pump might be worn. You might need to replace the gauge or the pump. Addressing leaks is an important part of how to install aftermarket gauge on mini pump successfully.
Question No 6: How often should I check the accuracy of my bike tire pressure gauge?
Answer: You should check the accuracy of your bike tire pressure gauge at least once a month. Regular checks ensure that your gauge is providing reliable readings. This helps you maintain the correct tire pressure for optimal performance and safety. If you notice any inconsistencies or suspect that the gauge is not accurate, check it more frequently. You should also check the accuracy after any significant impact or damage to the gauge. This proactive approach is a key part of knowing how to install aftermarket gauge on mini pump and maintain it properly.


