
How to Use Shock Pump for Downhill Bike Suspension: Easy!
Do you love riding your downhill bike? Do you want to make it even better? One key thing is your bike’s suspension. It helps you ride smoothly. Learning how to use shock pump for downhill bike suspension can make a big difference. It can improve your ride and keep you safe.
Have you ever felt your bike bounce too much? Or maybe it felt too hard? That could mean your suspension needs adjusting. Using a shock pump is how you change the air pressure. This lets you set up your suspension just right. Let’s learn how!
Why is this important? Your suspension soaks up bumps. It keeps your tires on the ground. This gives you more control. When your suspension is set up well, you can ride faster. You can also ride with more confidence. So, let’s get started!
Key Takeaways
- Knowing how to use shock pump for downhill bike suspension improves ride quality.
- A shock pump adjusts air pressure for optimal suspension performance.
- Proper suspension setup enhances control and reduces rider fatigue.
- Always check the manufacturer’s recommendations for air pressure settings.
- Regularly maintain your suspension for safety and consistent performance.
Understanding Downhill Bike Suspension Setup

Downhill bike suspension is like the springs in a car. It helps absorb bumps and keep your ride smooth. It uses air pressure to work. This is where how to use shock pump for downhill bike suspension comes in. The shock pump lets you add or remove air. This changes how soft or firm your suspension feels. Your weight affects how much air you need. Heavier riders need more air. Lighter riders need less. Too much air makes the ride harsh. Too little air makes it feel bouncy. Finding the right balance is key for a good ride. Checking your suspension before each ride is a good habit. This helps keep you safe and comfortable. It also ensures your bike performs its best. Always follow the manufacturer’s guidelines. This helps prevent damage to your suspension.
- Suspension absorbs bumps for a smoother ride.
- Air pressure affects suspension firmness.
- Heavier riders need more air pressure.
- Lighter riders need less air pressure.
- Regular checks keep you safe and comfortable.
- Follow manufacturer guidelines for air pressure.
Understanding your suspension is important. Think of it like tuning an instrument. Each adjustment affects the overall sound. Similarly, each adjustment to your suspension affects your ride. Experimenting with small changes can help you find the perfect setup. You can start with the recommended settings from the bike’s manual. Then, adjust based on how the bike feels on the trail. Pay attention to how the suspension reacts to different types of bumps. Does it soak them up easily? Or does it feel too stiff? Taking notes can help you remember what works best. This way, you can always return to your favorite setup. Learning how to use shock pump for downhill bike suspension is an investment in your riding experience.
Why Is Suspension Important?
Have you ever ridden over a big bump and felt like you were going to lose control? That’s where suspension comes in! It’s like having tiny helpers on your bike. They work hard to keep your tires on the ground. This gives you more control and makes riding safer. Without suspension, every bump would send you flying! Suspension also helps you ride faster. It soaks up the bumps so you can focus on steering. Think of it like running with bouncy shoes. They make running easier and more fun. Good suspension does the same for your bike. Knowing how to use shock pump for downhill bike suspension helps you keep those helpers working their best.
What Does Air Pressure Do?
Imagine a balloon. If you put too much air in it, it gets really hard. If you don’t put enough air in it, it’s floppy. Your bike’s suspension is similar. The air pressure inside affects how it feels. More air pressure makes it stiffer. Less air pressure makes it softer. Finding the right amount is important. It depends on your weight and the type of riding you do. If you’re riding downhill, you might want a bit more air. This helps prevent the suspension from bottoming out on big jumps. If you’re riding on smoother trails, you might want less air. This makes the ride more comfortable. Using a shock pump lets you fine-tune the air pressure. This helps you get the perfect feel.
How Does Weight Affect Suspension?
Think about a seesaw. If a big person sits on one side, and a small person sits on the other, the big person’s side goes down. Your weight affects your bike’s suspension in a similar way. If you’re heavier, you’ll need more air pressure to support you. If you’re lighter, you’ll need less. It’s all about finding the right balance. If you don’t have enough air, the suspension will sink too much. This is called “bottoming out.” It can feel harsh and uncomfortable. If you have too much air, the suspension won’t move enough. This makes the ride feel stiff and bumpy. Adjusting the air pressure with a shock pump helps you compensate for your weight. This ensures your suspension works properly.
Fun Fact or Stat: Did you know that professional downhill racers often adjust their suspension multiple times during a race day to account for changing track conditions?
Necessary Tools for Adjusting Suspension

To adjust your downhill bike suspension, you need a few key tools. The most important tool is a shock pump. This is a special pump designed for suspension systems. It has a gauge that shows the air pressure. Regular tire pumps won’t work. They don’t have the right connectors or pressure control. You’ll also need a rag to wipe off any dirt. A small notebook and pen can be useful. This helps you record your settings. You might also need a few Allen wrenches. These are used to adjust other parts of your suspension. Always keep your tools clean and organized. This makes the job easier. Having the right tools makes how to use shock pump for downhill bike suspension simpler and safer. It also helps you get the best performance from your bike.
- You need a special shock pump.
- A rag helps keep things clean.
- A notebook helps record settings.
- Allen wrenches adjust other parts.
- Keep your tools clean and organized.
- Regular tire pumps will not work.
Having the right tools is like being prepared for a test. If you have all the right materials, you’ll do better. The shock pump is your main tool for adjusting air pressure. Make sure it’s in good working condition. The gauge should be accurate. The hose should be free from leaks. The rag is important for keeping the valve clean. Dirt can damage the valve and affect the air pressure. The notebook is a great way to track your adjustments. Write down the air pressure you started with. Then, write down any changes you make. This helps you remember what works best. Allen wrenches are needed for other adjustments. These might include rebound and compression settings. Having all these tools on hand ensures you can make any necessary adjustments quickly and easily.
What Is a Shock Pump?
A shock pump is like a mini air compressor for your bike. It lets you add or remove small amounts of air. This is important for fine-tuning your suspension. A regular tire pump pushes in too much air too quickly. This can make it hard to get the pressure just right. A shock pump has a special valve that prevents air from leaking out when you disconnect it. It also has a gauge that shows the air pressure in PSI (pounds per square inch). This helps you be precise. Using a shock pump is easy. You attach it to the valve on your suspension. Then, you pump the handle until you reach the desired pressure. You can also release air by pressing a small button. This lets you make small adjustments until you get the perfect feel.
Why Can’t I Use a Tire Pump?
Imagine trying to fill a small glass with a fire hose. It would be hard to control, right? A tire pump is like a fire hose for your suspension. It pushes in too much air too quickly. This makes it hard to make small adjustments. A shock pump is like a dropper. It lets you add air slowly and precisely. This is important because even a small change in air pressure can make a big difference in how your suspension feels. Tire pumps also don’t have the right kind of connector. They won’t fit properly on the valve of your suspension. Using a tire pump could even damage your suspension. So, it’s always best to use a shock pump.
How Accurate Do I Need to Be?
Think about baking a cake. If you don’t measure the ingredients carefully, the cake might not turn out right. The same is true for your suspension. Being accurate with your air pressure is important. Even a few PSI can make a difference in how your bike feels. That’s why a shock pump has a precise gauge. It lets you see exactly how much air is in your suspension. When you’re making adjustments, go slowly. Add or remove small amounts of air at a time. Then, test the suspension to see how it feels. It takes some practice to get it just right. But with a little patience, you’ll be able to dial in your suspension perfectly.
Fun Fact or Stat: Some professional downhill racers use digital shock pumps that display air pressure to the nearest 0.1 PSI for ultra-precise adjustments!
Step-By-Step Guide: Using a Shock Pump
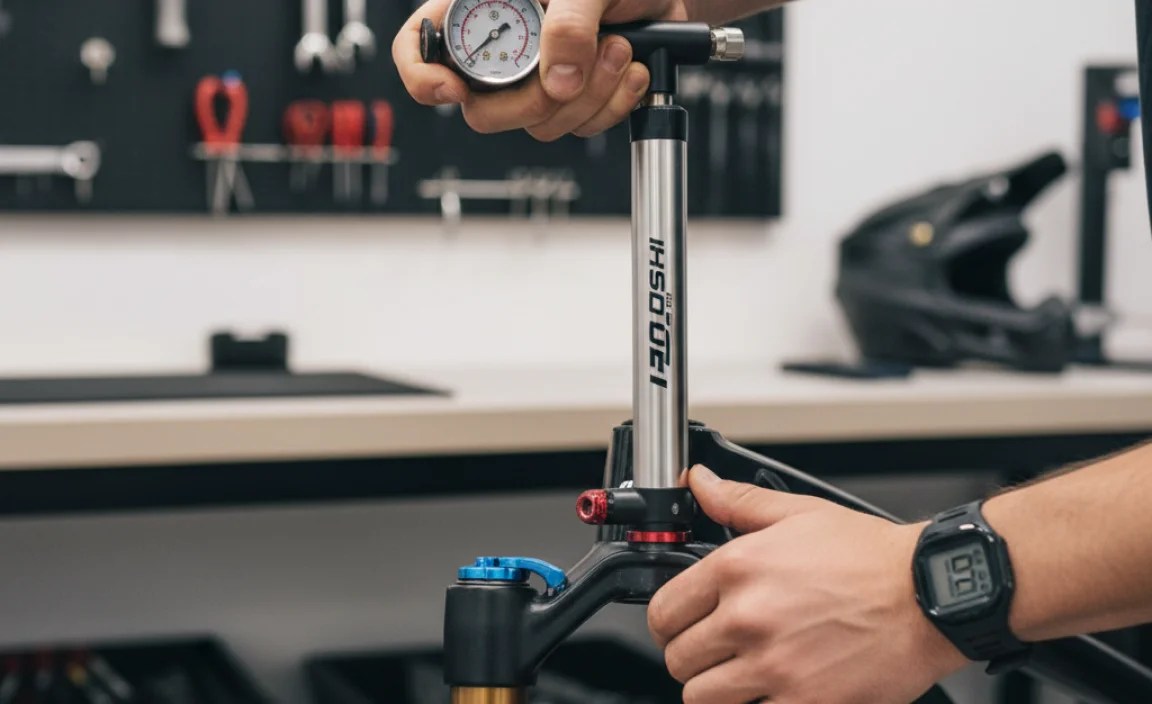
Learning how to use shock pump for downhill bike suspension is easier than you think. First, find the air valve on your suspension. It usually has a small cap. Remove the cap. Next, attach the shock pump to the valve. Make sure it’s on tight. You should not hear any air leaking. Now, check the pressure gauge. See what the current air pressure is. If you need to add air, pump the handle. Watch the gauge as you pump. Stop when you reach the desired pressure. If you need to remove air, press the release button. Do this slowly. Check the gauge after each small release. Once you have the right pressure, detach the pump. Put the cap back on the valve. You’re done! It’s important to check your suspension regularly. This helps keep it working its best.
- Find the air valve on your suspension.
- Attach the shock pump tightly.
- Check the pressure gauge.
- Pump to add air, release to remove.
- Detach the pump carefully.
- Replace the valve cap.
This process is like following a recipe. Each step is important for getting the right result. Start by finding the air valve. It’s usually located on the top or bottom of the suspension. It might be hidden under a rubber cap. The cap protects the valve from dirt and damage. When you attach the pump, make sure it’s secure. If it’s not, air will leak out. This will make it hard to get an accurate reading. The pressure gauge is your guide. It tells you how much air is in the suspension. Use it to add or remove air until you reach the desired pressure. Be patient when releasing air. Press the release button gently. This prevents you from letting out too much air at once. Finally, always replace the valve cap. This keeps dirt and debris out of the valve.
Finding the Air Valve
Imagine you’re on a treasure hunt. The first step is to find the treasure chest. In this case, the treasure chest is the air valve on your suspension. It’s usually a small, black valve that looks like the one on your bike tires. It might be hidden under a small cap. Look closely! The valve is usually located on the top or bottom of the suspension. If you’re not sure where to find it, check your bike’s manual. It will have a diagram that shows the location of all the important parts. Once you find the valve, remove the cap carefully. Be careful not to lose it! You’ll need it to protect the valve from dirt and damage.
Attaching the Shock Pump
Think about connecting a hose to a faucet. You want to make sure it’s on tight so water doesn’t leak out. Attaching the shock pump is similar. You need to make sure it’s connected securely to the air valve. Line up the pump’s nozzle with the valve. Then, push it on firmly. You should feel it click into place. If it’s not on tight, air will leak out when you start pumping. This will make it hard to get an accurate reading. Some shock pumps have a locking lever. This helps secure the pump to the valve. If your pump has a lever, make sure to lock it into place. Once the pump is attached, check for leaks. Listen for a hissing sound. If you hear air leaking, try tightening the connection.
Reading the Pressure Gauge
Imagine you’re driving a car. The speedometer tells you how fast you’re going. The pressure gauge on a shock pump tells you how much air is in your suspension. It’s important to know how to read it. The gauge usually has a needle that points to a number. The number represents the air pressure in PSI (pounds per square inch). Look closely at the gauge. What number is the needle pointing to? That’s your current air pressure. If the needle is pointing to a number that’s too low, you need to add air. If it’s pointing to a number that’s too high, you need to remove air. Use the pump to adjust the pressure until it’s just right.
Fun Fact or Stat: The pressure gauge on a shock pump is designed to be very accurate, often displaying pressure within 1-2 PSI of the actual value!
Finding the Right Air Pressure

Knowing how to use shock pump for downhill bike suspension also means knowing the right air pressure. Finding the right air pressure is like finding the perfect shoe size. It needs to fit just right. Too tight, and it’s uncomfortable. Too loose, and it doesn’t work well. The same is true for your suspension. The right air pressure depends on your weight and riding style. Most suspension manufacturers have charts. These charts recommend air pressure based on your weight. Start with the recommended pressure. Then, adjust based on how the bike feels. If it feels too harsh, reduce the pressure. If it feels too bouncy, increase the pressure. Experiment until you find the perfect balance. Remember to write down your settings. This helps you repeat them in the future. Proper air pressure improves your ride and keeps you safe.
| Rider Weight (lbs) | Recommended Air Pressure (PSI) |
|---|---|
| 100-120 | 80-90 |
| 121-140 | 91-105 |
| 141-160 | 106-120 |
| 161-180 | 121-135 |
- Check manufacturer charts for recommendations.
- Start with the recommended pressure.
- Adjust based on how the bike feels.
- Reduce pressure if it feels harsh.
- Increase pressure if it feels bouncy.
- Write down your settings.
Finding the right air pressure is a process of trial and error. It’s like learning to ride a bike. You might fall a few times before you get it right. Don’t be afraid to experiment. Start with the recommended settings. Then, make small adjustments. Ride the bike and see how it feels. Pay attention to how the suspension reacts to different types of bumps. Does it soak them up easily? Or does it feel too stiff? Adjust the pressure accordingly. Remember, there’s no one-size-fits-all solution. The perfect air pressure for you will depend on your weight, riding style, and the type of terrain you’re riding on. Keeping a record of your settings will help you fine-tune your suspension over time. This will also allow you to quickly return to a known baseline if you get lost.
Using Manufacturer Charts
Imagine you’re building a Lego set. The instructions tell you exactly which pieces to use and where to put them. Manufacturer charts are like instructions for your suspension. They tell you the recommended air pressure based on your weight. These charts are usually found in the bike’s manual or on the manufacturer’s website. They’re a great starting point for finding the right air pressure. To use the chart, find your weight. Then, look at the recommended air pressure for that weight. This is the pressure you should start with. Remember, the chart is just a guide. You might need to adjust the pressure based on how the bike feels.
Adjusting Based on Feel
Think about Goldilocks and the Three Bears. She tried different bowls of porridge until she found the one that was “just right.” Adjusting your suspension based on feel is similar. You need to try different air pressures until you find the one that feels best. Start with the recommended pressure from the manufacturer’s chart. Then, ride the bike and pay attention to how the suspension feels. If it feels too harsh, reduce the pressure by a few PSI. If it feels too bouncy, increase the pressure by a few PSI. Keep making small adjustments until you find the pressure that feels “just right.”
Recording Your Settings
Imagine you’re a scientist conducting an experiment. You need to keep careful records of your results. This helps you learn from your experiments and repeat them in the future. Recording your suspension settings is similar. It helps you remember what works best. Get a small notebook and pen. Write down the date, your weight, and the air pressure you’re using. Also, write down how the bike feels with those settings. This will help you remember what worked well and what didn’t. Over time, you’ll develop a good understanding of how your suspension works. You’ll be able to quickly dial in the perfect settings for any type of riding.
Fun Fact or Stat: Some riders even use mobile apps to track their suspension settings and riding conditions for optimal performance analysis!
Maintaining Your Suspension System

Knowing how to use shock pump for downhill bike suspension is just one part of the story. Maintaining your suspension system is also very important. Regular maintenance keeps it working well. It also helps prevent problems. Clean your suspension after each ride. Use a soft cloth to wipe off dirt and mud. Check for any damage. Look for cracks or leaks. Lubricate the moving parts. Use a special suspension lubricant. Don’t use regular oil. This can damage the seals. Check the air pressure regularly. Adjust it as needed. If you notice any problems, take your bike to a professional. They can diagnose and fix the issue. Proper maintenance extends the life of your suspension. It also keeps you safe on the trail.
- Clean after each ride.
- Check for damage.
- Lubricate moving parts.
- Use suspension lubricant.
- Check air pressure regularly.
- See a professional for problems.
Think of your suspension like a car engine. It needs regular maintenance to keep running smoothly. Cleaning your suspension after each ride is like washing your car. It helps remove dirt and grime that can damage the components. Checking for damage is like inspecting your car for problems. Look for any signs of wear and tear. Lubricating the moving parts is like changing the oil in your car. It helps keep everything running smoothly. Using suspension lubricant is important. Regular oil can damage the seals. Checking the air pressure is like checking the tire pressure on your car. It ensures that your suspension is working properly. If you notice any problems, take your bike to a professional. They have the tools and expertise to diagnose and fix the issue.
Why Clean Your Suspension?
Imagine you’re wearing dirty clothes all day. You would start to feel uncomfortable, right? Dirt and grime can also make your suspension uncomfortable. It can cause the moving parts to rub together. This can lead to wear and tear. Cleaning your suspension after each ride helps remove dirt and grime. This keeps the moving parts clean and smooth. It also helps prevent damage. Use a soft cloth to wipe off the dirt. You can also use a mild soap and water. Just make sure to rinse it off thoroughly. Avoid using harsh chemicals. These can damage the seals and other components.
Why Lubricate Your Suspension?
Think about a door hinge that’s squeaking. It’s annoying, right? The same is true for your suspension. If the moving parts aren’t lubricated, they can start to squeak and bind. This can make the ride uncomfortable. It can also lead to wear and tear. Lubricating your suspension helps keep the moving parts smooth and quiet. It also helps prevent damage. Use a special suspension lubricant. This is designed to protect the seals and other components. Don’t use regular oil. This can damage the seals and cause them to leak.
When to See a Professional?
Imagine you’re sick and you don’t know what’s wrong. You would go to a doctor, right? The same is true for your suspension. If you notice any problems, it’s best to see a professional. They have the tools and expertise to diagnose and fix the issue. Some common signs that you need to see a professional include: leaks, strange noises, and a loss of performance. Don’t try to fix the suspension yourself. You could damage it further. A professional can properly diagnose the problem and make the necessary repairs.
Fun Fact or Stat: Regular suspension maintenance can extend its lifespan by up to 50%, saving you money in the long run!
Advanced Suspension Tuning Tips
Once you know how to use shock pump for downhill bike suspension, you can start exploring advanced tuning. Advanced suspension tuning is like fine-tuning a race car. It involves making small adjustments. These adjustments can improve your bike’s performance. One common adjustment is rebound damping. This controls how quickly the suspension returns after a bump. Another adjustment is compression damping. This controls how much the suspension compresses on a bump. Experiment with these settings. See how they affect your ride. Read articles and watch videos. Learn from experienced riders. Advanced tuning takes time and practice. But it can make a big difference in your riding experience. Remember to always make small adjustments. This helps you avoid making big mistakes.
- Adjust rebound damping.
- Adjust compression damping.
- Experiment with settings.
- Learn from experienced riders.
- Make small adjustments.
- Read articles and watch videos.
Think of advanced suspension tuning like learning a new language. It takes time and effort. But it can be very rewarding. Rebound damping controls how quickly the suspension returns after a bump. Too much rebound damping can make the ride feel harsh. Too little rebound damping can make the ride feel bouncy. Compression damping controls how much the suspension compresses on a bump. Too much compression damping can make the ride feel stiff. Too little compression damping can make the ride feel soft. Experiment with these settings to find what works best for you. Read articles and watch videos to learn more about suspension tuning. Talk to experienced riders and get their advice. Remember to always make small adjustments. This helps you avoid making big mistakes. Keep a record of your settings. This helps you track your progress.
What Is Rebound Damping?
Imagine bouncing a basketball. If you don’t control it, it will bounce all over the place. Rebound damping controls the “bounce” of your suspension. It determines how quickly the suspension returns after a bump. Too much rebound damping can make the ride feel harsh. The suspension won’t return quickly enough. This can cause it to pack up on successive bumps. Too little rebound damping can make the ride feel bouncy. The suspension will return too quickly. This can cause it to lose control. Adjusting the rebound damping helps you find the right balance. This ensures that the suspension returns smoothly and predictably.
What Is Compression Damping?
Think about pushing down on a spring. The amount of force it takes to compress the spring is determined by its compression damping. Compression damping controls how much the suspension compresses on a bump. Too much compression damping can make the ride feel stiff. The suspension won’t compress enough to absorb the bump. Too little compression damping can make the ride feel soft. The suspension will compress too easily. This can cause it to bottom out on big bumps. Adjusting the compression damping helps you find the right balance. This ensures that the suspension absorbs bumps effectively without bottoming out.
How Do I Experiment Safely?
Imagine you’re trying a new recipe. You wouldn’t add all the ingredients at once, right? You would add them one at a time and taste the dish along the way. Experimenting with suspension settings is similar. You should make small adjustments one at a time. Then, ride the bike and see how it feels. Don’t make big changes all at once. This can make it hard to tell what’s working and what’s not. Also, make sure you’re riding in a safe area. Choose a trail that you’re familiar with. This will help you focus on the suspension. Finally, always wear a helmet and other safety gear.
Fun Fact or Stat: Professional suspension tuners often spend hours testing and adjusting suspension settings to find the perfect setup for a specific rider and track!
Common Mistakes to Avoid
Even with knowledge of how to use shock pump for downhill bike suspension, mistakes can happen. Some common mistakes can damage your suspension. One mistake is using too much air pressure. This can damage the seals. Another mistake is using the wrong type of lubricant. This can also damage the seals. A common mistake is ignoring the manufacturer’s recommendations. Always follow their guidelines. Another mistake is not checking the air pressure regularly. This can lead to poor performance. Always be careful when adjusting your suspension. Avoid these mistakes. This will help keep your suspension working well. It will also keep you safe on the trail.
- Using too much air pressure.
- Using the wrong lubricant.
- Ignoring recommendations.
- Not checking air pressure.
- Being careless.
Think of these mistakes like tripping hazards on a trail. If you’re not careful, you can stumble and fall. Using too much air pressure is like overfilling a balloon. It can cause it to pop. Using the wrong type of lubricant is like putting the wrong fuel in your car. It can damage the engine. Ignoring the manufacturer’s recommendations is like ignoring the rules of a game. It can lead to problems. Not checking the air pressure regularly is like not checking the tire pressure on your car. It can lead to poor performance. Being careless is like not paying attention to where you’re going. It can lead to accidents. Avoid these mistakes to keep your suspension working well and stay safe on the trail.
Overinflating the Suspension
Imagine blowing up a balloon until it pops. That’s what can happen if you overinflate your suspension. Too much air pressure can damage the seals. This can cause the suspension to leak. It can also make the ride harsh and uncomfortable. Always check the manufacturer’s recommendations for the maximum air pressure. Don’t exceed this limit. Use a shock pump with an accurate gauge. This will help you avoid overinflating the suspension. If you’re not sure how much air to add, start with a lower pressure. Then, gradually increase it until you reach the desired feel.
Using Incorrect Lubricants
Think about using the wrong kind of oil in your car’s engine. It could cause serious damage. The same is true for your suspension. Using the wrong type of lubricant can damage the seals and other components. Always use a suspension-specific lubricant. This is designed to protect the seals and keep the moving parts smooth. Don’t use regular oil, grease, or WD-40. These can damage the seals and cause them to leak. Apply the lubricant sparingly. Too much lubricant can attract dirt and grime. This can also damage the suspension.
Ignoring Manufacturer’s Advice
Imagine you’re building a model airplane. You wouldn’t ignore the instructions, would you? The manufacturer knows best how to assemble the model. The same is true for your suspension. The manufacturer knows best how to set it up and maintain it. Always read the owner’s manual. Follow the manufacturer’s recommendations for air pressure, lubricant, and maintenance. Ignoring their advice can lead to problems. It can also void the warranty. If you have any questions, contact the manufacturer or a qualified mechanic.
Fun Fact or Stat: Over 70% of suspension problems are caused by improper maintenance or incorrect setup, highlighting the importance of avoiding these common mistakes!
Summary
Learning how to use shock pump for downhill bike suspension is a key skill. It helps you fine-tune your bike. Proper suspension setup improves your ride. It gives you more control and comfort. You need a shock pump to adjust the air pressure. Start by finding the air valve. Attach the pump and check the gauge. Add or remove air to reach the right pressure. Follow the manufacturer’s recommendations. Adjust based on how the bike feels. Remember to maintain your suspension. Clean it and lubricate it regularly. Avoid common mistakes, like overinflating. With practice, you’ll become a suspension expert. This will make your downhill rides even better.
Conclusion
Adjusting your downhill bike suspension might seem hard. But with a shock pump, it’s easy! Understanding how to use shock pump for downhill bike suspension lets you dial in your ride. You can get more control and comfort. Start with the basics. Find the right air pressure. Then, experiment with advanced settings. Remember to maintain your suspension. Clean it and lubricate it often. With a little practice, you’ll be riding like a pro! So grab your shock pump and hit the trails!
Frequently Asked Questions
Question No 1: What is a shock pump and why do I need one?
Answer: A shock pump is a special type of pump designed for adjusting the air pressure in your bike’s suspension. It has a precise gauge that lets you add or remove small amounts of air. This is important for fine-tuning your suspension to match your weight and riding style. Regular tire pumps won’t work because they don’t have the right connectors or pressure control. Knowing how to use shock pump for downhill bike suspension ensures you can properly set up your bike for optimal performance and comfort. It’s an essential tool for any serious downhill rider.
Question No 2: How often should I check and adjust my suspension air pressure?
Answer: You should check your suspension air pressure before each ride. Air can leak out over time, so it’s important to make sure it’s at the correct level. Adjust the pressure as needed to match your weight and the type of terrain you’ll be riding. If you’re riding on rough trails, you might want to add a little more air. If you’re riding on smoother trails, you might want to reduce the pressure. Regularly checking and adjusting your suspension will help you maintain optimal performance and control. It also helps you understand how to use shock pump for downhill bike suspension effectively.
Question No 3: How do I know what air pressure to use in my suspension?
Answer: Start by checking the manufacturer’s recommendations. Most suspension manufacturers have charts that recommend air pressure based on your weight. These charts are usually found in the bike’s manual or on the manufacturer’s website. Use the chart as a starting point. Then, adjust the pressure based on how the bike feels. If it feels too harsh, reduce the pressure. If it feels too bouncy, increase the pressure. Keep experimenting until you find the pressure that feels best. Remembering how to use shock pump for downhill bike suspension, and adjusting the pressure in small increments, is key.
Question No 4: Can I damage my suspension by using too much air pressure?
Answer: Yes, using too much air pressure can damage your suspension. It can put excessive stress on the seals and other components. This can cause them to leak or fail. Always check the manufacturer’s recommendations for the maximum air pressure. Don’t exceed this limit. Use a shock pump with an accurate gauge to avoid overinflating the suspension. If you’re not sure how much air to add, start with a lower pressure. Then, gradually increase it until you reach the desired feel. Knowing how to use shock pump for downhill bike suspension safely can prevent damage.
Question No 5: What is rebound damping and how do I adjust it?
Answer: Rebound damping controls how quickly the suspension returns after a bump. Too much rebound damping can make the ride feel harsh. Too little rebound damping can make the ride feel bouncy. To adjust the rebound damping, look for a small knob or dial on the suspension. Turn the knob to adjust the damping. Start by turning it all the way to one side. Then, turn it back until the suspension feels smooth and controlled. Experiment with different settings to find what works best for you. Understanding the basics of how to use shock pump for downhill bike suspension and rebound damping is essential for fine-tuning your ride.
Question No 6: How do I maintain my suspension system?
Answer: Regular maintenance is important for keeping your suspension system working well. Clean your suspension after each ride to remove dirt and grime. Check for any damage, such as leaks or cracks. Lubricate the moving parts with a suspension-specific lubricant. Check the air pressure regularly and adjust it as needed. If you notice any problems, take your bike to a professional mechanic. Proper maintenance can extend the life of your suspension and keep you safe on the trail. Plus, understanding how to use shock pump for downhill bike suspension complements your maintenance efforts.


