
How to Make a DIY Hand Pump for Air: Easy Guide
Quick Summary
Want to make your own DIY air pump? It’s easier than you think! By using simple materials like PVC pipes, valves, and a few basic tools, you can create a functional hand pump for inflating bike tires, sports equipment, or small inflatable toys. This guide breaks down each step, from gathering supplies to testing your finished pump, so you can enjoy a rewarding DIY project and save money.
Ever been stuck with a flat tire and no pump in sight? Or needed to inflate a basketball and realized your pump was missing its nozzle? We’ve all been there. Store-bought pumps can be expensive, and sometimes they break at the worst possible moment. That’s why learning to build your own DIY hand pump can be a game-changer.
In this guide, I’ll walk you through each step, from gathering the necessary materials to assembling and testing your homemade air pump. You’ll be surprised at how simple and satisfying this project can be. Let’s get started and turn some basic supplies into a handy tool!
What You’ll Need

Before diving in, let’s gather all the necessary materials. Here’s a comprehensive list to ensure you have everything on hand.
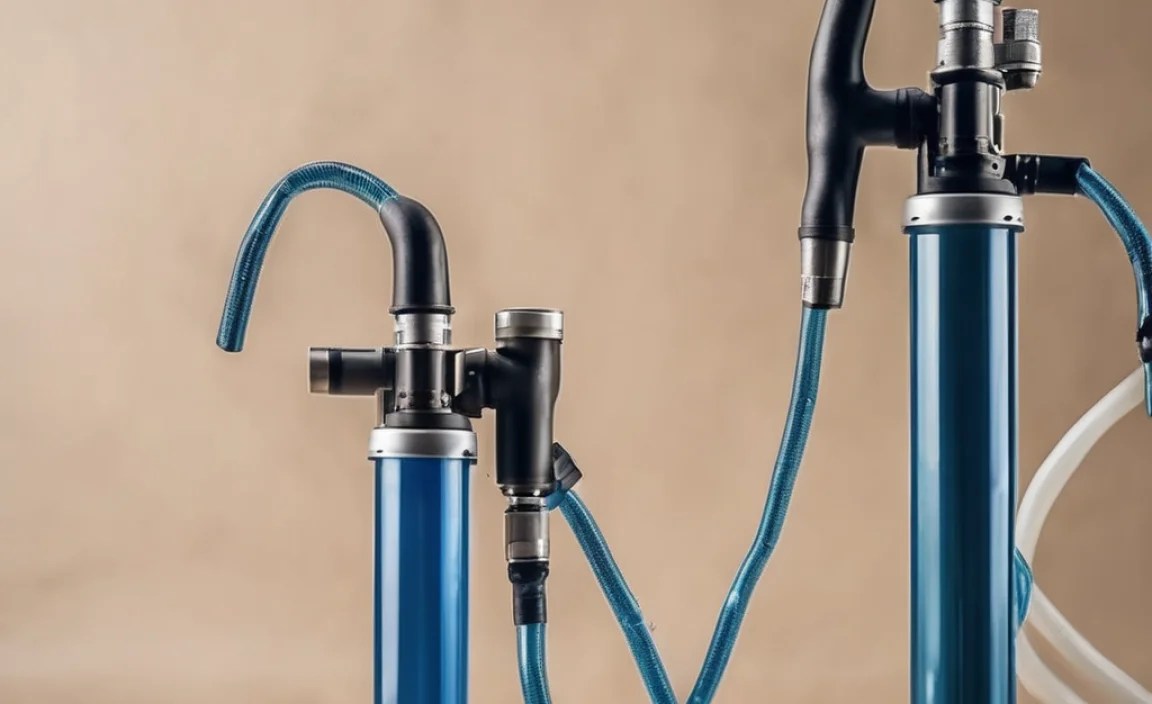
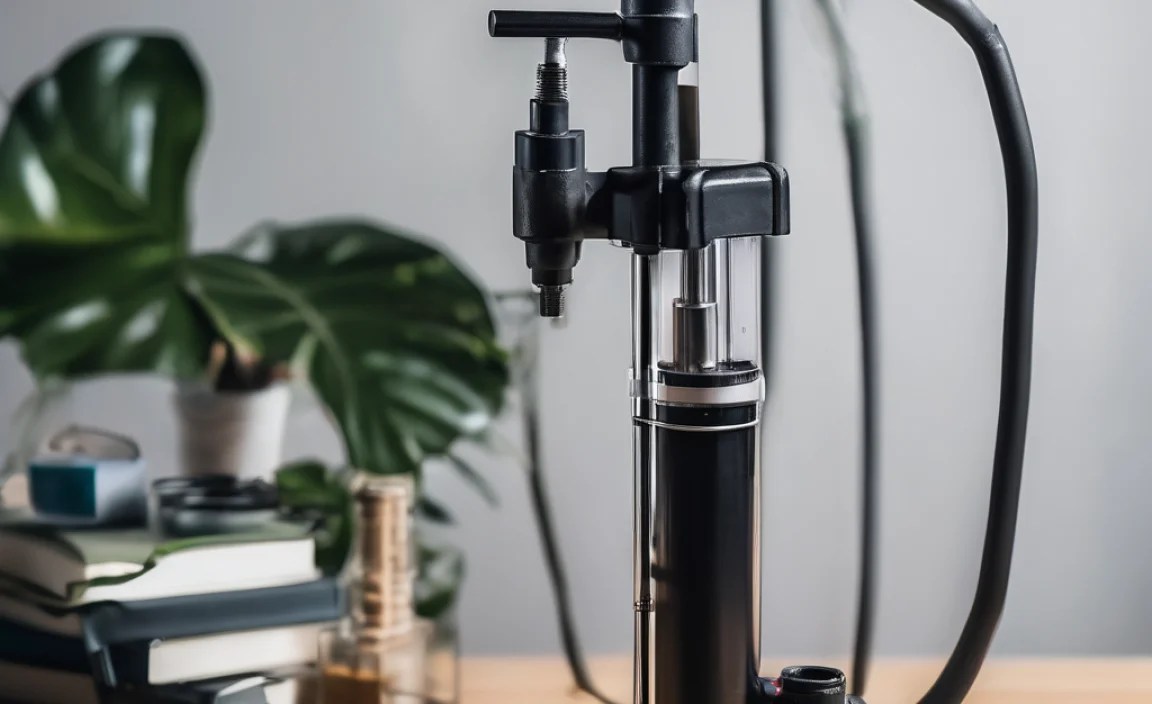
- PVC Pipe: A length of PVC pipe (e.g., 1-inch diameter, about 12-18 inches long) will form the body of your pump.
- PVC End Caps: Two end caps to seal the ends of the PVC pipe.
- Check Valve: A one-way valve that allows air to flow in only one direction.
- Rubber or Leather Washer: To act as a piston inside the pipe.
- Connecting Rod: A metal or wooden rod to move the piston (about 24 inches long).
- Handle: A comfortable handle for the connecting rod (e.g., a wooden dowel or a PVC pipe section).
- Hose: A flexible hose to direct the airflow to the tire or object you want to inflate.
- Hose Clamp: To secure the hose to the pump.
- Tire Chuck or Nozzle: To connect the hose to the tire valve or inflatable.
Tools Required
Having the right tools will make the construction process smoother and safer.
- PVC Cutter or Saw: For cutting the PVC pipe to the desired length.
- Drill: With various drill bits for making holes in the PVC caps.
- Sandpaper: To smooth any rough edges on the PVC pipe.
- PVC Cement: To securely glue the end caps to the PVC pipe.
- Wrench or Pliers: For tightening the hose clamp.
- Measuring Tape or Ruler: To measure and mark accurate lengths.
- Safety Glasses: To protect your eyes during cutting and drilling.
- Work Gloves: To protect your hands.
Step-by-Step Guide: Building Your DIY Hand Pump

Follow these steps to construct your hand pump. Each step includes detailed instructions and helpful tips to ensure success.
Step 1: Prepare the PVC Pipe
First, you need to prepare the PVC pipe that will serve as the main body of the pump.
- Measure and Cut: Use a measuring tape to mark the desired length on the PVC pipe (12-18 inches is a good starting point). Use a PVC cutter or saw to cut the pipe to the marked length.
- Smooth the Edges: Use sandpaper to smooth any rough edges on the cut ends of the PVC pipe. This will ensure a better seal with the end caps and prevent any injuries.
Step 2: Install the Check Valve
The check valve is crucial as it ensures air flows in only one direction.
- Drill a Hole: Drill a hole in one of the PVC end caps. The size of the hole should match the inlet size of the check valve.
- Insert the Valve: Insert the check valve into the hole. Use PVC cement to glue the valve securely in place. Ensure the valve is oriented so that air can flow into the pump.
- Allow to Dry: Let the cement dry completely according to the manufacturer’s instructions.
Step 3: Assemble the Piston
The piston is what creates the pressure to pump the air.
- Prepare the Washer: The rubber or leather washer will act as the piston. Make sure it fits snugly inside the PVC pipe. If it’s too large, trim it down.
- Attach the Connecting Rod: Drill a hole in the center of the washer. Attach the connecting rod to the washer using a bolt and nut or strong adhesive. Ensure the connection is secure.
Step 4: Create the Handle
A comfortable handle makes the pump easier to use.
- Attach the Handle: Attach the handle to the other end of the connecting rod. This could be a wooden dowel, a PVC pipe section, or any comfortable grip. Secure it with glue or screws.
Step 5: Assemble the Pump Body
Now, put all the parts together to form the pump body.
- Insert the Piston Assembly: Insert the piston assembly (washer and connecting rod) into the PVC pipe.
- Attach the End Caps: Apply PVC cement to the inside of both end caps. Attach the end cap with the check valve to one end of the PVC pipe. Attach the other end cap to the opposite end, ensuring the connecting rod extends out.
- Allow to Dry: Let the cement dry completely before proceeding.
Step 6: Connect the Hose and Nozzle
The hose and nozzle will direct the airflow to the desired target.
- Attach the Hose: Attach one end of the flexible hose to the outlet of the check valve. Use a hose clamp to secure it tightly.
- Attach the Nozzle: Attach the tire chuck or nozzle to the other end of the hose. Ensure it is securely connected.
Step 7: Test Your Pump
Before relying on your DIY pump, it’s important to test it.
- Test the Pump: Insert the nozzle into a tire valve or inflatable. Move the handle back and forth to pump air. Check for any leaks and ensure air is flowing properly.
- Troubleshoot: If you detect any leaks, tighten the hose clamps or re-glue any loose connections. If the pump is not building pressure, check the check valve orientation and the piston seal.
Tips for Improving Your DIY Hand Pump
Here are some tips to enhance the performance and durability of your DIY hand pump.
- Use Quality Materials: Investing in high-quality PVC pipe, valves, and hoses will ensure your pump lasts longer and performs better.
- Ensure a Tight Seal: Proper sealing is crucial for efficient pumping. Use ample PVC cement and ensure all connections are airtight.
- Lubricate the Piston: Applying a small amount of lubricant (e.g., silicone grease) to the piston can reduce friction and improve its performance.
- Regular Maintenance: Periodically check and tighten all connections. Replace any worn parts to keep your pump in top condition.
Advantages and Disadvantages of a DIY Hand Pump

Building your own hand pump has several benefits, but it’s also important to consider the drawbacks.
Advantages
- Cost-Effective: DIY hand pumps are significantly cheaper than store-bought pumps.
- Customizable: You can customize the pump to suit your specific needs and preferences.
- Educational: Building your own pump is a great learning experience.
- Repairable: If something breaks, you can easily repair or replace the parts.
Disadvantages
- Time-Consuming: Building a pump takes time and effort.
- Requires Skills: Some DIY skills are required, such as cutting, drilling, and gluing.
- Performance: DIY pumps may not be as efficient as professional pumps.
- Durability: The durability of a DIY pump depends on the quality of materials and workmanship.
Alternative Designs and Modifications
There are many ways to modify and improve your DIY hand pump. Here are a few ideas.
- Foot Pump: Modify the design to create a foot pump for hands-free operation.
- Double-Action Pump: Design a pump that inflates on both the upstroke and downstroke for increased efficiency.
- Add a Pressure Gauge: Incorporate a pressure gauge to monitor the inflation pressure.
Cost Analysis: DIY vs. Store-Bought Hand Pump
Let’s compare the cost of building a DIY hand pump versus buying a commercially available one.
| Item | DIY Hand Pump Cost | Store-Bought Hand Pump Cost |
|---|---|---|
| PVC Pipe | $5 | N/A |
| PVC End Caps | $2 | N/A |
| Check Valve | $3 | N/A |
| Rubber Washer | $1 | N/A |
| Connecting Rod | $4 | N/A |
| Handle | $2 | N/A |
| Hose and Clamp | $5 | N/A |
| Tire Chuck | $3 | N/A |
| Hand Pump (Complete) | N/A | $20 – $50 |
| Total Cost | $25 | $20 – $50 |
As you can see, building your own hand pump can save you money, especially if you already have some of the materials on hand. It also gives you the satisfaction of creating something yourself.
Safety Precautions
When building and using your DIY hand pump, keep these safety precautions in mind.
- Wear Safety Glasses: Protect your eyes from debris when cutting and drilling.
- Use Gloves: Protect your hands from sharp edges and chemicals.
- Work in a Well-Ventilated Area: When using PVC cement, work in a well-ventilated area to avoid inhaling harmful fumes.
- Follow Instructions: Always follow the manufacturer’s instructions for all materials and tools.
Troubleshooting Common Issues
Even with careful construction, you might encounter some issues. Here’s how to troubleshoot them.
| Issue | Possible Cause | Solution |
|---|---|---|
| Pump not building pressure | Check valve installed backward | Reinstall the check valve in the correct orientation |
| Air leaks | Loose connections or cracks in the PVC pipe | Tighten hose clamps, re-glue connections, or replace damaged parts |
| Piston not moving smoothly | Piston too tight or lack of lubrication | Trim the piston size or apply lubricant |
| Hose detaches | Hose clamp not tight enough | Tighten the hose clamp or replace it with a new one |
FAQ: DIY Hand Pump for Air
1. Is it hard to build a DIY hand pump?
Not at all! With basic tools and readily available materials like PVC pipes, valves, and a bit of glue, you can easily assemble a functional hand pump. Follow our step-by-step guide, and you’ll be pumping air in no time!
2. What are the main benefits of making my own air pump?
DIY air pumps are cost-effective, customizable, and educational. They’re significantly cheaper than store-bought pumps, allow you to tailor the design to your needs, and offer a great learning experience in basic mechanics.
3. Can I use different materials for the pump body?
While PVC is a common choice due to its availability and ease of use, you can experiment with other materials like metal pipes. Just ensure the materials are durable, airtight, and compatible with the other components.
4. How efficient is a DIY hand pump compared to a store-bought one?
While DIY pumps might not match the efficiency of professional models, they can still provide sufficient pressure for inflating tires, sports equipment, and small inflatables. The efficiency largely depends on the precision of your construction and the quality of materials used.
5. What kind of maintenance does a DIY hand pump need?
Regular maintenance includes checking and tightening connections, lubricating the piston, and replacing any worn parts. This will ensure your pump remains in top condition and provides reliable performance.
6. Can I add a pressure gauge to my homemade pump?
Yes, you can! Incorporating a pressure gauge allows you to monitor the inflation pressure accurately. Simply connect the gauge to the hose, ensuring it is properly sealed to prevent leaks.
7. What if my DIY pump isn’t building enough pressure?
If your pump isn’t building pressure, check the check valve to ensure it’s installed correctly, look for any leaks in the connections, and make sure the piston is moving smoothly. Addressing these issues will often solve the problem.
Conclusion
Building your own DIY hand pump is a rewarding project that combines practicality with creativity. Not only will you save money and gain a useful tool, but you’ll also learn valuable skills in the process. Whether you’re inflating bike tires, sports equipment, or other inflatables, a homemade air pump can be a reliable and cost-effective solution.
So, gather your materials, follow the steps outlined in this guide, and get ready to pump some air! With a little patience and effort, you’ll have a customized hand pump that meets your specific needs. Happy building, and happy inflating!


