
How to Fix Mount That Crushes Cable Housing? Easy Fix!
Have you ever squeezed a garden hose too hard? The water stops, right? That can happen to your bike cables too. The mount holding them can sometimes crush the cable housing. This makes it hard to brake or shift gears. Learning how to fix mount that crushes cable housing is super important. It keeps your bike safe and fun to ride.
Why is this important? Well, imagine trying to stop quickly. But your brakes don’t work well. Yikes! Knowing how to adjust things can save the day. Let’s learn how to keep those cables happy.
Sometimes, a little adjustment can make a big difference. A loose or badly placed mount can cause problems. We will learn easy steps to fix this. So, let’s get started and keep your bike in top shape!
Key Takeaways
- Knowing how to fix mount that crushes cable housing ensures smooth riding.
- Regularly check your bike’s cable mounts for proper alignment.
- Adjusting the cable tension can prevent crushing and improve performance.
- Use the correct tools to avoid damaging the cable or its housing.
- A properly maintained bike is safer and more enjoyable to ride.
How to Identify Mount Crushing Cable Housing

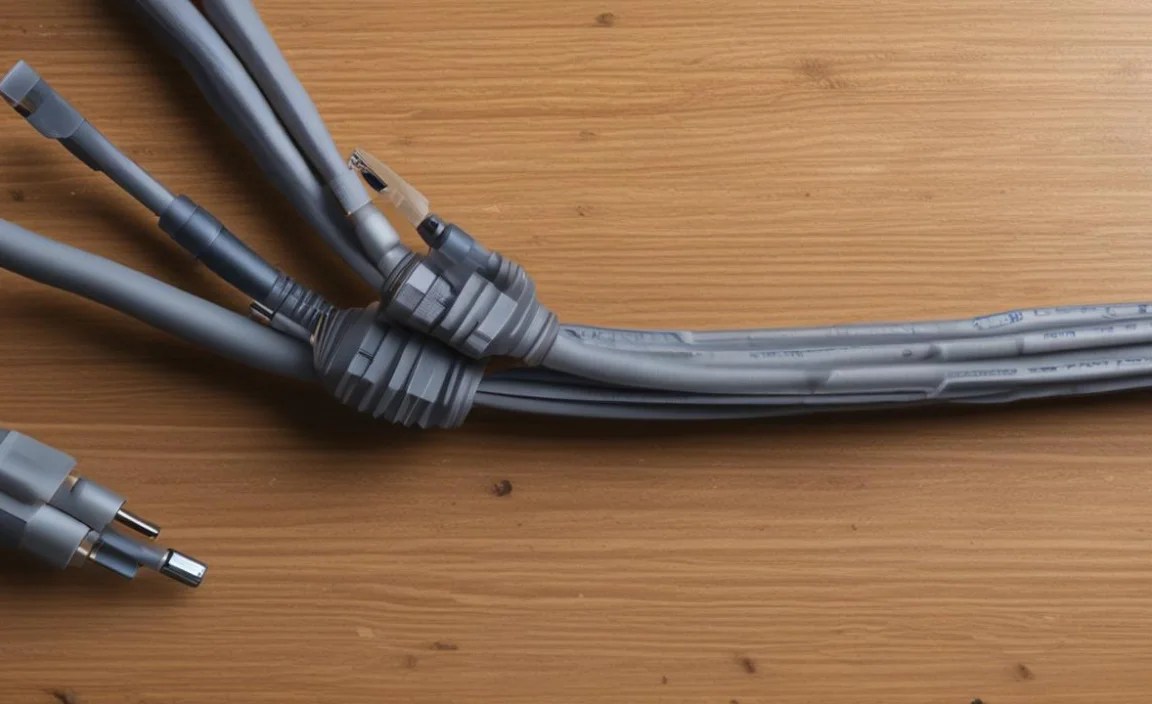
First, let’s figure out if your cable mount is actually the problem. Look closely at the cable housing near the mount. Do you see any dents or flat spots? These are signs of crushing. Gently squeeze the housing. Does it feel soft or compressed? That’s another clue. If you see any rust, it is likely the cause. Sometimes, the problem is not as obvious. You might notice your brakes or gears are not working as smoothly as they used to. They might feel stiff or slow. This can happen even if the housing doesn’t look too bad. Check the cable’s path. Make sure it’s not bent too sharply at the mount. A sharp bend can also cause crushing over time. Identifying the issue early is key to fixing it quickly. It will also help save you money.
- Check for dents or flat spots on the cable housing.
- Feel the housing for softness or compression.
- Look for rust or damage near the mount.
- Observe if brakes or gears feel stiff or slow.
- Ensure the cable’s path isn’t bent too sharply.
Okay, you’ve checked the cable housing and found some damage. Now what? Don’t worry; it’s not the end of the world! The next step is to figure out why the mount is crushing the housing. Is the mount too tight? Is it the wrong size or shape for your bike? Maybe it’s just old and worn out. Sometimes, the mount is simply in the wrong position. It might be too close to another part of the bike. This can cause the cable to rub and get crushed. Take a close look at everything. Understanding the cause will help you choose the right solution. It will also help prevent the problem from happening again.
Fun Fact or Stat: Did you know that regular bike maintenance can extend the life of your bike by up to 50%? Checking your cables and mounts is a key part of that maintenance!
Is the Mount Too Tight?
Sometimes, the simplest answer is the right one. The mount might just be too tight. Over-tightening can put a lot of pressure on the cable housing. This can lead to crushing and make it hard for the cable to move freely. Think of it like squeezing a balloon too hard. It will pop! The same thing can happen to your cable housing. Use the right tools to loosen the mount a little. Be careful not to loosen it too much, or the cable will move. Check the cable movement after you adjust it. Does it feel smoother? That’s a good sign. Remember, a little adjustment can go a long way. Try to avoid over-tightening again. You don’t want to crush the cables in the future.
Is the Mount the Right Size?
Have you ever tried to wear shoes that are too small? It’s not comfortable, right? The same goes for your bike cable mounts. If the mount is too small or the wrong shape, it can crush the cable housing. This happens because the cable doesn’t fit properly. It ends up getting squeezed in the wrong places. Check to see if the mount is designed for your type of bike cable. Different bikes need different types of mounts. If you’re not sure, ask someone at your local bike shop. They can help you find the right size and shape. Getting the right mount can make a big difference in how well your bike works.
Is the Mount Worn Out?
Everything wears out over time, even bike parts. Mounts can get old and brittle. They might rust or crack. This can cause them to lose their shape. A worn-out mount can put uneven pressure on the cable housing. This leads to crushing. Check your mounts for signs of wear. Look for rust, cracks, or loose parts. If you see any of these, it’s time to replace the mount. Replacing a worn-out mount is easy and cheap. It can save you from bigger problems later on. Plus, new mounts will keep your cables working smoothly.
Tools Needed to Fix a Crushed Cable Mount

Before you start fixing anything, you need the right tools. Trying to fix a bike without the right tools is like trying to build a house with only a spoon. It’s not going to work very well! For fixing a crushed cable mount, you’ll need a few basic things. First, you’ll need a set of Allen wrenches or hex keys. These are used to tighten and loosen the bolts on the mount. Make sure you have the right size for your bike. Next, you might need a cable cutter. This is used to trim the cable if it’s frayed or damaged. You’ll also want some new cable housing and cable ends. These are cheap and easy to replace. Finally, a little bit of grease can help things move smoothly. Having these tools on hand will make the job much easier and faster.
- Allen wrenches or hex keys (various sizes)
- Cable cutter
- New cable housing
- Cable ends (ferrules)
- Grease or lubricant
- Pliers
Having the right tools is only half the battle. Knowing how to use them is just as important. Always be careful when working with tools. Wear gloves to protect your hands. Don’t over-tighten bolts. This can strip the threads and make things worse. If you’re not sure how to use a tool, ask someone for help. There are lots of videos online that show you how to do things step by step. Remember, safety first! Taking your time and doing things right will save you time and trouble in the long run. Plus, you’ll feel great knowing you fixed your bike yourself!
Fun Fact or Stat: A good set of Allen wrenches can last for many years if you take care of them! Keep them clean and dry to prevent rust.
Choosing the Right Allen Wrench
Allen wrenches, or hex keys, are your best friends when working on bikes. They come in different sizes. You need the right size to fit the bolts on your cable mount. Using the wrong size can strip the bolt head. This makes it really hard to remove. Most bike shops sell sets of Allen wrenches. These sets have all the sizes you need. To choose the right one, try different sizes until you find one that fits snugly. It shouldn’t be too loose or too tight. If it feels loose, try the next size up. A snug fit will help you avoid damaging the bolts. This will help you fix the crushed cable mount with ease.
Using a Cable Cutter Safely
Cable cutters are sharp and powerful. They can cut through bike cables like butter. But they can also be dangerous if you’re not careful. Always wear gloves when using cable cutters. This will protect your hands from getting cut. Hold the cable firmly in the cutter. Make sure your fingers are out of the way. Squeeze the handles firmly and smoothly. Don’t jerk the cutter or twist the cable. This can cause the cable to fray. After you cut the cable, use a file to smooth any rough edges. A smooth cable will slide through the housing easily. This will also help you fix the crushed cable mount.
Applying Grease Correctly
Grease is like magic for bike parts. It helps things move smoothly and prevents rust. When fixing a crushed cable mount, apply a small amount of grease to the bolts. This will make them easier to tighten and loosen. Also, put a little grease inside the cable housing. This will help the cable slide freely. Use a special grease made for bikes. Don’t use regular car grease. Bike grease is designed to withstand water and dirt. Apply the grease sparingly. Too much grease can attract dirt and make things worse. A little bit of grease goes a long way. This can ensure the mount doesn’t crush the cables.
Steps to Adjust the Cable Mount

Okay, you have your tools ready. Now it’s time to adjust the cable mount. First, loosen the bolt that holds the mount in place. Don’t remove it completely. Just loosen it enough so you can move the mount. Next, gently reposition the mount. Make sure it’s not putting too much pressure on the cable housing. The cable should run smoothly through the mount without any kinks or bends. Once you’re happy with the position, tighten the bolt. Don’t over-tighten it! Just make it snug. Check the cable movement. Does it feel smoother? If not, try adjusting the mount again. Sometimes, it takes a few tries to get it just right. Be patient and keep tweaking it until it feels good.
- Loosen the mount’s bolt.
- Reposition the mount gently.
- Ensure smooth cable movement.
- Tighten the bolt snugly.
- Check cable movement again.
Adjusting the cable mount might seem tricky at first. But with a little practice, you’ll get the hang of it. The key is to take your time and pay attention to the details. Make small adjustments and check the cable movement after each one. If you’re not sure what you’re doing, ask someone for help. A friend or a bike shop mechanic can give you some pointers. Remember, the goal is to make the cable run smoothly through the mount without any pressure or bends. This will prevent the cable from getting crushed. It will also make your brakes and gears work better. It is important to do this to help fix the cable mount.
Fun Fact or Stat: Professional bike mechanics can adjust a cable mount in less than a minute! But don’t worry, it’s okay if it takes you a little longer.
Finding the Right Position
The position of the cable mount is super important. It can make or break how well your brakes and gears work. The goal is to find a position that allows the cable to run smoothly. The cable should not have any sharp bends or kinks. Start by loosening the mount. Then, move it around slowly. Watch how the cable moves as you adjust the mount. Look for a position where the cable flows freely. Tighten the mount in that position. Test the brakes and gears to see if they feel better. If not, keep adjusting the mount until you find the sweet spot. This can help prevent the cable from being crushed.
Tightening the Bolt Correctly
Tightening the bolt on the cable mount might seem easy. But it’s important to do it right. Over-tightening can damage the mount or the cable. Under-tightening can cause the mount to slip. The key is to find the right balance. Use an Allen wrench to tighten the bolt. Turn it slowly and carefully. Stop when the bolt feels snug. It should be tight enough to hold the mount in place. But not so tight that you’re straining. If you’re not sure, ask someone for help. They can show you how much pressure to apply. This can prevent the cable from being crushed.
Testing the Cable Movement
After you adjust the cable mount, it’s important to test the cable movement. This will help you see if you’ve fixed the problem. Pull on the cable gently. It should move smoothly and easily. If it feels stiff or sticky, something is wrong. The cable might be bent or crushed. Or the mount might be in the wrong position. If the cable doesn’t move smoothly, loosen the mount and adjust it again. Keep testing the cable movement until it feels good. Smooth cable movement is essential for good brakes and gears. This can help prevent the cable from being crushed.
Replacing the Cable Housing
Sometimes, adjusting the mount isn’t enough. If the cable housing is badly crushed, you might need to replace it. Don’t worry; it’s not as hard as it sounds. First, you’ll need to remove the old housing. Use a cable cutter to snip off the ends. Then, pull the old housing out of the mounts. Next, measure the length of the old housing. Cut a new piece of housing to the same length. Slide the new housing into the mounts. Make sure it’s seated properly. Finally, attach new cable ends (ferrules) to the ends of the housing. This will protect the cable from fraying. Replacing the housing can make a big difference in how well your brakes and gears work.
- Remove the old cable housing.
- Measure the old housing’s length.
- Cut new housing to the same length.
- Slide new housing into the mounts.
- Attach new cable ends (ferrules).
Replacing the cable housing is a great way to improve your bike’s performance. New housing is smooth and flexible. It allows the cable to move freely. This makes your brakes and gears feel more responsive. Plus, new housing looks great! It can give your bike a fresh, clean look. When choosing new housing, make sure to get the right type for your bike. There are different types of housing for brakes and gears. Ask someone at your local bike shop for help if you’re not sure. They can help you choose the best housing for your needs. This can help prevent the cable from being crushed.
Fun Fact or Stat: Cable housing comes in different colors! You can choose a color that matches your bike’s frame.
Choosing the Right Housing
Not all cable housing is created equal. There are different types for different purposes. Brake housing is stronger and stiffer than gear housing. This is because brakes need to handle more force. Gear housing is more flexible. This allows for smoother shifting. When choosing new housing, make sure to get the right type for your bike. Brake housing usually has a spiral-wound construction. Gear housing usually has a linear-strand construction. Check your bike’s manual or ask a bike shop mechanic if you’re not sure. Using the wrong type of housing can affect your bike’s performance. This can help prevent the cable from being crushed.
Cutting Housing to the Correct Length
Cutting the cable housing to the correct length is important. If it’s too short, the cable will be too tight. This can make it hard to brake or shift. If it’s too long, the cable will be too loose. This can make your brakes and gears feel sloppy. The best way to measure the housing is to compare it to the old housing. Lay the old housing next to the new housing. Mark the new housing at the same length. Use a cable cutter to cut the new housing at the mark. Make sure the cut is clean and straight. A clean cut will help the cable slide smoothly. This can help prevent the cable from being crushed.
Attaching Ferrules Properly
Ferrules are small metal caps that go on the ends of the cable housing. They protect the housing from fraying. They also provide a smooth surface for the cable to slide on. Attaching ferrules properly is important. Slide the ferrule onto the end of the housing. Use pliers to crimp the ferrule in place. Make sure the ferrule is snug and secure. If it’s loose, it can fall off. This can cause the housing to fray. Use the right size ferrule for your housing. There are different sizes for different types of housing. A properly attached ferrule will help your cables last longer. This can help prevent the cable from being crushed.
Preventing Future Cable Housing Crushing

Now that you’ve fixed your crushed cable housing, you want to keep it from happening again. Regular maintenance is key. Check your cable mounts regularly. Make sure they’re tight and in the right position. Also, inspect your cable housing for signs of wear. Look for dents, cracks, or fraying. Replace the housing if you see any damage. Lubricate your cables regularly. This will help them move smoothly and prevent them from getting crushed. Keep your bike clean. Dirt and grime can damage your cables and mounts. By following these simple tips, you can keep your cables happy and your bike running smoothly.
- Check cable mounts regularly.
- Inspect cable housing for wear.
- Replace damaged housing promptly.
- Lubricate cables regularly.
- Keep your bike clean.
Preventing cable crushing is all about paying attention to the details. Take a few minutes each week to inspect your cables and mounts. Look for anything that seems out of place. If you catch a problem early, you can fix it before it gets worse. Remember, a little bit of maintenance goes a long way. By taking good care of your cables, you’ll keep your bike running smoothly for years to come. This will also help you avoid costly repairs. So, make cable maintenance a part of your regular bike routine. Your bike will thank you for it! This can help prevent the cable from being crushed.
| Preventative Measure | Description | Frequency | Benefits |
|---|---|---|---|
| Mount Inspection | Check for tightness and position. | Weekly | Prevents misalignment and crushing. |
| Housing Inspection | Look for dents, cracks, or fraying. | Weekly | Identifies wear early. |
| Cable Lubrication | Apply lubricant to cables. | Monthly | Ensures smooth movement. |
| Bike Cleaning | Clean dirt and grime. | Monthly | Prevents damage to cables and mounts. |
Fun Fact or Stat: Bikes that are regularly maintained last twice as long as bikes that are neglected!
Regularly Lubricating Cables
Lubricating your cables is like giving them a drink of water. It helps them stay smooth and flexible. Use a special lubricant made for bike cables. Don’t use oil or grease. These can attract dirt and make things worse. Apply the lubricant to the cables where they enter the housing. Work the lubricant in by squeezing the cable. Do this a few times. Wipe off any excess lubricant. Lubricate your cables every few months. Or more often if you ride in wet or dirty conditions. This will help prevent the cable from getting crushed. This can also ensure that the cable mount doesn’t crush cables in the future.
Keeping Mounts Clean
Clean mounts are happy mounts. Dirt and grime can build up on the mounts over time. This can cause them to rust or corrode. Clean your mounts regularly with a damp cloth. Use a mild soap if needed. Dry the mounts thoroughly after cleaning. This will prevent rust. Inspect the mounts for signs of damage. Look for cracks or loose parts. Replace the mounts if you see any damage. Clean mounts will help your cables last longer. This can prevent the cable from getting crushed. Regular cleaning helps to keep the bike in great condition.
Storing Your Bike Properly
How you store your bike can affect its cables. Don’t leave your bike out in the rain or sun. This can damage the cables and mounts. Store your bike in a dry, sheltered place. If you have to store it outside, cover it with a tarp. Avoid hanging your bike by its cables. This can put stress on the cables and cause them to get crushed. Instead, hang it by the frame or wheels. Proper storage will help your cables last longer. This can prevent the cable from getting crushed. Storing your bike properly extends its life.
Summary
In this article, we learned how to fix mount that crushes cable housing. First, we learned how to identify the problem. We looked for signs of crushing on the cable housing. Then, we discussed the tools needed to fix the problem. These include Allen wrenches, cable cutters, and new cable housing. Next, we went through the steps to adjust the cable mount. This involves loosening the mount, repositioning it, and tightening it. We also learned how to replace the cable housing if it’s too damaged. Finally, we discussed how to prevent future cable crushing. This includes regular maintenance, lubrication, and proper bike storage. Fixing and preventing cable crushing will keep your bike running smoothly.
Conclusion
Knowing how to fix mount that crushes cable housing is important for every bike owner. It helps keep your bike safe and fun to ride. By following the steps in this article, you can fix a crushed cable mount yourself. Regular maintenance and proper storage can prevent future problems. So, take care of your cables and enjoy the ride! This will make your bike perform at its best. You can do it!
Frequently Asked Questions
Question No 1: What are the signs that my cable housing is being crushed?
Answer: There are several signs to look for. Check for dents or flat spots on the cable housing. Feel the housing for softness or compression. Observe if your brakes or gears feel stiff or slow. Ensure the cable’s path isn’t bent too sharply at the mount. Look for rust or damage near the mount. These are all signs that your cable housing might be getting crushed. If you notice any of these signs, it’s time to investigate further. Addressing the issue early can prevent more serious problems down the road.
Question No 2: What tools do I need to fix a crushed cable mount?
Answer: To fix a crushed cable mount, you’ll need a few basic tools. A set of Allen wrenches or hex keys is essential for tightening and loosening bolts. A cable cutter is necessary for trimming the cable if it’s frayed or damaged. You’ll also want some new cable housing and cable ends (ferrules). A little bit of grease can help things move smoothly. Pliers can be useful for crimping ferrules. Having these tools on hand will make the job much easier and faster. It is important to have the right tools to do the job well.
Question No 3: How do I adjust the cable mount to prevent crushing?
Answer: Adjusting the cable mount involves a few key steps. First, loosen the bolt that holds the mount in place. Don’t remove it completely; just loosen it enough to move the mount. Next, gently reposition the mount. Make sure it’s not putting too much pressure on the cable housing. The cable should run smoothly through the mount without any kinks or bends. Once you’re happy with the position, tighten the bolt snugly. Check the cable movement to ensure it feels smoother. If not, keep adjusting the mount until it does.
Question No 4: When should I replace the cable housing instead of just adjusting the mount?
Answer: You should consider replacing the cable housing if it’s badly crushed, frayed, or damaged. If adjusting the mount doesn’t improve the cable movement, the housing might be the problem. Also, if the housing is old and brittle, it’s a good idea to replace it. New housing is smooth and flexible, allowing the cable to move freely. Replacing the housing can significantly improve your bike’s braking and shifting performance. If you see any visible damage, you should replace the cable and housing.
Question No 5: How can I prevent cable housing from being crushed in the future?
Answer: Preventing future cable housing crushing involves regular maintenance and care. Check your cable mounts regularly to ensure they’re tight and in the correct position. Inspect your cable housing for signs of wear, such as dents or fraying. Replace the housing if you notice any damage. Lubricate your cables regularly to keep them moving smoothly. Keep your bike clean to prevent dirt and grime from damaging the cables and mounts. Proper bike storage can also help prevent cable damage. Following these tips will keep your cables in good condition.
Question No 6: What type of lubricant should I use on my bike cables?
Answer: When lubricating your bike cables, it’s important to use a lubricant specifically designed for that purpose. Avoid using oil or grease, as these can attract dirt and make things worse. Look for a cable lubricant that’s lightweight and designed to penetrate the cable housing. Apply the lubricant to the cables where they enter the housing. Work the lubricant in by squeezing the cable a few times. Wipe off any excess lubricant. Regular lubrication will help prevent the cable from getting crushed and keep your brakes and gears working smoothly.


