
Easy: How to Install Rack Mount for Touring Bike
Do you love bike rides? Have you ever wanted to carry more stuff? A rack mount helps you do that! It lets you add bags to your bike. This is great for touring bikes. Knowing how to install rack mount for touring bike is important. It makes your rides easier and more fun.
Imagine riding your bike to school. You have a heavy backpack. It makes your back hurt. With a rack mount, you can put your backpack on the bike. Now, your ride is much better! Learning how to install rack mount for touring bike can change how you ride.
What if you want to go on a long bike trip? You need to carry food and clothes. A rack mount lets you do that easily. It turns your bike into a touring machine. Let’s learn how to install rack mount for touring bike. It’s easier than you think!
Key Takeaways
- Installing a rack mount on your touring bike increases its carrying capacity.
- Make sure the rack is compatible with your bike’s frame and brakes.
- You will need basic tools like wrenches, Allen keys, and possibly a torque wrench.
- Follow the manufacturer’s instructions carefully for safe and secure installation.
- Knowing how to install rack mount for touring bike makes your rides more enjoyable.
How To Choose The Right Rack Mount

Choosing the right rack mount is very important. You want it to fit your bike well. It should also be strong enough to carry your stuff. Look at the rack’s weight limit. This tells you how much weight it can handle. Think about what you will carry on your bike. If you plan to carry heavy things, get a strong rack. Also, check if the rack fits your bike frame. Some racks only work with certain bikes. Make sure the rack is compatible with your brakes too. Disc brakes might need a special rack. Read reviews from other people. They can tell you if the rack is good quality. Think about the material of the rack. Aluminum is light, and steel is strong. Pick the one that works best for you. A good rack makes your bike trips much easier and safer. It is a great way to carry your things!
- Check the rack’s weight limit.
- Make sure the rack fits your bike frame.
- Consider the type of brakes on your bike.
- Read reviews from other cyclists.
- Think about the material of the rack.
Think about where you will ride your bike. Will you ride on smooth roads or bumpy trails? A stronger rack is better for bumpy trails. A lighter rack is fine for smooth roads. Consider the weather where you live. Some racks rust easily in wet weather. Look for a rack that is rust-resistant. A good rack will last for many years. It will make your bike rides more enjoyable. Take your time and choose wisely. The right rack will make a big difference. You will be happy you did your research. A well-chosen rack improves your touring bike’s usefulness. It also makes your rides safer and more fun. Make sure to check the warranty too. This protects you if the rack breaks.
Fun Fact or Stat: Did you know that some bike racks can carry up to 70 pounds of gear? That’s like carrying a small adult on your bike!
What Are The Different Types Of Racks?
There are many types of bike racks. Each one has different features. Some racks attach to the seat post. These are easy to install. But they might not be as strong. Other racks attach to the frame. These are more stable and can carry more weight. There are also front racks. These go on the front of your bike. They are good for carrying smaller items. Some racks are made for specific types of bikes. Make sure you get the right one for your bike. Consider how easy the rack is to install. Some racks are harder to install than others. Read the instructions carefully. If you are not sure, ask a bike shop for help. They can help you choose the right rack and install it for you. Choosing the right rack makes your touring bike more useful.
How Much Weight Can A Rack Handle?
The weight limit of a rack is very important. It tells you how much weight the rack can safely carry. Exceeding the weight limit can damage the rack. It can also make your bike unstable. This could be dangerous. Always check the weight limit before you load up your rack. Think about what you will be carrying. If you are carrying heavy items, get a rack with a higher weight limit. Some racks can carry up to 50 pounds. Others can carry even more. Make sure the rack is strong enough for your needs. Distribute the weight evenly on the rack. This will help keep your bike balanced. A balanced bike is easier to control. It is also safer to ride. Always be aware of the weight you are carrying. This will help you have a safe and enjoyable ride.
What Materials Are Bike Racks Made Of?
Bike racks are made from different materials. The most common materials are aluminum and steel. Aluminum is light and rust-resistant. It is a good choice for riders who want a lightweight rack. Steel is stronger than aluminum. It can carry more weight. Steel racks are also more durable. They are a good choice for riders who carry heavy loads. Some racks are made from a combination of materials. They might have a steel frame with aluminum parts. This combines the benefits of both materials. Consider the material when you choose a rack. Think about your needs and your budget. A good rack will last for many years. It will make your bike rides more enjoyable. Choose the material that works best for you. A durable rack is a great investment for your touring bike.
Tools You’ll Need To Install A Rack Mount

To install a rack mount, you’ll need some tools. First, you need wrenches. Wrenches help you tighten the bolts. You might need different sizes of wrenches. Allen keys are also important. These fit into special bolts. A torque wrench is useful too. It helps you tighten bolts to the right amount. This prevents you from overtightening them. You will also need a screwdriver. A Phillips head screwdriver is common. Some racks come with extra parts. Keep these parts organized. A small bag can help. Read the instructions carefully. They will tell you which tools you need. If you don’t have the right tools, ask a friend. You can also borrow tools from a bike shop. Having the right tools makes the job easier. It also helps you install the rack safely. Always be careful when using tools. If you’re not sure, ask for help. A properly installed rack is safe and secure.
- Wrenches of different sizes.
- Allen keys to fit special bolts.
- A torque wrench for proper tightening.
- Screwdrivers, usually Phillips head.
- A small bag to keep parts organized.
Before you start, protect your bike. Use a soft cloth to cover the frame. This prevents scratches. Have a clean workspace. This helps you find the parts easily. Good lighting is also important. It helps you see what you are doing. Take your time and don’t rush. Installing a rack mount takes patience. If you get stuck, watch a video online. There are many helpful videos. They show you how to install a rack step by step. If you’re still not sure, go to a bike shop. They can install the rack for you. It’s better to be safe than sorry. A properly installed rack makes your rides safer. It also makes them more enjoyable. Make sure you have all the tools before you begin. This will save you time and frustration. A well-prepared workspace makes the job easier.
Fun Fact or Stat: The torque wrench was invented to make sure car engines were assembled correctly. Now, cyclists use them too!
Why Is A Torque Wrench Important?
A torque wrench is a special tool. It helps you tighten bolts correctly. Overtightening bolts can damage them. It can also damage your bike frame. Undertightening bolts can be dangerous. The bolts might come loose while you are riding. A torque wrench measures how tight the bolt is. It tells you when you have reached the right amount. This prevents damage and keeps you safe. Using a torque wrench is easy. Set the wrench to the correct torque. Then, tighten the bolt until the wrench clicks. The click means you have reached the right torque. Always use a torque wrench when installing a rack mount. This will protect your bike and keep you safe. Read the instructions carefully to find the correct torque settings. A torque wrench is a valuable tool for any cyclist.
What Size Allen Keys Will I Need?
Allen keys come in different sizes. You will need the right size for your rack mount. Most racks use Allen keys between 4mm and 6mm. Check the instructions to see what size you need. A set of Allen keys is a good investment. It will have all the sizes you need. Allen keys are used for many parts on your bike. They are useful for adjusting brakes and derailleurs. Make sure the Allen key fits snugly in the bolt. If it is loose, it can strip the bolt. Stripped bolts are hard to remove. Use the correct size Allen key to avoid this problem. A good set of Allen keys will last for many years. They are an essential tool for any cyclist who works on their own bike. Keep your Allen keys organized in a safe place.
How Do I Protect My Bike’s Frame?
Protecting your bike frame is very important. Scratches and dents can damage the paint. They can also weaken the frame. Use a soft cloth to protect the frame when installing the rack mount. Place the cloth between the rack and the frame. This will prevent scratches. You can also use frame protectors. These are small pieces of plastic or rubber. They stick to the frame and protect it from damage. Be careful when tightening bolts. Overtightening can damage the frame. Use a torque wrench to avoid this problem. Inspect your frame regularly for damage. Look for cracks or dents. If you find any damage, take your bike to a shop. A damaged frame can be dangerous to ride. Protect your frame to keep your bike in good condition. A well-maintained frame will last longer and perform better.
Step-By-Step Guide: Installing The Rack Mount
Here’s how to install rack mount for touring bike. First, read the instructions. Make sure you understand them. Gather all your tools. Put them in a safe place. Locate the mounting points on your bike frame. These are usually near the rear axle and seat stays. Attach the rack to the mounting points. Use the bolts and washers that came with the rack. Tighten the bolts with a wrench. Use a torque wrench to tighten them to the correct torque. Make sure the rack is secure. It should not wobble or move. Double-check all the bolts. If everything looks good, you are done! Test the rack by putting some weight on it. Make sure it can handle the weight. If you have any problems, ask a bike shop for help. They can help you install the rack correctly. A properly installed rack is safe and secure.
- Read the instructions carefully first.
- Gather all the necessary tools.
- Locate the mounting points on your bike.
- Attach the rack using bolts and washers.
- Tighten the bolts securely with a wrench.
Before you start, clean the mounting points on your bike. Dirt and grime can prevent the rack from fitting properly. Use a clean cloth to wipe the mounting points. If the mounting points are rusty, use a wire brush to clean them. Be careful not to damage the frame. Apply a small amount of grease to the bolts. This will make them easier to tighten. It will also prevent them from rusting. Start by loosely attaching the rack. This will allow you to adjust the position. Once you are happy with the position, tighten the bolts. Make sure the rack is level. Use a level to check. A level rack will distribute the weight evenly. This will make your bike more stable. Take your time and be careful. A properly installed rack will last for many years.
Fun Fact or Stat: Some bike racks are designed to fold up when not in use, making them easier to store!
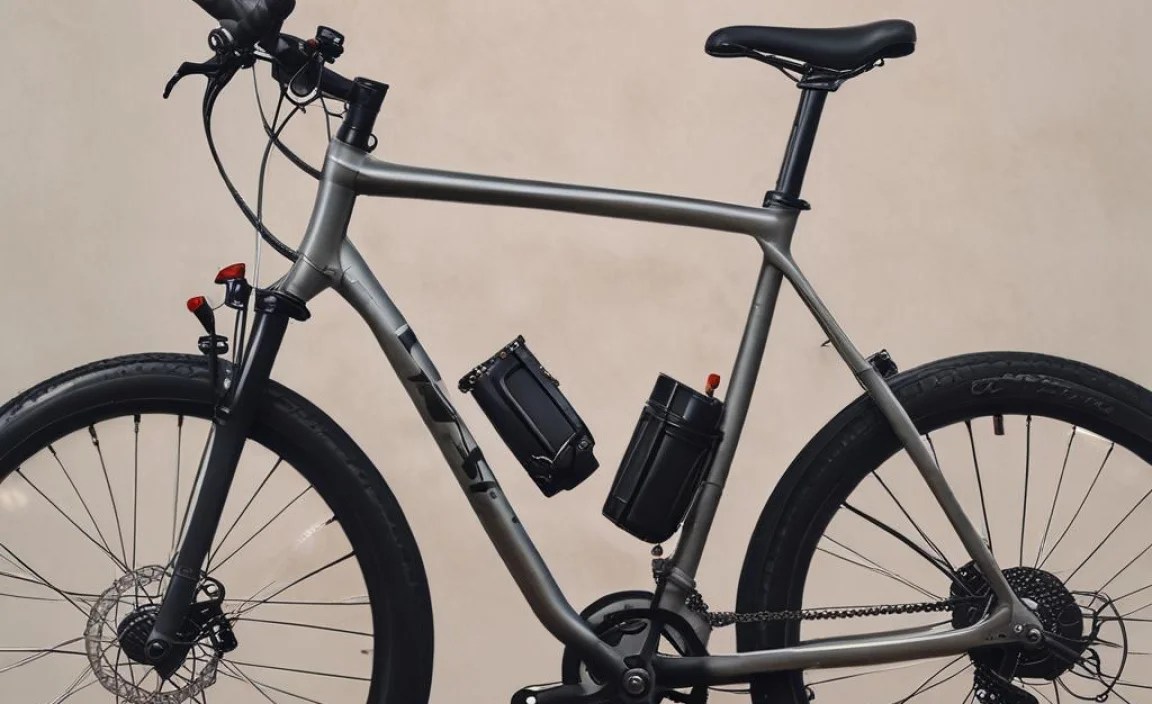
What Are Mounting Points And Where Are They?
Mounting points are special places on your bike frame. They are where you attach the rack mount. Look for small holes near the rear axle. These are called eyelets. There are also mounting points on the seat stays. The seat stays are the tubes that connect the seat to the rear wheel. Some bikes have mounting points on the fork. The fork is the part that holds the front wheel. The mounting points might be covered with small bolts. Remove these bolts before attaching the rack. Make sure the rack is compatible with your bike’s mounting points. Some racks only work with certain types of mounting points. If you are not sure, ask a bike shop for help. They can help you find the right rack for your bike. Mounting points are essential for attaching accessories to your bike.
How Tight Should I Tighten The Bolts?
Tightening the bolts correctly is very important. If you tighten them too much, you can damage the bolts. You can also damage your bike frame. If you don’t tighten them enough, the bolts might come loose. This can be dangerous. Use a torque wrench to tighten the bolts to the correct torque. The instructions for your rack will tell you the correct torque. If you don’t have a torque wrench, tighten the bolts firmly. But don’t overtighten them. Check the bolts regularly to make sure they are still tight. If they are loose, tighten them again. A properly tightened rack is safe and secure. It will make your rides more enjoyable. Always be careful when tightening bolts on your bike.
How Do I Know If The Rack Is Secure?
There are a few ways to check if the rack is secure. First, try to move the rack with your hands. It should not wobble or move easily. If it does, tighten the bolts more. Make sure the bolts are tightened to the correct torque. Put some weight on the rack. This will test its strength. If the rack sags or bends, it might not be strong enough. Check the mounting points. Make sure they are not damaged. Look for cracks or dents. If you see any damage, replace the rack. Take your bike for a short ride. Listen for any unusual noises. If you hear any noises, stop and check the rack. A secure rack is essential for safe riding. Always check your rack before each ride. This will help prevent accidents.
Common Problems And Solutions
Sometimes, installing a rack mount can be tricky. One common problem is that the bolts don’t fit. This might be because the bolts are the wrong size. Check the instructions to see what size bolts you need. Another problem is that the rack doesn’t fit the bike frame. This might be because the rack is not compatible with your bike. Make sure you get the right rack for your bike. Sometimes, the rack wobbles even after you tighten the bolts. This might be because the mounting points are loose. Tighten the mounting points with a wrench. If you are still having problems, ask a bike shop for help. They can help you troubleshoot the problem. They can also install the rack for you. Don’t get discouraged if you have problems. With a little patience, you can solve them. A properly installed rack is worth the effort.
| Problem | Solution |
|---|---|
| Bolts don’t fit | Check bolt size in instructions |
| Rack doesn’t fit bike | Ensure rack is compatible |
| Rack wobbles | Tighten mounting points |
| Instructions are unclear | Watch online tutorial videos |
| Missing parts | Contact the manufacturer |
- Bolts don’t fit properly.
- Rack doesn’t fit the bike frame.
- Rack wobbles after tightening.
- Instructions are unclear or missing.
- Missing parts in the rack kit.
Many people find the instructions confusing. If you have this problem, try watching a video online. There are many videos that show you how to install a rack mount. If you are missing parts, contact the manufacturer. They might be able to send you the missing parts. Don’t try to use the rack without all the parts. This can be dangerous. If you are not comfortable installing the rack yourself, take it to a bike shop. They can install it for you for a small fee. It’s better to be safe than sorry. A properly installed rack will make your bike rides more enjoyable. It will also make them safer. Don’t give up if you have problems. With a little effort, you can solve them. A rack mount is a great addition to any bike.
Fun Fact or Stat: Some bike shops offer free rack installation with the purchase of a new rack!
What If The Bolts Are Too Short?
Sometimes, the bolts that come with the rack are too short. This can happen if your bike frame is thick. You will need to buy longer bolts. Take the original bolts to a hardware store. Ask for bolts that are the same size but longer. Make sure the new bolts are the correct type. They should be made of steel or aluminum. Don’t use bolts that are made of soft metal. They might break easily. When you install the longer bolts, don’t overtighten them. This can damage the frame. Use a torque wrench to tighten them to the correct torque. If you are not sure what size bolts to get, ask a bike shop for help. They can help you find the right bolts for your rack and bike. Using the correct bolts is essential for a safe installation.
How Do I Adjust The Rack After Installation?
After you install the rack, you might need to adjust it. This is to make sure it is level and secure. Check the rack from the side. It should be parallel to the ground. If it is not, loosen the bolts and adjust the rack. You can also adjust the height of the rack. This is useful if you are carrying tall items. Some racks have adjustable legs. These let you change the height of the rack easily. Make sure the rack is still secure after you adjust it. Tighten the bolts again. Check the rack regularly to make sure it is still level. Vibration from riding can cause the rack to loosen. Adjusting the rack is important for comfort and safety. A properly adjusted rack will make your rides more enjoyable.
What If My Bike Doesn’t Have Mounting Points?
Some bikes don’t have mounting points for racks. This can be a problem if you want to install a rack. There are a few solutions. One option is to use P-clamps. These are metal clamps that attach to the frame. They provide a place to attach the rack. Another option is to use a seatpost rack. This type of rack attaches to the seatpost. It doesn’t require mounting points on the frame. However, seatpost racks are not as strong as frame-mounted racks. A third option is to have a bike shop add mounting points to your frame. This is a more permanent solution. But it can be expensive. Choose the option that works best for you and your bike. If you are not sure, ask a bike shop for help. They can help you find a solution that works.
Maintaining Your Rack Mount
Taking care of your rack mount is important. It helps it last longer. Check the bolts regularly. Make sure they are tight. If they are loose, tighten them with a wrench. Clean the rack regularly. Use soap and water. This removes dirt and grime. Lubricate the bolts. Use a small amount of grease. This prevents them from rusting. Inspect the rack for damage. Look for cracks or dents. If you find any damage, replace the rack. Protect the rack from the weather. Store your bike indoors when possible. This will prevent rust and corrosion. A well-maintained rack will last for many years. It will also perform better. Regular maintenance is essential for safety and performance. A little care goes a long way. Keep your rack in good condition.
- Check the bolts regularly for tightness.
- Clean the rack with soap and water.
- Lubricate the bolts to prevent rust.
- Inspect the rack for any damage.
- Protect the rack from the weather.
If you ride in wet or snowy conditions, clean your rack more often. Salt and road grime can damage the rack. Use a brush to remove dirt from hard-to-reach places. Apply a rust inhibitor to the rack. This will protect it from corrosion. If you notice any rust, remove it with a wire brush. Then, apply a rust inhibitor. Check the rack’s weight limit regularly. Don’t overload the rack. This can damage it. Replace the rack if it is damaged beyond repair. A new rack is a good investment in your safety. Maintaining your rack is easy. It just takes a little time and effort. A well-maintained rack will provide years of reliable service. It will also make your bike rides more enjoyable. Taking care of your rack is a smart choice.
Fun Fact or Stat: Some bike racks come with a built-in lock to help prevent theft of your gear!
How Often Should I Check The Bolts?
Checking the bolts regularly is important. It helps prevent accidents. Check the bolts before each ride. This is especially important if you are carrying heavy loads. If you ride frequently, check the bolts more often. Loose bolts can cause the rack to wobble. This can make your bike unstable. Tighten the bolts with a wrench. Use a torque wrench to tighten them to the correct torque. If you are not sure how tight to tighten the bolts, ask a bike shop for help. They can show you how to do it correctly. Regular bolt checks are essential for safety. Don’t neglect this important task. A quick check can prevent a serious accident.
What Kind Of Lubricant Should I Use?
Lubricating the bolts is important. It prevents them from rusting. Use a light grease or oil. Apply a small amount to the threads of the bolts. This will make them easier to tighten. It will also prevent them from seizing. Don’t use too much lubricant. This can attract dirt and grime. Clean the bolts before applying lubricant. This will remove any dirt or rust. Use a clean cloth to wipe off excess lubricant. There are many different types of lubricants available. Choose one that is designed for bicycles. A good lubricant will protect your bolts from the elements. It will also make them last longer. Lubricating your bolts is a simple task. But it can make a big difference in the performance of your rack.
How Do I Clean A Rusty Rack?
Rust can damage your rack. It can also weaken the metal. Clean rust as soon as you see it. Use a wire brush to remove the rust. Scrub the affected area until the rust is gone. Be careful not to damage the metal. After you remove the rust, clean the area with soap and water. This will remove any residue. Apply a rust inhibitor to the area. This will prevent rust from forming again. There are many different rust inhibitors available. Choose one that is designed for bicycles. Follow the instructions on the rust inhibitor. Some rust inhibitors need to be applied regularly. Cleaning a rusty rack takes some effort. But it is worth it to protect your investment. A clean, rust-free rack will last longer and perform better.
Summary
Learning how to install rack mount for touring bike is easier than it seems. First, choose the right rack for your bike. Make sure it fits your frame and brakes. Gather the tools you need. This includes wrenches, Allen keys, and a torque wrench. Follow the instructions carefully. Attach the rack to the mounting points on your bike. Tighten the bolts securely. Check the rack regularly. Make sure the bolts are tight. Clean the rack and lubricate the bolts. This will help it last longer. If you have any problems, ask a bike shop for help. They can help you install the rack correctly. A properly installed rack makes your rides more enjoyable. It lets you carry more stuff. This is great for long bike trips or even just riding to school.
Conclusion
Installing a rack mount on your touring bike is a great idea. It lets you carry more gear and makes your rides easier. Follow the steps carefully and use the right tools. Check the rack regularly to make sure it’s secure. Now you know how to install rack mount for touring bike. Go out and enjoy your ride with all your gear. A rack mount makes your bike more useful and fun. Enjoy the freedom of carrying everything you need!
Frequently Asked Questions
Question No 1: What kind of bike is best for a rack mount?
Answer: Touring bikes and hybrid bikes are often best. These bikes usually have mounting points. These points let you attach the rack easily. Some mountain bikes can also work. But you need to check for mounting points. Road bikes sometimes don’t have mounting points. You can still use a seatpost rack. But these racks are not as strong. Choose a bike that fits your needs. Make sure it is compatible with the rack you want to use. Think about the weight you will be carrying. A stronger bike is better for heavy loads. A lighter bike is fine for lighter loads. The right bike makes installing a rack much easier and safer. Knowing how to install rack mount for touring bike is important no matter what type of bike you have.
Question No 2: Can I install a rack mount on any bike?
Answer: Not all bikes can have a rack mount installed. It depends on whether the bike has mounting points. Look for small holes on the frame near the rear wheel. These are where the rack attaches. If your bike doesn’t have these holes, it might be harder to install a rack. You can use P-clamps to attach a rack. But this is not as secure. Some bikes have disc brakes. You need a special rack that fits with disc brakes. Check your bike carefully before buying a rack. Make sure it is compatible. If you are not sure, ask a bike shop for help. They can tell you if your bike can have a rack installed. They can also help you choose the right rack. Understanding how to install rack mount for touring bike starts with knowing your bike’s compatibility.
Question No 3: How much weight can a bike rack carry?
Answer: The weight limit of a bike rack varies. It depends on the rack’s design and materials. Most racks can carry between 20 and 50 pounds. Some heavy-duty racks can carry more. Check the rack’s specifications before you load it up. Exceeding the weight limit can damage the rack. It can also make your bike unstable. This is dangerous. Distribute the weight evenly on the rack. This will help keep your bike balanced. A balanced bike is easier to control. It is also safer to ride. Always be aware of the weight you are carrying. This will help you have a safe and enjoyable ride. Following these guidelines helps you learn how to install rack mount for touring bike safely.
Question No 4: What if the rack mount doesn’t fit my bike perfectly?
Answer: Sometimes, the rack mount might not fit perfectly. This can happen if your bike frame is an unusual size. You can try adjusting the rack. Loosen the bolts and move the rack around. See if you can find a better fit. You can also use spacers. These are small pieces of metal or plastic. They fill the gap between the rack and the frame. If you still can’t get a good fit, ask a bike shop for help. They might have a solution. They can also help you choose a different rack. A properly fitted rack is essential for safety. Don’t force the rack to fit. This can damage the rack or your bike frame. Take your time and be patient. A little effort can make a big difference. Understanding how to install rack mount for touring bike includes knowing how to adjust for imperfect fits.
Question No 5: How do I keep my rack mount from rusting?
Answer: Rust can damage your rack mount. To prevent rust, clean the rack regularly. Use soap and water. Dry the rack thoroughly after cleaning. Apply a rust inhibitor to the rack. This will protect it from the elements. Store your bike indoors when possible. This will prevent the rack from getting wet. If you ride in wet conditions, clean the rack more often. Salt and road grime can cause rust. Check the rack regularly for rust. If you see any rust, remove it with a wire brush. Then, apply a rust inhibitor. A little care can go a long way. A rust-free rack will last longer and perform better. Protect your investment by taking good care of your rack. By maintaining it well, you ensure that knowing how to install rack mount for touring bike leads to long-term benefits.
Question No 6: Can I install a front rack on my touring bike?
Answer: Yes, you can install a front rack on your touring bike. Front racks are great for carrying extra gear. They are especially useful for long trips. Make sure your bike has mounting points on the fork. This is where the front rack attaches. Some bikes don’t have these mounting points. You can use P-clamps to attach a front rack. But this is not as secure. Choose a front rack that is designed for touring. These racks are stronger and more durable. Distribute the weight evenly on the front rack. This will help keep your bike balanced. A balanced bike is easier to control. It is also safer to ride. Be careful when turning with a loaded front rack. The extra weight can make it harder to steer. Knowing how to install rack mount for touring bike applies to both front and rear racks.


