
How to Cut Hose to Correct Length: Easy Guide
Cutting a hose to the correct length is easy with the right tools and a few simple steps. First, measure the length you need, then use a sharp utility knife or hose cutter to make a clean cut. Ensure the cut is straight to avoid leaks or kinks. Following these steps will help you get the perfect fit every time.
Ever struggled with a hose that’s too long and gets tangled? Or maybe one that’s too short, making it hard to reach where you need to? Getting the length just right can save you a lot of hassle. It’s a common issue, but don’t worry! With a few simple tools and the right technique, you can easily cut any hose to the perfect length.
In this guide, I’ll show you exactly how to measure, cut, and prepare your hose for any task. We’ll cover the best tools to use, step-by-step instructions, and some handy tips to ensure a clean, leak-free connection. Let’s get started and make your next project a breeze!
Tools and Materials You’ll Need

Before you start, gather these essential tools and materials to make the job easier and more efficient:
- Measuring Tape: For accurate length measurements.
- Utility Knife or Hose Cutter: To make clean, precise cuts.
- Cutting Board or Mat: To protect your work surface.
- Marker or Pen: For marking the cut line.
- Hose Clamps: To secure the hose to fittings.
- Heat Gun or Hair Dryer (Optional): To soften the hose for easier fitting.
- Safety Glasses: To protect your eyes from debris.
- Gloves: To protect your hands.
Step-by-Step Guide to Cutting a Hose

Follow these detailed steps to cut your hose to the perfect length:
Step 1: Measure the Required Length
Accurate measurement is crucial for a perfect fit. Here’s how to do it right:
- Determine the Exact Length: Use a measuring tape to determine the precise length of the hose you need. Consider the path the hose will take and any bends or curves.
- Add Extra Length (If Needed): If the hose needs to bend around corners or connect to fittings, add a bit of extra length to avoid strain. An extra inch or two should be sufficient.
- Mark the Hose: Use a marker or pen to clearly mark the spot where you need to make the cut. Double-check your measurement to ensure accuracy.
Step 2: Prepare Your Workspace
A clean and organized workspace will make the cutting process smoother and safer:
- Choose a Flat Surface: Select a flat, stable surface to work on. A cutting board or mat can protect the surface from scratches.
- Secure the Hose: If possible, secure the hose to the surface using clamps or weights to prevent it from moving during the cut.
- Gather Your Tools: Keep all your tools within easy reach. This will help you maintain focus and work efficiently.
Step 3: Make the Cut
The cutting method depends on the type of hose and the tools you have available:
Using a Utility Knife:
- Extend the Blade: Extend the blade of your utility knife to a suitable length. Ensure the blade is sharp for a clean cut.
- Score the Hose: Place the blade on the marked line and gently score the surface of the hose. Apply even pressure to create a shallow groove.
- Cut Through the Hose: Gradually deepen the cut by making multiple passes along the scored line. Rotate the hose as you cut to ensure a straight, even cut.
- Inspect the Cut: Check the cut to ensure it’s clean and straight. If necessary, trim any rough edges with the knife.
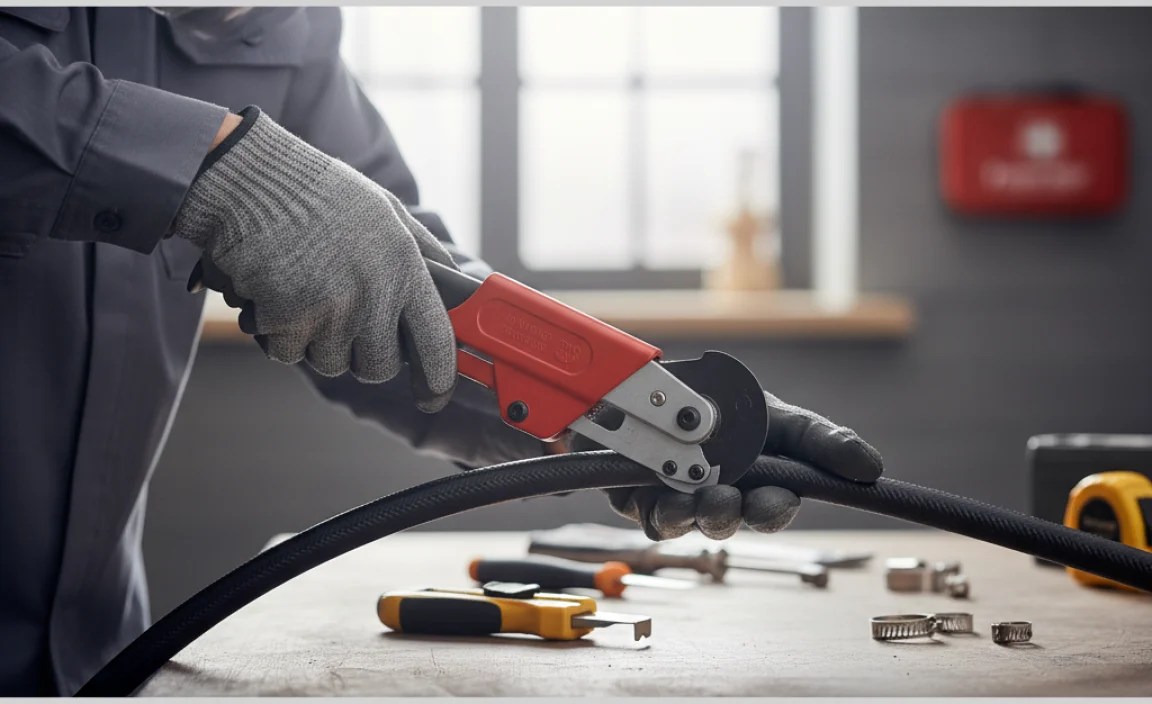
Using a Hose Cutter:
- Open the Cutter: Open the jaws of the hose cutter wide enough to accommodate the hose.
- Position the Hose: Place the hose in the cutter, aligning the blade with the marked line.
- Close the Cutter: Close the cutter firmly, applying even pressure. The blade should slice through the hose in one smooth motion.
- Inspect the Cut: Check the cut to ensure it’s clean and straight. If necessary, trim any rough edges with the knife.
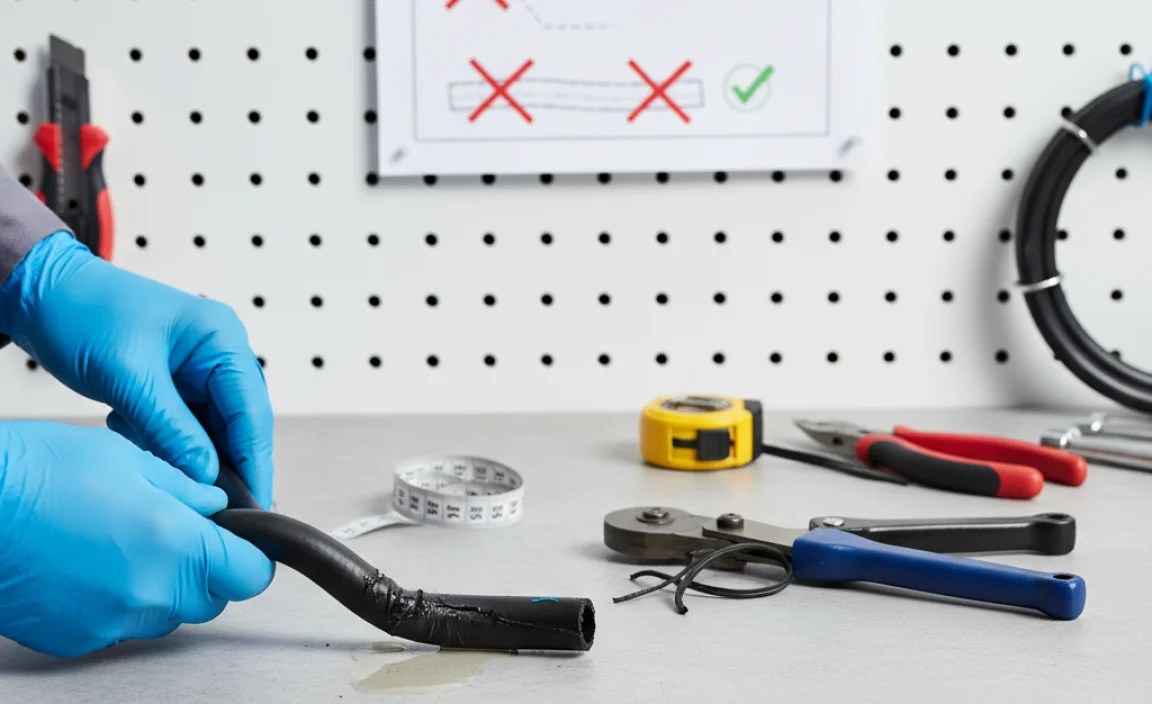
Step 4: Prepare the Cut End
Preparing the cut end ensures a secure and leak-free connection:
- Remove Burrs and Debris: Use a utility knife or deburring tool to remove any burrs or debris from the cut end of the hose.
- Smooth the Edges: Smooth the edges of the cut end with sandpaper or a file to prevent damage to the fitting.
- Soften the Hose (Optional): If the hose is stiff or difficult to fit, use a heat gun or hair dryer to gently warm the end. This will make it more pliable and easier to work with.
Step 5: Attach Fittings and Clamps
Securely attaching fittings and clamps is essential for a reliable connection:
- Insert the Fitting: Insert the fitting into the cut end of the hose. Ensure it’s fully seated and properly aligned.
- Position the Clamp: Place the hose clamp over the hose, positioning it close to the end.
- Tighten the Clamp: Use a screwdriver or wrench to tighten the clamp. Apply even pressure to ensure a secure grip without damaging the hose.
- Test the Connection: After attaching the fitting and clamp, test the connection by gently pulling on the hose. Ensure it’s firmly attached and doesn’t slip.
Tips for Cutting Different Types of Hoses

Different types of hoses may require slightly different techniques. Here are some tips for specific materials:
- Rubber Hoses: These are generally easy to cut with a utility knife or hose cutter. Ensure the blade is sharp for a clean cut.
- PVC Hoses: PVC hoses can be brittle, so use a fine-toothed saw or a specialized PVC cutter to avoid cracking.
- Reinforced Hoses: These hoses have internal reinforcement, making them tougher to cut. Use a sharp utility knife or a hose cutter with a strong blade.
- Silicone Hoses: Silicone hoses are flexible and can be cut with a sharp utility knife or scissors. Ensure the cut is straight to avoid kinks.
Safety Precautions
Safety should always be a priority when working with tools. Keep these precautions in mind:
- Wear Safety Glasses: Protect your eyes from flying debris by wearing safety glasses.
- Use Gloves: Protect your hands from cuts and abrasions by wearing gloves.
- Work in a Well-Lit Area: Ensure your workspace is well-lit to avoid accidents.
- Keep Tools Sharp: Sharp tools are safer than dull ones because they require less force.
- Cut Away from Yourself: When using a knife, always cut away from your body to avoid injury.
- Dispose of Blades Safely: Dispose of used blades in a safe container to prevent accidents.
Troubleshooting Common Issues
Even with careful preparation, you might encounter some issues. Here’s how to troubleshoot them:
- Hose Kinks After Cutting: Ensure the cut is straight and smooth. If the hose still kinks, try using a hose support or bending restrictor.
- Leaks at the Fitting: Check the fitting and clamp for proper alignment and tightness. If the leak persists, try using a sealant or replacing the fitting.
- Difficult to Insert Fitting: Soften the hose end with a heat gun or hair dryer to make it more pliable. You can also use a lubricant to ease insertion.
- Hose Cracks During Cutting: Use a sharper blade or a specialized cutter for the hose material. Avoid applying excessive pressure during the cut.
Best Practices for Hose Maintenance
Proper maintenance can extend the life of your hoses and ensure reliable performance:
- Store Hoses Properly: Store hoses in a cool, dry place away from direct sunlight. Coil them neatly to prevent kinks and tangles.
- Inspect Regularly: Regularly inspect hoses for cracks, leaks, and wear. Replace damaged hoses promptly to avoid failures.
- Clean Hoses Periodically: Clean hoses with mild soap and water to remove dirt and debris. Rinse thoroughly and allow to dry before storing.
- Protect from Extreme Temperatures: Avoid exposing hoses to extreme temperatures, which can cause them to become brittle or lose flexibility.
- Use the Right Hose for the Job: Use hoses that are specifically designed for the intended application. Using the wrong hose can lead to premature failure.
Recommended Tools and Products
Here are some top-rated tools and products that can make hose cutting and maintenance easier:
| Tool/Product | Description | Why It’s Recommended |
|---|---|---|
| Utility Knife | A sharp, durable knife for making precise cuts. | Essential for scoring and cutting various hose materials. |
| Hose Cutter | A specialized tool for cutting hoses quickly and cleanly. | Provides a straight, even cut without damaging the hose. |
| Hose Clamps | Metal clamps for securing hoses to fittings. | Ensures a tight, leak-free connection. |
| Measuring Tape | A retractable tape measure for accurate length measurements. | Crucial for determining the correct hose length. |
| Heat Gun | A tool for softening hose ends for easier fitting. | Makes stiff hoses more pliable and easier to work with. |
| Deburring Tool | A tool for removing burrs and sharp edges from cut hose ends. | Prevents damage to fittings and ensures a smooth connection. |
Understanding Hose Materials and Their Properties
Different hose materials have unique properties that affect their performance and durability. Here’s a quick overview:
| Material | Properties | Common Uses |
|---|---|---|
| Rubber | Flexible, durable, and resistant to abrasion. | Garden hoses, automotive hoses, and industrial hoses. |
| PVC | Lightweight, rigid, and resistant to chemicals. | Irrigation systems, drainage systems, and chemical transfer. |
| Silicone | Flexible, heat-resistant, and non-reactive. | Automotive hoses, medical tubing, and food processing. |
| Polyurethane | Abrasion-resistant, flexible, and durable. | Air hoses, fuel lines, and hydraulic systems. |
| Reinforced Rubber | High-strength, durable, and resistant to pressure. | Hydraulic hoses, air compressor hoses, and high-pressure applications. |
Cost Considerations
The cost of cutting a hose can vary depending on the tools and materials you need. Here’s a breakdown of potential expenses:
- Tools: A utility knife or hose cutter can cost between $10 and $50, depending on the quality and features.
- Hose Clamps: Hose clamps typically cost between $0.50 and $5 each, depending on the size and material.
- Fittings: Fittings can range from $2 to $20 or more, depending on the type and material.
- Hose Material: The cost of the hose itself will depend on the material and length. Rubber hoses can cost between $1 and $5 per foot, while silicone hoses may cost $5 to $15 per foot.
Overall, cutting a hose yourself can be a cost-effective solution compared to buying a pre-cut hose or hiring a professional. Plus, you’ll have the tools on hand for future projects.
Advanced Techniques for Specialized Hoses
For specialized hoses, such as hydraulic or high-pressure hoses, you may need to use advanced techniques and tools:
- Hydraulic Hose Cutting: Use a hydraulic hose cutter to ensure a clean, straight cut. These cutters are designed to handle the high-strength materials used in hydraulic hoses.
- Crimping Fittings: Use a hydraulic hose crimper to securely attach fittings to hydraulic hoses. This tool creates a tight seal that can withstand high pressure.
- Testing the Connection: After crimping the fitting, test the connection using a pressure tester to ensure it can handle the intended pressure.
If you’re working with specialized hoses, it’s best to consult with a professional or refer to the manufacturer’s instructions for specific guidance.
External Resources and Further Reading
For more information on hose cutting and maintenance, check out these helpful resources:
- Occupational Safety and Health Administration (OSHA): Provides safety guidelines for working with tools and equipment.
- The Engineering ToolBox: Offers detailed information on different types of hoses and their applications.
- The Family Handyman: Provides practical tips and advice for home improvement projects, including hose maintenance.
FAQs
- What’s the best tool for cutting a hose?
- A sharp utility knife or a specialized hose cutter works well. For PVC hoses, use a fine-toothed saw to prevent cracking.
- How do I measure the correct hose length?
- Use a measuring tape to determine the exact length needed, considering any bends or curves. Add an extra inch or two for flexibility.
- How do I prevent leaks after cutting a hose?
- Ensure the cut is clean and straight. Remove any burrs and use hose clamps to securely attach fittings.
- Can I use scissors to cut a hose?
- While possible for thin, flexible hoses like silicone, it’s better to use a utility knife or hose cutter for a cleaner, more precise cut.
- What should I do if the fitting is hard to insert after cutting?
- Soften the hose end with a heat gun or hair dryer to make it more pliable. You can also use a lubricant to ease insertion.
- How do I store hoses to prevent damage?
- Store hoses in a cool, dry place away from direct sunlight. Coil them neatly to prevent kinks and tangles.
- What safety precautions should I take when cutting a hose?
- Wear safety glasses and gloves to protect your eyes and hands. Always cut away from your body and use sharp tools carefully.
Conclusion
Cutting a hose to the correct length doesn’t have to be a daunting task. With the right tools, accurate measurements, and a bit of patience, you can achieve a perfect fit every time. Remember to prioritize safety, use the appropriate cutting method for your hose type, and take the time to prepare the cut end for a secure connection. By following these steps and tips, you’ll be well-equipped to handle any hose-cutting project with confidence. Happy DIY-ing!


