
How to Cycle an ABS Pump: A Step-by-Step Guide
Quick Summary: Cycling an ABS (Anti-lock Braking System) pump on your bike helps maintain its functionality and prevents issues caused by inactivity. This involves activating the pump motor to circulate fluid, ensuring proper operation. You’ll need basic tools, protective gear, and a diagnostic scanner if available. The process includes connecting the bike to a power source, initiating the ABS cycle via the scanner or manual methods, and verifying proper function. Regular cycling prevents corrosion and keeps your ABS system in top shape.
Ever wondered why your bike’s ABS seems a bit sluggish, especially after a long period of inactivity? Like any precision component, your ABS pump benefits from regular exercise. When left sitting, the fluid inside can degrade, and the pump itself might become less responsive. Think of it as waking up your bike’s brain! This guide will walk you through the simple steps to cycle your ABS pump, ensuring it stays in tip-top shape. We’ll cover everything from gathering the right tools to understanding what to listen for during the process. So, let’s get started and keep those brakes performing at their best!
Understanding Your Bike’s ABS
Before we dive into the how-to, let’s quickly cover why cycling your ABS pump is important. ABS is designed to prevent wheel lockup during hard braking, allowing you to maintain steering control. The ABS pump is the heart of this system, regulating brake fluid pressure. Regular cycling ensures that all internal components are lubricated and functioning correctly. Neglecting this maintenance can lead to decreased braking performance and potentially costly repairs.
Why Cycle the ABS Pump?
- Prevents Corrosion: Regular fluid circulation helps prevent corrosion within the pump and valve bodies.
- Maintains Responsiveness: Keeps the pump motor and valves responsive for optimal braking performance.
- Extends System Lifespan: Prevents premature wear and tear, extending the lifespan of your ABS.
- Ensures Proper Function: Verifies that the ABS is working correctly, giving you confidence in your bike’s safety systems.
When Should You Cycle the ABS Pump?
Ideally, you should cycle your ABS pump every few months, especially if your bike is stored for extended periods. Here are some key times to consider:
- After Winter Storage: Before your first ride of the season.
- After Long Periods of Inactivity: If the bike hasn’t been ridden for a month or more.
- After Brake Fluid Changes: To ensure the new fluid is properly circulated.
- When Experiencing Brake Issues: If you notice unusual brake behavior, cycling the pump can sometimes resolve minor issues.
Tools and Materials You’ll Need

Gathering the necessary tools and materials beforehand will make the process smoother and more efficient. Here’s a list of what you’ll need:
- Motorcycle Jack or Lift: To safely lift your bike, allowing access to the ABS unit.
- Wrench Set: For accessing and potentially disconnecting components.
- Protective Gear: Gloves and eye protection to handle brake fluid safely.
- Diagnostic Scanner (Recommended): A scanner compatible with your bike’s ABS system can simplify the process.
- Brake Fluid: The correct type for your bike, in case you need to top off the reservoir. Check your owner’s manual.
- Clean Rags: For wiping up any spilled fluid.
- Battery Charger or Tender: To maintain battery voltage during the process.
Safety First: Always wear gloves and eye protection when working with brake fluid, as it can irritate skin and damage your eyes. Work in a well-ventilated area.
Step-by-Step Guide to Cycling Your ABS Pump

Now, let’s get to the heart of the matter. This section provides a detailed, step-by-step guide to cycling your ABS pump. We’ll cover both methods: using a diagnostic scanner and manual cycling.
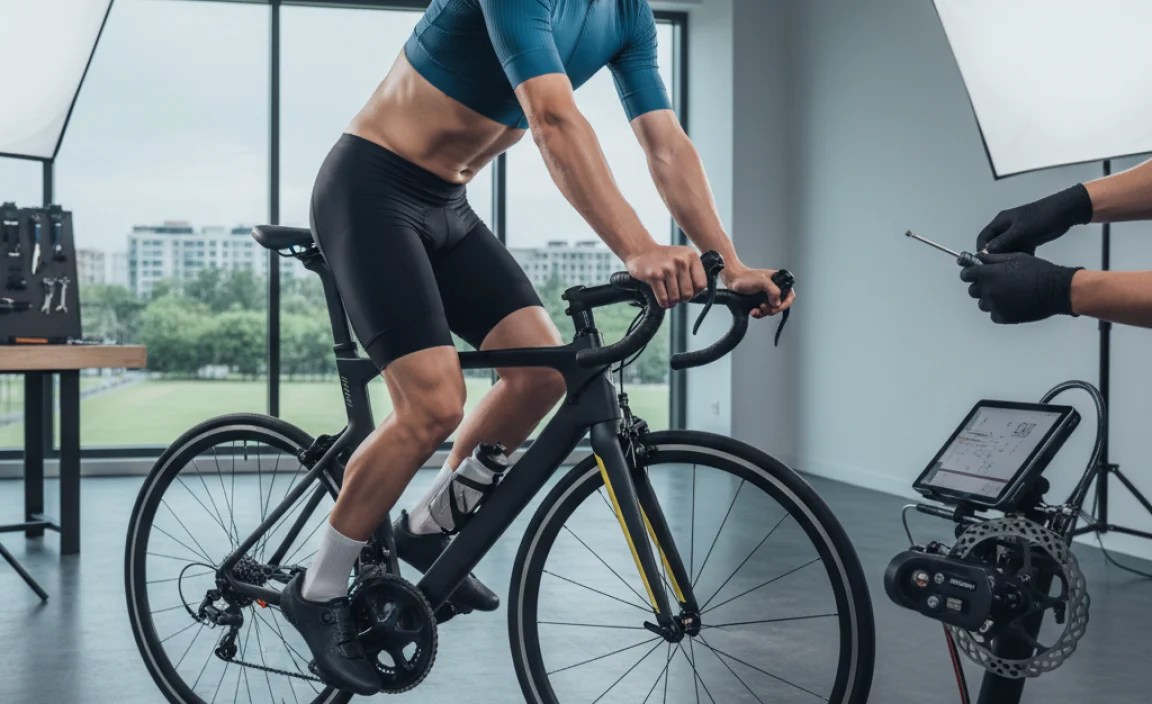
Method 1: Using a Diagnostic Scanner
This method is the most straightforward and recommended if you have access to a compatible diagnostic scanner. The scanner automates the process, making it safer and more efficient.
- Prepare Your Bike:
- Place your bike on a motorcycle jack or lift to ensure it’s stable.
- Connect a battery charger or tender to maintain voltage.
- Locate the diagnostic port on your bike (usually near the battery or under the seat).
- Connect the Scanner:
- Plug the diagnostic scanner into the bike’s diagnostic port.
- Turn on the ignition but do not start the engine.
- Navigate to ABS Functions:
- Follow the scanner’s instructions to navigate to the ABS menu.
- Look for options like “ABS Pump Cycling,” “ABS Bleed,” or “ABS Activation.”
- Initiate the Cycle:
- Select the appropriate function and follow the scanner’s prompts.
- The scanner will activate the ABS pump, cycling the fluid through the system.
- You may hear the pump motor running and feel slight vibrations.
- Monitor and Complete:
- Allow the cycle to complete as directed by the scanner (usually a few minutes).
- Check for any error codes or warnings displayed by the scanner.
- If necessary, repeat the cycle as recommended.
- Disconnect and Verify:
- Turn off the ignition and disconnect the diagnostic scanner.
- Take the bike for a short test ride to verify that the ABS is functioning correctly.
Method 2: Manual Cycling (Without a Scanner)
If you don’t have a diagnostic scanner, you can manually cycle the ABS pump. This method requires a bit more care and attention, but it’s still effective. Note: This method is more complex and may not be suitable for all bikes. Consult your service manual first.
- Prepare Your Bike:
- Place your bike on a motorcycle jack or lift.
- Connect a battery charger or tender.
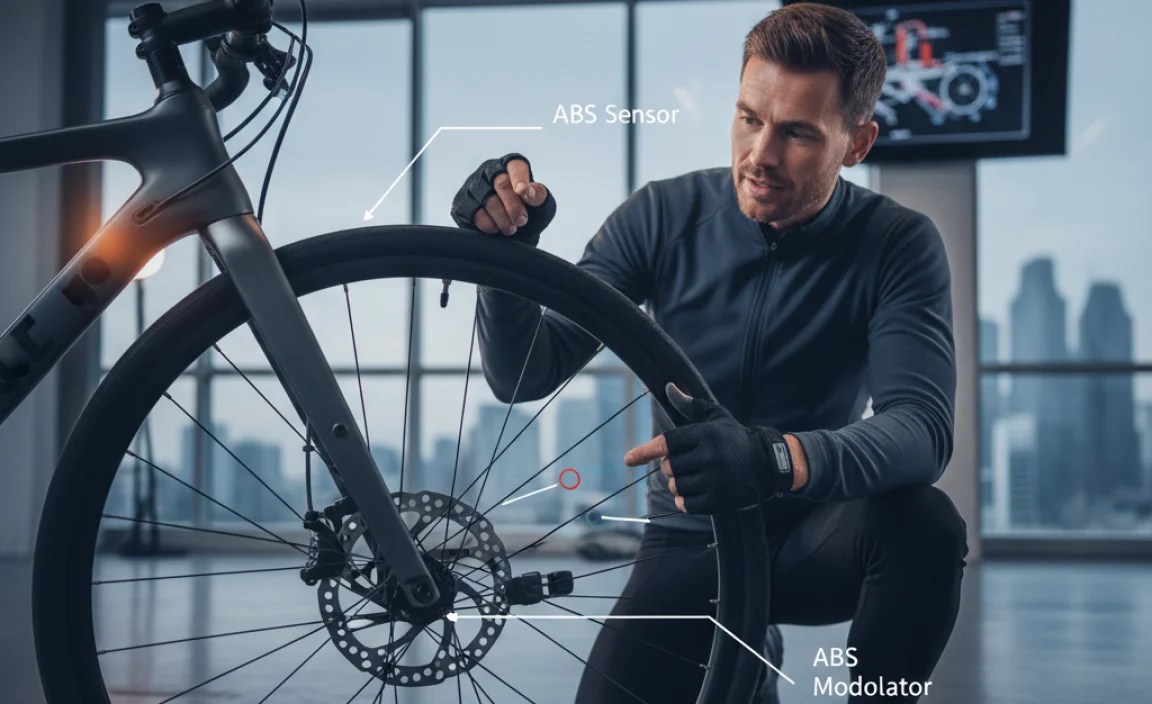
- Locate the ABS modulator unit (usually near the front or rear brakes).
- Access the ABS Connector:
- Locate the electrical connector for the ABS modulator.
- Consult your service manual for the correct pinout diagram.
- Identify Pump Motor Pins:
- Using the pinout diagram, identify the pins that correspond to the ABS pump motor.
- Apply Power Briefly:
- Using jumper wires, briefly apply 12V power to the pump motor pins.
- Important: Apply power in short bursts (1-2 seconds) to avoid overheating the motor.
- Listen for the pump motor running.
- Reverse Polarity (Optional):
- Reverse the polarity of the jumper wires and apply power briefly again.
- This can help dislodge any debris or blockages in the pump.
- Repeat and Verify:
- Repeat the power application process several times, alternating polarity.
- Take the bike for a short test ride to verify ABS function.
- Reassemble and Test:
- Disconnect the jumper wires and reconnect the ABS modulator connector.
- Ensure all connections are secure.
- Take the bike for a test ride, performing hard braking in a safe area to ensure the ABS engages.
Caution: Incorrectly applying power can damage the ABS pump or other electrical components. Always consult your service manual and proceed with caution.
Troubleshooting Common Issues

Sometimes, things don’t go exactly as planned. Here are some common issues you might encounter and how to troubleshoot them:
| Issue | Possible Cause | Solution |
|---|---|---|
| ABS light stays on | Faulty sensor, low brake fluid, or ABS module issue | Check brake fluid level, inspect sensors, or consult a mechanic for module diagnosis. |
| Pump motor doesn’t run | Blown fuse, faulty wiring, or damaged pump motor | Check fuses, inspect wiring for damage, or replace the pump motor. |
| Scanner won’t connect | Incorrect scanner, damaged diagnostic port, or communication error | Verify scanner compatibility, inspect the diagnostic port, or try a different scanner. |
| Weak or inconsistent braking | Air in the brake lines, contaminated brake fluid, or worn brake pads | Bleed the brake lines, flush the brake fluid, or replace the brake pads. |
Tips for Success
- Consult Your Service Manual: Always refer to your bike’s service manual for specific instructions and torque specifications.
- Use Quality Brake Fluid: Use the correct type of brake fluid recommended by the manufacturer.
- Maintain Battery Voltage: Ensure your battery is fully charged to avoid issues during the cycling process.
- Work in a Clean Environment: Keep your work area clean to prevent contamination of brake components.
- Take Your Time: Don’t rush the process. Take your time and pay attention to detail.
Maintaining Your ABS System
Regular maintenance is key to keeping your ABS system in top condition. Here are some tips for maintaining your ABS:
- Regular Brake Fluid Flushes: Brake fluid absorbs moisture over time, which can lead to corrosion and reduced braking performance. Flush the brake fluid every two years or as recommended by the manufacturer.
- Inspect Brake Lines: Check brake lines for cracks, leaks, or damage. Replace any damaged lines immediately.
- Check Brake Pads: Inspect brake pads regularly and replace them when they reach the wear limit.
- Clean ABS Sensors: Keep ABS sensors clean to ensure accurate readings.
- Cycle the ABS Pump: Cycle the ABS pump regularly, as described in this guide.
FAQ: Cycling Your Bike’s ABS Pump
Here are some frequently asked questions about cycling your bike’s ABS pump:
- Q: How often should I cycle my ABS pump?
- A: Ideally, every few months, especially after periods of inactivity or before the riding season.
- Q: Can I damage my ABS system by cycling the pump too often?
- A: Cycling the pump too frequently is unlikely to cause damage, but following a reasonable schedule (every few months) is sufficient.
- Q: Do I need a diagnostic scanner to cycle my ABS pump?
- A: A diagnostic scanner makes the process easier and safer, but you can manually cycle the pump if necessary (consult your service manual).
- Q: What if I hear unusual noises when cycling the pump?
- A: Unusual noises could indicate a problem with the pump. Stop the process and consult a mechanic.
- Q: Can I cycle the ABS pump with the engine running?
- A: No, cycle the ABS pump with the ignition on but the engine off.
How to bleed ABS Module?

- Q: What type of brake fluid should I use?
- A: Use the brake fluid type recommended in your bike’s owner’s manual. Using the wrong type can damage the ABS system.
- Q: Is it necessary to bleed the brakes after cycling the ABS pump?
- A: Bleeding the brakes isn’t always necessary, but it’s a good idea if you suspect air in the lines or if the brake fluid hasn’t been flushed in a while.
Conclusion
Cycling your bike’s ABS pump is a simple yet crucial maintenance task that can significantly improve braking performance and extend the life of your ABS system. Whether you choose to use a diagnostic scanner or manually cycle the pump, following the steps outlined in this guide will help you keep your brakes in top condition. Regular maintenance, combined with attention to detail, ensures a safer and more enjoyable riding experience. So, get those tools ready, consult your service manual, and give your ABS pump the exercise it deserves! Happy riding!
“`


