
Ultimate Pump Gauge Ergonomic Mount: Easier Pumping!
Quick Summary:
Need a better way to see your bike pump’s gauge? An ergonomic mount puts the gauge where you can easily read it while pumping. You can buy mounts designed for specific pumps, or even make your own using simple tools. This guide walks you through choosing the right mount and setting it up for comfortable, accurate inflation every time.
Hey there, Raymond Ammons from BicyclePumper.com here! Ever struggled to read the tiny gauge on your bike pump while trying to inflate your tires? It’s a common problem! Bending over or squinting to see the pressure can be frustrating and even lead to inaccurate readings. This can ruin your ride.
The good news is, there’s a simple solution: an ergonomic pump gauge mount. It lifts and positions the gauge for easy viewing. I’ll show you how to choose the right mount and install it. We will cover DIY options, too! This upgrade makes pumping your tires easier, more accurate, and way more comfortable. Let’s get started!
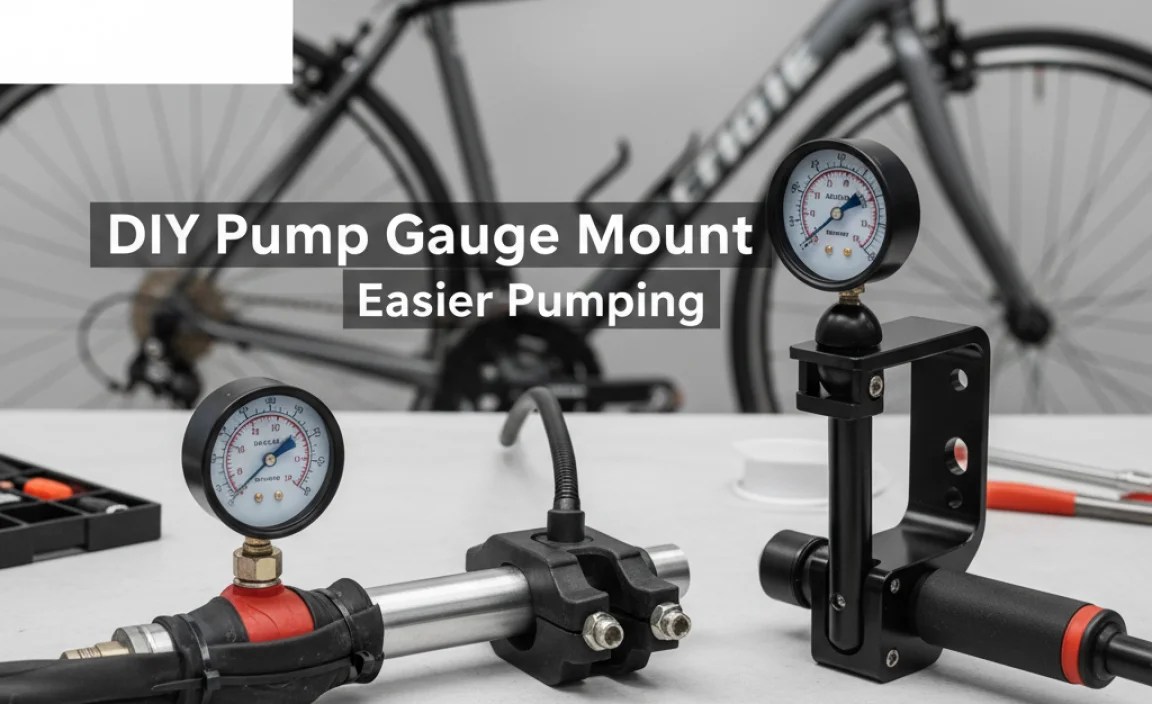
Why You Need an Ergonomic Pump Gauge Mount

Let’s be honest, bike pumps aren’t always designed with ergonomics in mind. Here’s why an ergonomic mount is a game-changer:
- Improved Visibility: Raises the gauge to eye level, eliminating the need to bend over.
- Increased Accuracy: Easier to read the pressure precisely, preventing over or under inflation.
- Enhanced Comfort: Reduces strain on your back and neck.
- Professional Look: Gives your pump a more refined and user-friendly appearance.
Types of Pump Gauge Mounts

You have a few options when it comes to mounting your pump gauge. Here’s a breakdown:
- Integrated Mounts: Some high-end pumps come with built-in ergonomic mounts.
- Aftermarket Mounts: These are designed to attach to existing pumps.
- DIY Mounts: If you’re handy, you can create your own mount using readily available materials.
Integrated Mounts
These are the easiest option, but require purchasing a new pump. Look for features like adjustable angles and sturdy construction.
Aftermarket Mounts
These mounts offer a cost-effective way to upgrade your current pump. They come in various styles, including handlebar mounts and frame mounts.
DIY Mounts
For the resourceful cyclist, a DIY mount can be a fun and rewarding project. We’ll cover some simple DIY options later in this guide.
Choosing the Right Mount

Selecting the right mount depends on your pump type, budget, and desired level of customization. Here are some factors to consider:
- Pump Compatibility: Ensure the mount is compatible with your pump’s gauge size and shape.
- Mounting Location: Decide where you want to position the gauge (handlebar, frame, etc.).
- Adjustability: Look for mounts that allow you to adjust the gauge angle for optimal viewing.
- Material: Choose a durable material like aluminum or high-quality plastic.
- Price: Mounts range in price from a few dollars for DIY options to $50 or more for high-end aftermarket mounts.
Step-by-Step Guide: Installing an Aftermarket Pump Gauge Mount

Let’s walk through the process of installing an aftermarket mount. This assumes you’ve purchased a mount compatible with your pump.
Tools You’ll Need:
- Screwdriver (matching the screws on your pump)
- Allen wrench set (if required by the mount)
- Adjustable wrench (if required)
- Clean rag
Steps:
- Prepare Your Pump: Clean the area around the gauge with a clean rag to remove any dirt or grease.
- Remove the Existing Gauge (If Necessary): Some mounts require removing the original gauge housing. Use a screwdriver or wrench to carefully detach it.
- Attach the Mount: Follow the manufacturer’s instructions to attach the mount to your pump. This usually involves screws or clamps.
- Position the Gauge: Insert the gauge into the mount and adjust the angle for optimal viewing.
- Tighten All Fasteners: Ensure all screws and clamps are securely tightened.
- Test the Setup: Inflate a tire to verify that the gauge is easy to read and the mount is stable.
DIY Pump Gauge Mount Options
If you’re feeling creative, here are a couple of DIY mount ideas:
Option 1: PVC Pipe Mount
This is a simple and inexpensive option using PVC pipe.
Materials:
- Short length of PVC pipe (diameter to fit your gauge)
- PVC end cap
- PVC cement
- Sandpaper
- Paint (optional)
Instructions:
- Cut the PVC Pipe: Cut a section of PVC pipe to the desired length.
- Sand the Edges: Smooth the cut edges with sandpaper.
- Attach the End Cap: Cement the end cap to one end of the PVC pipe.
- Create a Gauge Opening: Drill or cut an opening in the side of the PVC pipe to accommodate your gauge.
- Paint (Optional): Paint the mount to match your pump or bike.
- Attach to Pump: Use zip ties or adhesive to attach the mount to your pump.
Option 2: Metal Bracket Mount
This option uses a metal bracket for a more durable mount.
Materials:
- Metal bracket (available at hardware stores)
- Drill
- Screws
- Washers
- Paint (optional)
Instructions:
- Drill Mounting Holes: Drill holes in the metal bracket to match the mounting points on your pump.
- Attach the Bracket: Use screws and washers to attach the bracket to your pump.
- Create a Gauge Holder: Bend the bracket to create a holder for your gauge.
- Paint (Optional): Paint the mount to prevent rust and improve appearance.
- Secure the Gauge: Use zip ties or adhesive to secure the gauge in the holder.
Troubleshooting Common Issues
Here are some common problems you might encounter and how to solve them:
- Mount Doesn’t Fit: Double-check the compatibility of the mount with your pump before purchasing.
- Gauge is Loose: Tighten all screws and clamps. If the gauge is still loose, use rubber shims to create a snug fit.
- Mount is Unstable: Ensure the mount is securely attached to the pump. Consider using additional adhesive or zip ties for added stability.
- Gauge Angle is Incorrect: Adjust the angle of the gauge until you have a clear view.
Maintaining Your Pump Gauge Mount
To keep your mount in good condition, follow these tips:
- Clean Regularly: Wipe down the mount with a damp cloth to remove dirt and grime.
- Check Fasteners: Periodically check and tighten all screws and clamps.
- Protect from the Elements: If you store your pump outdoors, consider covering it to protect the mount from rust and corrosion.
Benefits of a Properly Mounted Gauge
Let’s recap the advantages of having a well-mounted pump gauge:
- Improved Accuracy: Reading the gauge at eye level minimizes parallax errors.
- Enhanced Safety: Accurate inflation prevents tire blowouts and improves handling.
- Increased Efficiency: Easy gauge reading speeds up the inflation process.
- Greater Enjoyment: A comfortable and efficient pumping experience makes cycling more enjoyable.
Pump Gauge Ergonomic Mount: A Comparison Table
| Feature | Integrated Mount | Aftermarket Mount | DIY Mount |
|---|---|---|---|
| Cost | Higher (requires new pump) | Moderate | Low |
| Ease of Installation | Easiest (built-in) | Easy | Moderate to Difficult |
| Customization | Limited | Moderate | High |
| Durability | High | Moderate to High | Variable |
| Compatibility | Specific to pump model | Check compatibility | Requires modification |
Ergonomic Considerations
Ergonomics is all about designing things to fit the human body. When it comes to your pump gauge, think about these points:
- Eye Level: The gauge should be positioned at or slightly below eye level to minimize neck strain.
- Reach: The gauge should be within easy reach so you don’t have to stretch or strain.
- Angle: The gauge should be angled towards you for optimal viewing.
- Lighting: Ensure there is adequate lighting so you can clearly see the gauge.
Alternative Solutions for Gauge Visibility
Besides ergonomic mounts, here are a few other ways to improve gauge visibility:
- Magnifying Glass: Use a small magnifying glass to enlarge the gauge readings.
- Digital Gauge: Upgrade to a digital gauge with a large, easy-to-read display.
- Pump with Larger Gauge: Consider purchasing a pump with a larger gauge.
The Importance of Accurate Tire Pressure
Maintaining proper tire pressure is crucial for several reasons:
- Performance: Correct pressure optimizes rolling resistance and speed.
- Comfort: Proper inflation absorbs bumps and provides a smoother ride.
- Safety: Accurate pressure prevents blowouts and improves handling.
- Tire Life: Correct pressure reduces wear and tear on your tires.
Consult reputable sources like the tire manufacturer’s recommendations or websites like Continental Tires for guidance on optimal tire pressure.
Recommended Products
Here are a few recommended pump gauge mounts:
- Topeak SmartGauge D2: A popular digital gauge with a rotating head for easy viewing.
- SKS Airchecker: A compact digital gauge with high accuracy.
- Lezyne Digital Pressure Drive: A high-end digital gauge with Bluetooth connectivity.
Safety Tips
Always follow these safety precautions when working with bike pumps and gauges:
- Wear Eye Protection: Protect your eyes from debris.
- Be Careful with Sharp Tools: Use caution when using knives or other sharp objects.
- Don’t Overinflate: Never exceed the maximum pressure rating of your tires.
- Inspect Regularly: Check your pump and gauge for damage before each use.
Pump Gauge Ergonomic Mount: Pros and Cons
| Feature | Pros | Cons |
|---|---|---|
| Improved Visibility | Easier to read the gauge at eye level | May require adjustment for different riders |
| Increased Accuracy | Reduces parallax errors | Accuracy depends on gauge quality |
| Enhanced Comfort | Reduces strain on back and neck | May add bulk to the pump |
| Professional Look | Gives pump a more refined appearance | Aesthetics are subjective |
| Cost | DIY options are inexpensive | High-end mounts can be pricey |
FAQ: Pump Gauge Ergonomic Mounts
Q: What is an ergonomic pump gauge mount?
A: It’s a device that positions your bike pump’s pressure gauge so it’s easier to read, reducing strain on your back and neck.
Q: Why do I need one?
A: It makes inflating your tires more comfortable and accurate, preventing over or under inflation.
Q: Are they hard to install?
A: No, most aftermarket mounts are easy to install with basic tools. DIY options are also available.
Q: Will it work with my pump?
A: Check the mount’s compatibility with your pump’s gauge size and shape before purchasing.
Q: Can I make my own mount?
A: Yes, you can create a DIY mount using materials like PVC pipe or metal brackets.
Q: How much do they cost?
A: Aftermarket mounts range from $10 to $50, while DIY options can cost just a few dollars.
Q: Where should I position the gauge?
A: Position the gauge at or slightly below eye level for optimal viewing and minimal strain.
Conclusion
Adding an ergonomic pump gauge mount to your bike pump is a small upgrade that makes a big difference. It improves accuracy, comfort, and overall enjoyment of your cycling experience. Whether you choose an integrated mount, an aftermarket option, or a DIY solution, you’ll appreciate the benefits of having a gauge that’s easy to read and use. So go ahead, give your pump some love and enjoy a more comfortable and efficient inflation process!


