
Pump for Tubeless Tires: The Easy Inflation Secret
Quick Summary:
Setting up tubeless tires? You’ll need a pump that can deliver a quick burst of air! A pump for tubeless tires needs to seat the tire bead against the rim. Look for a pump that can deliver a high volume of air quickly, like a floor pump with a boost chamber or a dedicated tubeless inflator. Some standard floor pumps work too, but it might take more effort. The right pump makes all the difference!
Tubeless tires are fantastic! They give you a smoother ride, fewer flats, and better grip. But, getting them set up can sometimes be a real headache. The biggest challenge? Seating the tire bead. This means getting the tire edges to pop into place on the rim. It needs a sudden rush of air – more than a standard pump can always provide.
Don’t worry, it’s totally doable! This guide will walk you through choosing the right pump and using it to conquer your tubeless setup. We’ll cover different pump types, techniques, and even troubleshoot common problems. Get ready to ditch those tubes and enjoy the benefits of tubeless!
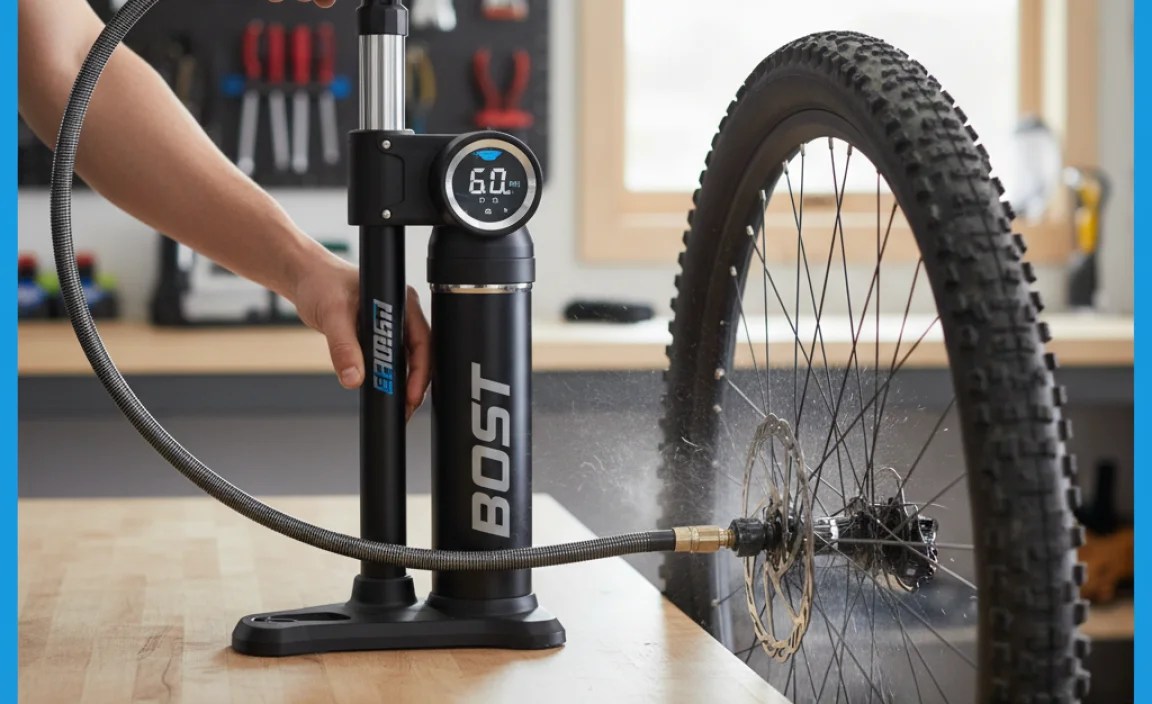
What Makes a Good Tubeless Tire Pump?

Not all pumps are created equal, especially when it comes to tubeless tires. Here’s what to look for in a pump that will make your life easier:
High Volume Air Delivery
This is the most important factor. Tubeless tires need a large volume of air, delivered quickly, to push the tire bead onto the rim. Pumps designed for tubeless setups excel at this.
Boost Chamber or Charge Tank
Many tubeless-specific pumps have a boost chamber or charge tank. This feature allows you to pre-charge the pump with air and then release it all at once for that crucial initial inflation.
Compatibility with Presta and Schrader Valves
Most high-quality pumps will work with both Presta and Schrader valves. Make sure the pump head is easy to switch between the two, or that it automatically adjusts.
Stable Base and Durable Construction
A stable base is essential for a floor pump. You’ll be putting a lot of force into it, so you want it to stay put. Durable construction ensures the pump will last for years.
Accurate Pressure Gauge
An accurate gauge helps you inflate your tires to the correct pressure. Look for a gauge that is easy to read and has clear markings.
Types of Pumps for Tubeless Tires

Let’s explore the different types of pumps that can handle tubeless tires:
Floor Pumps with Boost Chamber
These are standard floor pumps with an added boost chamber. You pump air into the chamber, then release it quickly into the tire. They are a great all-around option.
Pros:
- Versatile – can be used for regular tire inflation as well.
- Relatively affordable.
- Easy to use.
Cons:
- May require more effort than dedicated tubeless inflators.
- Boost chamber may not be powerful enough for some stubborn tires.
Dedicated Tubeless Inflators (Charge Tanks)
These pumps are specifically designed for tubeless tires. They have a large charge tank that you fill with air using a regular pump or compressor. Then, you release the air all at once for a powerful burst.
Pros:
- Most effective for seating stubborn tubeless tires.
- Provides a very high volume of air quickly.
Cons:
- More expensive than floor pumps.
- Only useful for tubeless tire inflation.
- Requires a separate pump or compressor to fill the tank.
Standard Floor Pumps
Believe it or not, some standard floor pumps can work for tubeless tires, especially if you have a good technique and the tire and rim are a good match.
Pros:
- You probably already have one!
- No extra cost.
Cons:
- Often requires a lot of effort and multiple attempts.
- May not work for all tubeless setups.
- Can be frustrating.
CO2 Inflators
CO2 inflators use cartridges of compressed carbon dioxide to inflate tires quickly. While they can seat a tubeless tire in a pinch, they aren’t the best long-term solution.
Pros:
- Very fast inflation.
- Portable and lightweight.
Cons:
- Expensive to use regularly (requires buying cartridges).
- Can be wasteful.
- CO2 can cause pressure fluctuations in the tire.
| Pump Type | Pros | Cons | Best For |
|---|---|---|---|
| Floor Pump with Boost Chamber | Versatile, Affordable, Easy to Use | May require more effort, Not always powerful enough | General use and occasional tubeless setup |
| Dedicated Tubeless Inflator | Most effective, High volume of air | Expensive, Only for tubeless, Requires separate pump | Frequent tubeless setup, Stubborn tires |
| Standard Floor Pump | No extra cost | Requires effort, May not always work, Can be frustrating | Simple tubeless setups when you don’t want to buy a new pump |
| CO2 Inflator | Very fast, Portable | Expensive, Wasteful, Pressure fluctuations | Emergency use only |
Step-by-Step Guide: Using a Floor Pump with Boost Chamber
Let’s walk through how to use a floor pump with a boost chamber to set up your tubeless tires:
Step 1: Prepare Your Wheel and Tire
- Make sure your rim is taped properly with tubeless tape. Overlap the tape by a few inches at the valve hole. A good resource for this is your rim manufacturer’s website.
- Install a tubeless valve. Tighten the valve nut snugly, but don’t overtighten.
- Mount one side of the tire onto the rim.
Step 2: Add Tubeless Sealant
- Pour the recommended amount of tubeless sealant into the tire. Check the sealant manufacturer’s instructions for the correct amount.
- Mount the second side of the tire onto the rim. This can be tricky – use tire levers if needed, but be careful not to pinch the tube.
Step 3: Position the Tire
- Make sure the tire bead is seated evenly around the rim.
- Check that the tire is not pinched or twisted anywhere.
Step 4: Connect the Pump
- Attach the pump head to the valve. Make sure it’s securely connected.
- If your pump has a Presta/Schrader selector, make sure it’s set to the correct valve type.
Step 5: Charge the Boost Chamber
- Close the valve to the tire and start pumping to charge the boost chamber.
- Most pumps have a gauge to indicate when the chamber is full.
Step 6: Release the Air
- Open the valve to release the air from the boost chamber into the tire.
- You should hear a loud “pop” as the tire bead seats onto the rim.
Step 7: Inflate to the Correct Pressure
- Once the tire is seated, disconnect the boost chamber (if applicable) and use the pump to inflate the tire to your desired pressure.
- Check the tire sidewall for the recommended pressure range.
Step 8: Check for Leaks
- Listen for any air leaks around the rim.
- If you find a leak, try shaking the wheel to distribute the sealant. You can also try inflating the tire to a higher pressure (within the recommended range) to help seal the leak.
Troubleshooting Tubeless Tire Setup

Sometimes, things don’t go as planned. Here are some common problems and how to fix them:
Tire Won’t Seat
- Problem: The tire bead won’t pop onto the rim, even with the boost chamber.
- Solution:
- Make sure the tire bead is centered in the rim channel.
- Use soapy water on the tire bead to help it slide onto the rim.
- Try a more powerful pump or a dedicated tubeless inflator.
- Remove the valve core for maximum airflow (be prepared for sealant to spray out!).
Air Leaks Around the Rim
- Problem: Air is leaking between the tire bead and the rim.
- Solution:
- Shake the wheel to distribute the sealant to the leak area.
- Inflate the tire to a higher pressure (within the recommended range).
- If the leak persists, you may need to add more sealant or re-tape the rim.
Valve Leaks
- Problem: Air is leaking from the valve.
- Solution:
- Make sure the valve nut is tightened securely.
- Check the valve core for damage. Replace if necessary.
- Ensure the tubeless tape is properly sealed around the valve hole.
Sealant喷出
- Problem: Sealant is spraying out of the tire during inflation.
- Solution:
- This is normal in small amounts. Wipe away excess sealant.
- If a large amount of sealant is spraying out, check for a puncture or a poor seal between the tire and rim.
Tips for Easier Tubeless Setup

Here are some extra tips to make your tubeless setup experience smoother:
- Use fresh sealant: Sealant dries out over time, so use a fresh bottle for best results.
- Clean your rims: Make sure your rims are clean and free of debris before taping.
- Use the right tape: Use tubeless-specific tape that is the correct width for your rims. For example, Stan’s NoTubes sells a variety of tape widths.
- Practice: Tubeless setup gets easier with practice. Don’t be discouraged if it takes a few tries to get it right.
- Watch videos: There are many helpful videos online that demonstrate tubeless setup techniques.
Maintaining Your Tubeless Setup
Once your tubeless tires are set up, you’ll need to maintain them to keep them performing their best:
Check Tire Pressure Regularly
Use a reliable tire pressure gauge to check your tire pressure before each ride. Adjust as needed based on your weight, riding conditions, and preferences.
Top Off Sealant
Tubeless sealant dries out over time, so you’ll need to top it off periodically. How often you need to do this depends on the sealant you use and your riding conditions. Check the sealant manufacturer’s instructions.
You can usually add sealant through the valve stem using a sealant injector. Remove the valve core first.
Inspect Tires Regularly
Check your tires for cuts, punctures, and wear. Replace your tires when they are worn or damaged.
Recommended Pumps for Tubeless Tires
Here are a few highly-rated pumps that are great for tubeless tire setup:
- Bontrager TLR Flash Charger Floor Pump: A popular floor pump with a boost chamber.
- Topeak JoeBlow Booster Pump: Another excellent floor pump with a boost chamber.
- Airshot Tubeless Inflator: A dedicated tubeless inflator that is easy to use and very effective.
FAQ About Pumps for Tubeless Tires
Here are some frequently asked questions about pumps for tubeless tires:
Can I use a regular floor pump for tubeless tires?
Sometimes, yes. It depends on the tire and rim combination. A standard floor pump may work if the tire bead seats easily. But, a pump with a boost chamber or a dedicated tubeless inflator is usually more effective.
What is a boost chamber?
A boost chamber is a feature on some floor pumps that allows you to pre-charge a chamber with air and then release it all at once. This provides a high-volume burst of air that is helpful for seating tubeless tire beads.
How much sealant should I use in my tubeless tires?
The amount of sealant you need depends on the tire size and the sealant manufacturer’s recommendations. Check the sealant bottle for instructions. A good starting point is typically 2-3 ounces for a mountain bike tire and 1-2 ounces for a road bike tire.
Can I use CO2 cartridges to inflate tubeless tires?
Yes, you can use CO2 cartridges to inflate tubeless tires in an emergency. However, CO2 can cause pressure fluctuations and may not be the best long-term solution. It’s better to use a pump whenever possible.
What if my tubeless tire keeps losing air?
If your tubeless tire keeps losing air, check for leaks around the rim and valve. Shake the wheel to distribute the sealant. You may need to add more sealant or re-tape the rim. Also, inspect the tire for punctures.
Do I need special tools to set up tubeless tires?
Besides a suitable pump, you’ll need tubeless tape, tubeless valves, sealant, and possibly tire levers. A sealant injector can also be helpful for adding sealant through the valve stem.
How often should I replace my tubeless sealant?
You should replace your tubeless sealant every 3-6 months, depending on the sealant type and your riding conditions. Sealant dries out over time, so regular replacement ensures it remains effective at sealing punctures.
Conclusion
Setting up tubeless tires can seem daunting at first, but with the right pump and a little practice, it’s totally achievable! Choosing the right pump for tubeless tires, like a floor pump with a boost chamber or a dedicated tubeless inflator, will make the process much easier. Follow the steps outlined in this guide, troubleshoot any problems you encounter, and you’ll be enjoying the benefits of tubeless tires in no time. Happy riding!


