
Water Pump Floor: Ultimate Protection Guide
Did you ever see a big puddle after it rained? Where did all that water come from? Sometimes, water can come from inside your house. A broken water pump can make a big mess on your floor. This can cause problems if you are not careful.
Water pumps are helpful, but they can leak. If the water pump floor is not protected, it can get damaged. Let’s learn how to keep our floors safe from leaky water pumps! We will learn easy ways to fix problems.
Key Takeaways
- Protecting your water pump floor prevents costly damage from leaks and spills.
- Regular checks of your water pump can catch small leaks before they become big floods.
- Using a water pump drip tray helps contain any water that might escape.
- Sealing the floor around your water pump can stop water from soaking into the concrete.
- Knowing what to do when a leak happens can save you time and money.
Understanding Your Water Pump Floor

Your water pump floor is the area around your water pump. It is usually made of concrete. Sometimes, it might have tiles or a special coating. The floor is important because it supports the water pump. It also protects your house from water damage. When a water pump leaks, the floor can get wet. Over time, this can cause the floor to crack. Water can also seep into the walls. This can lead to mold and other problems. Protecting your water pump floor is important for keeping your home safe and dry. You can use mats or trays to catch water. You can also seal the floor to keep water out. Regular checks and quick fixes can prevent big problems. By taking care of your water pump floor, you are taking care of your home.
- Check your water pump often for leaks.
- Use a mat to protect the floor.
- Clean up spills right away.
- Seal the floor to keep water out.
- Make sure the area is dry.
The water pump floor is more important than you might think. It is the first line of defense against water damage from a leaky pump. Imagine the floor as a shield. It protects your home’s foundation and walls. A strong, well-maintained floor can save you from costly repairs. Ignoring the water pump floor can lead to bigger problems. These can include structural damage and mold growth. Taking simple steps to protect it is a smart idea. It keeps your home safe and dry. Remember, a little care goes a long way in preventing water damage.
Why is the Floor Important?
Have you ever built a tower with blocks? What happens if the bottom blocks are wobbly? The whole tower can fall! The floor under your water pump is like those bottom blocks. It needs to be strong and steady. If the floor is cracked or weak, the pump might not work right. A damaged floor can also let water seep into your house. This can cause mold and other problems. So, a good floor is super important for keeping your water pump working well and your house safe. Think of it as a superhero protecting your home from water damage! Make sure your water pump floor is in good shape.
What Happens if the Floor is Damaged?
Imagine you spill juice on the floor. If you don’t clean it up, it gets sticky. A leaky water pump is like that juice. If water sits on the floor, it can cause damage. The floor might crack or get stained. Water can also seep into the walls. This can cause mold to grow. Mold is not good for your health. It can make you cough or sneeze. So, a damaged floor can lead to more problems than just a wet spot. It can affect your health and the safety of your home. Always check for leaks and fix them fast.
How Can You Protect the Floor?
Think about wearing a raincoat when it rains. It keeps you dry! You can also give your water pump floor a “raincoat.” This raincoat is a special coating that keeps water out. You can also use a mat or tray under the water pump. This will catch any drips. Checking the pump often is also a good idea. If you see a leak, fix it right away. These simple steps can help protect your water pump floor. They keep your home safe and dry. Protecting your floor is like being a superhero for your house!
Fun Fact or Stat: Did you know that a small water leak can waste up to 200 gallons of water per day? That’s like filling up a whole swimming pool!
Checking for Leaks Around the Pump Floor

Checking for leaks around your water pump floor is very important. It helps you find problems early. Early fixes can prevent big damage. Look for wet spots around the pump. Check for drips or puddles. Feel the floor to see if it is damp. Look for signs of rust or corrosion on the pump. These can mean there is a leak. Listen for dripping sounds. Sometimes, you can hear a leak before you see it. Check the pipes connected to the pump. Make sure they are not loose or cracked. Regular checks can save you money. They can also keep your home safe from water damage. Make it a habit to check your water pump floor often.
- Look for wet spots on the floor.
- Check for drips and puddles.
- Feel the floor for dampness.
- Listen for dripping sounds.
- Check the pipes for cracks.
- Look for rust or corrosion.
Imagine you are a detective. Your mission is to find any clues that show a leak. Wet spots, drips, and puddles are all clues. Rust and corrosion are also important clues. Use your senses to find these clues. Look carefully, feel the floor, and listen for drips. If you find any clues, don’t ignore them. Take action right away. Fix the leak or call a professional. Being a water leak detective can save your home from serious damage. Regular checks are key to keeping your water pump floor dry and safe.
What Tools Do You Need to Check for Leaks?
Imagine you are going on a treasure hunt. You need special tools to find the treasure. Checking for leaks also needs some tools. A flashlight helps you see in dark places. A dry cloth helps you feel for dampness. A small mirror helps you see behind the pump. These tools can help you find leaks that you might miss. You don’t need fancy tools. Just a few simple things can make a big difference. So, grab your tools and start your leak treasure hunt! Finding leaks early can save you from big problems.
How Often Should You Check for Leaks?
Think about brushing your teeth. You do it every day to keep your teeth healthy. Checking for leaks should also be a regular habit. Check your water pump floor at least once a month. If you have had problems before, check it more often. After a big storm, check for leaks right away. Regular checks help you catch problems early. This can save you from costly repairs. Make it a part of your home care routine. Your house will thank you for it!
What Do You Do If You Find a Leak?
Imagine you see a fire. You wouldn’t just stand there, would you? You would take action! Finding a water leak is the same. First, turn off the water pump. This will stop more water from leaking. Then, clean up the water to prevent damage. If it’s a small leak, you might be able to fix it yourself. If it’s a big leak, call a plumber. A plumber is a water expert. They can fix the leak quickly and safely. Taking action fast can prevent big problems. Don’t wait, fix that leak!
Fun Fact or Stat: A dripping faucet can waste up to 3,000 gallons of water per year. That’s enough water to fill a small swimming pool!
Using Water Pump Drip Trays
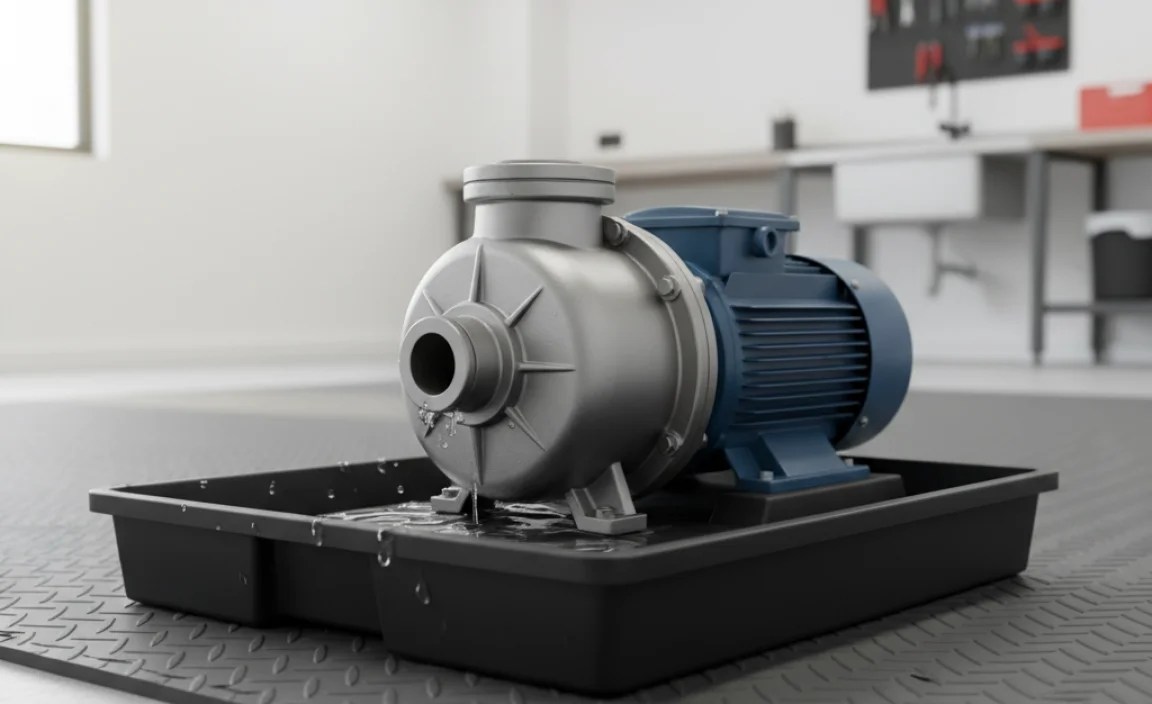
Water pump drip trays are like safety nets for your water pump floor. They catch any water that drips from the pump. This keeps the floor dry and prevents damage. Drip trays are usually made of plastic or metal. They come in different sizes to fit different pumps. To use a drip tray, simply place it under the water pump. Make sure it is positioned to catch any drips. Check the drip tray regularly. Empty it if it has water in it. Clean the drip tray to prevent mold growth. Using a drip tray is a simple way to protect your water pump floor. It can save you from costly repairs in the future. Think of it as a small investment that protects your home.
- Place the drip tray under the pump.
- Make sure it catches all drips.
- Check the tray regularly.
- Empty the tray when needed.
- Clean the tray to prevent mold.
- Use the right size tray for your pump.
Think of a drip tray as a little pool for leaky water. It’s like having a tiny swimming pool under your water pump. Any water that escapes the pump lands in the tray. This keeps your floor dry and safe. Drip trays are easy to use. Just slide one under your pump. Make sure it fits well. Check it now and then. If you see water, empty it. A drip tray is a simple way to protect your home. It’s a small thing that can make a big difference. Keep your water pump floor safe with a drip tray!
What are Drip Trays Made Of?
Imagine you are building a house. You need different materials for different parts. Drip trays are also made of different materials. Some are made of plastic. Plastic is light and easy to clean. Others are made of metal. Metal is strong and lasts a long time. The best material depends on your needs. If you want something light and cheap, choose plastic. If you want something strong and durable, choose metal. No matter what you choose, a drip tray will protect your floor.
How Do You Choose the Right Size Drip Tray?
Think about buying shoes. You need to choose the right size so they fit. Drip trays are the same. You need to choose the right size for your water pump. Measure the base of your pump. Choose a drip tray that is a little bigger. This will make sure it catches all the drips. A drip tray that is too small won’t work. A drip tray that is too big will take up too much space. So, measure carefully and choose the right size. Your floor will thank you for it!
How Do You Clean a Drip Tray?
Imagine you are washing dishes. You need to clean them to keep them from getting dirty. Drip trays also need to be cleaned. Over time, they can get dirty and moldy. To clean a drip tray, remove it from under the water pump. Wash it with soap and water. Rinse it well and let it dry. You can also use a disinfectant to kill mold. Clean your drip tray regularly to keep it working well. A clean drip tray is a happy drip tray!
Fun Fact or Stat: Drip trays can also be used under washing machines, water heaters, and other appliances that use water.
Sealing the Floor Around the Water Pump

Sealing the floor around your water pump is like giving it a waterproof shield. It prevents water from soaking into the concrete. This can prevent cracks and other damage. Sealing also helps prevent mold growth. Mold can be bad for your health. To seal the floor, you need a special sealant. You can buy sealant at a hardware store. Clean the floor before you apply the sealant. Follow the instructions on the sealant container. Apply the sealant evenly. Let it dry completely before using the water pump. Sealing the floor is a great way to protect it from water damage. It’s like giving your floor a long-lasting raincoat.
- Clean the floor before sealing.
- Use a special floor sealant.
- Apply the sealant evenly.
- Let the sealant dry completely.
- Follow the instructions on the container.
- Reapply sealant every few years.
Think of your water pump floor as a sponge. If you spill water on a sponge, it soaks it up. Concrete is like a sponge too. It can soak up water if it’s not sealed. Sealing the floor is like making the sponge waterproof. The water can’t soak in. It just sits on top. This protects the concrete from damage. Sealing is a simple way to keep your floor strong and dry. It’s like giving your floor a superpower against water!
What Kind of Sealant Should You Use?
Imagine you are painting a picture. You need to choose the right kind of paint. Sealing your water pump floor is the same. You need to choose the right kind of sealant. Some sealants are made for concrete. Others are made for tile. Read the labels carefully. Choose a sealant that is waterproof. It should also be resistant to chemicals. Ask someone at the hardware store for help. They can help you choose the right sealant for your needs. The right sealant will protect your floor for years to come.
How Do You Prepare the Floor for Sealing?
Think about washing your car. You need to clean it before you wax it. Sealing your water pump floor is the same. You need to clean it before you seal it. Remove any dirt, dust, and debris. Use a brush and soap to clean the floor. Rinse it well and let it dry completely. If there are any cracks, fill them with concrete patch. A clean and smooth floor will help the sealant stick better. This will give you the best protection against water damage.
How Often Should You Reseal the Floor?
Imagine you are mowing your lawn. You need to do it regularly to keep it looking nice. Resealing your water pump floor is the same. You need to do it every few years to keep it protected. The sealant will wear down over time. Water can start to seep in again. Check the sealant regularly. If you see any cracks or peeling, it’s time to reseal. Resealing will keep your floor strong and dry for years to come. It’s a small job that can prevent big problems.
Fun Fact or Stat: Sealing your concrete floor can increase its lifespan by up to 25 years!
Repairing Cracks in the Pump Floor

Cracks in your water pump floor can be a big problem. They can let water seep in and cause more damage. Repairing cracks is important to protect your home. First, clean the crack. Remove any loose debris. You can use a brush or a vacuum. Then, fill the crack with concrete patch. You can buy concrete patch at a hardware store. Follow the instructions on the container. Smooth the patch with a trowel. Let it dry completely. Sealing the repaired crack can add extra protection. Repairing cracks is a simple way to keep your floor strong and dry.
| Repair Step | Description | Tools/Materials |
|---|---|---|
| 1. Clean the Crack | Remove loose debris and dirt from the crack. | Brush, vacuum cleaner |
| 2. Apply Concrete Patch | Fill the crack with concrete patch compound. | Concrete patch, trowel |
| 3. Smooth the Surface | Use a trowel to smooth the patch and make it even. | Trowel |
| 4. Let it Dry | Allow the patch to dry completely as per instructions. | Time |
| 5. Seal the Repair | Seal the repaired crack for extra protection. | Sealant |
- Clean the crack thoroughly.
- Use concrete patch to fill it.
- Smooth the patch with a trowel.
- Let the patch dry completely.
- Seal the repaired crack.
- Check the repair regularly.
Think of cracks in your water pump floor as little doorways for water. Water can sneak in through these doorways and cause trouble. Repairing the cracks is like closing those doorways. You’re blocking the water from getting in. This protects your floor from further damage. It also helps prevent mold growth. Repairing cracks is a simple way to keep your home safe and dry. It’s like being a superhero for your floor!
What Causes Cracks in the Floor?
Imagine you are bending a paperclip back and forth. It will eventually break, right? Concrete is similar. Over time, it can get stressed and crack. This can happen because of changes in temperature. It can also happen because of the weight of the water pump. Water can also seep into the concrete and freeze. This can cause the concrete to expand and crack. Knowing what causes cracks can help you prevent them. Take care of your water pump floor and it will last longer.
Can You Repair Cracks Yourself?
Think about fixing a small tear in your clothes. You can probably do it yourself with a needle and thread. Repairing small cracks in your water pump floor is similar. You can often do it yourself with concrete patch. But, if the cracks are big or there are many of them, it’s best to call a professional. A professional has the tools and experience to fix the cracks properly. They can also identify the cause of the cracks and prevent them from coming back. Know your limits and don’t be afraid to ask for help.
How Do You Prevent Cracks from Coming Back?
Imagine you are planting a tree. You need to give it the right conditions to grow strong. Preventing cracks in your water pump floor is similar. You need to give it the right conditions to stay strong. Make sure the floor is properly sealed. This will prevent water from seeping in. Avoid putting heavy objects on the floor. This can cause stress and cracks. Repair any cracks as soon as you see them. These simple steps can help prevent cracks from coming back.
Fun Fact or Stat: Concrete is one of the most widely used building materials in the world!
Cleaning Up Spills on the Pump Floor
Cleaning up spills on your water pump floor is very important. Spills can cause stains and damage if you leave them. Always clean up spills right away. Use a cloth or mop to soak up the water. You can use soap and water to clean the floor. Rinse the floor well and let it dry. If the spill is oily, use a degreaser to clean it. A degreaser is a special cleaner for oily messes. Always wear gloves when using a degreaser. Cleaning up spills quickly can prevent stains and damage. It also helps prevent mold growth. Make it a habit to clean up spills on your water pump floor right away.
- Clean up spills immediately.
- Use a cloth or mop to soak up water.
- Use soap and water to clean the floor.
- Rinse the floor well.
- Use a degreaser for oily spills.
- Wear gloves when using a degreaser.
Think of spills on your water pump floor as little monsters. They can cause all sorts of problems if you don’t take care of them. They can stain the floor, damage the concrete, and even cause mold to grow. Cleaning up spills is like fighting those little monsters. You’re stopping them from causing any more trouble. So, grab your cleaning supplies and get ready to fight those spills! Cleaning up spills quickly is the best way to protect your floor.
What Kind of Cleaning Supplies Should You Use?
Imagine you are going to paint a picture. You need to choose the right kind of brushes and paints. Cleaning spills is the same. You need to choose the right kind of cleaning supplies. For water spills, use a cloth or mop. For oily spills, use a degreaser. You might also need soap, water, and a bucket. Always wear gloves to protect your hands. Using the right cleaning supplies will make the job easier and more effective.
How Do You Clean Up Oily Spills?
Think about washing greasy dishes. You need special soap to cut through the grease. Cleaning up oily spills is the same. You need a degreaser to break down the oil. Apply the degreaser to the spill. Let it sit for a few minutes. Then, scrub the floor with a brush. Rinse the floor well with water. Repeat if necessary. Oily spills can be tough to clean, but a degreaser will do the trick.
How Do You Prevent Stains from Spills?
Imagine you are wearing a white shirt. You want to avoid getting stains on it, right? Preventing stains on your water pump floor is similar. Clean up spills immediately. The longer the spill sits, the more likely it is to stain. Use a good quality sealant on the floor. This will help prevent spills from soaking in. You can also use mats to protect the floor from spills. Taking these steps can help prevent stains and keep your floor looking its best.
Fun Fact or Stat: Some cleaning products can damage concrete. Always test a small area first before using a new cleaner.
Improving Ventilation Around the Pump Floor
Improving ventilation around your water pump floor is important for several reasons. Good ventilation helps to dry out any moisture that might be present. This can prevent mold growth and protect the floor from damage. Ventilation also helps to dissipate any fumes or odors that might be coming from the water pump. To improve ventilation, you can open windows or doors. You can also use a fan to circulate the air. Make sure the area around the pump is not cluttered. This will allow air to flow freely. Good ventilation is a simple way to keep your water pump floor dry, clean, and safe.
- Open windows or doors for airflow.
- Use a fan to circulate the air.
- Keep the area uncluttered.
- Check for mold growth regularly.
- Ensure proper air circulation.
- Install a vent if needed.
Think of your water pump floor as a plant. Plants need fresh air to grow strong. Your floor also needs fresh air to stay healthy. Good ventilation is like giving your floor a breath of fresh air. It helps to prevent mold growth and keep the floor dry. Improving ventilation is a simple way to protect your investment. It’s like giving your floor a little extra love.
Why is Ventilation Important?
Imagine you are in a stuffy room with no windows. It can get uncomfortable and you might start to feel sick. Poor ventilation can also cause problems for your water pump floor. It can lead to mold growth, which can be bad for your health. It can also cause the floor to deteriorate over time. Good ventilation helps to prevent these problems and keep your floor in good condition.
How Can You Improve Ventilation?
Think about airing out a room after someone has been sick. You open the windows and let the fresh air in. You can do the same for your water pump floor. Open windows or doors to let fresh air circulate. Use a fan to help move the air around. Make sure there is nothing blocking the airflow. These simple steps can make a big difference in the ventilation of your floor.
What are the Signs of Poor Ventilation?
Imagine you are walking into a room and you smell something musty. That’s a sign of poor ventilation. Other signs include condensation on the walls, mold growth, and a generally stuffy feeling. If you notice any of these signs around your water pump floor, it’s time to improve the ventilation. Don’t ignore these signs, as they can lead to bigger problems down the road.
Fun Fact or Stat: Proper ventilation can also help to reduce energy costs by preventing the need for excessive heating or cooling.
Summary
Protecting your water pump floor is important for keeping your home safe and dry. You can check for leaks often. Look for wet spots, drips, and puddles. Use a drip tray to catch any water that might escape. Seal the floor to prevent water from soaking in. Repair any cracks in the floor to prevent further damage. Clean up spills right away to prevent stains and mold. Improve ventilation to keep the floor dry and healthy. Following these steps can help you protect your water pump floor for years to come.
Conclusion
Taking care of your water pump floor is a smart move. It helps prevent costly repairs and keeps your home safe. Regular checks for leaks are key. Using drip trays and sealing the floor adds extra protection. Quick cleanups of spills prevent stains and mold. Good ventilation keeps the area dry. By following these simple steps, you can protect your water pump floor and enjoy a worry-free home.
Frequently Asked Questions
Question No 1: Why is it important to protect my water pump floor?
Answer: Protecting your water pump floor is important because it prevents water damage to your home. A leaky water pump can cause water to seep into the floor, leading to cracks, mold growth, and structural damage. By taking steps to protect your floor, you can avoid these costly problems and keep your home safe and dry. A well-maintained floor also ensures the water pump operates efficiently without being affected by environmental factors like dampness.
Question No 2: How often should I check for leaks around my water pump?
Answer: You should check for leaks around your water pump at least once a month. Regular checks can help you catch small leaks before they become big problems. If you have had problems with leaks in the past, you might want to check more often. After a heavy rain or a change in temperature, it’s also a good idea to check for leaks. Early detection can save you time, money, and prevent significant damage to your water pump floor and surrounding areas.
Question No 3: What kind of drip tray should I use under my water pump?
Answer: The best kind of drip tray to use under your water pump is one that is made of durable material like plastic or metal. It should be large enough to catch any drips or spills from the pump. Make sure the drip tray is easy to clean. You should also choose a drip tray that is the right size for your pump. A drip tray that is too small won’t work, and one that is too big will take up too much space. Consider a tray with raised edges to better contain any leaks and prevent water from spreading onto the water pump floor.
Question No 4: How do I seal the floor around my water pump?
Answer: To seal the floor around your water pump, first clean the floor thoroughly. Remove any dirt, dust, and debris. Then, apply a concrete sealant according to the manufacturer’s instructions. Make sure to apply the sealant evenly and let it dry completely before using the water pump. Sealing the floor will help to prevent water from soaking into the concrete and causing damage. It’s a simple yet effective way to protect your water pump floor and extend its lifespan, particularly against the effects of occasional water exposure.
Question No 5: Can I repair cracks in my water pump floor myself?
Answer: Yes, you can often repair small cracks in your water pump floor yourself. First, clean the crack thoroughly. Then, fill it with concrete patch. Smooth the patch with a trowel and let it dry completely. For larger cracks or extensive damage, it’s best to call a professional. They have the tools and experience to fix the cracks properly and prevent them from coming back. DIY repairs are suitable for minor issues, but professional help ensures long-term stability and prevents further deterioration of the water pump floor.
Question No 6: How can I improve ventilation around my water pump floor?
Answer: Improving ventilation around your water pump floor is crucial for preventing mold growth and maintaining a dry environment. You can improve ventilation by opening windows or doors to allow fresh air to circulate. Using a fan can also help to move the air around. Make sure the area around the pump is not cluttered, as this can block airflow. Adequate ventilation minimizes moisture buildup, preserving the integrity of the water pump floor and reducing the risk of related structural issues.


