
What Cycle and Vacuum on a Breast Pump Mean for Milk Expression
Quick Summary: Cycle and vacuum settings on a breast pump control the speed and strength of suction. Cycle refers to the number of suction cycles per minute, while vacuum indicates the suction strength. Adjusting these settings helps mimic a baby’s natural nursing pattern, optimizing milk output and comfort. Finding the right combination is key for efficient and pain-free pumping.
Figuring out breast pump settings can feel like decoding a secret language when you’re a new parent. Cycle and vacuum are two key terms you’ll see. Many moms find it tricky to understand what these settings mean and how to use them effectively. This often leads to discomfort, frustration, or even a lower milk supply than desired. Don’t worry – it’s simpler than it seems! This guide will break down cycle and vacuum settings, helping you find the sweet spot for comfortable and efficient pumping. Let’s get started so you can make the most of your pumping sessions.
Understanding Cycle and Vacuum Settings

Let’s dive into what cycle and vacuum settings actually do on your breast pump. Knowing this will help you customize your pumping sessions for the best results.
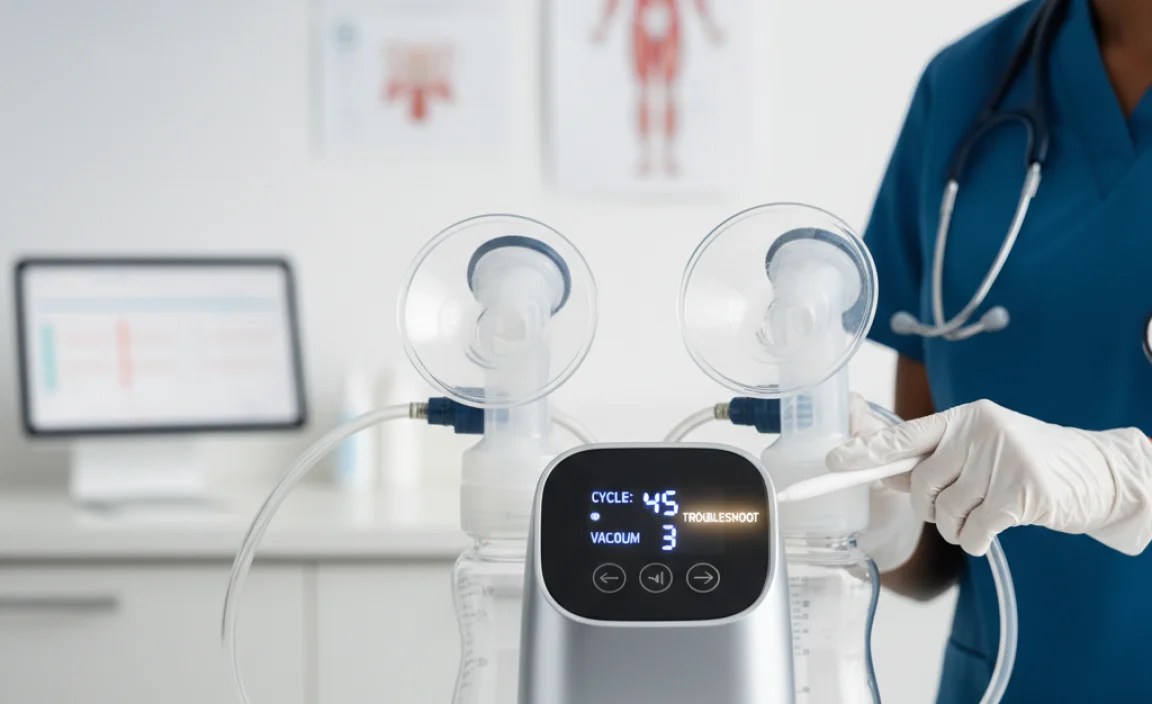
What is Cycle?
Cycle refers to the number of times the pump suctions and releases per minute. It’s often measured in cycles per minute (CPM). Think of it as the speed of the pump. A higher cycle speed means more suction-release actions in a minute, while a lower speed means fewer.
Why it matters: The cycle speed mimics your baby’s natural sucking rhythm. When babies first latch, they usually suckle quickly to stimulate milk flow. This is like a higher cycle speed on your pump. Once the milk lets down, the baby will slow their sucking rhythm to drink. This is similar to a lower cycle speed.
What is Vacuum?
Vacuum refers to the strength of the suction, usually measured in millimeters of mercury (mmHg). This setting controls how strongly the pump pulls on your nipple. A higher vacuum setting means stronger suction, while a lower setting means gentler suction.
Why it matters: Vacuum strength directly affects how much milk you can express. However, more suction isn’t always better. Too much suction can cause pain, nipple damage, and even swelling, which can reduce milk flow. The goal is to find the highest comfortable vacuum setting that efficiently removes milk without causing discomfort.
How Cycle and Vacuum Work Together

Cycle and vacuum settings work hand in hand to mimic your baby’s nursing pattern and efficiently express milk. Here’s how you can think about their relationship:
- Initiation Phase: Start with a high cycle speed and a lower vacuum level. This mimics the initial rapid sucking that stimulates milk ejection.
- Expression Phase: Once your milk lets down, reduce the cycle speed and gradually increase the vacuum until you find a comfortable but effective suction level. This mimics the slower, stronger sucking of a baby actively drinking.
Step-by-Step Guide to Adjusting Cycle and Vacuum Settings

Here’s a step-by-step guide to help you find the best cycle and vacuum settings for your breast pump.
Step 1: Start with Stimulation Mode
Most electric breast pumps come with a stimulation mode. This mode usually has a high cycle speed and a low vacuum level. Start your pumping session in this mode to stimulate your let-down reflex. Pump in this mode for about two minutes, or until you see your milk start to flow.
Step 2: Switch to Expression Mode
Once your milk starts flowing, switch to expression mode. This mode typically has adjustable cycle and vacuum settings. Now, it’s time to experiment to find what works best for you.
Step 3: Adjust the Vacuum Setting
Begin with the lowest vacuum setting and gradually increase it until you feel a strong pull on your nipple. The key is to find the highest vacuum level that is still comfortable. If you feel any pain, immediately reduce the vacuum. Comfort is crucial to avoid nipple damage and ensure successful pumping sessions.
Step 4: Fine-Tune the Cycle Setting
After you’ve found a comfortable vacuum level, adjust the cycle speed. Some women prefer a slower cycle speed for more efficient milk removal, while others find a faster cycle speed works better. Experiment to see what feels most natural and effective for you.
Step 5: Monitor Your Milk Flow and Comfort
Pay close attention to your milk flow and comfort level as you pump. If your milk flow slows down, you might need to slightly increase the vacuum. If you start to feel discomfort, reduce the vacuum immediately. Remember, pumping should not be painful.
Step 6: Save Your Preferred Settings
Once you find a combination of cycle and vacuum settings that works well for you, make a note of them. Some pumps have a memory function that allows you to save your preferred settings for future use. This can save you time and effort during your next pumping session.
Troubleshooting Common Issues
Even with the right settings, you might encounter some issues. Here are a few common problems and how to address them.
Problem: Low Milk Output
Possible Causes:
- Incorrect cycle and vacuum settings
- Pump parts not properly assembled
- Dehydration
- Stress
Solutions:
- Double-check your pump settings and adjust as needed.
- Ensure all pump parts are correctly assembled and in good condition. Replace any worn or damaged parts.
- Drink plenty of water throughout the day.
- Try to relax and create a calm environment before pumping.
Problem: Nipple Pain or Damage
Possible Causes:
- Vacuum setting too high
- Incorrect flange size
- Nipple sensitivity
Solutions:
- Reduce the vacuum setting immediately.
- Make sure you are using the correct flange size. The nipple should move freely in the flange tunnel without rubbing.
- Apply a nipple cream to soothe and protect your nipples.
Problem: Slow Let-Down
Possible Causes:
- Stress or anxiety
- Not using stimulation mode
- Cold environment
Solutions:
- Try to relax and create a calming environment before pumping.
- Start with stimulation mode to encourage let-down.
- Apply a warm compress to your breasts or take a warm shower before pumping.
Tips for Comfortable and Efficient Pumping

Here are some extra tips to help you have a more comfortable and efficient pumping experience:
- Find the Right Flange Size: Using the correct flange size is crucial for comfort and milk output. Your nipple should move freely in the flange tunnel without rubbing against the sides.
- Use a Hands-Free Pumping Bra: This allows you to multitask while pumping, freeing up your hands to read, work, or care for your baby.
- Massage Your Breasts: Gently massage your breasts before and during pumping to help stimulate milk flow.
- Stay Hydrated: Drink plenty of water throughout the day to support milk production.
- Relax: Stress can inhibit milk flow. Try to relax and create a calm environment before pumping. Listen to music, watch a movie, or practice deep breathing exercises.
- Establish a Pumping Schedule: Regular pumping helps maintain your milk supply. Try to pump at the same times each day, even if you are not away from your baby.
- Double Pump: Pumping both breasts simultaneously can save time and increase milk output.
Choosing the Right Breast Pump
With so many breast pumps on the market, it can be overwhelming to choose the right one. Here’s a quick guide to help you make the best decision for your needs.
Manual vs. Electric Pumps
Manual Pumps:
- Pros: Affordable, portable, quiet
- Cons: Requires more effort, can be tiring for frequent use
- Best for: Occasional pumping, travel, emergencies
Electric Pumps:
- Pros: Efficient, adjustable settings, double pumping options
- Cons: More expensive, can be noisy, requires a power source
- Best for: Frequent pumping, working mothers, establishing milk supply
Hospital-Grade vs. Personal-Use Pumps
Hospital-Grade Pumps:
- Pros: Stronger suction, more durable, designed for frequent use
- Cons: Expensive, often requires a prescription
- Best for: Establishing milk supply, premature babies, mothers with medical conditions
Personal-Use Pumps:
- Pros: More affordable, portable, variety of options
- Cons: Less powerful than hospital-grade pumps, may not be as durable
- Best for: Most mothers, occasional to frequent pumping
Features to Consider
When choosing a breast pump, consider the following features:
- Adjustable Cycle and Vacuum Settings: Essential for finding the right settings for your comfort and milk output.
- Closed System: Prevents milk from entering the pump motor, reducing the risk of contamination.
- Portability: Consider the size and weight of the pump, especially if you plan to travel with it.
- Noise Level: Some pumps are quieter than others, which can be important if you plan to pump in public or at work.
- Ease of Use: Look for a pump that is easy to assemble, use, and clean.
Understanding Breast Pump Modes
Many electric breast pumps come with different modes designed to mimic a baby’s natural nursing patterns. Understanding these modes can help you optimize your pumping sessions.
Stimulation Mode
As mentioned earlier, stimulation mode is designed to stimulate your let-down reflex. It typically features a high cycle speed and low vacuum level. This mode mimics the rapid, shallow sucking that babies do at the beginning of a feeding to trigger milk ejection.
Expression Mode
Expression mode is used once your milk has let down. It typically has adjustable cycle and vacuum settings, allowing you to customize the suction strength and speed to match your baby’s nursing pattern and your comfort level.
Massage Mode
Some pumps also include a massage mode, which uses gentle vibrations or pulsations to stimulate milk flow. This mode can be particularly helpful for mothers who have difficulty with let-down or who want to increase their milk supply.
2-in-1 Mode
Certain breast pumps offer a 2-in-1 mode that automatically switches between stimulation and expression modes. This can be a convenient option for mothers who want a hands-free pumping experience.
Table: Cycle and Vacuum Settings: A Quick Reference
Use this table as a quick reference guide to understanding cycle and vacuum settings on your breast pump.
| Setting | Description | Effect | When to Use |
|---|---|---|---|
| Cycle (CPM) | Number of suction cycles per minute | Higher CPM: Faster suction, stimulates let-down Lower CPM: Slower suction, efficient milk removal |
High CPM: Stimulation mode, initial let-down Low CPM: Expression mode, after let-down |
| Vacuum (mmHg) | Strength of suction | Higher mmHg: Stronger suction, more milk removal Lower mmHg: Gentler suction, less risk of discomfort |
High mmHg: Expression mode, maximize milk output (within comfort) Low mmHg: Stimulation mode, sensitive nipples |
Table: Troubleshooting Breast Pump Settings
Here’s a table to help you troubleshoot common issues related to breast pump settings.
| Issue | Possible Cause | Solution |
|---|---|---|
| Low Milk Output | Incorrect cycle/vacuum settings | Adjust cycle and vacuum until comfortable and effective |
| Nipple Pain | Vacuum too high | Lower vacuum setting immediately |
| Slow Let-Down | Stress, not using stimulation mode | Relax, use stimulation mode initially |
| Plugged Ducts | Incomplete emptying of breast | Increase vacuum, massage breast, ensure proper flange fit |
External Resources for Further Reading
For more in-depth information on breast pumping, consider checking out these resources:
- Centers for Disease Control and Prevention (CDC) – Breastfeeding: Comprehensive information on breastfeeding and pumping.
- La Leche League International: Support and resources for breastfeeding mothers.
- Office on Women’s Health – Breastfeeding: Information on breastfeeding from the U.S. Department of Health and Human Services.
FAQ: Understanding Cycle and Vacuum on Breast Pump
Here are some frequently asked questions about cycle and vacuum settings on breast pumps.
What does cycle mean on a breast pump?
Cycle refers to the number of suction and release motions the pump makes per minute, mimicking a baby’s sucking rhythm. A higher cycle speed is often used to stimulate let-down, while a slower cycle is used for milk expression.
What does vacuum mean on a breast pump?
Vacuum refers to the strength of the suction. It’s measured in mmHg. A higher vacuum setting provides stronger suction, which can help remove more milk, but it should always be comfortable to avoid nipple pain.
How do I know what cycle and vacuum settings to use?
Start with stimulation mode (high cycle, low vacuum) to initiate let-down. Once milk flows, switch to expression mode and gradually increase the vacuum until you find a comfortable but effective suction level. Adjust the cycle speed to match your comfort and milk flow.
Can I use a high vacuum setting all the time?
Not necessarily. While a higher vacuum can remove more milk, it’s important to prioritize comfort. Using a vacuum setting that’s too high can cause nipple pain, damage, and even reduce milk supply. Find the highest comfortable setting.
Why is my milk output low even with the right settings?
Low milk output can be caused by various factors, including dehydration, stress, incorrect flange size, or pump parts not being properly assembled. Make sure you’re drinking enough water, relaxing, using the correct flange size, and that your pump is correctly assembled.
How often should I replace my pump parts?
Replace pump parts according to the manufacturer’s recommendations. Generally, valves and membranes should be replaced every 4-6 weeks, while tubing and flanges can be replaced every 3-6 months, depending on usage.
Is it normal to feel pain while pumping?
No, pumping should not be painful. If you experience pain, reduce the vacuum setting immediately and check your flange size. If pain persists, consult with a lactation consultant.
Conclusion
Understanding cycle and vacuum settings on your breast pump empowers you to customize your pumping sessions for optimal comfort and milk output. Remember to start with stimulation mode, gradually adjust the vacuum, and fine-tune the cycle speed to match your body’s needs. By paying attention to your comfort and milk flow, you can create a pumping routine that works best for you and your baby. Happy pumping!
“`


