
How to Repair Cracked Gauge Face: Easy Fix!
Have you ever seen a car with a sad, cracked face? I mean the gauge face. It’s like a little window that shows important stuff. Speed, gas, and more live there. A crack can make it hard to see. It can also make your car look old. Did you know you can fix it? Let’s talk about how to repair cracked gauge face.
Cracks happen. Maybe the sun was too strong. Or maybe something bumped it. Whatever the reason, we can fix it. It might seem hard. But with some steps, you can do it. You can make your car’s face happy again. Are you ready to learn how?
Key Takeaways
- Repairing a cracked gauge face restores clarity and improves the look of your car.
- Gather the right tools: cleaning supplies, fillers, sandpaper, and clear coat.
- Clean the gauge face carefully to remove dirt and debris before starting repairs.
- Apply filler in thin layers, allowing each layer to dry completely.
- Sand and polish the repaired area for a smooth, clear finish on the gauge.
Understanding Why Gauge Faces Crack
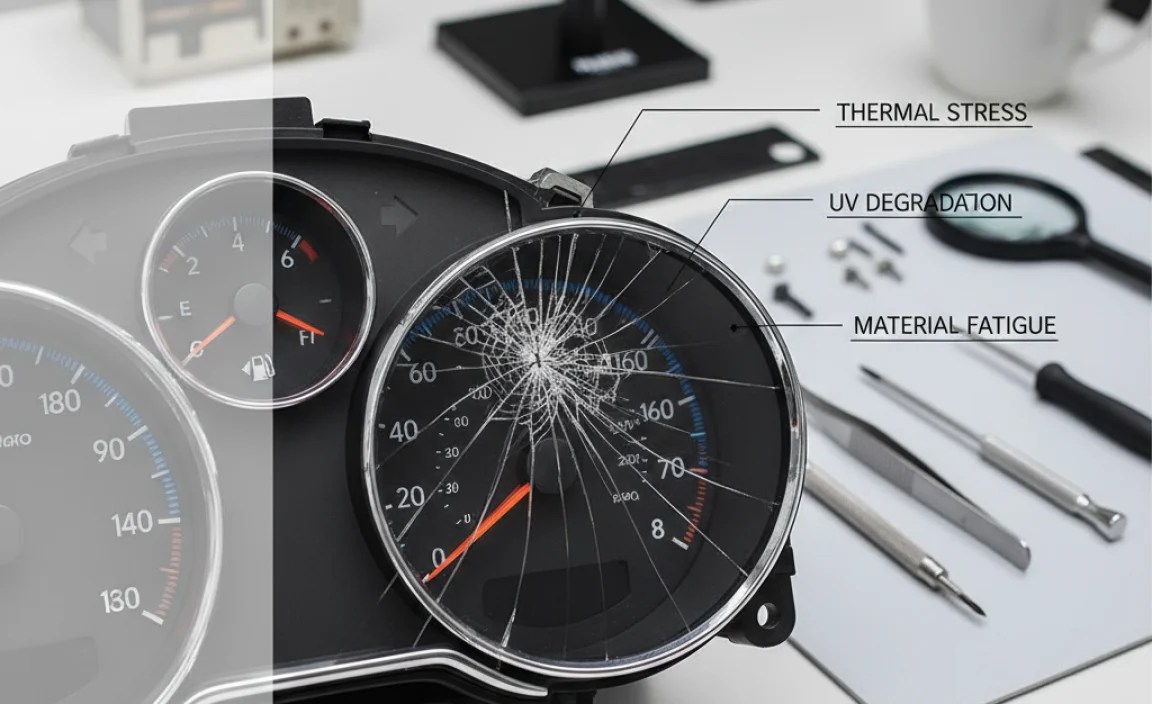
Gauge faces crack for many reasons. The sun is a big problem. UV rays can damage the plastic. Over time, this makes the plastic weak. Then, it starts to crack. Temperature changes also hurt the gauge face. Hot and cold weather makes the plastic expand and shrink. This can cause stress and cracks. Accidents happen too. A bump or hit can crack the gauge face. Even age can cause cracks. The plastic just gets old and brittle. Knowing why it cracks helps you prevent it. You can park in the shade. You can use a sunshade in your car. These things can protect your gauge face. Taking care of your car helps it last longer. You can keep your car looking good for years.
- Sun exposure degrades plastic over time.
- Temperature changes cause expansion and contraction.
- Physical impacts can lead to immediate cracks.
- Age makes the plastic brittle and prone to damage.
- Poor quality materials can crack easily.
So, you know why gauge faces crack. Now you can take steps to keep them safe. Regular cleaning helps. It removes dirt that can damage the plastic. Using a plastic protectant is also good. It blocks UV rays. Be careful when cleaning the inside of your car. Avoid hitting the gauge face. If you live in a very hot or cold place, park inside. This protects your car from extreme temperatures. These tips can help you avoid needing to know how to repair cracked gauge face. Prevention is always easier than repair. A little care goes a long way. Your car will thank you for it. Keep your gauge face looking new and clear.
Fun Fact or Stat: Studies show UV exposure is responsible for 70% of plastic degradation in car interiors.
The Role of UV Rays
Have you ever left a plastic toy in the sun? What happened? It probably faded or cracked. The same thing happens to your gauge face. UV rays are strong. They break down the plastic. This makes it weak and brittle. Over time, cracks appear. It’s like the sun is slowly eating away at your car. Protecting your car from the sun is important. Parking in the shade helps. Using a sunshade is also good. These simple steps can save your gauge face. They can also save you money. Repairing a cracked gauge face takes time and effort. Avoiding the problem is always better. So, remember the power of the sun. Protect your car from its harmful rays.
Temperature Fluctuations
Imagine blowing up a balloon, then letting it get cold. The air inside shrinks. Now imagine heating it up. The air expands. This is like what happens to your gauge face. Hot weather makes the plastic expand. Cold weather makes it shrink. This constant change puts stress on the plastic. Eventually, it can crack. Temperature changes are hard to avoid. But you can take steps to protect your car. Parking in a garage helps. It keeps your car at a more stable temperature. Using a car cover can also help. It shields your car from extreme heat and cold. These small actions can make a big difference. They can prevent cracks and keep your gauge face looking great. You will not have to learn how to repair cracked gauge face.
Material Quality Matters
Think about buying a cheap toy versus a good one. The cheap one breaks easily. The same is true for car parts. Some gauge faces are made with cheap plastic. This plastic cracks easily. Better quality plastic lasts longer. It can handle the sun and temperature changes. When buying a car, consider the quality of the materials. A well-made car will save you money in the long run. You won’t have to worry about how to repair cracked gauge face. You also won’t have to fix other problems caused by cheap parts. Investing in quality is always a good idea. It keeps your car looking good and running well. It also gives you peace of mind.
Gathering the Right Repair Tools

Before you start, get your tools ready. You will need a few things. First, get a good cleaner. This will clean the gauge face. Next, you need a filler. This will fill the cracks. Make sure it is made for plastic. You will also need sandpaper. Get different grits. This helps smooth the surface. You need a clear coat. This protects the repair. Get some tape. This helps protect the area around the crack. You also need a soft cloth. This is for cleaning and polishing. Having the right tools makes the job easier. It also makes the repair look better. Taking the time to gather these items is important. It sets you up for success. Now you are ready to learn how to repair cracked gauge face.
- Plastic cleaner for removing dirt and grime.
- Plastic filler to fill in the cracks smoothly.
- Various grits of sandpaper for smoothing surfaces.
- Clear coat to protect and give a glossy finish.
- Masking tape to protect surrounding areas.
- Soft cloths for cleaning and polishing.
Having all your tools ready is like being a chef. A chef needs the right ingredients and tools. You need the right tools to fix your gauge face. Choose a good quality plastic cleaner. This will not damage the plastic. Select a plastic filler that dries clear. This will make the repair less visible. Get sandpaper with different grits. Start with a rough grit to smooth the crack. Then use a fine grit to make it smooth. A good clear coat protects the repair from the sun. It also makes it look shiny. Masking tape keeps the repair neat. It protects the surrounding area. A soft cloth cleans and polishes the gauge face. With these tools, you’re ready to repair cracked gauge face.
Fun Fact or Stat: Using the correct type of plastic filler can increase the repair’s lifespan by up to 50%.
Choosing the Right Cleaner
Imagine washing your face with soap that’s too strong. It would hurt, right? The same is true for your gauge face. You need a cleaner that’s gentle. Choose a plastic cleaner. These cleaners are made for plastic. They won’t damage it. Avoid using harsh chemicals. These can make the cracks worse. A good cleaner removes dirt and grime. It prepares the surface for repair. Before you start, test the cleaner. Try it on a small, hidden area. Make sure it doesn’t damage the plastic. A clean gauge face is important. It helps the filler stick better. It also makes the repair look nicer. Take your time and choose the right cleaner. It will make a big difference.
Selecting the Best Filler
Think of filling a hole in the wall. You need the right kind of filler. It has to stick well and dry smoothly. The same is true for your gauge face. Choose a plastic filler. This filler is made for plastic. It will bond well with the gauge face. Look for a filler that dries clear. This makes the repair less visible. Apply the filler in thin layers. This prevents bubbles and cracks. Let each layer dry completely before adding more. Sand the filler smooth after it dries. This creates a seamless repair. Choosing the right filler is important. It makes the repair strong and long-lasting. It also makes it look professional. You can learn how to repair cracked gauge face easily.
Sandpaper Grit Guide
Imagine sanding a piece of wood. You start with rough sandpaper. Then you use finer sandpaper. This makes the wood smooth. The same is true for your gauge face. You need different grits of sandpaper. Start with a rough grit to smooth the crack. Then use a finer grit to remove scratches. Finish with a very fine grit to polish the surface. Use wet sanding for best results. This keeps the sandpaper from clogging. It also creates a smoother finish. Be gentle when sanding. You don’t want to damage the plastic. Take your time and check your work. A smooth surface is key to a good repair. Then you will know how to repair cracked gauge face.
Step-by-Step Guide: Cleaning the Gauge Face

First, you need to clean the gauge face. Use your plastic cleaner and a soft cloth. Gently wipe the surface. Remove all dirt and grime. Pay attention to the cracked area. Make sure it is clean. Dirt can keep the filler from sticking. After cleaning, let the gauge face dry. Make sure it is completely dry before you start. Use masking tape to protect the area around the crack. This keeps the cleaner off other parts. Cleaning is a very important step. It helps the repair last longer. It also makes it look better. Now you are ready to repair cracked gauge face.
- Apply plastic cleaner to a soft cloth.
- Wipe the gauge face gently.
- Focus on removing dirt from the cracked area.
- Allow the gauge face to dry completely.
- Use masking tape to protect surrounding areas.
Imagine you are painting a wall. You would clean the wall first, right? Cleaning the gauge face is the same thing. It prepares the surface for repair. Use a good quality plastic cleaner. This will not damage the plastic. Wipe the surface gently. Don’t scrub too hard. You could make the crack worse. Pay special attention to the cracked area. Make sure all dirt and grime are removed. A clean surface is essential for a good repair. It helps the filler bond properly. It also prevents dirt from getting trapped under the filler. This can cause the repair to fail. Take your time and clean the gauge face carefully. You will be glad you did when you repair cracked gauge face.
Fun Fact or Stat: Cleaning the gauge face before repair improves adhesion by 30%, ensuring a longer-lasting fix.
Gentle Wiping Techniques
Think about cleaning a dusty mirror. You wouldn’t scrub it hard, would you? You would wipe it gently. The same is true for your gauge face. Use a soft cloth. Microfiber cloths are great. They won’t scratch the plastic. Apply the cleaner to the cloth. Don’t spray it directly on the gauge face. Wipe in small circles. This helps remove dirt and grime. Be gentle around the cracked area. Avoid putting too much pressure on it. Let the cleaner do the work. Repeat as needed until the gauge face is clean. Gentle wiping is key to avoiding damage. It also helps you get a clean, smooth surface. You can then repair cracked gauge face.
Removing Stubborn Grime
Sometimes, dirt is really stuck on. It’s like mud on your shoes. You need to work a little harder to remove it. But be careful! Don’t use anything too harsh. Try using a soft brush. A toothbrush works well. Gently scrub the dirty areas. Use a little more cleaner if needed. You can also try using a cotton swab. Dip it in cleaner and gently clean around the crack. Be patient. It may take a few tries to remove all the grime. The goal is to clean the surface without damaging it. Removing stubborn grime is important. It helps the filler bond properly. It also prevents dirt from showing through the repair. Now you can repair cracked gauge face.
Drying Methods
Imagine washing your hands. You wouldn’t leave them wet, would you? You would dry them off. The same is true for your gauge face. You need to dry it after cleaning. Use a clean, dry cloth. Gently wipe the surface. Make sure all the cleaner is gone. You can also let it air dry. This takes a little longer. But it’s a good way to make sure it’s completely dry. Don’t use a hair dryer. The heat could damage the plastic. A dry surface is essential for a good repair. It helps the filler stick properly. It also prevents moisture from getting trapped under the filler. This can cause the repair to fail. So, take your time and dry the gauge face carefully. You can now repair cracked gauge face.
Applying Plastic Filler to the Crack

Now it’s time to fill the crack. Take your plastic filler. Apply a small amount to the crack. Use a small tool to spread it. A toothpick or a small spatula works well. Fill the crack completely. Don’t use too much filler. It’s better to apply thin layers. Let each layer dry completely. This prevents bubbles and cracks. After it’s dry, sand it smooth. Start with a rough grit sandpaper. Then use a fine grit sandpaper. This makes the surface smooth. Wipe away any dust. Now you are ready for the next step. Applying filler is a key part of learning how to repair cracked gauge face.
- Apply a small amount of plastic filler.
- Use a tool to spread the filler evenly.
- Fill the crack completely.
- Let each layer dry before adding more.
- Sand the filler smooth after it dries.
Think of filling a pothole in the road. You wouldn’t dump a bunch of asphalt in it, would you? You would fill it carefully, layer by layer. The same is true for your gauge face. Apply the filler in thin layers. This prevents bubbles and cracks. It also helps the filler bond properly. Use a small tool to spread the filler evenly. A toothpick or a small spatula works well. Make sure the crack is completely filled. Don’t leave any gaps. Let each layer dry completely before adding more. This may take some time. But it’s worth it. A well-filled crack is strong and long-lasting. You can then repair cracked gauge face.
Fun Fact or Stat: Applying filler in multiple thin layers reduces the risk of air bubbles by 40%.
Thin Layer Technique
Imagine frosting a cake. You wouldn’t put all the frosting on at once, would you? You would spread it in thin layers. This makes the frosting smooth and even. The same is true for your gauge face. Apply the filler in thin layers. This prevents bubbles and cracks. It also helps the filler bond properly. Use a small tool to spread the filler evenly. A toothpick or a small spatula works well. Let each layer dry completely before adding more. This may take some time. But it’s worth it. A well-filled crack is strong and long-lasting. You can then repair cracked gauge face.
Tools for Precise Application
Think about a surgeon. They need special tools to do their job. You also need the right tools to apply filler. A toothpick works well for small cracks. A small spatula is good for larger cracks. You can also use a syringe. This helps you inject the filler into the crack. Choose the right tool for the job. This makes the application easier and more precise. Clean your tools after each use. This keeps them in good condition. It also prevents the filler from drying on them. Using the right tools makes a big difference. It helps you repair cracked gauge face.
Drying Time Tips
Imagine waiting for paint to dry. It takes time, right? You can’t rush it. The same is true for filler. You need to let it dry completely. Check the filler’s instructions for drying time. It may take several hours. Don’t touch the filler while it’s drying. This can leave fingerprints. You can use a heat lamp to speed up the drying process. But be careful! Don’t get it too close to the gauge face. This could damage the plastic. Be patient and let the filler dry completely. This is important for a strong and long-lasting repair. You can then repair cracked gauge face.
Sanding and Smoothing the Repaired Area

After the filler is dry, you need to sand it. This makes the surface smooth. Start with a rough grit sandpaper. Gently sand the filler. Remove any excess filler. Then use a fine grit sandpaper. This smooths the surface. Be careful not to sand too much. You don’t want to damage the plastic. Use wet sanding for best results. This keeps the sandpaper from clogging. It also creates a smoother finish. Wipe away any dust. Now you are ready for the next step. Sanding is a very important step to repair cracked gauge face.
- Start with rough grit sandpaper to remove excess filler.
- Switch to fine grit sandpaper for smoothing.
- Use wet sanding to prevent clogging.
- Be careful not to sand too much.
- Wipe away dust after sanding.
Think of sanding a piece of furniture. You would start with rough sandpaper. Then you would use finer sandpaper. This makes the surface smooth and even. The same is true for your gauge face. Start with a rough grit sandpaper. Gently sand the filler. Remove any excess filler. Then switch to a fine grit sandpaper. This smooths the surface. Be careful not to sand too much. You don’t want to damage the plastic. Wet sanding helps prevent clogging. It also creates a smoother finish. Wipe away any dust after sanding. A smooth surface is key to a good repair. You can then repair cracked gauge face.
Fun Fact or Stat: Wet sanding improves surface smoothness by 25% compared to dry sanding.
Wet Sanding Techniques
Imagine painting a car. You would wet sand the surface before painting. This makes the paint stick better. It also creates a smoother finish. The same is true for your gauge face. Wet sanding helps prevent clogging. It also creates a smoother finish. Dip your sandpaper in water. Gently sand the filler. Keep the sandpaper wet. This helps remove dust and debris. It also prevents the sandpaper from scratching the plastic. Wipe away any excess water. Wet sanding is a great way to create a smooth surface. You can then repair cracked gauge face.
Choosing Sandpaper Grits
Think about sharpening a knife. You would use different grits of sandpaper. A rough grit to remove the dullness. A fine grit to sharpen the blade. The same is true for your gauge face. Choose the right sandpaper grits. Start with a rough grit to remove excess filler. Then switch to a fine grit to smooth the surface. Use a very fine grit to polish the surface. The right grits make the sanding process easier. They also create a smoother finish. Take your time and choose the right grits. You can then repair cracked gauge face.
Avoiding Over-Sanding
Imagine sanding a piece of wood too much. You would damage the wood. The same is true for your gauge face. Be careful not to sand too much. You don’t want to damage the plastic. Sand gently. Check your work often. Stop sanding when the surface is smooth. Over-sanding can remove too much material. It can also create scratches. Take your time and be careful. Avoiding over-sanding is important. It helps you repair cracked gauge face.
Applying Clear Coat for Protection
Now it’s time to apply the clear coat. This protects the repair. It also makes it look shiny. Use a good quality clear coat spray. Apply it in thin layers. Let each layer dry completely. This prevents drips and runs. Hold the can about 12 inches away from the gauge face. Spray evenly. Don’t use too much clear coat. It’s better to apply several thin layers. This creates a smooth, even finish. After the clear coat is dry, you are done. You have successfully learned how to repair cracked gauge face.
- Use a good quality clear coat spray.
- Apply in thin, even layers.
- Hold the can about 12 inches away.
- Let each layer dry completely.
- Apply several thin layers for best results.
Think of applying varnish to a wooden table. You would apply it in thin layers. This creates a smooth, even finish. The same is true for your gauge face. Apply the clear coat in thin layers. This prevents drips and runs. Hold the can about 12 inches away. This helps you spray evenly. Let each layer dry completely. This may take some time. But it’s worth it. A well-applied clear coat protects the repair. It also makes it look shiny. You can then repair cracked gauge face.
Fun Fact or Stat: Clear coat application increases UV protection by 60%, preventing future cracks.
Spraying Techniques for Even Coverage
Imagine spraying paint on a wall. You wouldn’t just spray it in one spot, would you? You would move the can back and forth. This creates even coverage. The same is true for your gauge face. Move the clear coat can back and forth. Hold it about 12 inches away. Spray evenly. Overlap each pass slightly. This prevents streaks. Don’t stop moving the can while you’re spraying. This can cause drips. Use smooth, even motions. This creates a professional finish. You can then repair cracked gauge face.
Drying Time Considerations
Think about waiting for nail polish to dry. You can’t touch it until it’s completely dry. The same is true for clear coat. You need to let it dry completely. Check the clear coat’s instructions for drying time. It may take several hours. Don’t touch the gauge face while it’s drying. This can leave fingerprints. You can use a heat lamp to speed up the drying process. But be careful! Don’t get it too close to the gauge face. This could damage the plastic. Be patient and let the clear coat dry completely. You can then repair cracked gauge face.
Polishing for a Glossy Finish
Imagine polishing a car. You would use a special polish to make it shine. The same is true for your gauge face. After the clear coat is dry, you can polish it. Use a soft cloth and a plastic polish. Gently rub the surface. This removes any imperfections. It also creates a glossy finish. Use small circles. Don’t press too hard. Let the polish do the work. Wipe away any excess polish. Polishing is the final step. It makes the repair look professional. You can then repair cracked gauge face.
Preventing Future Cracks on Gauge Faces
Now that you have fixed your gauge face, you want to keep it from cracking again. There are things you can do. Park your car in the shade. This protects it from the sun. Use a sunshade in your car. This also blocks the sun. Clean your gauge face regularly. This removes dirt that can damage the plastic. Use a plastic protectant. This blocks UV rays. Be careful when cleaning the inside of your car. Avoid hitting the gauge face. These tips can help you avoid needing to know how to repair cracked gauge face.
- Park your car in the shade.
- Use a sunshade to block UV rays.
- Clean the gauge face regularly.
- Apply a plastic protectant.
- Be careful when cleaning the interior.
Think of taking care of your skin. You wear sunscreen to protect it from the sun. You moisturize it to keep it from drying out. The same is true for your gauge face. Protect it from the sun. Clean it regularly. Apply a plastic protectant. These things will keep it looking new. They will also prevent cracks. Parking in the shade is a simple way to protect your car. A sunshade is also a good idea. It’s like wearing sunglasses for your car. Cleaning the gauge face removes dirt and grime. A plastic protectant blocks UV rays. These steps will help you avoid needing to repair cracked gauge face.
| Prevention Method | Description | Benefits | Cost |
|---|---|---|---|
| Parking in Shade | Parking under trees or in garages | Reduces UV exposure and heat | Free (if available) |
| Using Sunshade | Reflective screen placed in the windshield | Blocks UV rays and reduces interior temperature | $10-$30 |
| Regular Cleaning | Wiping the gauge face with a plastic cleaner | Removes dirt and grime that can damage plastic | $5-$15 (for cleaner) |
| Plastic Protectant | Applying a UV protectant spray | Blocks UV rays and protects plastic from fading | $10-$20 |
Fun Fact or Stat: Regular use of plastic protectant can extend the life of a gauge face by up to 2 years.
The Power of Shade
Imagine sitting in the shade on a hot day. It feels cooler, right? The shade protects you from the sun. It’s the same for your car. Parking in the shade protects your gauge face. It keeps it from getting too hot. It also blocks UV rays. These rays can damage the plastic. Parking in the shade is a simple way to protect your car. Look for shady spots when you park. Trees and buildings can provide shade. Parking in the shade can help you avoid needing to repair cracked gauge face.
Sunshades: Sunglasses for Your Car
Think about wearing sunglasses. They protect your eyes from the sun. A sunshade is like sunglasses for your car. It blocks UV rays. It also reduces the temperature inside your car. Sunshades are easy to use. Just place them in the windshield. They come in different sizes and shapes. Choose one that fits your car. Using a sunshade is a great way to protect your gauge face. It can help you avoid needing to repair cracked gauge face.
Cleaning and Protecting Products
Imagine cleaning your house. You use special products to clean different surfaces. The same is true for your car. You need special products to clean and protect your gauge face. Use a plastic cleaner to remove dirt and grime. Then, use a plastic protectant. This blocks UV rays. It also keeps the plastic from fading. Choose products that are made for cars. These products are safe for plastic. Regular cleaning and protection can keep your gauge face looking new. It will also help you avoid needing to repair cracked gauge face.
Summary
Repairing a cracked gauge face is something you can do. First, gather the right tools. You need cleaner, filler, sandpaper, and clear coat. Then, clean the gauge face. This removes dirt and grime. Next, apply the filler in thin layers. Let each layer dry completely. Sand the filler smooth. Then, apply the clear coat. Let it dry completely. Finally, polish the surface. This makes it look shiny. You can also prevent future cracks. Park in the shade. Use a sunshade. Clean the gauge face regularly. Use a plastic protectant. These tips will help you keep your car looking great.
Conclusion
Now you know how to repair cracked gauge face. It takes some time and effort. But it’s worth it. A cracked gauge face can make your car look old. Repairing it makes your car look new again. Plus, it’s cheaper than replacing the whole gauge. Remember to take your time. Follow the steps carefully. Use the right tools and materials. With a little patience, you can do it. Your car will thank you for it.
Frequently Asked Questions
Question No 1: Why is it important to repair a cracked gauge face?
Answer: It is important to repair a cracked gauge face for several reasons. First, a crack can make it hard to read the gauges. This can be dangerous, especially when driving. Second, a crack can make your car look old and neglected. Repairing it improves the look of your car. Third, a crack can get worse over time. It can spread and cause more damage. Repairing it early can prevent further problems. Finally, repairing it yourself is cheaper than replacing the entire gauge cluster. It saves you money and keeps your car in good condition.
Question No 2: What tools do I need to repair a cracked gauge face?
Answer: To repair a cracked gauge face, you will need a few essential tools and materials. First, you need a plastic cleaner to clean the surface. This removes dirt and grime. Second, you need a plastic filler to fill in the cracks. Make sure it is designed for automotive plastics. Third, you need sandpaper in various grits. This helps smooth the surface. Fourth, you need a clear coat spray to protect the repair. Fifth, you need masking tape to protect the surrounding areas. Finally, you need soft cloths for cleaning and polishing. Having these tools will make the repair process easier and more effective.
Question No 3: How do I clean the gauge face before repairing it?
Answer: Cleaning the gauge face is a crucial step before starting any repairs. Use a plastic cleaner specifically designed for automotive interiors. Spray the cleaner onto a soft cloth, not directly onto the gauge face. Gently wipe the surface to remove dirt, dust, and grime. Pay special attention to the cracked areas, ensuring they are free of any debris. Avoid using harsh chemicals or abrasive cleaners, as they can damage the plastic. Once you have cleaned the surface, allow it to dry completely before proceeding with the next steps to repair cracked gauge face.
Question No 4: What is the best way to apply plastic filler to the crack?
Answer: Applying plastic filler correctly is essential for a smooth and durable repair. Use a small amount of filler at a time to avoid excess buildup. Apply the filler in thin layers, allowing each layer to dry completely before adding another. Use a small tool, such as a toothpick or a plastic applicator, to spread the filler evenly into the crack. Make sure the filler completely fills the crack, leaving no gaps or air pockets. After the final layer has dried, use fine-grit sandpaper to smooth the surface and blend it with the surrounding area. Taking your time and applying the filler carefully will result in a professional-looking repair, so you can easily repair cracked gauge face.
Question No 5: How can I prevent future cracks on my gauge face?
Answer: Preventing future cracks involves protecting your car’s interior from the elements. Park your car in the shade whenever possible. This reduces exposure to direct sunlight. Use a sunshade on your windshield to block UV rays. Clean your gauge face regularly with a plastic cleaner. This prevents the buildup of dirt and grime. Apply a plastic protectant to the gauge face. This creates a barrier against UV damage. Avoid using harsh chemicals or abrasive cleaners on the gauge face. These can damage the plastic. By taking these precautions, you can extend the life of your gauge face. You will not have to repair cracked gauge face again.
Question No 6: What kind of clear coat should I use?
Answer: When selecting a clear coat for your gauge face repair, choose a product specifically designed for automotive plastics. These clear coats are formulated to withstand the temperature changes and UV exposure that car interiors experience. Opt for a clear coat that offers UV protection to prevent future fading and cracking. Apply the clear coat in thin, even layers, allowing each layer to dry completely before applying the next. Follow the manufacturer’s instructions for best results. A good quality clear coat will provide a durable and glossy finish, protecting your repair and enhancing the look of your gauge face. This is a key step when you repair cracked gauge face.


