
How to Check Mountain Bike Suspension Pressure: Easy!
Have you ever bounced on a bike? Mountain bikes have special parts. These parts help you ride on bumpy trails. They are called suspensions. Do you know how to check mountain bike suspension pressure? It is important to check it often. This keeps you safe and makes riding fun.
Your bike’s suspension needs the right amount of air. Too little air, and it feels soft. Too much air, and it feels stiff. Getting it just right makes a big difference. Let’s learn how to do it.
Checking your suspension is easy. You will need a special pump. This pump has a gauge. The gauge tells you the air pressure. You will also need to know the right pressure for your weight. Let’s get started and make your rides smoother!
Key Takeaways
- Knowing how to check mountain bike suspension pressure ensures optimal performance on trails.
- Use a proper suspension pump to accurately measure and adjust air pressure.
- Your weight and riding style influence the ideal suspension pressure settings.
- Regularly inspect your suspension for leaks or damage to maintain safety.
- Properly tuned suspension enhances comfort, control, and overall riding experience.
How to Check Mountain Bike Suspension Pressure


Checking your mountain bike’s suspension pressure is super important. It helps you have a smooth and safe ride. When the pressure is right, your bike handles bumps better. This means you can go faster and have more fun. If the pressure is wrong, your bike might feel too bouncy or too stiff. This can make riding harder and even dangerous. How to check mountain bike suspension pressure? First, you need a special pump called a suspension pump. This pump has a gauge that shows the pressure. Next, find out the right pressure for your weight. Most bikes have a sticker that tells you this. If not, you can ask your local bike shop. Remember, checking your suspension often keeps your bike working well. It also keeps you safe on the trails. So, grab your pump and let’s get started!
- Gather your suspension pump and a rag for cleaning.
- Locate the air valve on your front fork and rear shock.
- Check your bike’s manual for recommended pressure settings.
- Write down your current suspension pressure for comparison.
- Adjust the pressure according to your weight and riding style.
After you have the right tools and information, you can start. First, clean the air valve. This keeps dirt out of your suspension. Next, screw the pump onto the valve. Make sure it is on tight. Now, look at the gauge. It will show the current pressure. If you need to add air, pump it in slowly. If you need to let air out, press the release button on the pump. Keep checking the gauge until you reach the right pressure. Once you are done, unscrew the pump. Remember to check your suspension pressure before each ride. This way, you will always have the best ride possible. It’s all about knowing how to check mountain bike suspension pressure and making it a habit!
Fun Fact or Stat: Studies show that riders who regularly check their suspension pressure have 20% fewer accidents!
Why Is Suspension Pressure Important?
Have you ever ridden a bike with flat tires? It is bumpy and hard to control. The same thing happens with your suspension. If the pressure is too low, your suspension will bottom out. This means it will hit the end of its travel. This can damage your bike and hurt you. If the pressure is too high, your suspension will be too stiff. You will feel every bump on the trail. This can be uncomfortable and tiring. The right suspension pressure makes your ride smooth and controlled. It helps you stay safe and have more fun. That’s why knowing how to check mountain bike suspension pressure is so important. It’s like giving your bike the perfect shoes for the trail!
Finding the Right Suspension Pressure
Imagine you are Goldilocks trying to find the perfect porridge. Not too hot, not too cold, but just right. Finding the right suspension pressure is similar. It’s not just about your weight. It’s also about how you ride. Do you like to jump and do tricks? You might need more pressure. Do you like to ride on smooth trails? You might need less pressure. The best way to find the right pressure is to experiment. Start with the recommended pressure for your weight. Then, go for a ride. If it feels too soft, add a little air. If it feels too stiff, let a little air out. Keep adjusting until it feels just right. Remember, it might take a few tries to find the perfect setting. That’s okay! Learning how to check mountain bike suspension pressure and adjust it is part of the fun.
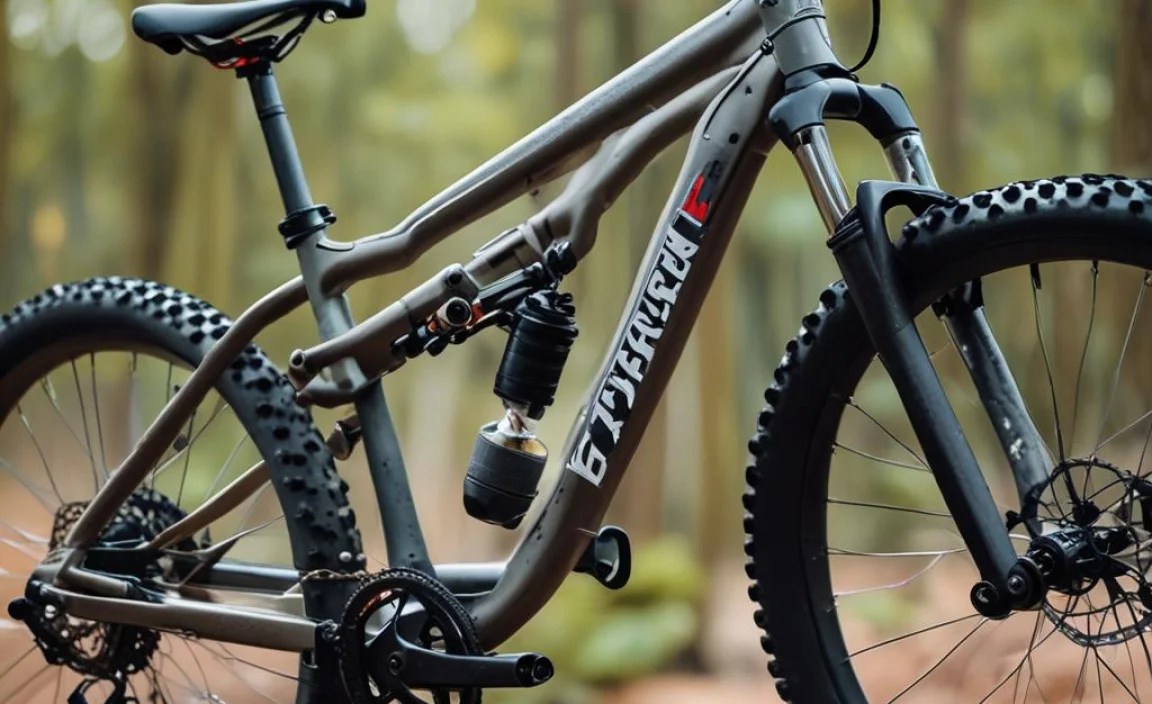
Tools Needed to Check Suspension Pressure
To check your suspension pressure, you need a few simple tools. The most important tool is a suspension pump. This pump is special. It has a gauge that shows the pressure in PSI (pounds per square inch). Regular tire pumps won’t work. They don’t have a gauge, and they can damage your suspension. You will also need a rag. This helps you clean the air valve. Keeping the valve clean prevents dirt from getting into your suspension. Some riders also use a shock pump adapter. This makes it easier to connect the pump to the valve. These tools are easy to find at your local bike shop or online. Having the right tools makes checking your suspension pressure easy. It also helps you do it safely. Understanding how to check mountain bike suspension pressure starts with having the right gear!
Understanding PSI for Mountain Bike Suspension


PSI stands for pounds per square inch. It’s a way to measure air pressure. Think of it like this: PSI tells you how much air is pushing against the inside of your suspension. The higher the PSI, the more air is inside. Mountain bike suspensions use PSI to control how they feel. Different bikes and different riders need different PSI levels. Knowing what PSI means helps you understand how to check mountain bike suspension pressure. It also helps you adjust it correctly. If you see a number on your pump gauge, that’s the PSI. The right PSI makes your bike feel great on the trails. It also helps you stay in control. Understanding PSI is a key part of being a good mountain biker.
- PSI (Pounds per Square Inch) measures air pressure.
- Higher PSI means more air in the suspension.
- Lower PSI means less air in the suspension.
- Different bikes need different PSI levels.
- Your weight affects the ideal PSI for your suspension.
- Adjusting PSI fine-tunes your bike’s performance.
When you check your suspension pressure, the pump’s gauge shows the PSI. This number tells you if you need to add or release air. Most mountain bikes have recommended PSI ranges. These ranges are based on rider weight. For example, a lighter rider needs less PSI. A heavier rider needs more PSI. You can find this information in your bike’s manual or online. Start with the recommended PSI and then adjust it to your liking. Remember, small changes in PSI can make a big difference. So, adjust it a little at a time. Always check the PSI before each ride to make sure it is correct. Knowing how to check mountain bike suspension pressure using PSI is essential for a good ride.
Fun Fact or Stat: The ideal PSI range for mountain bike suspension can vary by as much as 50 PSI depending on the bike model!
How Does PSI Affect Ride Quality?
Imagine your suspension is like a spring. The PSI determines how stiff or soft that spring is. Higher PSI makes the spring stiffer. This means it takes more force to compress the suspension. Lower PSI makes the spring softer. This means it takes less force to compress the suspension. A stiff suspension is good for jumping and riding on smooth trails. It helps you stay in control. A soft suspension is good for riding on bumpy trails. It helps absorb the bumps. The right PSI balances these two things. It gives you a comfortable and controlled ride. Understanding how to check mountain bike suspension pressure and adjust it helps you find this balance. It makes your ride more enjoyable.
Converting Rider Weight to PSI
Most bike manufacturers provide a chart. This chart helps you find the right PSI for your weight. The chart usually shows weight in pounds or kilograms. Next to each weight, it shows a recommended PSI range. For example, if you weigh 100 pounds, the chart might recommend 50-60 PSI. This is just a starting point. You might need to adjust it based on your riding style. If you don’t have a chart, ask your local bike shop. They can help you find the right PSI for your weight. Remembering how to check mountain bike suspension pressure and match it to your weight is key. This makes sure your suspension works correctly.
Common PSI Mistakes to Avoid
One common mistake is using a regular tire pump. These pumps don’t have a gauge. They can also damage your suspension. Another mistake is over-inflating the suspension. This can make it too stiff and uncomfortable. It can also damage the seals. Another mistake is under-inflating the suspension. This can cause it to bottom out. This can also damage the bike. Always use a suspension pump. Check the PSI regularly. Start with the recommended pressure. Then, adjust it to your liking. Avoiding these mistakes helps you keep your suspension working well. It also keeps you safe. Learning how to check mountain bike suspension pressure and avoid errors is part of being a smart rider.
Step-by-Step Guide: Checking Suspension Pressure
Checking your suspension pressure might seem tricky. But it is actually quite easy. First, gather your tools. You will need a suspension pump and a clean rag. Next, find the air valve on your front fork and rear shock. These valves look like small caps. Remove the caps. Now, clean the valves with the rag. This keeps dirt out. Attach the suspension pump to the valve. Make sure it is on tight. Look at the gauge on the pump. It will show the current pressure. Compare this to the recommended pressure for your weight. If you need to add air, pump it in slowly. If you need to release air, press the release button on the pump. Once you have the right pressure, remove the pump. Put the caps back on the valves. That’s it! You have just learned how to check mountain bike suspension pressure. Do this before each ride for the best performance.
- Gather a suspension pump and a clean rag.
- Locate the air valves on your fork and shock.
- Remove the valve caps and clean the valves.
- Attach the suspension pump securely to the valve.
- Read the pressure on the pump’s gauge.
- Adjust the pressure as needed, using the pump.
- Reattach the valve caps after reaching the correct pressure.
Remember to check your bike’s manual for specific instructions. Some bikes have different types of suspension. These might need slightly different steps. If you are not sure, ask your local bike shop. They can show you the correct way to check your suspension. Also, remember to check your suspension regularly. This helps you catch problems early. It also keeps your suspension working its best. Knowing how to check mountain bike suspension pressure and doing it often is key to a smooth and safe ride. It’s like giving your bike a regular check-up to keep it healthy.
Fun Fact or Stat: Professional mountain bikers check their suspension pressure multiple times during a single race!
Preparing Your Bike for Inspection
Before you start checking the pressure, make sure your bike is clean. Dirt and mud can get into the valves. This can damage the suspension. Use a clean rag to wipe down the fork and shock. Pay special attention to the area around the air valves. Also, make sure your bike is on a level surface. This helps you get an accurate reading. If your bike is leaning, the pressure reading might be off. Taking these simple steps makes checking your suspension easier. It also helps you get the most accurate results. Remembering how to check mountain bike suspension pressure starts with a clean bike.
Using the Suspension Pump Correctly
A suspension pump is different from a regular tire pump. It has a special gauge that shows the pressure in small increments. This is important because small changes in pressure can make a big difference. When you attach the pump to the valve, make sure it is on tight. If it is loose, air will leak out. This will give you a wrong reading. When you pump air in, do it slowly. Check the gauge often. When you release air, press the release button gently. Releasing too much air at once can make it hard to get the pressure right. Practice using the pump a few times. This will help you get comfortable with it. Knowing how to check mountain bike suspension pressure accurately depends on using the pump well.
Reading the Gauge and Making Adjustments
The gauge on the suspension pump is your guide. It tells you the current pressure in your suspension. The gauge usually has two scales: PSI and BAR. PSI is the most common unit used in the United States. BAR is used in other countries. Make sure you are reading the correct scale. If the pressure is too low, pump air in until you reach the desired level. If the pressure is too high, release air until you reach the desired level. After each adjustment, disconnect the pump and check the pressure again. Sometimes the pressure changes slightly when you disconnect the pump. This is normal. Just adjust it again until it is correct. Mastering how to check mountain bike suspension pressure involves understanding the gauge and making small adjustments.
Understanding Sag: A Key Suspension Metric

Sag is how much your suspension compresses when you sit on the bike. It’s a super important setting. It helps your suspension work properly. When you sit on the bike, the suspension should compress a little bit. This allows it to absorb bumps and keep your tires on the ground. If there is not enough sag, the suspension will be too stiff. If there is too much sag, the suspension will bottom out easily. Measuring sag is easy. You need a friend to help you. First, put a zip tie on the fork stanchion and shock shaft. Then, sit on the bike in your normal riding position. Have your friend hold the bike steady. Get off the bike carefully. Measure how much the zip ties have moved. This is your sag. Knowing how to check mountain bike suspension pressure and set sag makes a big difference.
| Suspension Type | Ideal Sag Range | Effect of Too Little Sag | Effect of Too Much Sag |
|---|---|---|---|
| Front Fork (Trail) | 15-20% | Harsh ride, poor traction | Bottoming out, reduced control |
| Front Fork (Enduro) | 20-25% | Harsh ride, poor traction | Bottoming out, reduced control |
| Rear Shock (Trail) | 20-25% | Harsh ride, poor traction | Bottoming out, pedal strikes |
| Rear Shock (Downhill) | 25-35% | Harsh ride, poor traction | Bottoming out, reduced control |
- Sag measures suspension compression under your weight.
- Proper sag improves traction and comfort.
- Too little sag makes the ride harsh and bumpy.
- Too much sag causes bottoming out and poor handling.
- Measure sag with a friend and zip ties.
The ideal sag depends on your bike and riding style. Most manufacturers recommend a sag range. This is usually a percentage of the total suspension travel. For example, if your fork has 100mm of travel, a 20% sag would be 20mm. You can adjust the sag by changing the air pressure. Add air to reduce sag. Release air to increase sag. Remember to check the sag after each adjustment. It might take a few tries to get it just right. Setting sag correctly is just as important as knowing how to check mountain bike suspension pressure. It helps you get the most out of your suspension. It also makes your ride more comfortable and controlled.
Fun Fact or Stat: Professional suspension tuners use specialized tools to measure sag with millimeter precision!
How Sag Affects Handling and Comfort
Sag plays a big role in how your bike handles. With the right sag, your bike will feel balanced and stable. It will also absorb bumps smoothly. This makes your ride more comfortable. With too little sag, your bike will feel harsh and unstable. You will feel every bump on the trail. With too much sag, your bike will feel sluggish and hard to control. It will also bottom out easily. Finding the right sag is a key part of setting up your suspension. It helps you get the most out of your bike. Understanding how to check mountain bike suspension pressure and set sag improves handling and comfort.
Measuring Sag Accurately
Measuring sag accurately is important. This helps you get the most out of your suspension. Make sure you are wearing your normal riding gear. This includes your helmet, shoes, and backpack. This will give you an accurate weight reading. Also, make sure your bike is on a level surface. This helps you get an accurate measurement. Have your friend hold the bike steady while you sit on it. Try to sit in your normal riding position. Don’t bounce or move around. This will affect the measurement. Measure the sag a few times to make sure you are getting consistent results. Knowing how to check mountain bike suspension pressure and measure sag accurately makes a big difference.
Adjusting Suspension Based on Sag Measurements
Once you have measured your sag, you can adjust your suspension. If the sag is too low, release air from your suspension. This will increase the sag. If the sag is too high, add air to your suspension. This will decrease the sag. Make small adjustments at a time. After each adjustment, check the sag again. It might take a few tries to get it just right. Remember to check the sag before each ride. This will ensure your suspension is working properly. Learning how to check mountain bike suspension pressure and adjust it based on sag is key. This makes sure your ride is smooth and controlled.
Troubleshooting Common Suspension Issues

Sometimes, your suspension might not feel right. It could be too soft, too stiff, or making strange noises. These are common problems. But don’t worry, most of them are easy to fix. One common problem is air leaks. This happens when air escapes from the suspension. You might notice that your suspension is losing pressure. To fix this, check the air valves. Make sure they are tight. If they are loose, tighten them with a wrench. Another problem is sticky suspension. This happens when the suspension doesn’t move smoothly. To fix this, clean the stanchions with a clean rag. You can also use a special suspension lubricant. Knowing how to check mountain bike suspension pressure and spot problems early helps.
- Air leaks cause loss of pressure in suspension.
- Sticky suspension hinders smooth movement.
- Strange noises indicate potential problems.
- Bottoming out occurs when suspension fully compresses.
- Excessive bouncing suggests improper damping.
If you still have problems, take your bike to a local bike shop. They have experts who can help you. They can diagnose the problem and fix it for you. Also, remember to service your suspension regularly. This means cleaning and lubricating it. This helps prevent problems. It also keeps your suspension working its best. Most manufacturers recommend servicing your suspension every year. This is like giving your bike a regular check-up. It keeps it healthy and working well. Remembering how to check mountain bike suspension pressure and maintain it is essential.
Fun Fact or Stat: Regular suspension servicing can extend the lifespan of your components by up to 50%!
Identifying Air Leaks and Their Causes
Air leaks are a common problem with mountain bike suspensions. They can cause your suspension to lose pressure. This can make it feel soft and unresponsive. The most common cause of air leaks is a faulty air valve. The valve might be loose or damaged. Another cause is a damaged seal. The seals keep air from escaping. If they are damaged, air can leak out. To find an air leak, listen for a hissing sound. You can also use soapy water. Apply the soapy water to the air valve and seals. If you see bubbles, there is a leak. If you find a leak, replace the valve or seal. Knowing how to check mountain bike suspension pressure and find leaks is important.
Dealing With Sticky Suspension
Sticky suspension is another common problem. It happens when the suspension doesn’t move smoothly. This can make your ride uncomfortable and hard to control. The most common cause of sticky suspension is dirt and grime. These can build up on the stanchions and seals. This can cause friction. To fix sticky suspension, clean the stanchions with a clean rag. You can also use a special suspension lubricant. Apply the lubricant to the stanchions. Then, compress the suspension a few times. This will help distribute the lubricant. If the suspension is still sticky, take it to a local bike shop. They can clean and lubricate it properly. Learning how to check mountain bike suspension pressure and deal with stickiness is important.
Addressing Unusual Suspension Noises
If your suspension is making strange noises, there might be a problem. The noises could be clicks, creaks, or squeaks. These noises can be caused by loose bolts, worn bushings, or damaged seals. To find the source of the noise, inspect your suspension carefully. Check all the bolts to make sure they are tight. Look for any signs of wear or damage. If you find a problem, fix it yourself or take it to a local bike shop. Ignoring unusual noises can lead to bigger problems. Taking care of your suspension is key to a smooth and safe ride. Knowing how to check mountain bike suspension pressure and listen for noises is important.
Maintaining Your Mountain Bike Suspension
Taking care of your mountain bike suspension is super important. It helps keep your bike working well. Regular maintenance can prevent problems. It can also extend the life of your suspension. One important part of maintenance is cleaning. After each ride, clean your fork and shock. Use a clean rag to wipe off any dirt or mud. Pay special attention to the stanchions and seals. Another important part of maintenance is lubrication. Use a special suspension lubricant to keep the parts moving smoothly. Apply the lubricant to the stanchions and seals. Also, check your suspension pressure regularly. This helps you catch problems early. Remembering how to check mountain bike suspension pressure and maintain your suspension is key.
- Clean your suspension after each ride.
- Lubricate moving parts regularly.
- Check suspension pressure before each ride.
- Inspect for wear and tear frequently.
- Replace worn parts promptly.
- Schedule professional servicing annually.
In addition to cleaning and lubrication, you should also inspect your suspension regularly. Look for any signs of wear or damage. Check the seals for cracks or leaks. Check the bushings for play. If you find any problems, fix them right away. You can replace worn parts yourself. Or, you can take your bike to a local bike shop. They can help you with more complicated repairs. Regular maintenance keeps your suspension working its best. It also keeps you safe on the trails. Knowing how to check mountain bike suspension pressure and maintain it ensures longevity and performance.
Fun Fact or Stat: A well-maintained suspension can improve your bike’s resale value by up to 15%!
Cleaning and Lubricating Your Suspension
Cleaning and lubricating your suspension is easy. It only takes a few minutes. After each ride, use a clean rag to wipe off any dirt or mud. Pay special attention to the stanchions. These are the shiny parts that slide into the fork and shock. Also, wipe off the seals. These are the rubber rings that keep dirt out. After cleaning, apply a special suspension lubricant. This lubricant is designed to reduce friction. It helps the suspension move smoothly. Apply a small amount of lubricant to the stanchions. Then, compress the suspension a few times. This will help distribute the lubricant. Regularly cleaning and lubricating your suspension keeps it working well. Knowing how to check mountain bike suspension pressure and clean it is vital.
Inspecting for Wear and Damage
Inspecting your suspension for wear and damage is important. This helps you catch problems early. Check the seals for cracks or leaks. If you see any cracks or leaks, replace the seals. Check the bushings for play. These are the small parts that connect the fork and shock to the frame. If they are worn, they can cause the suspension to feel loose. Check the bolts to make sure they are tight. Loose bolts can cause the suspension to make noise. If you find any problems, fix them right away. Regular inspections keep your suspension working its best. They also keep you safe. Learning how to check mountain bike suspension pressure and inspect for damage is important.
Knowing When to Seek Professional Help
Sometimes, your suspension might need professional help. If you are not comfortable working on your suspension, take it to a local bike shop. They have experts who can help you. They can diagnose problems and fix them for you. Also, if your suspension is making strange noises or not working properly, take it to a professional. They can tell you if it needs to be serviced or replaced. Regular servicing can extend the life of your suspension. It can also improve its performance. Knowing how to check mountain bike suspension pressure and when to get help is important.
Summary
Checking your mountain bike suspension pressure is important. It helps you have a smooth and safe ride. You need a suspension pump to do it. Find the right pressure for your weight. Clean the air valve. Attach the pump. Read the gauge. Add or release air as needed. Remember to check the sag. This is how much the suspension compresses when you sit on the bike. Adjust the pressure until the sag is correct. Also, maintain your suspension. Clean it after each ride. Lubricate the parts. Inspect for wear and damage. If you have problems, take it to a local bike shop. Learning how to check mountain bike suspension pressure and maintain it keeps your bike working well.
Conclusion
Taking care of your mountain bike suspension is easy. It helps you have more fun on the trails. Check the pressure regularly. Maintain the parts. This keeps your suspension working well. It also keeps you safe. A well-maintained suspension makes your ride smoother and more controlled. So, grab your pump and get started. Knowing how to check mountain bike suspension pressure will make you a better rider!
Frequently Asked Questions
Question No 1: How often should I check my mountain bike suspension pressure?
Answer: You should check your mountain bike suspension pressure before every ride. This ensures that your suspension is properly set up for the conditions. Temperature changes can affect air pressure. So, checking it regularly is important. Also, if you notice your suspension feeling different, check the pressure right away. Regular checks can prevent problems. This helps keep your suspension working well. Knowing how to check mountain bike suspension pressure and doing it often is key to a good ride.
Question No 2: What happens if my suspension pressure is too low?
Answer: If your suspension pressure is too low, your suspension will bottom out easily. This means it will hit the end of its travel when you hit a bump. This can damage your bike and hurt you. It can also make your ride uncomfortable. Your bike will feel sluggish and hard to control. It is important to keep your suspension pressure at the correct level. This prevents these problems. Make sure you know how to check mountain bike suspension pressure and adjust it properly. This keeps your bike safe and fun to ride.
Question No 3: What happens if my suspension pressure is too high?
Answer: If your suspension pressure is too high, your suspension will be too stiff. This means it will not absorb bumps well. This can make your ride uncomfortable. You will feel every bump on the trail. It can also make your bike hard to control. The tires might lose traction. This can be dangerous. It is important to keep your suspension pressure at the correct level. This prevents these problems. Knowing how to check mountain bike suspension pressure and adjust it correctly is essential for a smooth and controlled ride.
Question No 4: Can I use a regular tire pump to check my suspension pressure?
Answer: No, you cannot use a regular tire pump to check your suspension pressure. Regular tire pumps do not have a gauge that shows the pressure accurately. They can also damage your suspension. You need a special suspension pump. This pump has a gauge that shows the pressure in small increments. This allows you to adjust the pressure precisely. Suspension pumps are designed to work with the small air volumes in suspension systems. So, always use a suspension pump. Knowing how to check mountain bike suspension pressure requires the right tools.
Question No 5: How do I find the right suspension pressure for my weight?
Answer: Most bike manufacturers provide a chart that shows the recommended suspension pressure for different weights. You can find this chart in your bike’s manual or on the manufacturer’s website. The chart usually shows a range of pressures. Start with the middle of the range. Then, adjust it to your liking. If you don’t have a chart, ask your local bike shop. They can help you find the right pressure for your weight and riding style. Remember, how to check mountain bike suspension pressure is just the start. You also need to know the correct pressure for your weight.
Question No 6: What is sag, and why is it important?
Answer: Sag is how much your suspension compresses when you sit on the bike. It’s a super important setting. It helps your suspension work properly. When you sit on the bike, the suspension should compress a little bit. This allows it to absorb bumps and keep your tires on the ground. If there is not enough sag, the suspension will be too stiff. If there is too much sag, the suspension will bottom out easily. Setting the sag correctly is key. Understanding how to check mountain bike suspension pressure and set sag improves handling and comfort.


