
How to Explain Shock Pump to Beginner Riders: Simple!
Do you love riding your bike on bumpy trails? Does your bike feel too hard or too soft? A shock pump can help! But how do you use it? And how to explain shock pump to beginner riders? It sounds tricky, but it’s not. Let’s learn about this cool tool. It will make your rides much smoother.
Imagine your bike bouncing perfectly on every jump. A shock pump helps you do that. It lets you change the air inside your bike’s shocks. This makes your ride comfy and fun. Let’s find out how!
Key Takeaways
- A shock pump lets you add or remove air from your bike’s suspension.
- Using the right air pressure makes your ride smoother and more fun.
- Knowing how to explain shock pump to beginner riders makes biking easier.
- Always check the pressure gauge to avoid over-inflating your suspension.
- Practice using your shock pump before hitting the trails for real fun.
How to Explain Shock Pump to Beginner Riders

Understanding how to explain shock pump to beginner riders is important. A shock pump is a special tool. It helps you adjust the air pressure in your bike’s suspension. Suspension is like the springs on your bike. These springs help soak up bumps when you ride. Too much air pressure makes your ride stiff. Too little air pressure makes your ride feel soft and squishy. The right amount of air pressure makes your ride just right. It absorbs bumps, but it doesn’t waste your power. A shock pump has a gauge. The gauge shows how much air is in your suspension. It also has a special head. This head connects to the valve on your suspension. Using a shock pump is easy once you learn the steps. It will help you have more fun on your bike!
- A shock pump adjusts air pressure.
- Air pressure affects how your bike feels.
- Too much air is stiff, too little is soft.
- The gauge shows the air pressure.
- Practice makes using the pump easier.
Think of your bike’s suspension like a bouncy castle. Too little air and you sink to the bottom. Too much air and you barely bounce. The shock pump is the air pump. It helps you find the perfect bounce. Knowing how to explain shock pump to beginner riders means showing them how to get that perfect bounce. Remember to always be careful. Don’t put too much air in at once. Check the gauge often. This will keep your suspension working great for a long time. Happy riding!
Why is a Shock Pump Important?
Have you ever ridden your bike and felt every little bump? That’s no fun! A shock pump helps fix that. It lets you adjust your bike’s suspension. This makes your ride smoother. It absorbs the bumps. The right air pressure makes a big difference. It helps you ride faster and longer. You won’t get as tired. Plus, it protects your bike. Too much bouncing can damage parts. A shock pump is like a magic tool. It makes your bike feel just right. It’s worth learning how to use it. You will have a much better time riding.
What Does a Shock Pump Do?
Imagine your bike has tiny pillows inside the suspension. These pillows are filled with air. A shock pump adds or removes air from these pillows. This changes how the suspension feels. More air makes it firmer. Less air makes it softer. The shock pump has a gauge. The gauge tells you how much air is inside. It’s like a tire pressure gauge, but for your suspension. You can see if you need to add or remove air. Adjusting the air helps you control your bike better. It also helps your bike last longer. It is an important part of bike care.
How Often Should I Use It?
How often should you check your suspension? It depends on how much you ride. If you ride every day, check it once a week. If you only ride once a week, check it before each ride. Air can leak out over time. The weather can also affect the air pressure. Hot weather makes the air expand. Cold weather makes it shrink. Checking often helps you keep the right pressure. It also helps you find any problems early. You might have a leak. Catching it early can save you money. It’s a good habit to check your suspension often.
Fun Fact or Stat: Did you know that professional mountain bikers check their suspension pressure before every single race run?
Understanding Air Pressure for Bike Shocks

Air pressure is very important for bike shocks. It’s like the amount of air in your tires. Too much air, and the ride is bumpy. Too little air, and the ride is slow. The right air pressure makes the ride smooth and fast. It lets you control your bike easily. Different bikes need different air pressures. Your weight also matters. A heavier rider needs more air. A lighter rider needs less air. Your bike’s manual will tell you the right range. Always start with the recommended pressure. Then, adjust it to fit your needs. Understanding air pressure is key to how to explain shock pump to beginner riders. It helps them have the best ride!
- Air pressure affects ride quality.
- The right pressure makes riding easier.
- Your weight affects needed air pressure.
- Check your bike’s manual for guidance.
- Adjust pressure to your liking.
Think about blowing up a balloon. Not enough air, and it’s floppy. Too much air, and it might pop! Your bike’s suspension is similar. You need just the right amount of air. This is where the shock pump comes in. It helps you add air slowly and carefully. It also lets you release air little by little. You can find the perfect balance. Remember to check the pressure gauge often. Don’t over-inflate! Start with a little air, then add more as needed. This will keep your suspension working perfectly. You will enjoy every ride even more.
How Does Weight Affect Pressure?
Imagine two friends riding the same bike. One friend is very light. The other friend is much heavier. The heavier friend needs more air in the suspension. Why? Because they put more weight on the bike. The air helps support that weight. If they used the same air pressure as the lighter friend, the suspension would sink too much. It would bottom out on bumps. The lighter friend needs less air. They don’t put as much weight on the bike. Finding the right balance is important for a comfortable ride.
What is Sag, and Why Does it Matter?
Sag is how much your suspension compresses when you sit on the bike. It’s like how much a mattress sinks when you lie down. Too much sag means the suspension is too soft. Too little sag means it’s too stiff. The right amount of sag is usually around 20-30% of the total travel. Travel is how far the suspension can move. You can measure sag with a ruler or a special sag meter. Adjust the air pressure until you get the right sag. This will help you ride smoothly and control your bike better.
Where Can I Find the Right Pressure?
Finding the right air pressure can seem tricky. Luckily, there are a few places to look. First, check your bike’s manual. It usually has a chart that shows recommended pressures based on weight. Second, look for stickers on the suspension itself. These stickers might have pressure recommendations. Third, ask your local bike shop. They can help you find the right starting point. Remember, these are just starting points. You might need to adjust the pressure based on your riding style and preferences.
Fun Fact or Stat: The “sag” measurement is crucial! Aim for 20-30% of your suspension travel for optimal performance.
Step-by-Step Guide: Using a Shock Pump Correctly
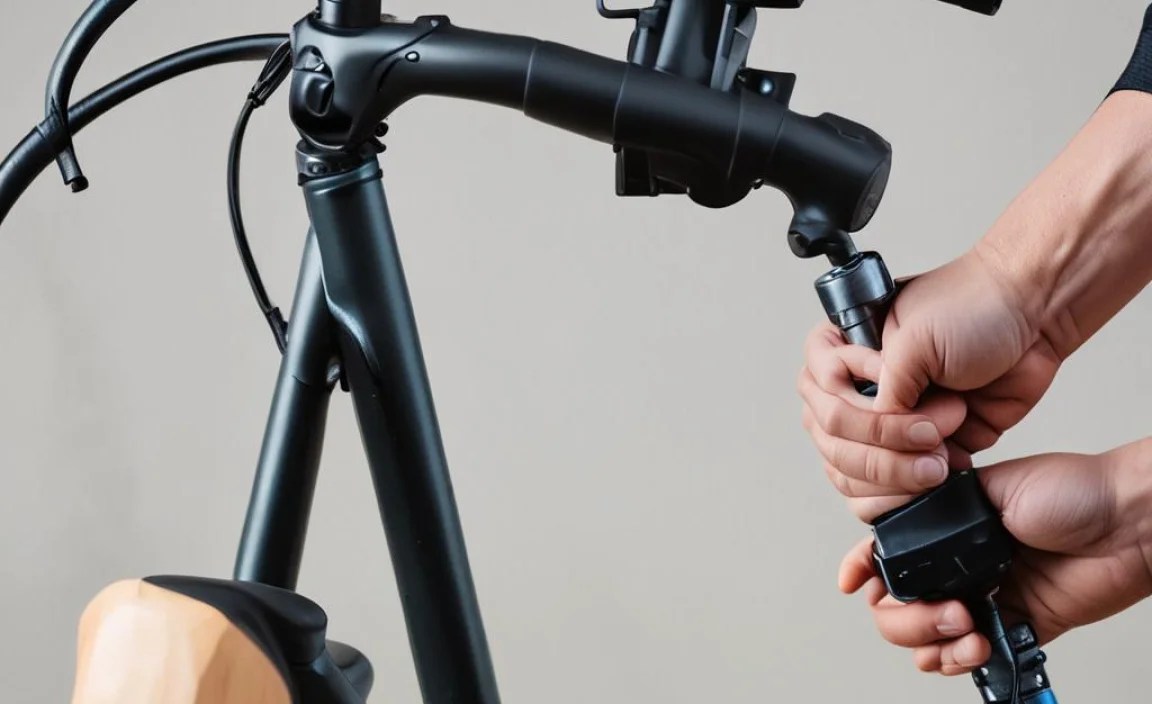
Learning how to use a shock pump is easy. First, find the valve on your bike’s suspension. It usually has a small cap. Unscrew the cap. Now, get your shock pump. Make sure the pump head is clean. Connect the pump head to the valve. Push it on firmly. You might hear a little hiss of air. That’s okay. Now, look at the gauge on the pump. It will show the current air pressure. If you need to add air, start pumping. Pump slowly and steadily. Watch the gauge as you pump. Stop when you reach the desired pressure. If you need to remove air, there’s usually a small button on the pump. Press the button lightly to release air. Check the gauge after each small release. Once you have the right pressure, disconnect the pump. Screw the valve cap back on. Now you’re ready to ride!
- Find the valve on your suspension.
- Connect the shock pump firmly.
- Check the pressure gauge.
- Pump slowly to add air.
- Release air carefully if needed.
- Disconnect the pump and replace the cap.
Imagine you are inflating a basketball. You wouldn’t just keep pumping until it bursts. You would check the pressure often. The same is true for your bike’s suspension. Go slowly. Check the gauge. Don’t over-inflate. If you do, just release a little air. Remember, it’s better to start with too little air. You can always add more. Over-inflating can damage your suspension. Taking your time and being careful will help you get the perfect pressure. This way, you will enjoy every ride!
Connecting the Pump: What to Watch For?
When you connect the shock pump, listen carefully. You should hear a slight hiss of air. This is normal. It means the pump is connected properly. If you hear a loud hiss, the pump might not be sealed correctly. Try pushing the pump head on harder. Make sure it’s straight. A loose connection will let air escape. This will make it hard to get an accurate reading. It will also waste your energy. A good, tight connection is key to using the pump effectively.
Adding Air: Slow and Steady Wins
Adding air to your suspension is like adding water to a glass. You wouldn’t pour it in all at once. You would pour slowly and carefully. This prevents spills. The same is true for air. Pump the shock pump slowly and steadily. Watch the gauge as you pump. This lets you see how much air you are adding. It also prevents you from over-inflating. Over-inflating can damage your suspension. Slow and steady pumping gives you more control. It helps you get the perfect pressure every time.
Releasing Air: A Little at a Time
Sometimes you need to release air from your suspension. Maybe you put in too much. Or maybe the weather changed. Releasing air is easy. Most shock pumps have a small button. Press the button lightly to release air. Only release a little bit at a time. Check the gauge after each release. It’s better to release too little than too much. You can always release more air later. Releasing too much air can make your suspension too soft. Small, controlled releases are the best way to fine-tune your suspension.
Fun Fact or Stat: Each pump stroke adds a very small amount of air, usually just a few PSI (pounds per square inch)!
Troubleshooting Common Shock Pump Problems

Sometimes, things don’t go as planned. You might have problems with your shock pump. Don’t worry! Many problems are easy to fix. One common problem is a leaky connection. This happens when the pump head isn’t sealed properly. Make sure the pump head is clean. Push it on firmly. Another problem is a broken gauge. If the gauge doesn’t move, the pump might be broken. You might need to buy a new pump. Another problem is difficulty pumping. This could mean the pump is clogged. Try cleaning the pump with a dry cloth. Knowing how to explain shock pump to beginner riders also means teaching them how to solve these problems. This helps them stay confident on the trails!
- Leaky connections: reseat the pump head.
- Broken gauge: replace the pump.
- Difficulty pumping: clean the pump.
- Check the valve for damage.
- Read the pump’s manual for help.
Imagine your shock pump is like a bicycle. Sometimes the chain falls off. Sometimes the tires go flat. These things happen. You can usually fix them yourself. The same is true for your shock pump. Don’t give up if you have a problem. Try to figure out what’s wrong. Read the instructions. Ask a friend for help. Most shock pump problems are easy to solve. With a little patience, you can get your pump working again. Then you can get back to riding. It’s also important to maintain your pump in good condition by keeping it clean and storing it properly.
The Pump Won’t Connect: What Now?
The pump won’t connect? This can be frustrating. First, check the valve on your suspension. Make sure it’s clean and free of dirt. Sometimes, dirt can block the connection. Second, check the pump head. Make sure it’s the right size for your valve. There are different types of valves. Third, try pushing the pump head on harder. Sometimes, it just needs a little extra force. If none of these things work, the valve or pump head might be damaged. You might need to replace them.
The Gauge Isn’t Moving: Is It Broken?
A gauge that won’t move is a bad sign. It could mean the gauge is broken. First, try pumping the pump a few times. Sometimes, the gauge just needs a little nudge. Second, check the connection. Make sure the pump is connected properly. A loose connection can prevent the gauge from reading correctly. If the gauge still doesn’t move, it’s probably broken. You will need to replace the pump. A broken gauge is useless. You can’t adjust the pressure accurately without it.
Air Leaks Out When I Disconnect: Help!
A little air leaking out when you disconnect is normal. But a lot of air leaking out is a problem. This usually means the pump head isn’t sealing properly. Try connecting the pump head quickly and removing it quickly. This can minimize the air loss. Also, make sure the pump head is clean. Dirt can prevent a good seal. If the problem continues, the pump head might be worn out. You might need to replace it. Some air loss is normal. But excessive air loss needs to be fixed.
| Problem | Possible Cause | Solution |
|---|---|---|
| Pump won’t connect | Dirty valve or pump head | Clean valve and pump head |
| Gauge not moving | Broken gauge | Replace the pump |
| Air leaks when disconnecting | Poor seal | Replace pump head or practice quick disconnect |
| Difficulty pumping | Clogged pump | Clean the pump |
Fun Fact or Stat: Most shock pumps are designed to lose a tiny bit of air when you disconnect them. This is normal!
Maintaining Your Shock Pump for Longevity

Taking care of your shock pump is important. It will help it last longer. Keep it clean. Wipe it down with a dry cloth after each use. Store it in a safe place. Don’t leave it in the sun. The sun can damage the seals. Check the hose and connections regularly. Look for cracks or leaks. If you find any problems, fix them right away. Also, consider getting your pump serviced. A bike shop can clean and lubricate the pump. This will keep it working smoothly. Proper maintenance will help your shock pump last for years. This saves you money and keeps your suspension working great. This is important information in how to explain shock pump to beginner riders.
- Clean the pump after each use.
- Store it in a cool, dry place.
- Check the hose and connections.
- Get it serviced regularly.
- Replace worn parts as needed.
Imagine your shock pump is like your toothbrush. You wouldn’t leave your toothbrush dirty and wet. You would clean it and store it properly. The same is true for your shock pump. Treat it with care. Clean it regularly. Store it safely. This will help it stay in good condition. A well-maintained shock pump will always be ready when you need it. It will help you keep your suspension dialed in. This means more fun on the trails. Proper maintenance is key to a long-lasting shock pump.
Cleaning Tips: Keep it Shiny
Cleaning your shock pump is easy. All you need is a dry cloth. Wipe down the pump after each use. Pay special attention to the pump head. Dirt can build up there. This can prevent a good seal. Also, check the hose for dirt. Wipe it down as well. Don’t use soap or water. These can damage the pump. A dry cloth is all you need. Regular cleaning will keep your pump working smoothly. It will also prevent problems down the road.
Storage Solutions: Where to Keep It?
Where should you store your shock pump? A cool, dry place is best. Avoid direct sunlight. The sun can damage the seals. A toolbox or garage is a good option. You can also store it in your car. But don’t leave it in the car on hot days. The heat can damage it. A storage bag can also help. It will protect the pump from dust and dirt. Proper storage will help your pump last longer.
When to Get a Professional Service?
How do you know when to get your pump serviced? If it’s not working smoothly, it’s time for a service. If it’s leaking air, it’s time for a service. If the gauge is inaccurate, it’s time for a service. A bike shop can clean and lubricate the pump. They can also replace worn parts. A professional service can extend the life of your pump. It will also keep it working properly. Consider getting your pump serviced once a year.
Fun Fact or Stat: A well-maintained shock pump can last for 5 years or more!
Advanced Techniques for Shock Pump Use
Once you know the basics, you can try some advanced techniques. These techniques can help you fine-tune your suspension. One technique is using a digital gauge. A digital gauge gives you a more accurate reading. This is helpful for riders who want precise control. Another technique is experimenting with different pressures. Try riding with slightly more or less air pressure. See how it affects your ride. Another technique is using volume spacers. Volume spacers change how the suspension feels. They can make it more or less progressive. Learning these techniques can take your riding to the next level. But always be careful. Don’t make big changes without understanding the effects. Remember how to explain shock pump to beginner riders? Start with the basics and build from there.
- Use a digital gauge for precise readings.
- Experiment with different air pressures.
- Consider using volume spacers.
- Adjust rebound and compression settings.
- Keep detailed notes of your settings.
Think of your bike’s suspension like a musical instrument. You can tune it to sound just right. The shock pump is like the tuning key. It lets you make small adjustments. These adjustments can make a big difference. Experiment with different settings. See what works best for you. Keep notes of your settings. This will help you remember what you like. With practice, you can become a suspension expert. You will be able to dial in your bike for any trail.
Using a Digital Gauge: Precision Matters
A digital gauge offers greater precision. It shows the air pressure in smaller increments. This allows for finer adjustments. Some digital gauges also have other features. They might have a memory function. This lets you store your favorite settings. They might have a backlight. This makes it easier to read in low light. A digital gauge is a great tool for serious riders. It helps you get the most out of your suspension.
Experimenting with Pressure: Find Your Sweet Spot
The recommended air pressure is just a starting point. You might need to adjust it to find your sweet spot. Try riding with slightly more air pressure. See if it makes your ride feel more efficient. Try riding with slightly less air pressure. See if it makes your ride feel more comfortable. Pay attention to how the bike feels. Does it feel too stiff? Does it feel too soft? Adjust the pressure until you find the perfect balance. Your sweet spot might be different for different trails.
Volume Spacers: Changing the Feel
Volume spacers are small plastic pieces. They fit inside your suspension. They change how the suspension feels. They make it more or less progressive. Progressive means the suspension gets stiffer as it compresses. This can help prevent bottoming out on big hits. Volume spacers are a more advanced technique. They are not for beginners. But they can be a useful tool for experienced riders. If you’re interested in volume spacers, talk to your local bike shop.
Fun Fact or Stat: Some riders use a mobile app to track their suspension settings and performance!
Summary
A shock pump is a helpful tool for adjusting your bike’s suspension. It lets you add or remove air to find the right feel. Understanding air pressure and how it affects your ride is important. Using the pump correctly takes practice, but it’s easy to learn. Common problems can be fixed with simple troubleshooting. Taking care of your pump will help it last longer. Advanced techniques can help you fine-tune your suspension. Knowing how to explain shock pump to beginner riders means sharing these tips and tricks. This empowers them to take control of their ride. It makes biking more fun for everyone.
Conclusion
Learning about shock pumps opens up a world of control. You can adjust your bike for comfort and performance. It takes practice to get it just right. But the effort is worth it. You will enjoy smoother rides. You will also have more control. Now you know how to explain shock pump to beginner riders. Go share your knowledge! Help others discover the joy of a perfectly tuned bike.
Frequently Asked Questions
Question No 1: What is a shock pump used for?
Answer: A shock pump is a special air pump. It is used to adjust the air pressure in your bike’s suspension. Suspension is like the springs on your bike. The right air pressure makes your ride smoother and more comfortable. It helps your bike absorb bumps and jumps. Using a shock pump lets you fine-tune your suspension. This way it performs best for your weight and riding style. It’s an important tool for mountain bikers and other riders who use suspension.
Question No 2: How do I know what pressure to put in my shocks?
Answer: Finding the right pressure can seem tricky. Start by checking your bike’s manual. It usually has a chart that shows recommended pressures based on your weight. You can also look for stickers on the suspension itself. These stickers might have pressure recommendations. If you’re still not sure, ask your local bike shop. They can help you find a good starting point. Remember, these are just starting points. You might need to adjust the pressure based on your riding style. Experiment until you find what feels best for you. Knowing how to explain shock pump to beginner riders involves helping them find these resources.
Question No 3: Can I use a regular tire pump for my shocks?
Answer: No, you should not use a regular tire pump for your shocks. A regular tire pump delivers too much air at once. This can easily over-inflate your shocks. It can also damage them. A shock pump is designed to deliver small amounts of air. It also has a gauge that shows the pressure. This allows you to make precise adjustments. Using the right tool is important for safety and performance. Always use a shock pump for your bike’s suspension.
Question No 4: What do I do if air leaks out when I disconnect the pump?
Answer: A little air leaking out when you disconnect the pump is normal. It happens because the pump head has to release from the valve. However, if a lot of air leaks out, there might be a problem. Make sure the pump head is sealed properly. Try connecting and disconnecting the pump quickly. This can minimize air loss. If the problem continues, the pump head might be worn out. You may need to replace it. It’s also possible the valve on your suspension is damaged.
Question No 5: How often should I check the pressure in my shocks?
Answer: How often you check your shocks depends on how much you ride. If you ride often, check them more often. A good rule of thumb is to check them before each ride. Air can leak out over time. The weather can also affect the pressure. Hot weather makes the air expand. Cold weather makes it shrink. Checking regularly helps you maintain the right pressure. This ensures a comfortable and safe ride. It’s a good habit to get into for how to explain shock pump to beginner riders.
Question No 6: Where can I buy a shock pump, and how much do they cost?
Answer: You can buy a shock pump at most bike shops. You can also find them online. Prices vary depending on the brand and features. A basic shock pump might cost around $30-$50. A more advanced pump with a digital gauge could cost $50-$100. It’s worth investing in a good quality shock pump. It will last longer and give you more accurate readings. Ask your local bike shop for recommendations. They can help you find the right pump for your needs. When considering how to explain shock pump to beginner riders, ensure you highlight the importance of investing in a reliable and accurate pump.


